Thanks, BigEasy. That info is not in my owners manual and labelling would certainly be a good idea considering my initial search which I think I may steal.After you identify & replace the fittings, might be a good idea to label them with plastic tags as well as drawing a schematic detailing the location of each fitting. That info was present in my owner's manual.
Seacock Quality... Replace?—Currently on the hard.
- Thread starter testingthewaters91
- Start date
With all due respect - this is incorrect.
- Marine-rated hoses with double clamps are required when below the water surface.
It is a commonly quoted misconception and in fact - unless the nipple is long enough for the two clamps to not reach the end of the nipple on the inside of that fitting - it is worse than using one clamp - as I explained above.
ABYC H-27 "SEACOCKS, THRU-HULL FITTINGS, AND DRAIN PLUGS" does not require two clamps. Pick up a copy and read it through.
The biggest issue is using the correct type of hose clamp - also attached above.
dj
Just a note - every single hose clamp shown in the pictures above are NOT the correct hose clamps to be using. These are specifically the kind of hose clamp that is commonly found in most big box stores and local hardware stores. You should be using solid hose clamps, not these hose clamps with the threading that cuts through the band.I'm in the process of replacing my first thru-hull. The summary, so far, is here.
The part of your posting that would worry me is this (I cut these pictures down a little in size):
View attachment 232472
View attachment 232473
Maybe there's a recessed head on the thru-hull or maybe you have something I ran into:
View attachment 232474
View attachment 232475
This was under the static water line so I was glad at least there was a valve there. Yours appear to be just above so that's up to you how you would handle it.
What concerns me is what I found. The flange base for mine was buried in the hull layup. The hull thickness at the flange is only about 3/8 inches versus about a 5/8 or 3/4 inch thick hull for the surrounding area. (Can't really tell because of the grinding I did to get the old one free.) What was worse, there was no thru-hull "head" (mushroom or recessed) there. Instead I found a plastic sleeve embedded in the hull. You can see it as a shadow in the first picture and it was visible once I sanded off the bottom paint. The 2nd picture shows what was left of the sleeve when I finally got it out. The rest was shavings all over the ground.
View attachment 232477
View attachment 232478
I'm not an old hand at this but I would be concerned if there wasn't even a bronze or Marelon thru-hull installed underneath those piles of fiberglass/epoxy. What I ended up with, after getting the plastic out, was a big hole 1/4" wider than the thru-hull fitting. A gap I'm going to have to fill in to get a proper seal.
View attachment 232479
Someone else mentioned the concern of the corrugated hose connected from the bilge pump. This is easily cut or broken off even when new. It may be above the waterline now but in choppy water or a big sea, they may not be.
Just some of my thoughts.
ETA: The rudder post appears to have a stuffing box so there must have been some concern by the builder of water ingress at a point higher than those other thru-hulls.
dj

Thanks for the thoughtful reply — super helpful. I checked the inside again and actually feel pretty good about it now. The bilge and engine exhaust thru-hulls may sit close to the waterline outside, but inside they’re glassed up higher than I expected. That gives me some peace of mind, though I agree the corrugated bilge hose is a weak point. I’ll definitely replace that with a proper smooth-walled hose.I'm in the process of replacing my first thru-hull. The summary, so far, is here.
The part of your posting that would worry me is this (I cut these pictures down a little in size):
View attachment 232472
View attachment 232473
Maybe there's a recessed head on the thru-hull or maybe you have something I ran into:
View attachment 232474
View attachment 232475
This was under the static water line so I was glad at least there was a valve there. Yours appear to be just above so that's up to you how you would handle it.
What concerns me is what I found. The flange base for mine was buried in the hull layup. The hull thickness at the flange is only about 3/8 inches versus about a 5/8 or 3/4 inch thick hull for the surrounding area. (Can't really tell because of the grinding I did to get the old one free.) What was worse, there was no thru-hull "head" (mushroom or recessed) there. Instead I found a plastic sleeve embedded in the hull. You can see it as a shadow in the first picture and it was visible once I sanded off the bottom paint. The 2nd picture shows what was left of the sleeve when I finally got it out. The rest was shavings all over the ground.
View attachment 232477
View attachment 232478
I'm not an old hand at this but I would be concerned if there wasn't even a bronze or Marelon thru-hull installed underneath those piles of fiberglass/epoxy. What I ended up with, after getting the plastic out, was a big hole 1/4" wider than the thru-hull fitting. A gap I'm going to have to fill in to get a proper seal.
View attachment 232479
Someone else mentioned the concern of the corrugated hose connected from the bilge pump. This is easily cut or broken off even when new. It may be above the waterline now but in choppy water or a big sea, they may not be.
Just some of my thoughts.
ETA: The rudder post appears to have a stuffing box so there must have been some concern by the builder of water ingress at a point higher than those other thru-hulls.
I’m probably not going to tear out those aft fittings just yet, since they look decent for now. I’ll pull the hoses and inspect the thru-hulls when I get a chance, but nothing is screaming danger back there.
I’m still on the fence about flanged seacocks — not sure the hull is thick enough in spots. I may go with inline bronze ball valves on fiberglass backing plates, which might be more realistic for my boat. And yes, I’ve got wooden bungs on board.
Now I’m debating whether to hire the boatyard or do it myself. They weren’t planning on me, and I know the labor’s going to add up. I’ve had a few folks tell me this job isn’t as hard as it looks, just time-consuming. I’ve got basic tools, access to a grinder, sander, etc., and I’m pretty handy. Thinking I could knock out five replacements after work over a couple evenings. Curious what others think — worth hiring out, or doable for a first-timer?
I will try to pick up some better ones at Ace Hardware. If I need to run to West Marine one day it's doable too. I should get a list of parts I need and hose clamps are definitely on it.Just a note - every single hose clamp shown in the pictures above are NOT the correct hose clamps to be using. These are specifically the kind of hose clamp that is commonly found in most big box stores and local hardware stores. You should be using solid hose clamps, not these hose clamps with the threading that cuts through the band.
Is there anything else you would address? I'm thinking of self installation for 5 inline bronze ball valves. I'm unsure if the hull can take flanged attachments due to it's thickness
I've not seen the correct hose clamps in Ace Hardware. But if you have one near you that is very near a marina and is used as a marine supply location, you might get lucky. I've never bought them from West Marine, but I'd imagine they would have the correct type hose clamps there.I will try to pick up some better ones at Ace Hardware. If I need to run to West Marine one day it's doable too. I should get a list of parts I need and hose clamps are definitely on it.
Is there anything else you would address? I'm thinking of self installation for 5 inline bronze ball valves. I'm unsure if the hull can take flanged attachments due to it's thickness
Why do you question if the hull can take flanged seacocks? But if you don't like the idea of bolts going through your hull, read how Maine Sail also shows how to put the bolts into the backing material. That way you don't have to go through the hull with them. It's a bit more fussy but works well.
I'm not at your boat - I can only comment on the commentary and photos that have been posted. Sorry...
dj
jssailem
SBO Weather and Forecasting Forum Jim & John
- Oct 22, 2014
- 24,457
IT IS YOUR CHOICE.I’m still on the fence about flanged seacocks — not sure the hull is thick enough in spots.
I sense that the flange seacock is not clearly understood. My belief is that the flange is even more important when the hull is thin.
Let me try to explain.
The support for this approach can be found here.
Seacock Backing Plates - Marine How To
Start by Drilling a Hole Many readers have asked me how to install stronger, flanged seacocks without also drilling extra holes in your hull for the bolts that hold the flange. It can be done, as you will see below. Though this
marinehowto.com
Some boat builders tried to save costs by installing the thru-hull using PVC pipe. Attaching a valve to a PVC pipe was quick and easy
Repetitive opening and closing of the valve stressed the PVC pipe. Eventually, failures occurred.
ABYC then set a standard to prevensuch events from occurring.
“27.6 INSTALLATION
27.6.1 A seacock shall be securely mounted so that the assembly will withstand a 500 pound (227 Kg) static force applied for 30 seconds to the inboard end of the assembly, without the assembly failing to stop the ingress of water.
Owners of boats with thin or wood sandwich hulls complained. These boats can not be penetrated with bolts and then be expected to remain sound.
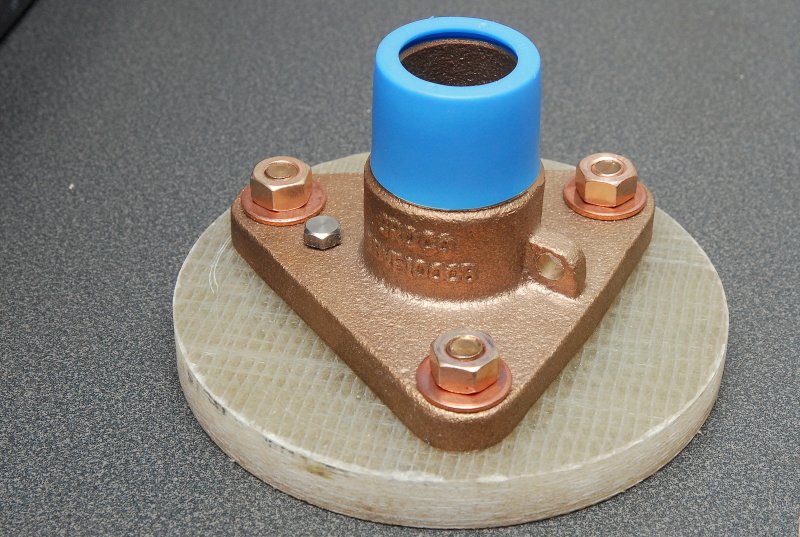
When you examine the problem, opening the valve puts a bending force on the "thru-hull". The flange resists that bending force. If we place a backing plate between the hull and the flange then the flange can be screwed into the backing plate.The backing plate and flange can be caulked or glued to the hull. This solves the problem of the bending force and the bolts/screws do not need to go through the hull.
How it is set up
Mushroom through-hull on the outside of the boat. The white block represents the hull. Then the backing plate with the flanged fitting is attached. The mushroom through-hull is threaded into the internal flanged fitting. The blue cap is removed and the valve is screwed on.
This is a very secure design that will bring many years of service.
Thanks again for the detailed illustrations—I'm now much clearer on how proper seacocks work. I had originally assumed I’d be drilling directly into the hull, but I understand now it’s just the backing plates that get fastened down, which are epoxied to the hull. That’s a huge relief, and I feel a lot more confident about installing proper flanged seacocks myself when the time comes.IT IS YOUR CHOICE.
I sense that the flange seacock is not clearly understood. My belief is that the flange is even more important when the hull is thin.
Let me try to explain.
The support for this approach can be found here.
Seacock Backing Plates - Marine How To
Start by Drilling a Hole Many readers have asked me how to install stronger, flanged seacocks without also drilling extra holes in your hull for the bolts that hold the flange. It can be done, as you will see below. Though thismarinehowto.com
Some boat builders tried to save costs by installing the thru-hull using PVC pipe. Attaching a valve to a PVC pipe was quick and easy
Repetitive opening and closing of the valve stressed the PVC pipe. Eventually, failures occurred.
View attachment 232484
ABYC then set a standard to prevensuch events from occurring.
“27.6 INSTALLATION
27.6.1 A seacock shall be securely mounted so that the assembly will withstand a 500 pound (227 Kg) static force applied for 30 seconds to the inboard end of the assembly, without the assembly failing to stop the ingress of water.
View attachment 232486
Owners of boats with thin or wood sandwich hulls complained. These boats can not be penetrated with bolts and then be expected to remain sound.
When you examine the problem, opening the valve puts a bending force on the "thru-hull". The flange resists that bending force. If we place a backing plate between the hull and the flange then the flange can be screwed into the backing plate.The backing plate and flange can be caulked or glued to the hull. This solves the problem of the bending force and the bolts/screws do not need to go through the hull.
How it is set up
View attachment 232487
View attachment 232485
Mushroom through-hull on the outside of the boat. The white block represents the hull. Then the backing plate with the flanged fitting is attached. The mushroom through-hull is threaded into the internal flanged fitting. The blue cap is removed and the valve is screwed on.
This is a very secure design that will bring many years of service.
Right now I’m in a bit of a pressure crunch. I had an emergency haul-out right after buying the boat due to a failing hose and a brass valve that wouldn’t close. The yard hauled me out quickly and now just wants to replace the valves while keeping the existing through-hulls. They did agree that if a through-hull turns out not to be bronze, they’ll replace it—but they’ve made it clear they don’t want the boat sitting there much longer.
So my likely plan is to go ahead and replace the valves with new bronze ones (yes, bronze this time), keep the old through-hulls unless they’re confirmed to be non-bronze, and install new compliant hose and clamps. Then maybe I can do a full rework in a couple of months when I can plan a proper haul-out at a more flexible marina.
One question: I don’t use the marine head on my boat. Is there any way to securely block that seacock from the outside of the hull? The current setup has a very dark metal elbow—might be bronze, might be brass, or even iron—and there are four different joints in that short run. It feels overcomplicated and not very secure.
Appreciate everyone’s input as always—this forum has been a lifesaver.
Go for it, after replacing four you will be an expert!Now I’m debating whether to hire the boatyard or do it myself. They weren’t planning on me, and I know the labor’s going to add up. I’ve had a few folks tell me this job isn’t as hard as it looks, just time-consuming. I’ve got basic tools, access to a grinder, sander, etc., and I’m pretty handy. Thinking I could knock out five replacements after work over a couple evenings. Curious what others think — worth hiring out, or doable for a first-timer?
Yeah, replacing four would definitely make me an expert by the end of it. But I just called the boatyard, and honestly, since this was an emergency haul-out and not something I had scheduled, they’re pushing to just replace the valves, leave the through-hulls as-is, and get me out of there.Go for it, after replacing four you will be an expert!
They’re also pressuring me to buy a full-year slip, which I’m not really looking to do. On top of that, they don’t want me doing any of the work myself—they want their technician to handle it and have the boat back in the water by early next week, maybe even Monday.
With my current schedule—working 12-hour shifts every day including Saturdays—I’m realizing I probably won’t have the time to take on all that work right now anyway.
I guess my question now is—would it actually take more time to install flanged seacocks with backing plates epoxied to the hull, while keeping the existing through-hulls, than just replacing the valves alone? I’m trying to figure out if that route is even realistic given the yard’s time pressure.
I agree, dj. That's why I have a box of the new clamps for when I get around to the final installation.Just a note - every single hose clamp shown in the pictures above are NOT the correct hose clamps to be using. These are specifically the kind of hose clamp that is commonly found in most big box stores and local hardware stores. You should be using solid hose clamps, not these hose clamps with the threading that cuts through the band.
dj
Ttw91, I doubt you will find them at Ace Hardware. Since you're planning to do some of the work in the future, you might want to stock up on the sizes you will be needing.
The two places that I've found to be reliable so far (read: have quantity in stock and shipped out almost immediately) have been Defender.com or Marsh Fasteners. Look for the ABA style clamps. Local chandleries around here sometimes have onesies & twosies and often not the sizes I've needed.
Yes it would take more time. Just replacing the valves is usually pretty fast, depending upon how hard they are to get off.I guess my question now is—would it actually take more time to install flanged seacocks with backing plates epoxied to the hull, while keeping the existing through-hulls, than just replacing the valves alone? I’m trying to figure out if that route is even realistic given the yard’s time pressure.
If they are insisting on doing the work, then just make sure they don't twist the thru-hulls to break the seal. It's not a good place to have a leak...
dj
Thanks so much for all the insight from everyone—it’s been invaluable.
Last night I went out and did some testing. I took a hammer and banged on the through-hulls and sanded them down a bit. The metal seemed malleable and dented well without cracking. I also shoved a metal hammer handle up into the through-hull and dinged it around. Lots of clanking, but nothing broke off.
Color-wise, I’m hoping they’re bronze. It’s a pretty light color, but when I looked around the yard at other boats, I saw some similar shades on confirmed bronze fittings. I’m fairly sure all my through-hulls are bronze, and I haven’t seen any pink color or signs of dezincification so far. I even put a metal pole inside one and applied a good bit of pressure, and it held up solidly.
I’m thinking these through-hulls will at least get me through until my next haul-out later this year, when I plan to install proper flanged seacocks.
I’ll attach some photos here. What do you all think about the condition and whether I should trust these for now?
One other question: my sink through-hull is just below the waterline, but it angles upward so that the hose itself ends up above the waterline. Would that setup be considered above or below the waterline, given that the seacock is angled up but the hose runs higher?
Attachments
-
 228.9 KB Views: 77
 -
 399.6 KB Views: 75
 -
 457 KB Views: 71
Is there any you'd recommend me to look for on the thru hulls before putting her back in the water for a few months before the next haul out?Your sink is below the water line.
I'd have to inspect your thru-hulls to offer an opinion.
dj
I think you need to make the marina responsible for this job.Is there any you'd recommend me to look for on the thru hulls before putting her back in the water for a few months before the next haul out?
dj
Excellent point! OP should also read this linked thread related to clamps Just a little surface rustJust a note - every single hose clamp shown in the pictures above are NOT the correct hose clamps to be using. These are specifically the kind of hose clamp that is commonly found in most big box stores and local hardware stores. You should be using solid hose clamps, not these hose clamps with the threading that cuts through the band.
dj
Ha, I'd not seen that thread. Well done!Excellent point! OP should also read this linked thread related to clamps Just a little surface rust
I don't know how many crappy clamps I've had to replace on my boat, I'm still changing them out. All that are critical are done but there are tons more all over....
The difference between those two types is night and day ...
dj
jssailem
SBO Weather and Forecasting Forum Jim & John
- Oct 22, 2014
- 24,457
There is a lot of help on line. Ultimately, the boat owner has to make the decision they choose for their boat.
Be sure that you have a good working bilge pump. They can deal with a trickle of water till you get the boat rescued.
Make sure you have adequate insurance if your own boat allocated resources are limited.
It is an exciting time for a boat owner. They get to be in rage of their own community. Mayor, Police Chief, Public Works director, Emergency Medical, Swim lifeguard etc., all the jobs rolled into one.