Repairing Hunter 40 damage from Hurricane Matthew
- Thread starter B757Captain
- Start date
Not a ‘Vette, or a 40-footer, but I love taking the roadster to the boat!Nothing worse than having a vette and a big boat. Ask me how I know! Good on ya, bud.

Greg
I like to think there's nothing better than having a Vette and a big boatNothing worse than having a vette and a big boat. Ask me how I know! Good on ya, bud.
 . They both need a little TLC once in a while - keeps life interesting!
Nice!Not a ‘Vette, or a 40-footer, but I love taking the roadster to the boat!
View attachment 173188
Greg
Bilge rebuild progress:
Moving forward on getting the bilge ready for final layup. This has to happen in stages - I would rather repair the underlying surfaces before the final layup than fair and fill afterward. In a sort-of necessary order I have to work from the bottom up to the aft and sides then the round-over to the tie-in to the liner. The bilge floor (after removing the previous mess!) cleaned up pretty well with a little grinding. Two layers of 1708 to start:

When it's all done I plan on building the floor up about 3/8" and adding 1/4" for the sides. That should duplicate the previous liner pretty closely.
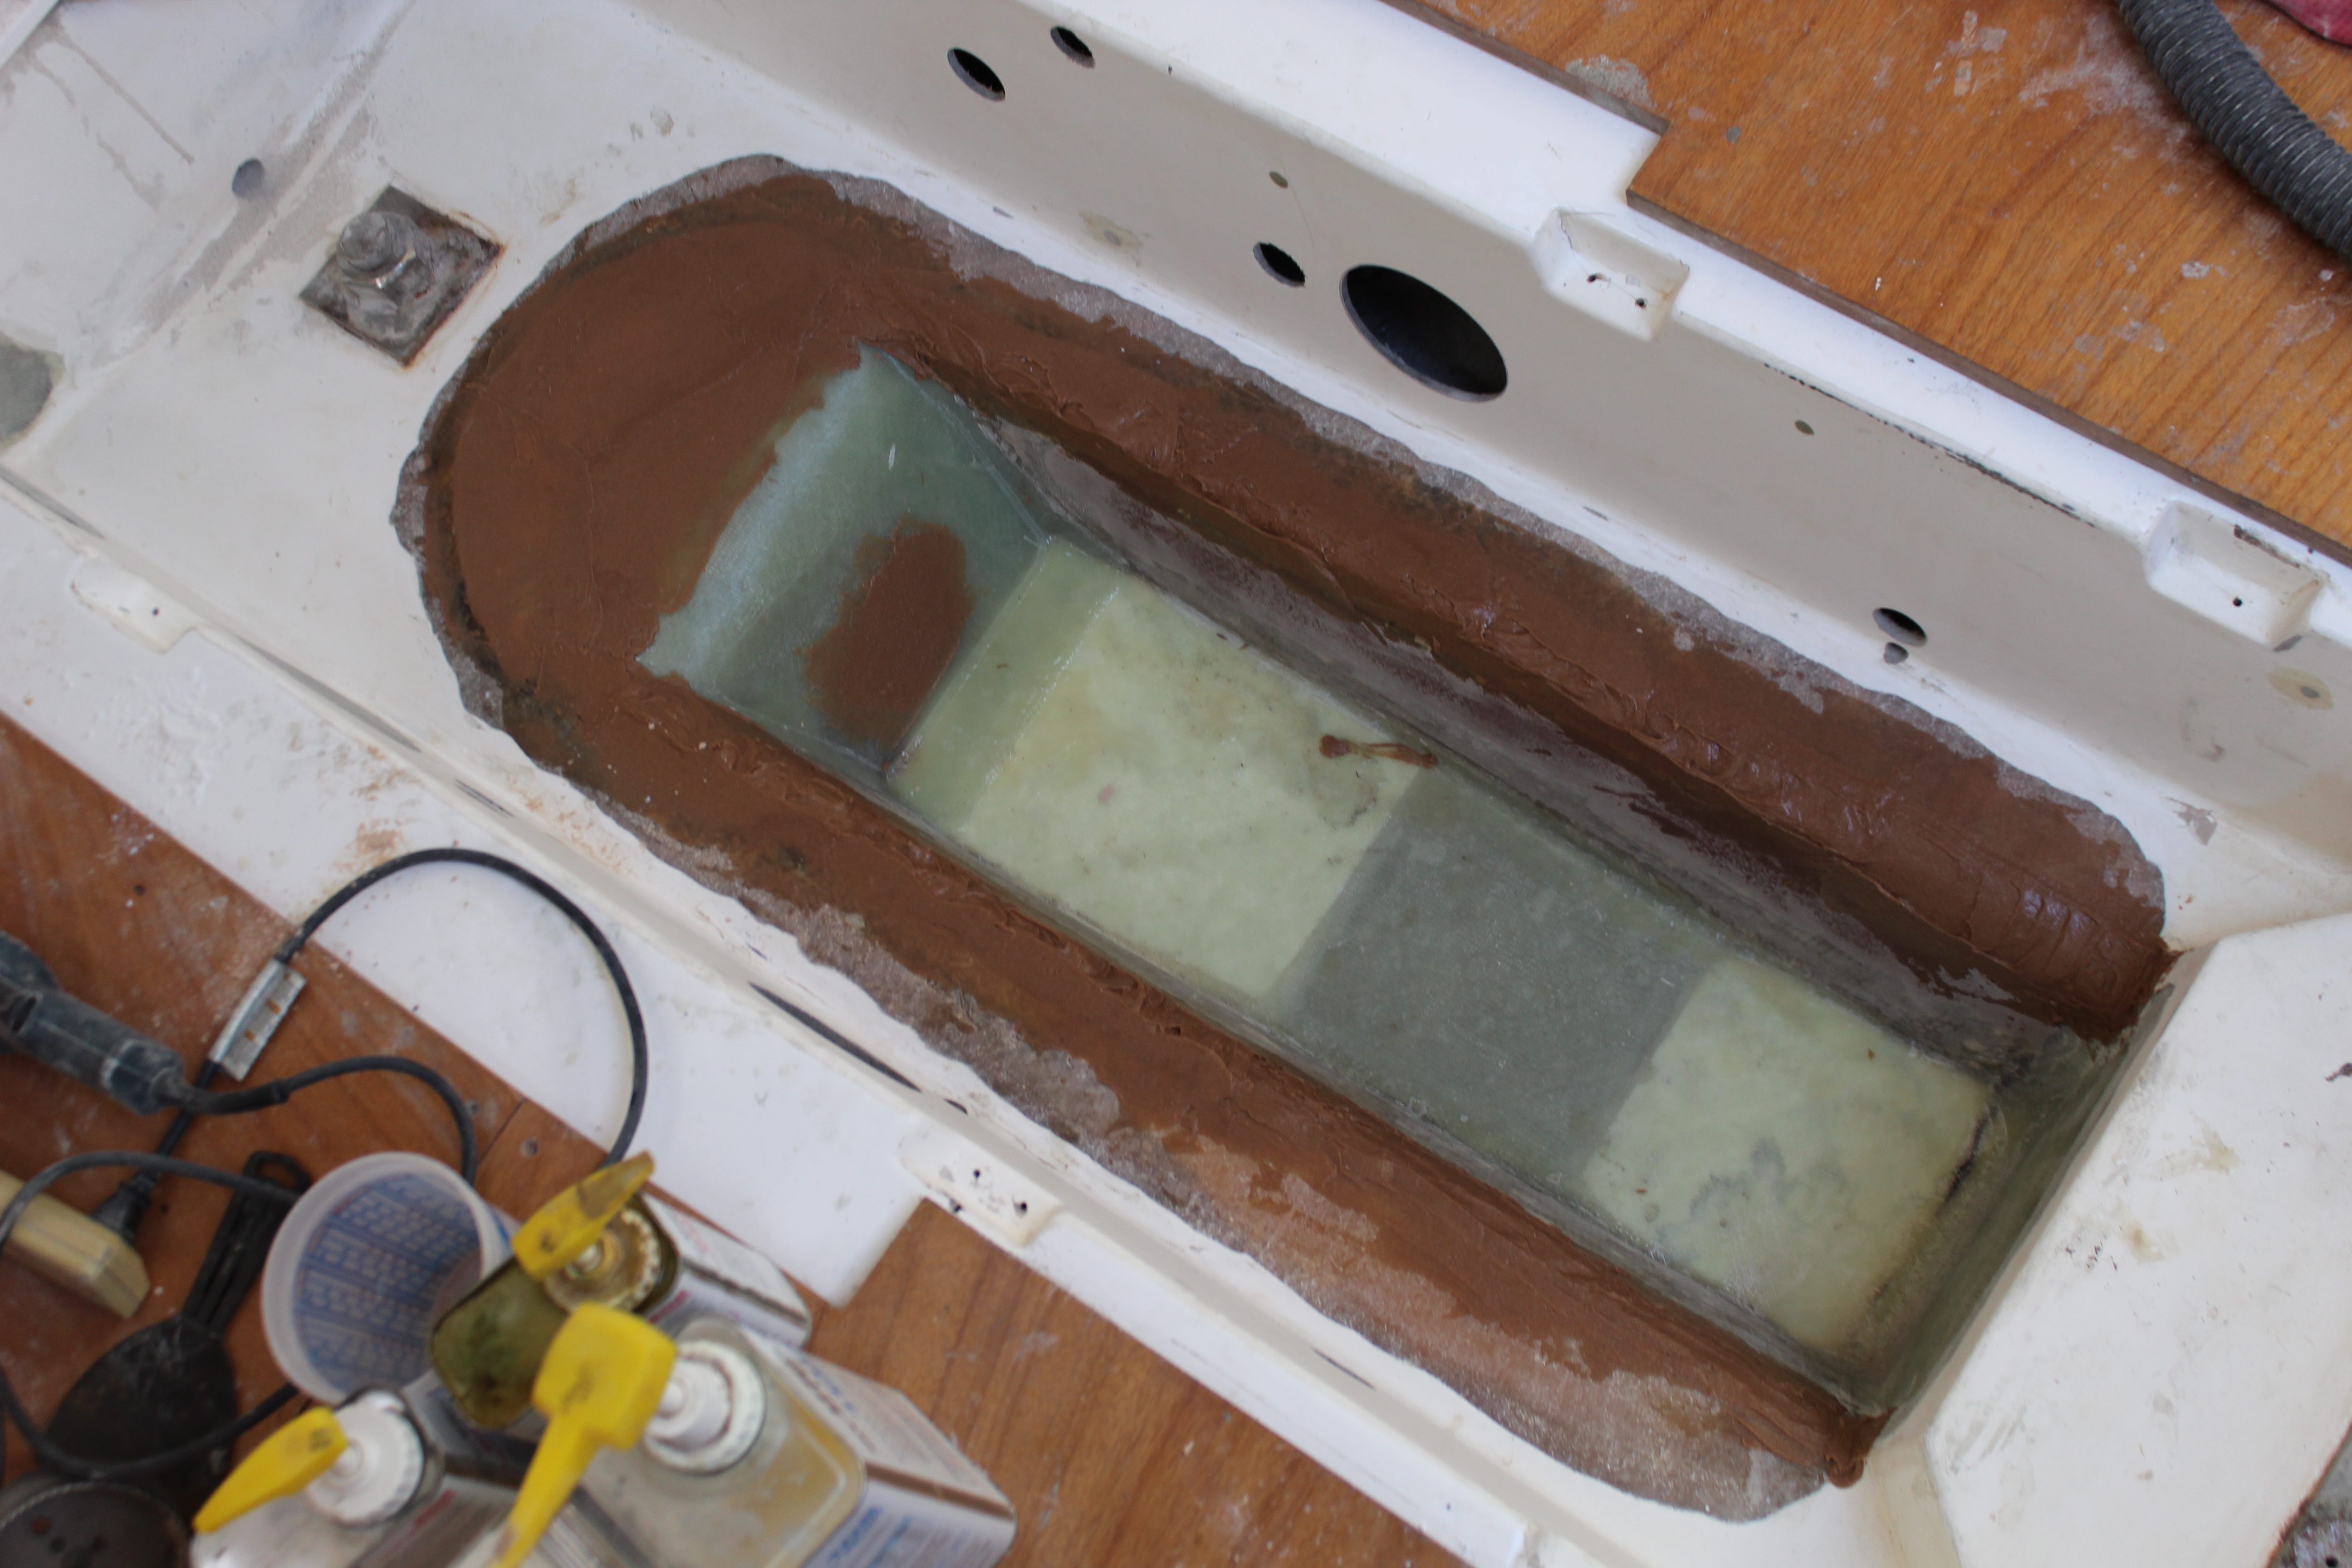
Next is to add to the gap in the aft end. Here I needed to build in almost an inch of filler. I didn't want to use just filler so I gathered up some random scrap pieces of glass, mixed with epoxy and packed the void. To make things easy I cut a template from plastic and used the template to squish everything and hold in place while curing:

A while ago I had mentioned that I wanted to reshape the bilge floor to aid in draining and minimize the water that remains in the bilge after the pump kicked off. The idea was to create a "V" with the the pump in the lowest part. I have been working over several ideas on how best to do this and finally settled on foam inserts. I figure that by using closed-cell foam and fully encapsulating it there will be no problem with water intrusion. Here is the foam inserts mocked up with the bilge pump:

This might be an exercise in futility - we'll see. Yesterday I got the foam inserts glued in and a layer of glass over-top in preparation for the biblical deluge that's promised for today and tomorrow. It looks like the rains are actually on the way so today will be a good day to catch up on some organizational stuff.
Cheers,
Mark
Moving forward on getting the bilge ready for final layup. This has to happen in stages - I would rather repair the underlying surfaces before the final layup than fair and fill afterward. In a sort-of necessary order I have to work from the bottom up to the aft and sides then the round-over to the tie-in to the liner. The bilge floor (after removing the previous mess!) cleaned up pretty well with a little grinding. Two layers of 1708 to start:
When it's all done I plan on building the floor up about 3/8" and adding 1/4" for the sides. That should duplicate the previous liner pretty closely.
Next is to add to the gap in the aft end. Here I needed to build in almost an inch of filler. I didn't want to use just filler so I gathered up some random scrap pieces of glass, mixed with epoxy and packed the void. To make things easy I cut a template from plastic and used the template to squish everything and hold in place while curing:
A while ago I had mentioned that I wanted to reshape the bilge floor to aid in draining and minimize the water that remains in the bilge after the pump kicked off. The idea was to create a "V" with the the pump in the lowest part. I have been working over several ideas on how best to do this and finally settled on foam inserts. I figure that by using closed-cell foam and fully encapsulating it there will be no problem with water intrusion. Here is the foam inserts mocked up with the bilge pump:
This might be an exercise in futility - we'll see
. Yesterday I got the foam inserts glued in and a layer of glass over-top in preparation for the biblical deluge that's promised for today and tomorrow. It looks like the rains are actually on the way so today will be a good day to catch up on some organizational stuff.Cheers,
Mark
Is this a historical post yet. Its survived the new format change and has run several years ? Very informative post and I have enjoyed the pictures of Hunter's 80's. 90's. Engineering and improvement
Thanks!Is this a historical post yet. Its survived the new format change and has run several years ? Very informative post and I have enjoyed the pictures of Hunter's 80's. 90's. Engineering and improvement
Bilge rebuild progress - continued:
Merry Christmas to all (belatedly)!
Progressing with the prep work on the bilge - Here's the base built up at the aft end:

It actually is straight across - the camera angle makes it look lopsided!
Next up is to start enclosing the aft end. I pre-wetted 3 layers of 1708 onto the plastic template and secured it in place:

With the aft end curing I moved to the forward end. Here the forward portion of the bilge needed to be leveled before the final pieces. I also filled in a low spot along the starboard side. This was several layers of glass then filler:

Next up is several layers of glass on the forward end. I re-purposed the plastic template to flatten the layup. A little pressure to hold things in place:

Last up is to add filler on the sides/corners for shaping. I have to do this before final shaping on the "ledge". Starting tomorrow the filler will be shaped for the final layup:
This has sidetracked me a little - didn't plan on needing all this extra work in the bilge but I'm glad I dug as far as I did. Better to fix it now and fix it right! The only frustrating thing at the moment is that I can only do one FG layup a day - too small an area to do more without stepping into something I just did!
Cheers,
Mark
Merry Christmas to all (belatedly
)!Progressing with the prep work on the bilge - Here's the base built up at the aft end:
It actually is straight across - the camera angle makes it look lopsided!
Next up is to start enclosing the aft end. I pre-wetted 3 layers of 1708 onto the plastic template and secured it in place:
With the aft end curing I moved to the forward end. Here the forward portion of the bilge needed to be leveled before the final pieces. I also filled in a low spot along the starboard side. This was several layers of glass then filler:
Next up is several layers of glass on the forward end. I re-purposed the plastic template to flatten the layup. A little pressure to hold things in place:
Last up is to add filler on the sides/corners for shaping. I have to do this before final shaping on the "ledge". Starting tomorrow the filler will be shaped for the final layup:
This has sidetracked me a little - didn't plan on needing all this extra work in the bilge but I'm glad I dug as far as I did. Better to fix it now and fix it right! The only frustrating thing at the moment is that I can only do one FG layup a day - too small an area to do more without stepping into something I just did!
Cheers,
Mark
Ready for cloth:
Bilge rebuild prep continues - after sanding the ledges I checked the angle of the ledge:

I need a slope towards the sump here to allow for the thickness of the added cloth and also for proper water drainage. I will remove about another 3/8" to create the taper then check to see if any additional filler is needed for the roundover to blend into the sump wall (Note: I finished this yesterday but forgot to get a photo - will do that today)
After a final round of filler to fix a few low spots and final sanding, the bilge is ready for glass:

I patterned and cut the first three layers yesterday and turned on the heater (!?!?!) this morning to warm things up down below. Later today will be the first layup. The plan is to get three layers on then after it cures fix any bumps or high spots then get the final three or four (as necessary) layers tomorrow.
Cheers,
Mark
Bilge rebuild prep continues - after sanding the ledges I checked the angle of the ledge:
I need a slope towards the sump here to allow for the thickness of the added cloth and also for proper water drainage. I will remove about another 3/8" to create the taper then check to see if any additional filler is needed for the roundover to blend into the sump wall (Note: I finished this yesterday but forgot to get a photo - will do that today)
After a final round of filler to fix a few low spots and final sanding, the bilge is ready for glass:
I patterned and cut the first three layers yesterday and turned on the heater (!?!?!
) this morning to warm things up down below. Later today will be the first layup. The plan is to get three layers on then after it cures fix any bumps or high spots then get the final three or four (as necessary) layers tomorrow.Cheers,
Mark
Bilge progress #42:
I got a snap of the taper I added to the ledge (before laying glass):

This should allow good drainage into the sump, which the previous version did not have! I always had a problem with water accumulating along the sides. Yesterday I got 2 layers of glass on - I thought about going with three layers but I never have much luck going more than two at a time. When I use the roller to get the air bubbles out two layers seem to be the maximum without everything shifting around. So two it was.
Today a quick sand to rough up the surface and knock down the high spots and two more layers:

Tomorrow will be layers 5 and 6. After 4 layers I'm at about 3/16" buildup so I'm thinking 6 will do it, plus I've been adding an extra layer on the bottom each time so by tomorrow I should have 3/8" on the sump floor. After that some filler, then primer and paint and I can move on to better projects!
Cheers,
Mark
I got a snap of the taper I added to the ledge (before laying glass):
This should allow good drainage into the sump, which the previous version did not have! I always had a problem with water accumulating along the sides. Yesterday I got 2 layers of glass on - I thought about going with three layers but I never have much luck going more than two at a time. When I use the roller to get the air bubbles out two layers seem to be the maximum without everything shifting around. So two it was.
Today a quick sand to rough up the surface and knock down the high spots and two more layers:
Tomorrow will be layers 5 and 6. After 4 layers I'm at about 3/16" buildup so I'm thinking 6 will do it, plus I've been adding an extra layer on the bottom each time so by tomorrow I should have 3/8" on the sump floor. After that some filler, then primer and paint and I can move on to better projects!
Cheers,
Mark
Bilge progress #79:
Glassing is done! I got 6 layers total except for the bottom which got 9. My test (small squares built up for each layer) yielded a total thickness average of .310, so slightly over 1/4" on the sides and over 3/8" on the bottom.
One small project I did during the layup was to address a weird thing in the bilge:

These corners are molded into the liner and I have no idea why. Maybe structural though I doubt there would be much additional strength needed there. Maybe asthetic but why?? At any rate all they are good for is trapping dirt and gunk so time to do something about it! I cut some templates, transferred to a glass sheet I had laying around and cut to fit:

I'm leaving the (?) notches, just sealing them in and creating a smooth transition ramp for water to flow to the bilge. Here they are test fitted and I marked the area on the liner I needed to grind down. Next up I glopped on a thickened mixture of West Systems and 406 silica to bond everything in place:

After that had gotten sticky I finished the final layup on the bilge and used scrap pieces to transition the new ramps into the ledges. After all that was done there was just enough time for everything to harden before the evening rains came! Good news is the rain wasn't as heavy as forecast so no water in the bilge the next morning! Next up will be some fairing compound where needed and then primer and paint. The hardest part is done!
Cheers,
Mark
Glassing is done! I got 6 layers total except for the bottom which got 9. My test (small squares built up for each layer) yielded a total thickness average of .310, so slightly over 1/4" on the sides and over 3/8" on the bottom.
One small project I did during the layup was to address a weird thing in the bilge:
These corners are molded into the liner and I have no idea why. Maybe structural though I doubt there would be much additional strength needed there. Maybe asthetic but why?? At any rate all they are good for is trapping dirt and gunk so time to do something about it! I cut some templates, transferred to a glass sheet I had laying around and cut to fit:
I'm leaving the (?) notches, just sealing them in and creating a smooth transition ramp for water to flow to the bilge. Here they are test fitted and I marked the area on the liner I needed to grind down. Next up I glopped on a thickened mixture of West Systems and 406 silica to bond everything in place:
After that had gotten sticky I finished the final layup on the bilge and used scrap pieces to transition the new ramps into the ledges. After all that was done there was just enough time for everything to harden before the evening rains came! Good news is the rain wasn't as heavy as forecast so no water in the bilge the next morning! Next up will be some fairing compound where needed and then primer and paint. The hardest part is done!
Cheers,
Mark
A non-bilge related project!:
To take a break from the bilge I addressed a spot on the hull which had always looked odd. Ever since I have owned the boat there has always been a small 3" x 4" square noticeable through the bottom paint starboard aft. Just thin black lines (cracks) in a square shape showing through the paint. Now is the time so I got the grinder out and found this:

I don't have access to the hull from the inside so I have no idea if this goes all the way through or not. I did discover the reason for the previous repair showing through though. As soon as the grinder got through the barrier coat I was removing lightweight filler. This is essentially similar to or maybe is West 410 filler. Just my opinion here but I find no viable area on a boat to use this filler! It's too soft and makes the filler mix water permeable. I definitely would not use it below the waterline! The black marks (areas of water penetration) went away with the filler and the repair area underneath looks to be solid. Whoever did this just cheaped out on the wrong filler material.
Since it has not been leaking I'm not really interested in creating another hole in the hull so I ground the area down to about a uniform 1/8" and laid a few layers of glass over it:

Now there's a proper transition for the glass and after sanding and fairing (with the right fairing compound!) no more weird spot!
Cheers,
Mark
To take a break from the bilge I addressed a spot on the hull which had always looked odd. Ever since I have owned the boat there has always been a small 3" x 4" square noticeable through the bottom paint starboard aft. Just thin black lines (cracks) in a square shape showing through the paint. Now is the time so I got the grinder out and found this:
I don't have access to the hull from the inside so I have no idea if this goes all the way through or not. I did discover the reason for the previous repair showing through though. As soon as the grinder got through the barrier coat I was removing lightweight filler. This is essentially similar to or maybe is West 410 filler. Just my opinion here but I find no viable area on a boat to use this filler! It's too soft and makes the filler mix water permeable. I definitely would not use it below the waterline! The black marks (areas of water penetration) went away with the filler and the repair area underneath looks to be solid. Whoever did this just cheaped out on the wrong filler material.
Since it has not been leaking I'm not really interested in creating another hole in the hull so I ground the area down to about a uniform 1/8" and laid a few layers of glass over it:
Now there's a proper transition for the glass and after sanding and fairing (with the right fairing compound!) no more weird spot!
Cheers,
Mark
Now is the time to pick and poke! I too cannot understand doing a half-ass job. I learned from working in car repair shops during high school and college summers that half-assing things eventually costs more than doing it right the first time.Nice job on the bilge. Amazing what you find when you start picking and poking. I'll never understand someone doing a half-assed repair job when doing it right would not take that much more effort and cost.
From looking at your bilge it seems you have a lot less room to work with than I do. My sump area (the flat bottom part) measures 27 x 9 inches. In the grand scheme of things probably not a lot of sitting water but I might have reduced the volume by a gallon or two. The other option I considered was to build up the bilge floor except for a cutout sized to the bilge pump but decided against that simply because I might want to fit a different pump some day and the new one might not fit the old cutout.great idea to slope the bildge into a small area to install the sump pump to keep bildge as dry as possible. Whish I thought of that when I did my modification on my h34. Looks great!
Bilge progress #124:
Work on the bilge continues - the last few days have been sanding and fairing:

The fairing looks heavier than it actually is - I've already sanded most of this off. The first round hit the flat areas, second round the upper fillets and today I got all that sanded and did the bottom fillets. Most of the bilge is final sanded (tomorrow I'll get the last bits) and it'll be ready for primer.
Now on to non-bilge related stuff!
Cheers,
Mark
Work on the bilge continues - the last few days have been sanding and fairing:
The fairing looks heavier than it actually is - I've already sanded most of this off. The first round hit the flat areas, second round the upper fillets and today I got all that sanded and did the bottom fillets. Most of the bilge is final sanded (tomorrow I'll get the last bits) and it'll be ready for primer.
Now on to non-bilge related stuff!
Cheers,
Mark
Working around the hull:
With the plan to splash soon I need to address the final issues with the hull to get ready for bottom paint. A long time ago I sounded the entire hull looking for soft spots or areas of delamination and found one on the rudder. I pulled out the phenolic hammer again and found the spot:

the soft spot circled is about 3" x 5". You might be able to see some dashed lines - these were questionable areas for investigation once it's opened up. For anyone interested in how to check for delamination, here's what I use:

It's just a hammer with a plastic tip (rubber on the other end). Surprisingly hard to find - it took some serious searching before I found one. Tapping the fiberglass surface with the plastic end will result in a sharp higher pitched sound for solid glass, and will result in a lower pitch dull thud type sound for soft spots or delamination.
I cut the offending area out small pieces at a time and eventually came up with this:

The upper area (brown color) is where the inner glass adhered well to the foam but the outer layer delaminated from the inner. The lower area was a small void in the foam where the glass never adhered at all. No worries! Now time for some (careful!) grinding and blending. I used 407 fairing compound to fill in and build up the voids and built the center area up with glass:

Next up is three layers of 1708 to cover the entire repair area:

as a reference, the repair area size wound up being 16" x 8". Today I sanded and blended:

There's a few spots that need a little filler but the rain thwarted me!
Cheers,
Mark
With the plan to splash soon I need to address the final issues with the hull to get ready for bottom paint. A long time ago I sounded the entire hull looking for soft spots or areas of delamination and found one on the rudder. I pulled out the phenolic hammer again and found the spot:
the soft spot circled is about 3" x 5". You might be able to see some dashed lines - these were questionable areas for investigation once it's opened up. For anyone interested in how to check for delamination, here's what I use:
It's just a hammer with a plastic tip (rubber on the other end). Surprisingly hard to find
- it took some serious searching before I found one. Tapping the fiberglass surface with the plastic end will result in a sharp higher pitched sound for solid glass, and will result in a lower pitch dull thud type sound for soft spots or delamination.I cut the offending area out small pieces at a time and eventually came up with this:
The upper area (brown color) is where the inner glass adhered well to the foam but the outer layer delaminated from the inner. The lower area was a small void in the foam where the glass never adhered at all. No worries! Now time for some (careful!) grinding and blending. I used 407 fairing compound to fill in and build up the voids and built the center area up with glass:
Next up is three layers of 1708 to cover the entire repair area:
as a reference, the repair area size wound up being 16" x 8". Today I sanded and blended:
There's a few spots that need a little filler but the rain thwarted me!
Cheers,
Mark