Congratulations, Mark. Sounds like a good plan. Looking forward to your updates on progress and splashing the boat.
Repairing Hunter 40 damage from Hurricane Matthew
- Thread starter B757Captain
- Start date
jssailem
SBO Weather and Forecasting Forum Jim & John
- Oct 22, 2014
- 24,579
Well done Mark san... Safe flight home.
May retirement rest be as fulfilling as you imagine...
Then get back to work on that boat man... you are going to need a hobby.
May retirement rest be as fulfilling as you imagine...
Then get back to work on that boat man... you are going to need a hobby.
Home and getting back into the groove:
Hi fellas! After a long and very arduous journey out west to visit the parental units, we're home! And having recovered from jetlag (though not even close on mental health) it's time to do some boat stuff!
The first few days have been mostly trying to find all the various tools, parts and pieces I invariably can't find - my normal working environment looks like a tornado visit but I can usually find anything I need amidst the chaos. It's when I clean up that the problems start! While out west I mentally worked through which project to start on first and decided the best place is from the bottom up. I had planned to do some work in the bilge so first thing is to clean it out:

With the bilge pump. battery and wiring removed, the mast wiring out of the way and the teak cross-braces removed it's time to get cleaning:

This is after some scrubbing and the first pass with the sander. My basic plan is to plug up the all the holes (it looks a little to much like swiss cheese for me!) I had planned to add some fore and aft bevels with the bilge pump at the lowest point to minimize the pesky last few inches of water that always remains. However there's a glitch (been there since I bought the boat so why is anyone's guess): The bottom and sides of the bilge have been - fortified. At some point in time, someone added a few layers of fiberglass to the bottom and sides of the bilge. Normally I would not have a problem with this but, as seems usual for the unknown yard gorillas who worked on the boat previously, they failed to properly prep the bilge sidewalls so the glass has delaminated from the sides. They didn't even sand the gelcoat - as I started cutting the loose parts away you could still see shiny! Plus they used polyester instead of epoxy . So I was in the process of cutting away this mess to see what they were trying to fix when:
The dockmaster caught up to me and said as part of marina repair and upgrade they needed to move the boat to repave that part of the yard. Cool, no problem, and it helps me solve two problems: First, the boat has sat leaned about a degree and a half to the right since forever so moving it, plus some help from my trusty (digital) angle finder will straighten things up in the new location. Second, I still have some scratches and gouges in the hull that need to be addressed but they are under or too close to the jack pads, so moving it will allow for shifting the stands so I can get at the scratches/gouges.
But!! Since I am planning to splash the boat soon (Early spring I think) it behooves me to get the areas that will soon be under the pads as ready as possible for bottom paint. So far I haven't really done much to the lower hull but now is the time to start. So bilge work went on hold and the queue the sanders! I'm planning to remove as much of the old built-up bottom paint as I can and get down to the barrier coat - and there were quite a few layers to get through! Two days of scraping ( I cheated, I used my planer) and sanding and here's the first coat of primer:

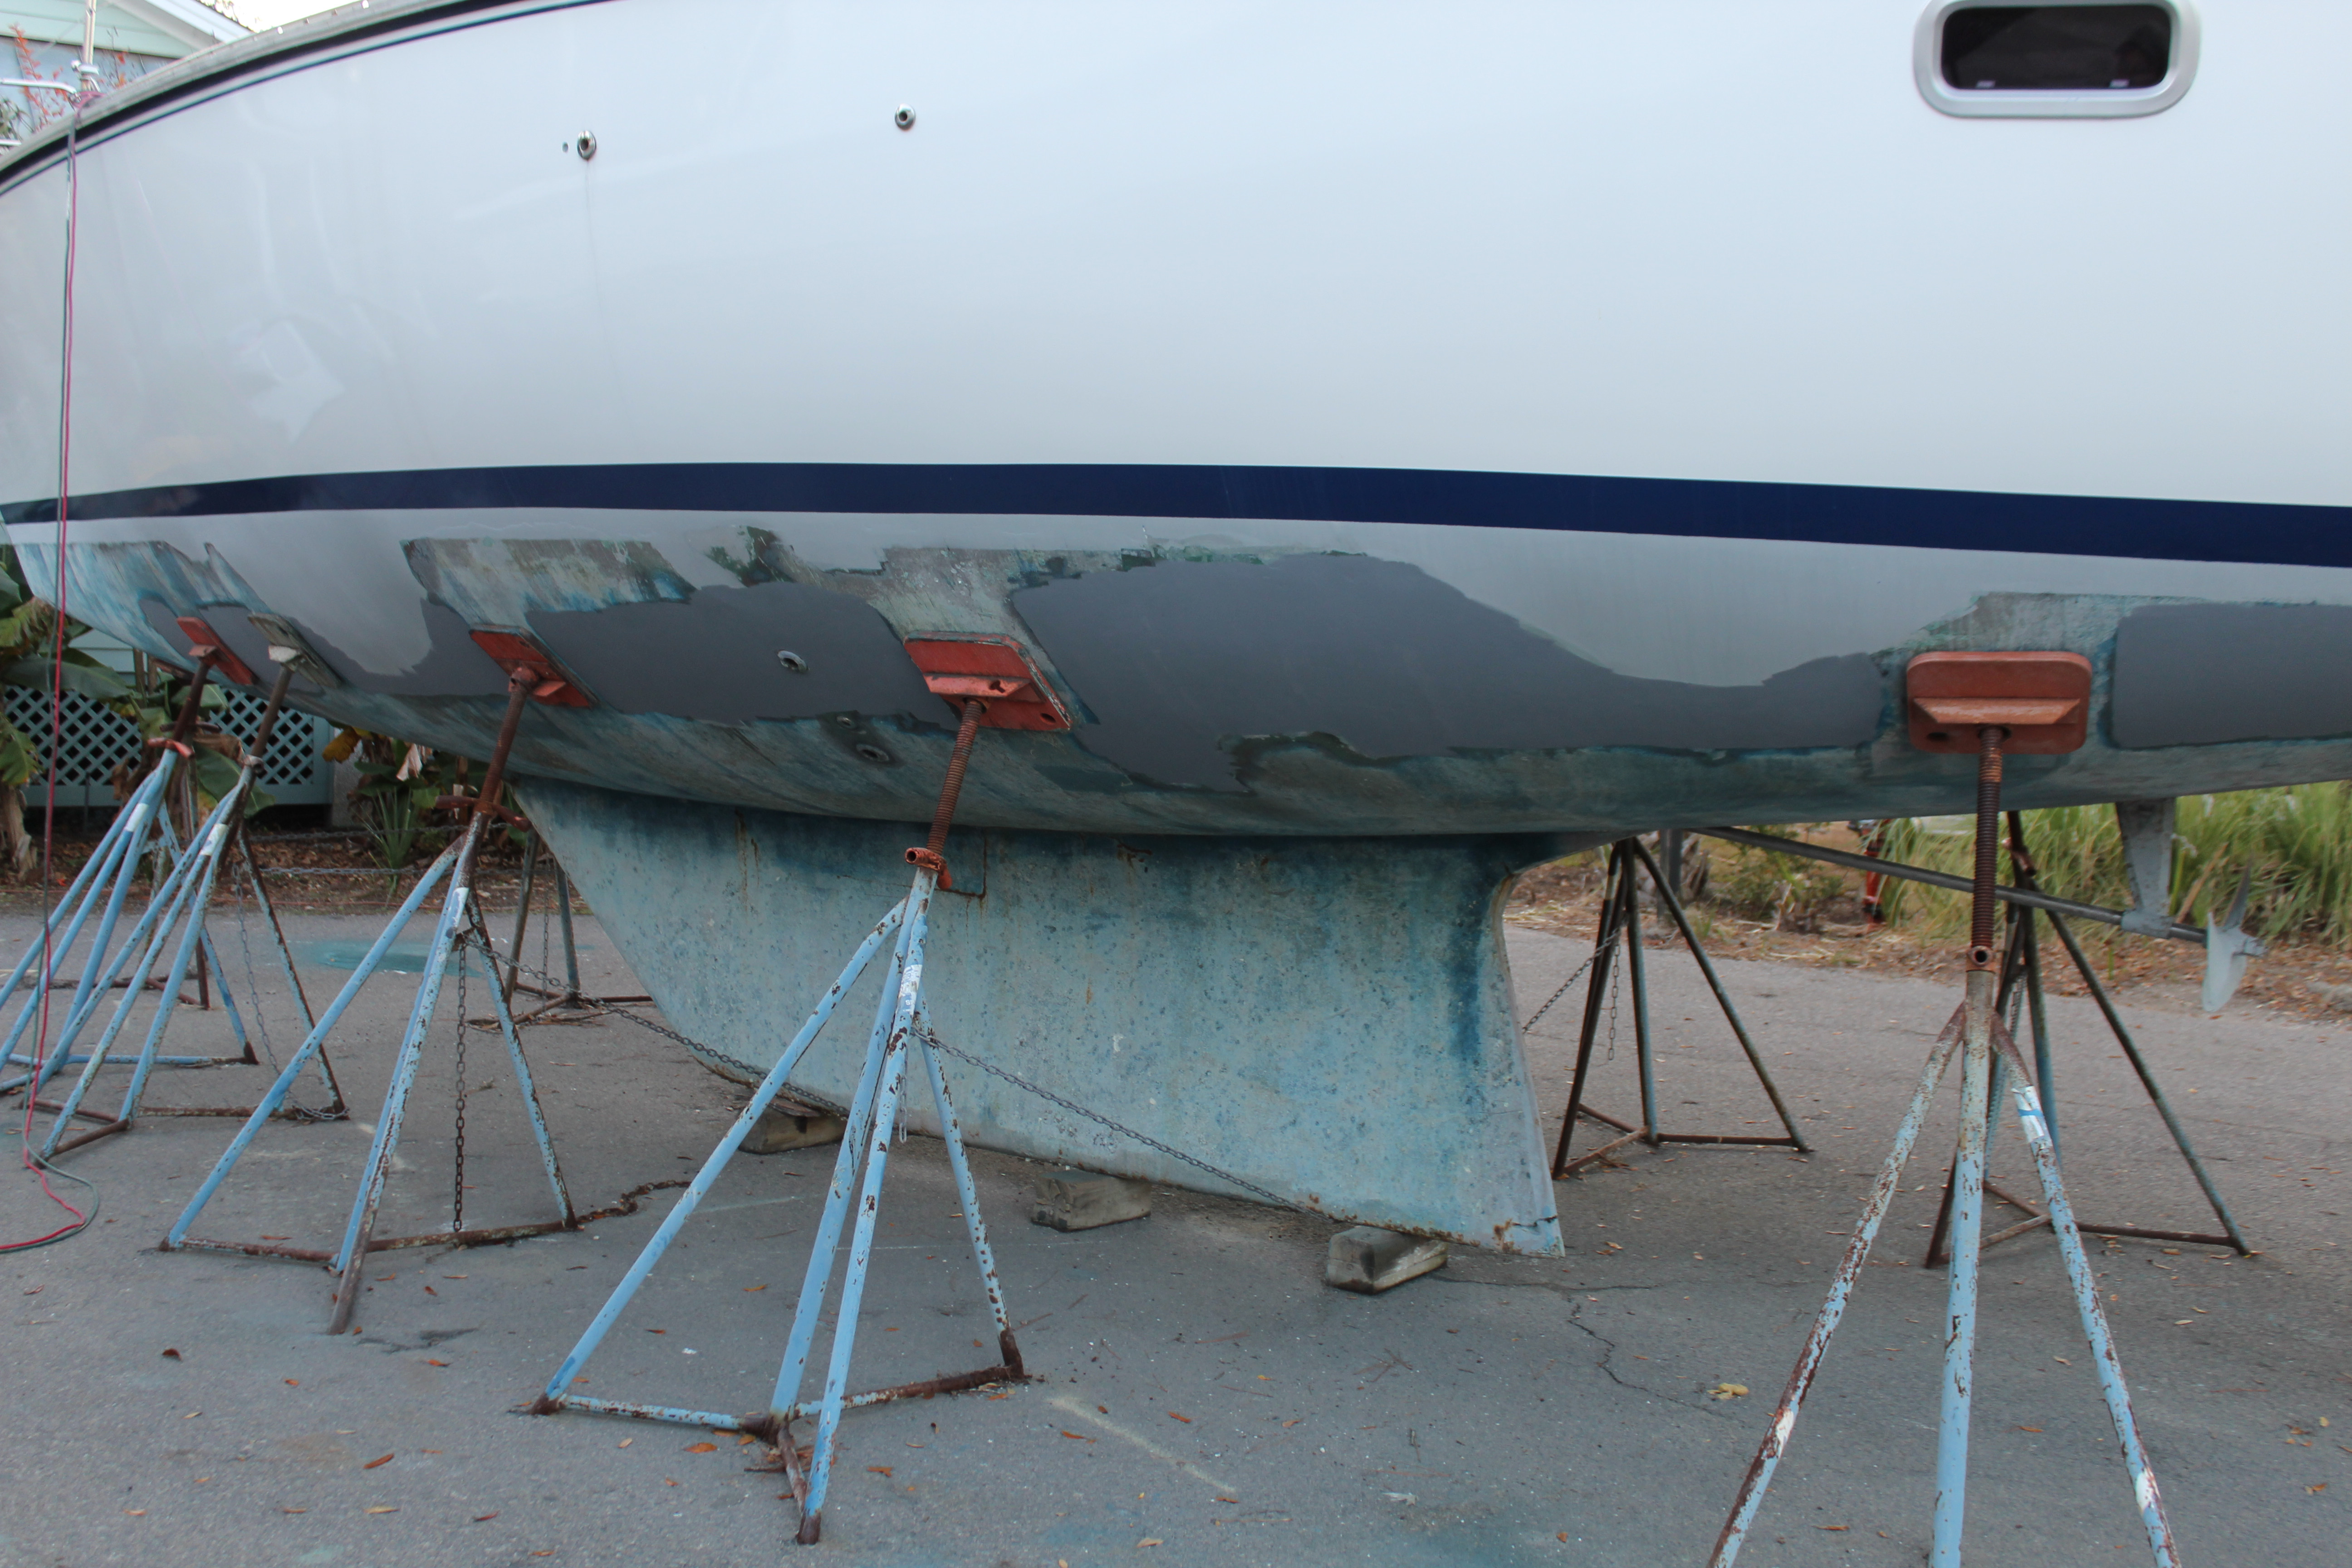
If the weather cooperates tomorrow I'll get 2 more coats on. That will cut down the time needed to finish up the barrier coat/bottom paint for the areas around the pads when it's sitting in the slings (when the time comes). And over the next few months I can finish up the rest of the bottom prep.
Tomorrow, back to the bilge investigation!
Cheers,
Mark (no more -san!)
Hi fellas! After a long and very arduous journey out west to visit the parental units, we're home! And having recovered from jetlag (though not even close on mental health) it's time to do some boat stuff!
The first few days have been mostly trying to find all the various tools, parts and pieces I invariably can't find - my normal working environment looks like a tornado visit but I can usually find anything I need amidst the chaos. It's when I clean up that the problems start! While out west I mentally worked through which project to start on first and decided the best place is from the bottom up. I had planned to do some work in the bilge so first thing is to clean it out:
With the bilge pump. battery and wiring removed, the mast wiring out of the way and the teak cross-braces removed it's time to get cleaning:
This is after some scrubbing and the first pass with the sander. My basic plan is to plug up the all the holes (it looks a little to much like swiss cheese for me!) I had planned to add some fore and aft bevels with the bilge pump at the lowest point to minimize the pesky last few inches of water that always remains. However there's a glitch (been there since I bought the boat so why is anyone's guess): The bottom and sides of the bilge have been - fortified. At some point in time, someone added a few layers of fiberglass to the bottom and sides of the bilge. Normally I would not have a problem with this but, as seems usual for the unknown yard gorillas who worked on the boat previously, they failed to properly prep the bilge sidewalls so the glass has delaminated from the sides. They didn't even sand the gelcoat - as I started cutting the loose parts away you could still see shiny! Plus they used polyester instead of epoxy
. So I was in the process of cutting away this mess to see what they were trying to fix when:The dockmaster caught up to me and said as part of marina repair and upgrade they needed to move the boat to repave that part of the yard. Cool, no problem, and it helps me solve two problems: First, the boat has sat leaned about a degree and a half to the right since forever so moving it, plus some help from my trusty (digital) angle finder will straighten things up in the new location. Second, I still have some scratches and gouges in the hull that need to be addressed but they are under or too close to the jack pads, so moving it will allow for shifting the stands so I can get at the scratches/gouges.
But!! Since I am planning to splash the boat soon (Early spring I think) it behooves me to get the areas that will soon be under the pads as ready as possible for bottom paint. So far I haven't really done much to the lower hull but now is the time to start. So bilge work went on hold and the queue the sanders! I'm planning to remove as much of the old built-up bottom paint as I can and get down to the barrier coat - and there were quite a few layers to get through! Two days of scraping ( I cheated, I used my planer
) and sanding and here's the first coat of primer:
If the weather cooperates tomorrow I'll get 2 more coats on. That will cut down the time needed to finish up the barrier coat/bottom paint for the areas around the pads when it's sitting in the slings (when the time comes). And over the next few months I can finish up the rest of the bottom prep.
Tomorrow, back to the bilge investigation!
Cheers,
Mark (no more -san!)
A little investigaion:
Hi gents. So, today started with adding another coat of epoxy primer to the hull and the boat is ready to be moved. Then lunch and a long nap! Shoulders still mighty sore from the last few days!
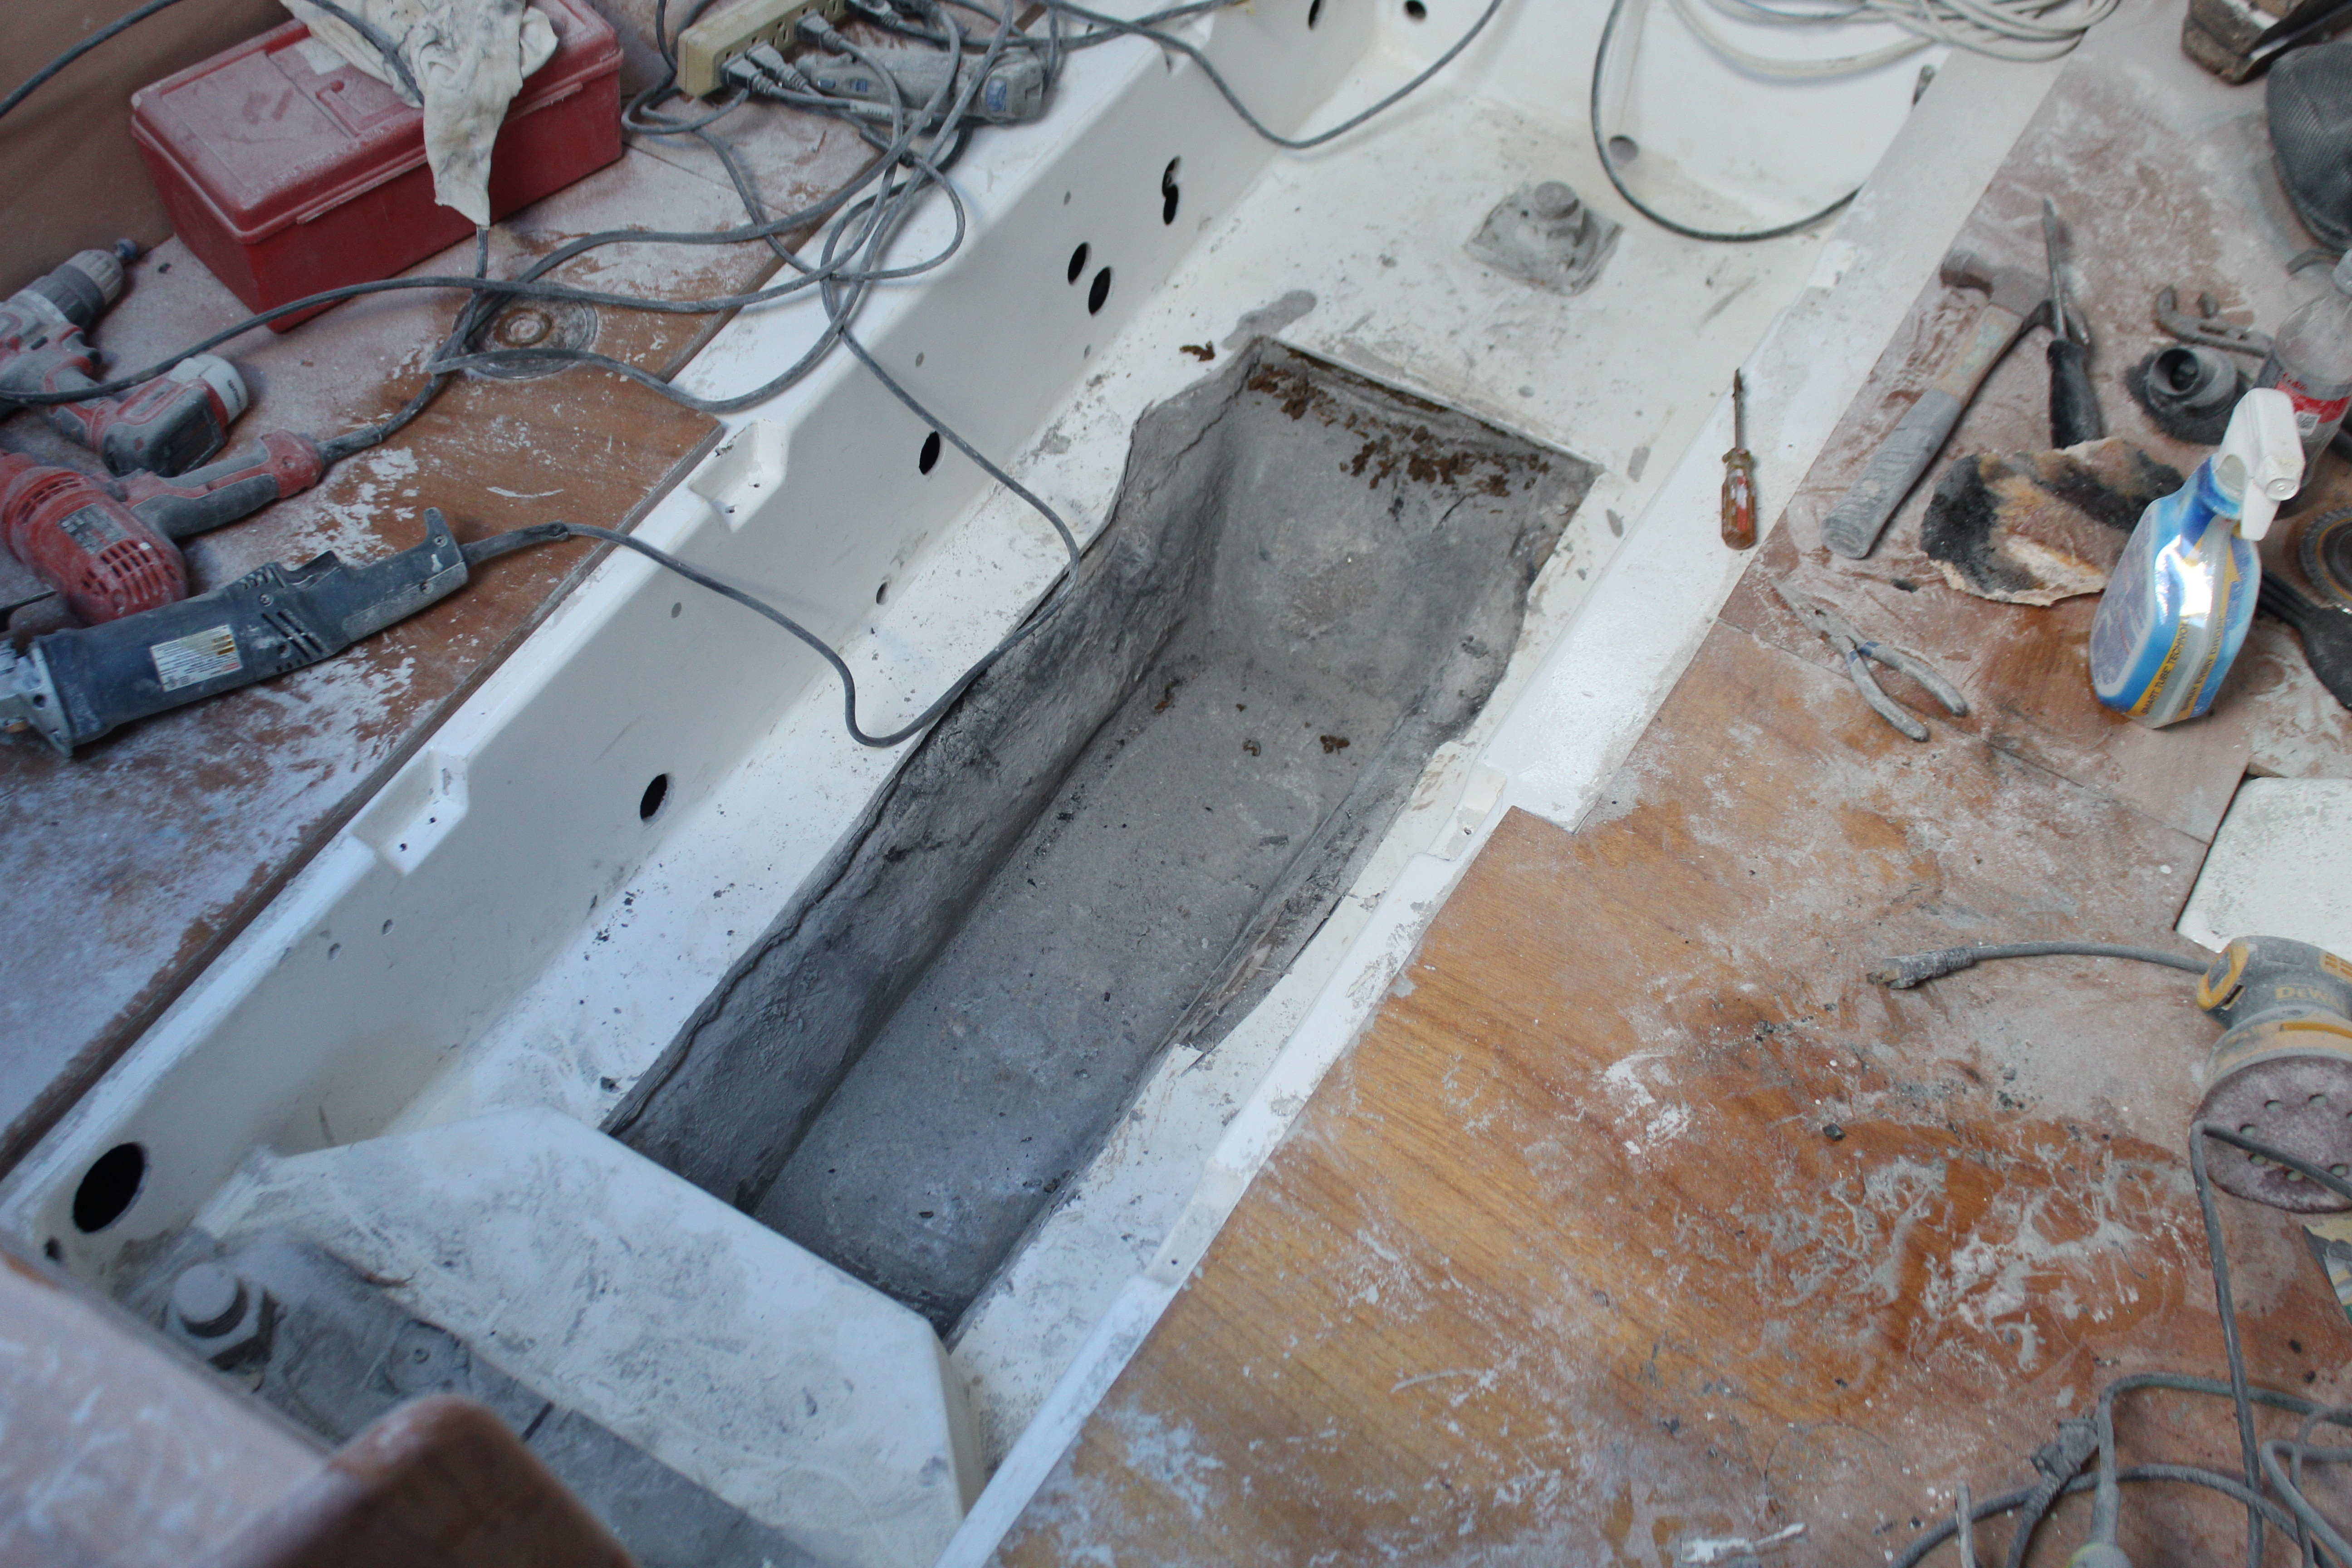
This afternoon I did some digging (literally!) into the bilge. The eagle-eyed among you might have noticed a black spot (square) in the picture I posted yesterday. After some cleaning and looking at the glass that was added to the bilge I noticed a bulge along the bottom. Curious, I decided after cutting away some of the glass along the upper edge that I needed to investigate the nature of this bulge so I cut into it. Out came some really foul-smelling water! I left it this way to get to other things and came back to it today:

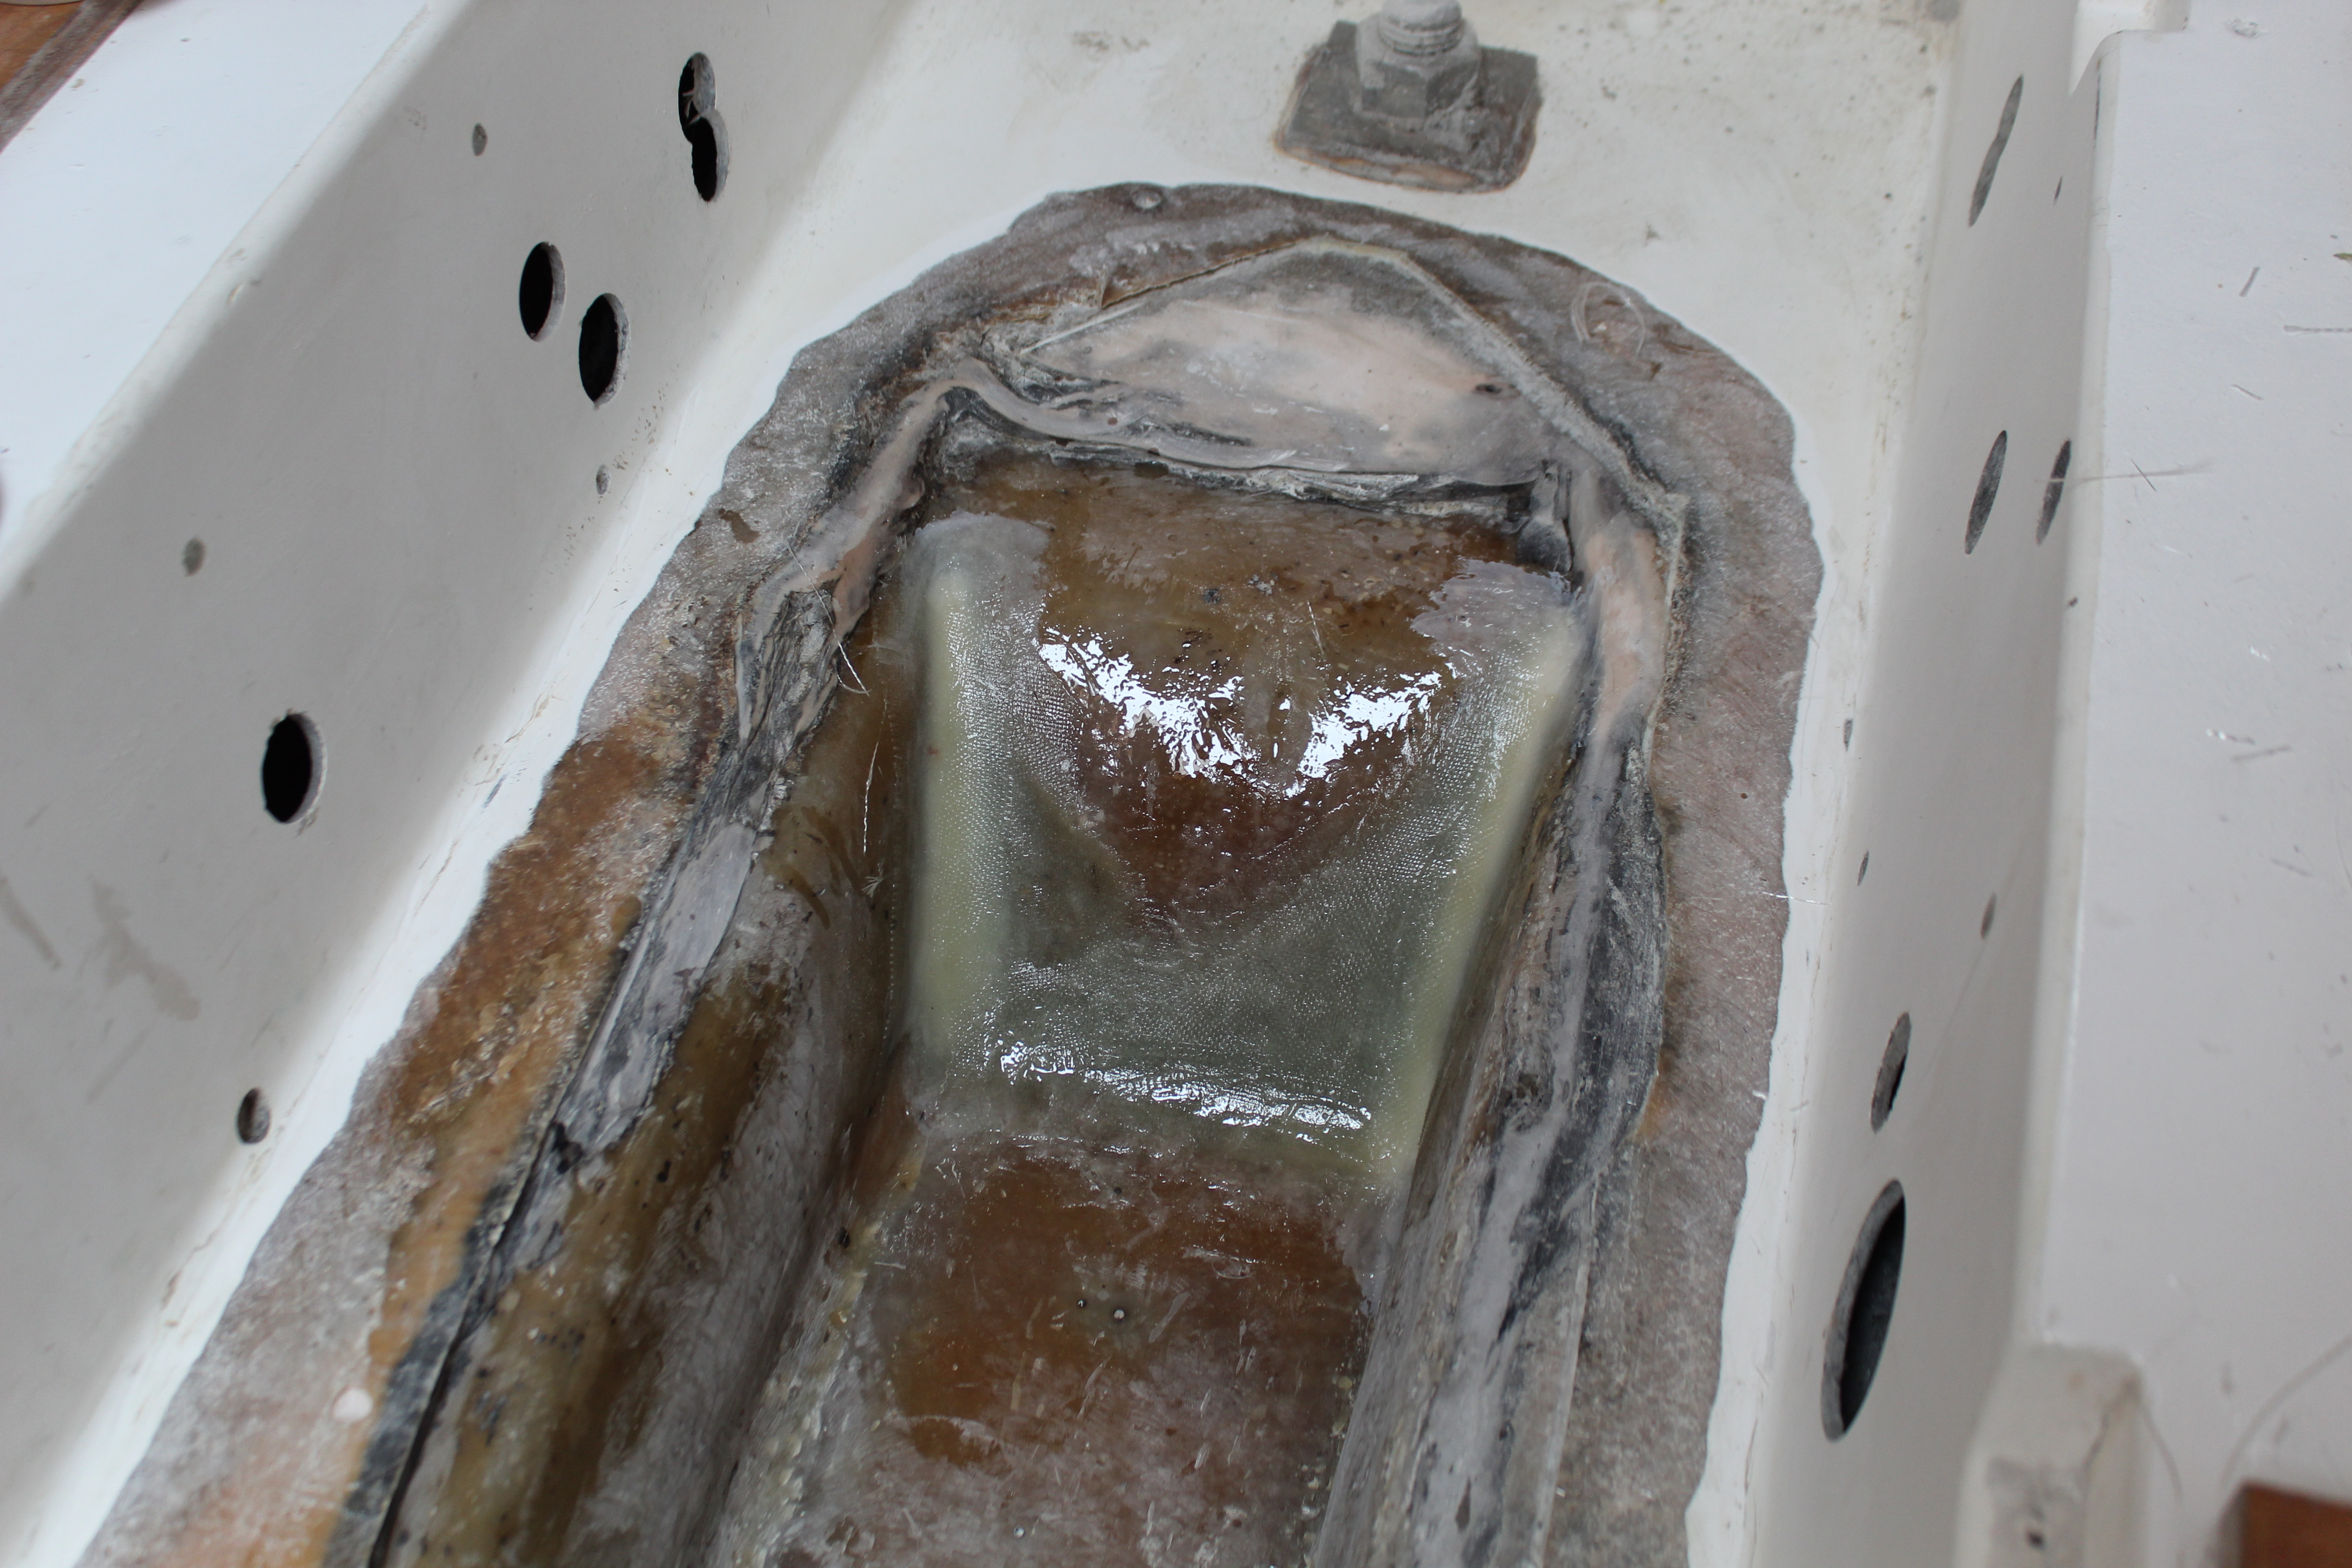
After cleaning up the water and sticking the vacuum to it some black gooey diesel-oil smelly stuff came out. Well, can't have that! A little more cutting to open up the area and this is what I found:

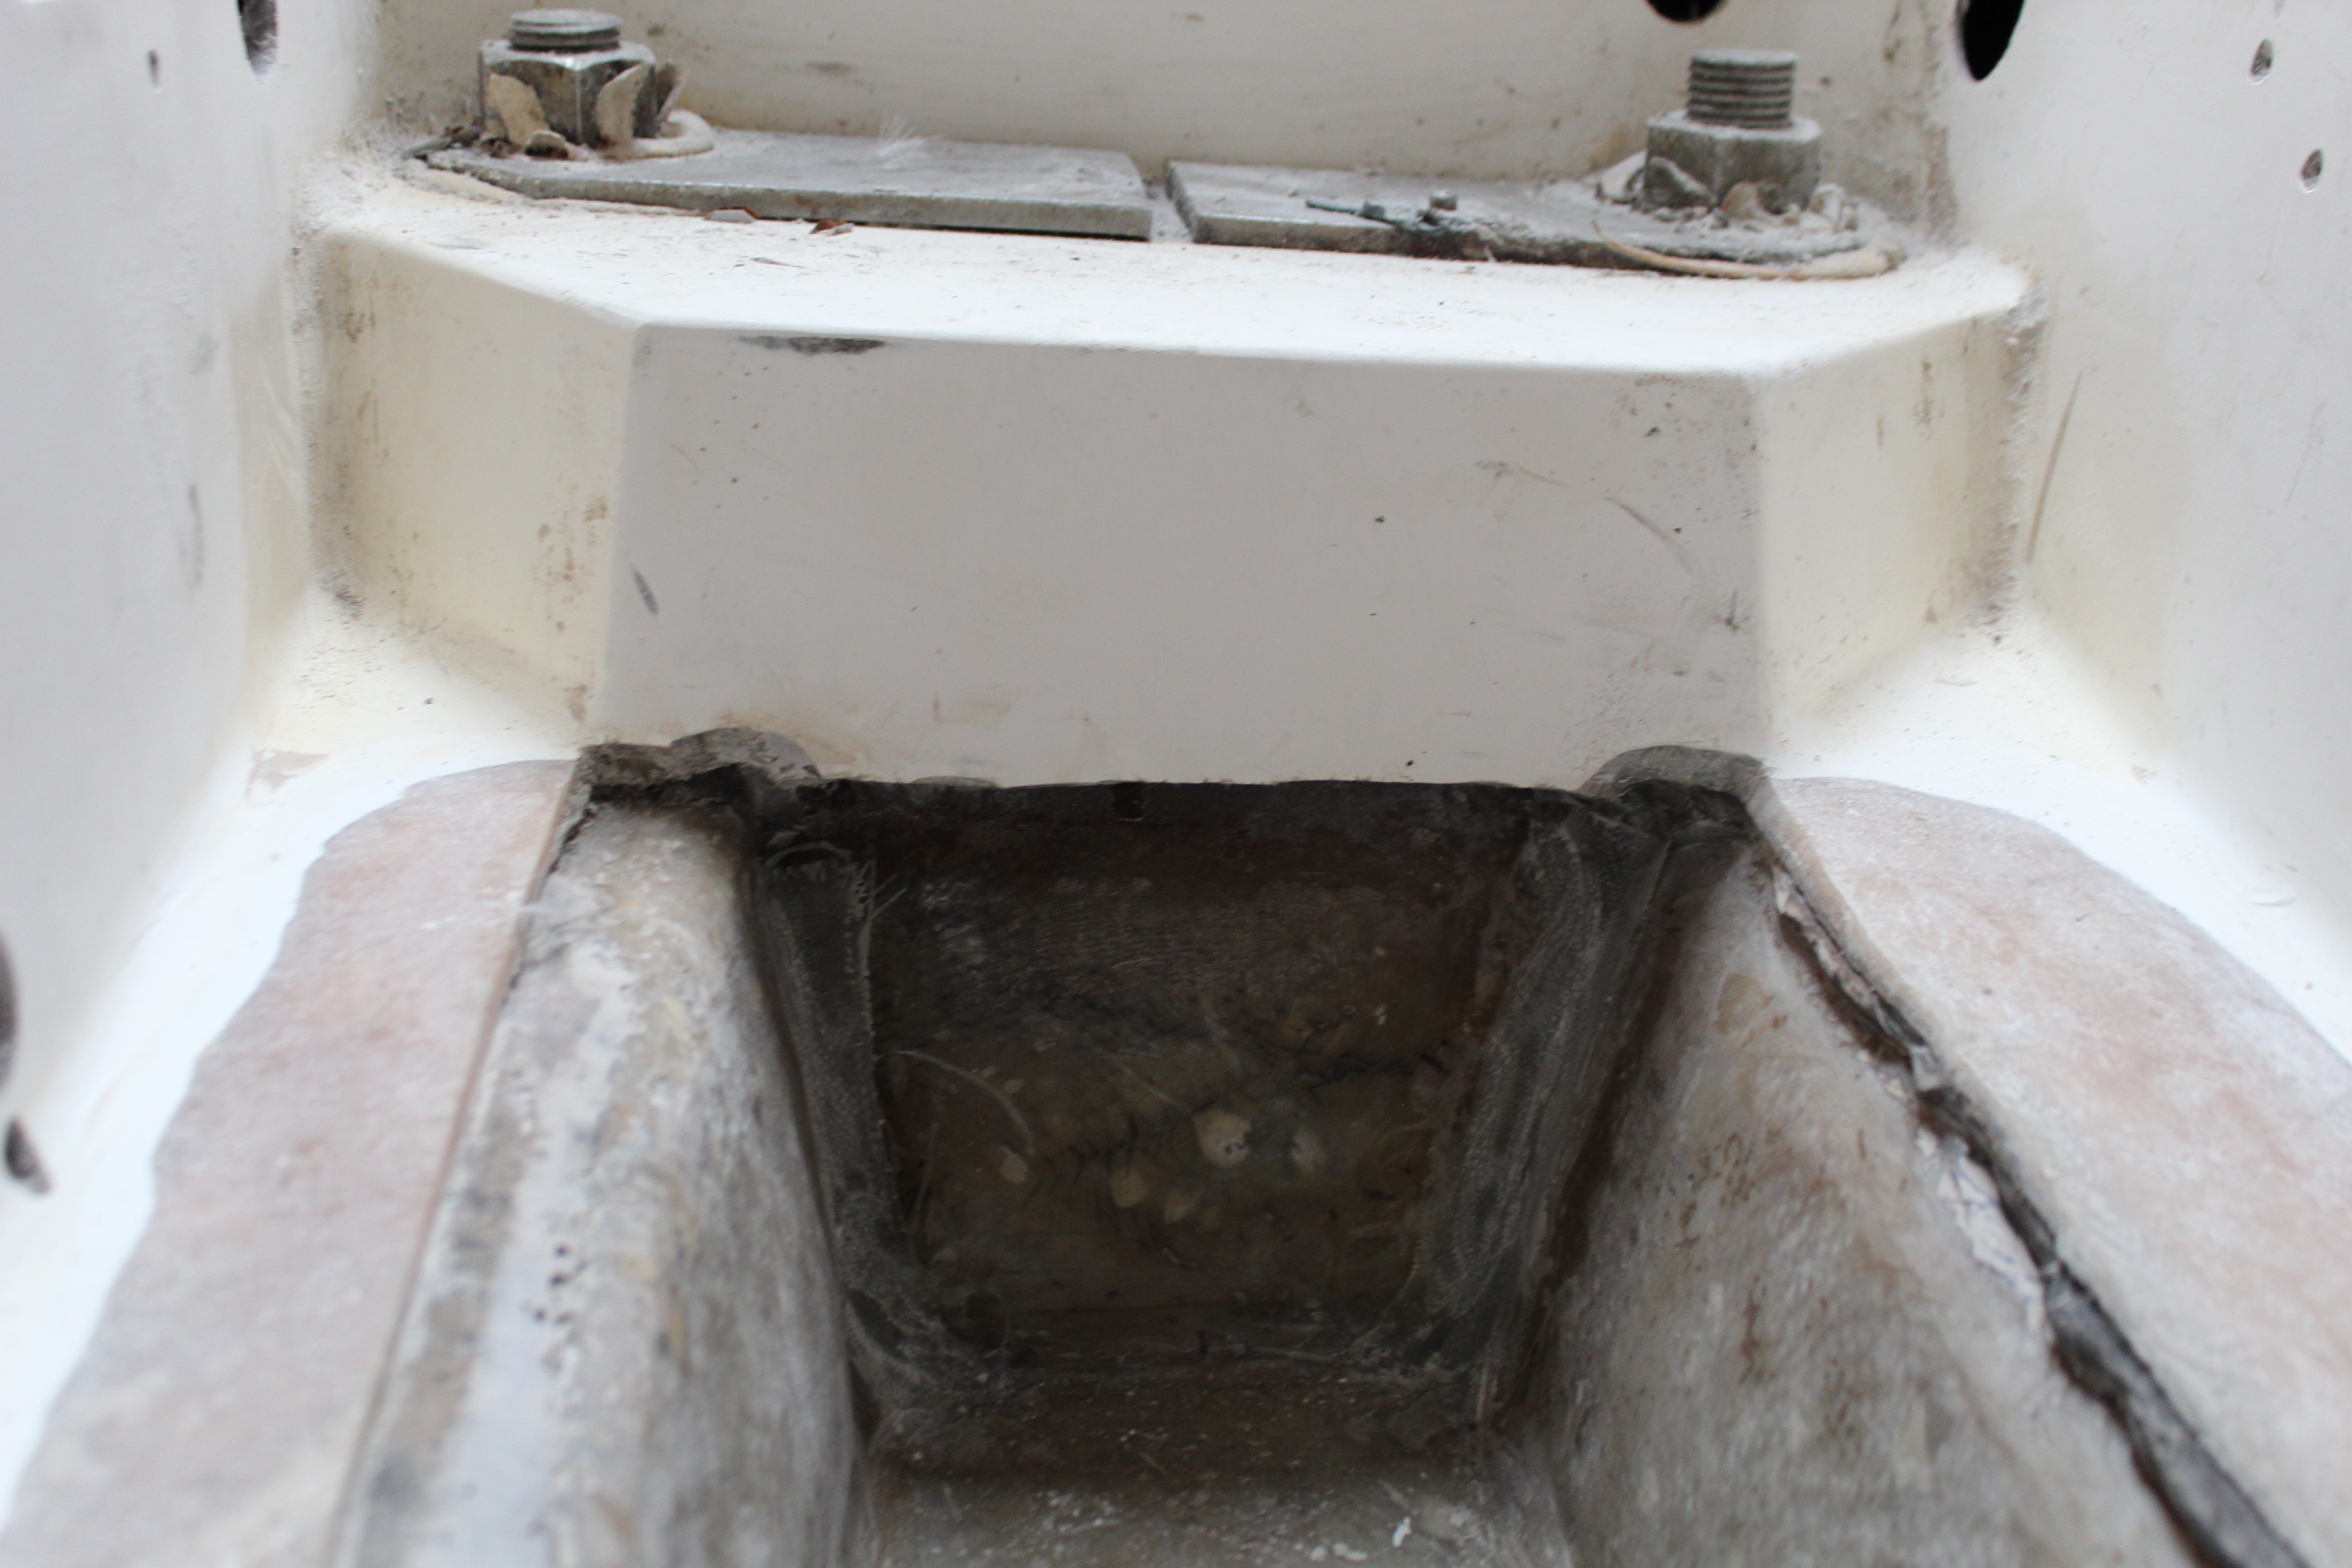
A close-up:

So it was time to investigate what might have happened here. First was to find out what the factory construction was supposed to be:
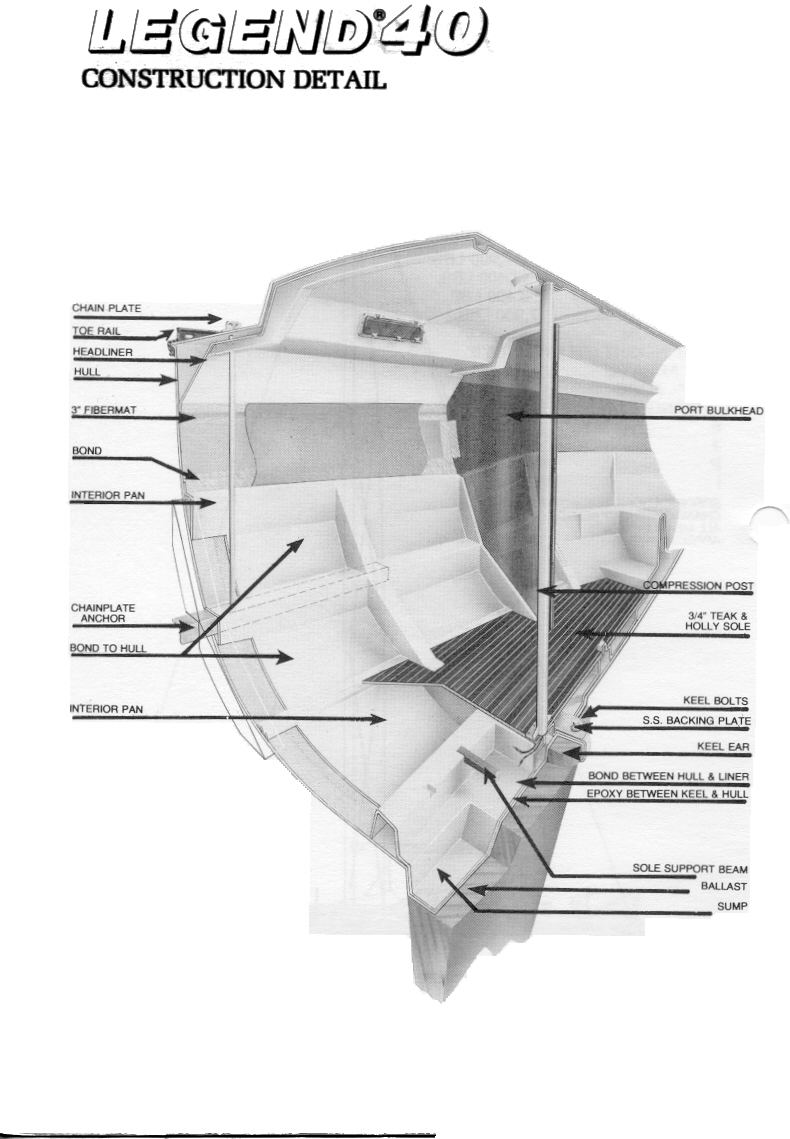
As you can see, the inner liner bilge "canoe" is a full liner and is supposed to fit inside the outer hull "canoe". As near as I can figure, that didn't happen with my boat:

#1: upper extent of the added glass, poorly prepped and delaminated
#2: farther down where areas did adhere, though not very well
#3: this is the edge of the inner liner "canoe". Looks to have been cut and based on the way the rest of the bilge looks, it goes along both sides
#4: this is a void about 1/4" to 3/8" deep to the outer hull
#5: some of the goo seeping up from underneath
Here is what I think happened: I think this came from the factory this way. I suspect that during the liner install they found that the liner and hull didn't match properly, the liner canoe being too deep. The answer? Cut the bottom out of the liner, drop it in and add some glass to fill in the bilge. And do the job poorly to boot.
Keep in mind, this is all going on in inside the boat - the outer hull isn't compromised and no evidence of this can be found at the keel/hull joint. So next up is to cut out all the bad stuff, clean out all the goo and do a proper "repair". Stay tuned!
Cheers,
Mark
Hi gents. So, today started with adding another coat of epoxy primer to the hull and the boat is ready to be moved. Then lunch and a long nap! Shoulders still mighty sore from the last few days!
This afternoon I did some digging (literally!) into the bilge. The eagle-eyed among you might have noticed a black spot (square) in the picture I posted yesterday. After some cleaning and looking at the glass that was added to the bilge I noticed a bulge along the bottom. Curious, I decided after cutting away some of the glass along the upper edge that I needed to investigate the nature of this bulge so I cut into it. Out came some really foul-smelling water! I left it this way to get to other things and came back to it today:
After cleaning up the water and sticking the vacuum to it some black gooey diesel-oil smelly stuff came out. Well, can't have that! A little more cutting to open up the area and this is what I found:
A close-up:
So it was time to investigate what might have happened here. First was to find out what the factory construction was supposed to be:
As you can see, the inner liner bilge "canoe" is a full liner and is supposed to fit inside the outer hull "canoe". As near as I can figure, that didn't happen with my boat:
#1: upper extent of the added glass, poorly prepped and delaminated
#2: farther down where areas did adhere, though not very well
#3: this is the edge of the inner liner "canoe". Looks to have been cut and based on the way the rest of the bilge looks, it goes along both sides
#4: this is a void about 1/4" to 3/8" deep to the outer hull
#5: some of the goo seeping up from underneath
Here is what I think happened: I think this came from the factory this way. I suspect that during the liner install they found that the liner and hull didn't match properly, the liner canoe being too deep. The answer? Cut the bottom out of the liner, drop it in and add some glass to fill in the bilge. And do the job poorly to boot
.Keep in mind, this is all going on in inside the boat - the outer hull isn't compromised and no evidence of this can be found at the keel/hull joint. So next up is to cut out all the bad stuff, clean out all the goo and do a proper "repair". Stay tuned!
Cheers,
Mark
that's an extra job you didn't need right now. and you don't want to slap the repair together b/c someone down the road will presume the boat hit something submerged if it looks like a half-ass repair. kind of like 2 steps forward and 1 back right now. but you are persevering very well, indeed! I'm learning a lot from your posts.
Yep, probably like this:It really is hard to find good help! I can picture the discussion as the boat is being built!
Worker: Hey boss, it don't fit!
Supervisor: Try a bigger hammer.
Engineer: Oops!
Boss: Bangs head against his desk (again). Says "Fix it, NOW!"
Engineer: Hey, it's lunch time!
Supervisor: Here's the BFH
Worker: (checks union contract) Not my problem
I'm just glad I have the time now to fix it right! Half-ass is not in my toolboxthat's an extra job you didn't need right now. and you don't want to slap the repair together b/c someone down the road will presume the boat hit something submerged if it looks like a half-ass repair. kind of like 2 steps forward and 1 back right now. but you are persevering very well, indeed! I'm learning a lot from your posts.
Ten pounds of crap removed!:
Got the boat moved to another spot today - we were joking that the stands might be stuck permanently in the asphalt after so much time. It's a better spot anyway, closer to electric and water and farther from the office!
Not kidding about the ten pounds of crap! Today I dug a little deeper into the bilge and decided that I needed to cut the the inner liner a little farther up to get better access and more surface area of the outer hull skin for the new glass layup. Good thing I did cuz it exposed more goo. The good news was that as I dug more and more crud out of the void it changed from tramp freighter diesel goo to more normal sand and dirt:

There's a bigger gap on the port side:

Starboard side looking better:

I got the aft 3/4ths cut open, tomorrow I'll get the rest, then start some serious deep cleaning! On that subject, anyone got any ideas on some good stuff to remove years of tramp freighter bilge goo buildup?
Cheers,
Mark
Got the boat moved to another spot today - we were joking that the stands might be stuck permanently in the asphalt after so much time. It's a better spot anyway, closer to electric and water and farther from the office!
Not kidding about the ten pounds of crap! Today I dug a little deeper into the bilge and decided that I needed to cut the the inner liner a little farther up to get better access and more surface area of the outer hull skin for the new glass layup. Good thing I did cuz it exposed more goo. The good news was that as I dug more and more crud out of the void it changed from tramp freighter diesel goo to more normal sand and dirt:
There's a bigger gap on the port side:
Starboard side looking better:
I got the aft 3/4ths cut open, tomorrow I'll get the rest, then start some serious deep cleaning! On that subject, anyone got any ideas on some good stuff to remove years of tramp freighter bilge goo buildup?
Cheers,
Mark
Mark
If you get time have a look at the false bilge posts for the hunter 31 and 34. We have had the same problem. Some good info in there on clean up and repairs. You are doing one hell of a job.
If you get time have a look at the false bilge posts for the hunter 31 and 34. We have had the same problem. Some good info in there on clean up and repairs. You are doing one hell of a job.
No mushrooms, but I don't cringe and hold my nose when cleaning the litter boxes anymore!keep looking.....you could have some really good mushrooms in there!
This was enlightening! After reading through your troubles I rethought what might have happened to mine. It's possible what I've encountered was someone's attempt to fix the false bilge. I have a plan, read on!Mark
If you get time have a look at the false bilge posts for the hunter 31 and 34. We have had the same problem. Some good info in there on clean up and repairs. You are doing one hell of a job.
Mark
Bilge de-struction complete:
No matter what I did I kept getting more and more gunk from the bilge voids. I tried cutting up a little more on the sides and it just kept coming. Sooo, after reading about Don's issues on his 34 I decided to go for broke and do the repair right. I have completely removed the inner liner (in the bilge) all the way to the glue line between the liner and hull. Oh boy! There was gunk packed all the way up to the glue joint! I never would have been able to get it all:
Today was cleanup day. Two heavy bags of goo, two cans of Gunk degreaser, several flushes and scrubbing with Purple Power and the bilge is clean!
The remainder of the previous glass repair attempt was so poorly adhered that it didn't take much to pry it all up, in either big chunks or big sheets. Once all that was gone I cleaned up the liner around the glue joint and it's ready for prep for a permanent and proper repair. I'll start that tomorrow. I do need to order some more 1708 - not enough left in my stash for this!
Cheers,
Mark
No matter what I did I kept getting more and more gunk from the bilge voids. I tried cutting up a little more on the sides and it just kept coming. Sooo, after reading about Don's issues on his 34 I decided to go for broke and do the repair right. I have completely removed the inner liner (in the bilge
) all the way to the glue line between the liner and hull. Oh boy! There was gunk packed all the way up to the glue joint! I never would have been able to get it all:
Today was cleanup day. Two heavy bags of goo, two cans of Gunk degreaser, several flushes and scrubbing with Purple Power and the bilge is clean!
The remainder of the previous glass repair attempt was so poorly adhered that it didn't take much to pry it all up, in either big chunks or big sheets. Once all that was gone I cleaned up the liner around the glue joint and it's ready for prep for a permanent and proper repair. I'll start that tomorrow. I do need to order some more 1708 - not enough left in my stash for this!
Cheers,
Mark
Mark,
After reading your post and seeing your photos it looks exactly like the false bulge and the poor quality control issues Hunter had when they bonded the liner to the hull.
I never new that the h40 was done the same way.
Lots of h34 & h31 owners have done mods to correct this issue.
Awesome job you are doing on you restoration.
Wish you worked for Hunter back on the 80s era and I'm sure the a lot of the stupid things done on these boats back then would have been eliminated.
What you have done so far is absolutly amazing.
I am curious how you plan to proceed? I am guessing that you will glass the bottom and sides of the bilge and connect to the liner. Will you be adding pipes or limber holes to connect the area between the floor pan and the hull?
I didn't know about the bilge construction either but it's on the way to being better! I'm not sure I would call this quality control as much as real world limitations of the molding process back then. Sure, they could have tested the masters for a better fit but we are talking cost issues vs. remaking an entire mold. Back then the ideas about boat usage were a bit different than now and I bet that back in the day Hunter never thought these boats would even still be around.Mark,
After reading your post and seeing your photos it looks exactly like the false bulge and the poor quality control issues Hunter had when they bonded the liner to the hull.
I never new that the h40 was done the same way.
Lots of h34 & h31 owners have done mods to correct this issue.
Awesome job you are doing on you restoration.
Wish you worked for Hunter back on the 80s era and I'm sure the a lot of the stupid things done on these boats back then would have been eliminated.
What you have done so far is absolutly amazing.
Thanks for the encouragement! I doubt working for Hunter back in the day would have made much of a difference though - square peg/round hole
.The plan is to glass directly to the hull section of the bilge and bring the glass over the sides to tie into the flat portion of the liner. Basically eliminating any voids up to the glue joint so there will be no need for limber holes except at the aft end - the gap there will have to stay. I'll post pics of that area tomorrow to show why and there will have to be limber holes or a drain port of some kind there. Since the glue joint around the bilge and liner is intact I shouldn't lose any hull integrity. That area of the hull is the strongest part of the boat anyway so probably not adding any measurable strength but that's not what I'm shooting for.I am curious how you plan to proceed? I am guessing that you will glass the bottom and sides of the bilge and connect to the liner. Will you be adding pipes or limber holes to connect the area between the floor pan and the hull?
Got the bilge ground back to good glass and the first layers on in the corners (no pics yet). The first few applications of glass will be fixing the radii of the corners so the final layup will go smoother.
Cheers,
Mark
My only concern with that plan would be condensation on the hull or liner that has nowhere to go. My thinking is that if there is a void, it should have some way to let water get to a lower point (even if you think it is sealed) I am sure that Hunter thought that there system would "prevent" any water getting to the area below the false bilge and we know how that turned out.The plan is to glass directly to the hull section of the bilge and bring the glass over the sides to tie into the flat portion of the liner. Basically eliminating any voids up to the glue joint so there will be no need for limber holes except at the aft end - the gap there will have to stay. I'll post pics of that area tomorrow to show why and there will have to be limber holes or a drain port of some kind there. Since the glue joint around the bilge and liner is intact I shouldn't lose any hull integrity. That area of the hull is the strongest part of the boat anyway so probably not adding any measurable strength but that's not what I'm shooting for.
Got the bilge ground back to good glass and the first layers on in the corners (no pics yet). The first few applications of glass will be fixing the radii of the corners so the final layup will go smoother.
Cheers,
Mark

Well, if there is any condensation it has nowhere else to go! Like you said, if there is an air gap it will just build up moisture again and eventually get packed with goo.My only concern with that plan would be condensation on the hull or liner that has nowhere to go. My thinking is that if there is a void, it should have some way to let water get to a lower point (even if you think it is sealed) I am sure that Hunter thought that there system would "prevent" any water getting to the area below the false bilge and we know how that turned out.
Update and side-job:
Just an update to the work so far:
Here's the aft portion of the bilge. The gap between the liner and hull is too great to fill in so I'm going to only fill it up a few inches and add a deck fill to the new back end. That will seal it off but allow a decent access area to flush it once in a while. I'll add servicing this opening every few months to the boat service schedule (when there is one that is).
Next up is filling the forward corners and starting to even out the front slope:
The area forward of the bilge front end but aft of the keel bolt will be tapered for better drainage.
That was yesterday. Today we got a little cold front and it's too cold for glassing, so time to do some Corvette maintenance. Back in post #466 I described a rattling/banging sound in the rear of the Corvette. Now that I have more time for little projects I can devote some time to finding and finally fixing this. Found it! The rear swaybar link was junk but the only way to find out it was bad was to jack it up and exercise the suspension (with the wheels off). It showed up when the suspension was at normal ride height but not at full extension. While I was there I checked the rest of the suspension and felt a little play in the rear wheel bearings. Not a problem, these things are a maintenance item that should be replaced about every 75,000 miles or so. Well the left side "might" have gone a little too long:
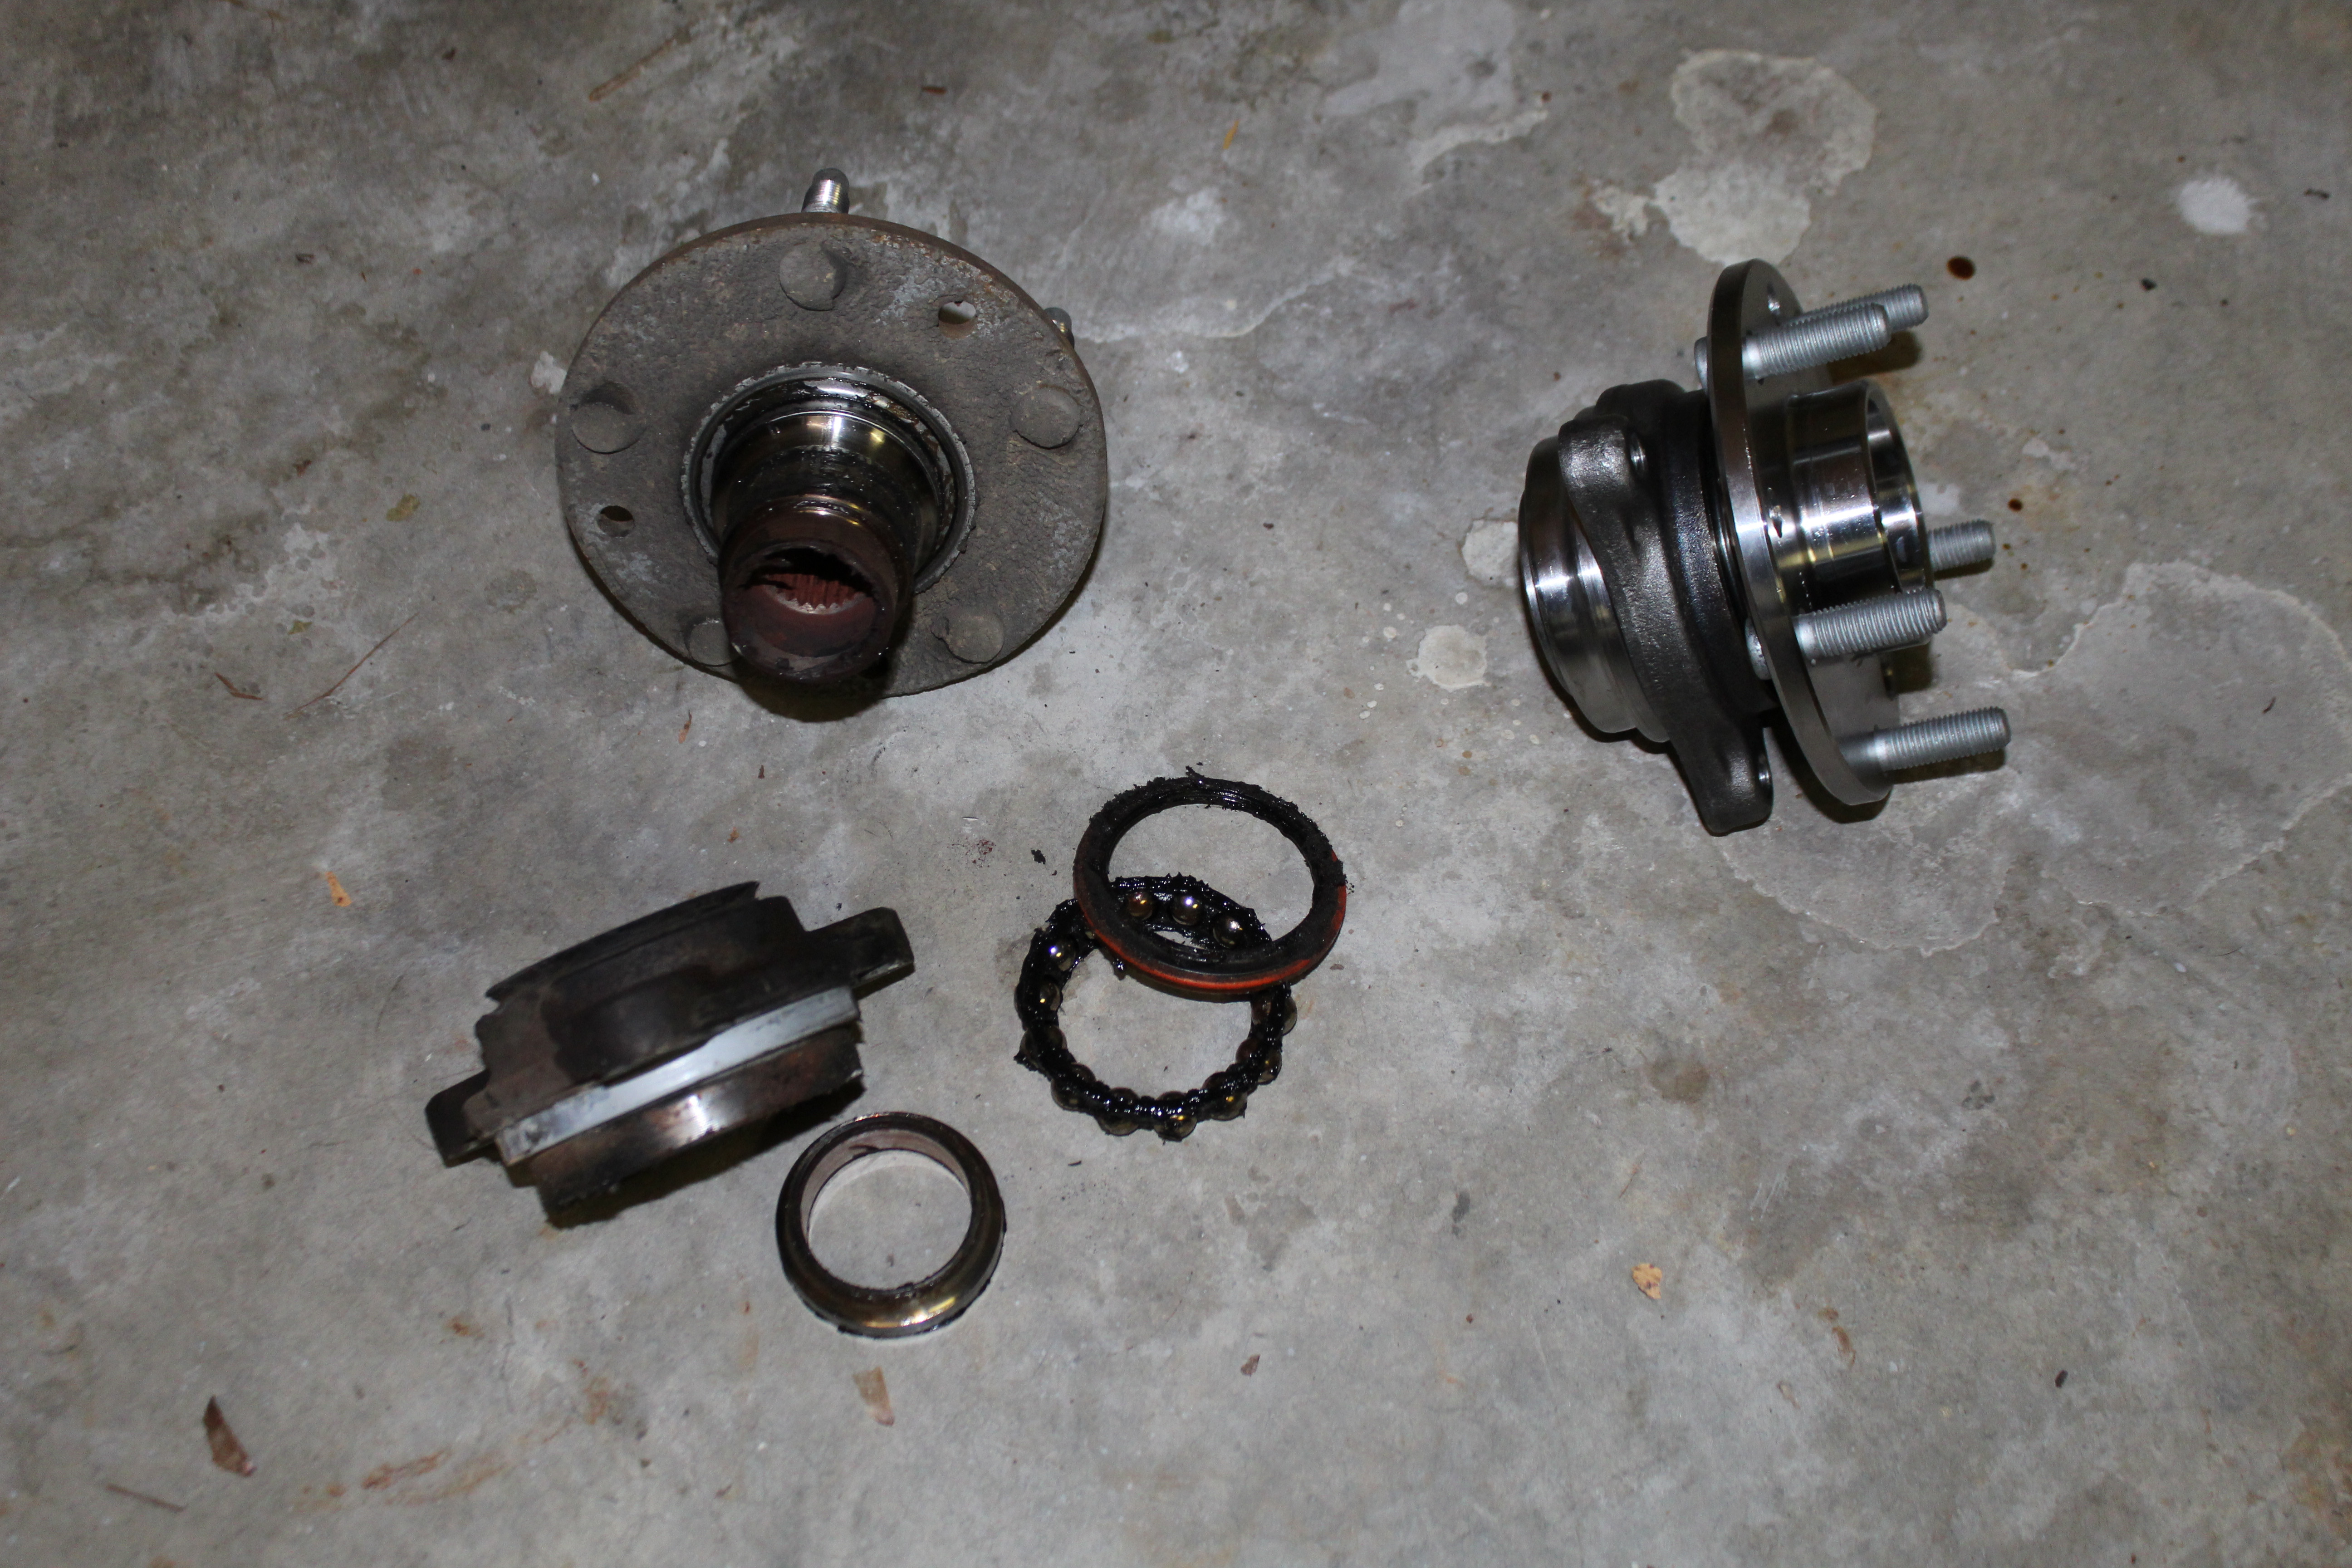
That's the old one on the left. It's not supposed to be in pieces! Dodged a bullet there. A little more to go tomorrow and she's back on the road - just in time for rain this weekend.
More boat stuff soon.
Cheers,
Mark
Just an update to the work so far:
Here's the aft portion of the bilge. The gap between the liner and hull is too great to fill in so I'm going to only fill it up a few inches and add a deck fill to the new back end. That will seal it off but allow a decent access area to flush it once in a while. I'll add servicing this opening every few months to the boat service schedule (when there is one that is).
Next up is filling the forward corners and starting to even out the front slope:
The area forward of the bilge front end but aft of the keel bolt will be tapered for better drainage.
That was yesterday. Today we got a little cold front and it's too cold for glassing, so time to do some Corvette maintenance. Back in post #466 I described a rattling/banging sound in the rear of the Corvette. Now that I have more time for little projects I can devote some time to finding and finally fixing this. Found it! The rear swaybar link was junk but the only way to find out it was bad was to jack it up and exercise the suspension (with the wheels off). It showed up when the suspension was at normal ride height but not at full extension. While I was there I checked the rest of the suspension and felt a little play in the rear wheel bearings. Not a problem, these things are a maintenance item that should be replaced about every 75,000 miles or so. Well the left side "might" have gone a little too long:
That's the old one on the left. It's not supposed to be in pieces! Dodged a bullet there
. A little more to go tomorrow and she's back on the road - just in time for rain this weekend.More boat stuff soon.
Cheers,
Mark