Help!! Did I make a huge mistake?

May 15, 2016
76
Catalina 22 Toronto
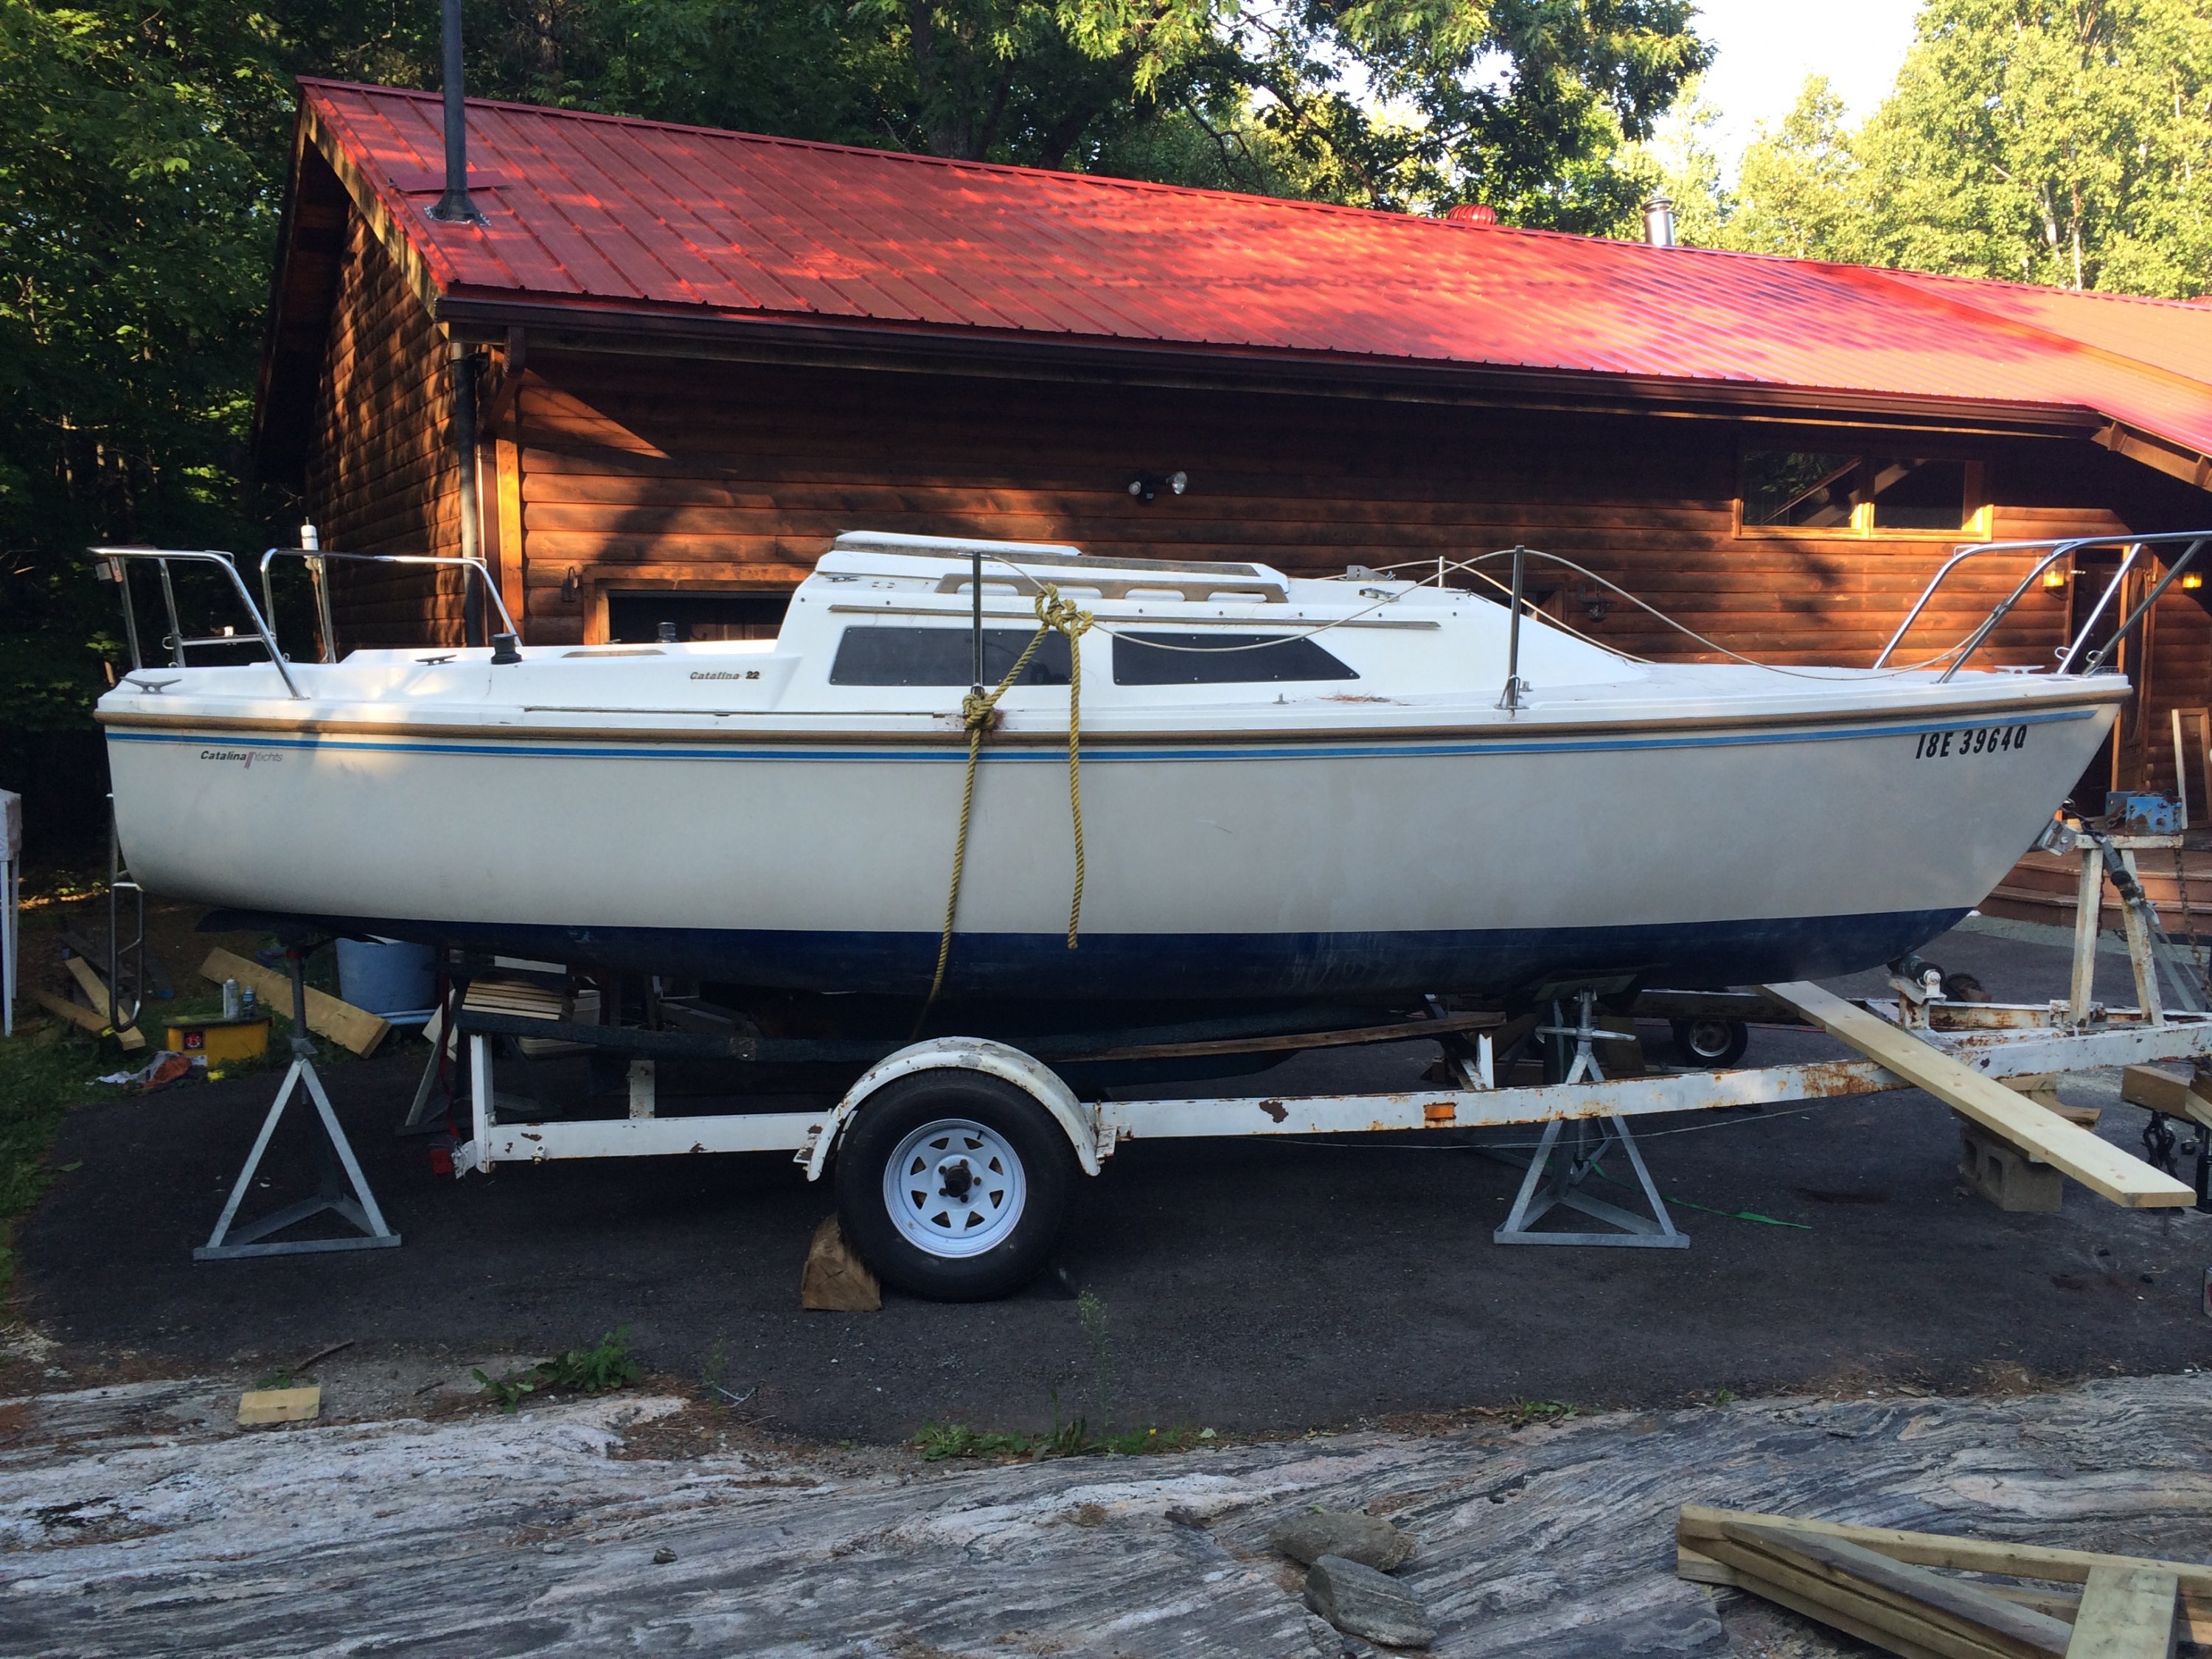
Well, it's been a long day but the boat is up and on stands.

Had to return the stands I bought as they were too big. Got the next size down and it was a lot more manageable.

Started by lowering the trailer nose as far down as it would go then placed the rear stands (and tied them together) and jacked up the front. Had to reposition the stands because it was causing some oil canning. So started all over with the stands in a different spot and it was all good until we got to certain point and noticed the rear stands were starting to tilt back from jacking up the front. Put blocks between the bunks and the boat and repositioned the rear stands again. Jacked up the front a bunch more and placed the stands in and tied them together. From there I just cranked the turnbuckles on the stands until I got to where it is. I'll probably go a bit higher in the front if I want to get the trailer out.
image.jpeg
image.jpeg
image.jpeg


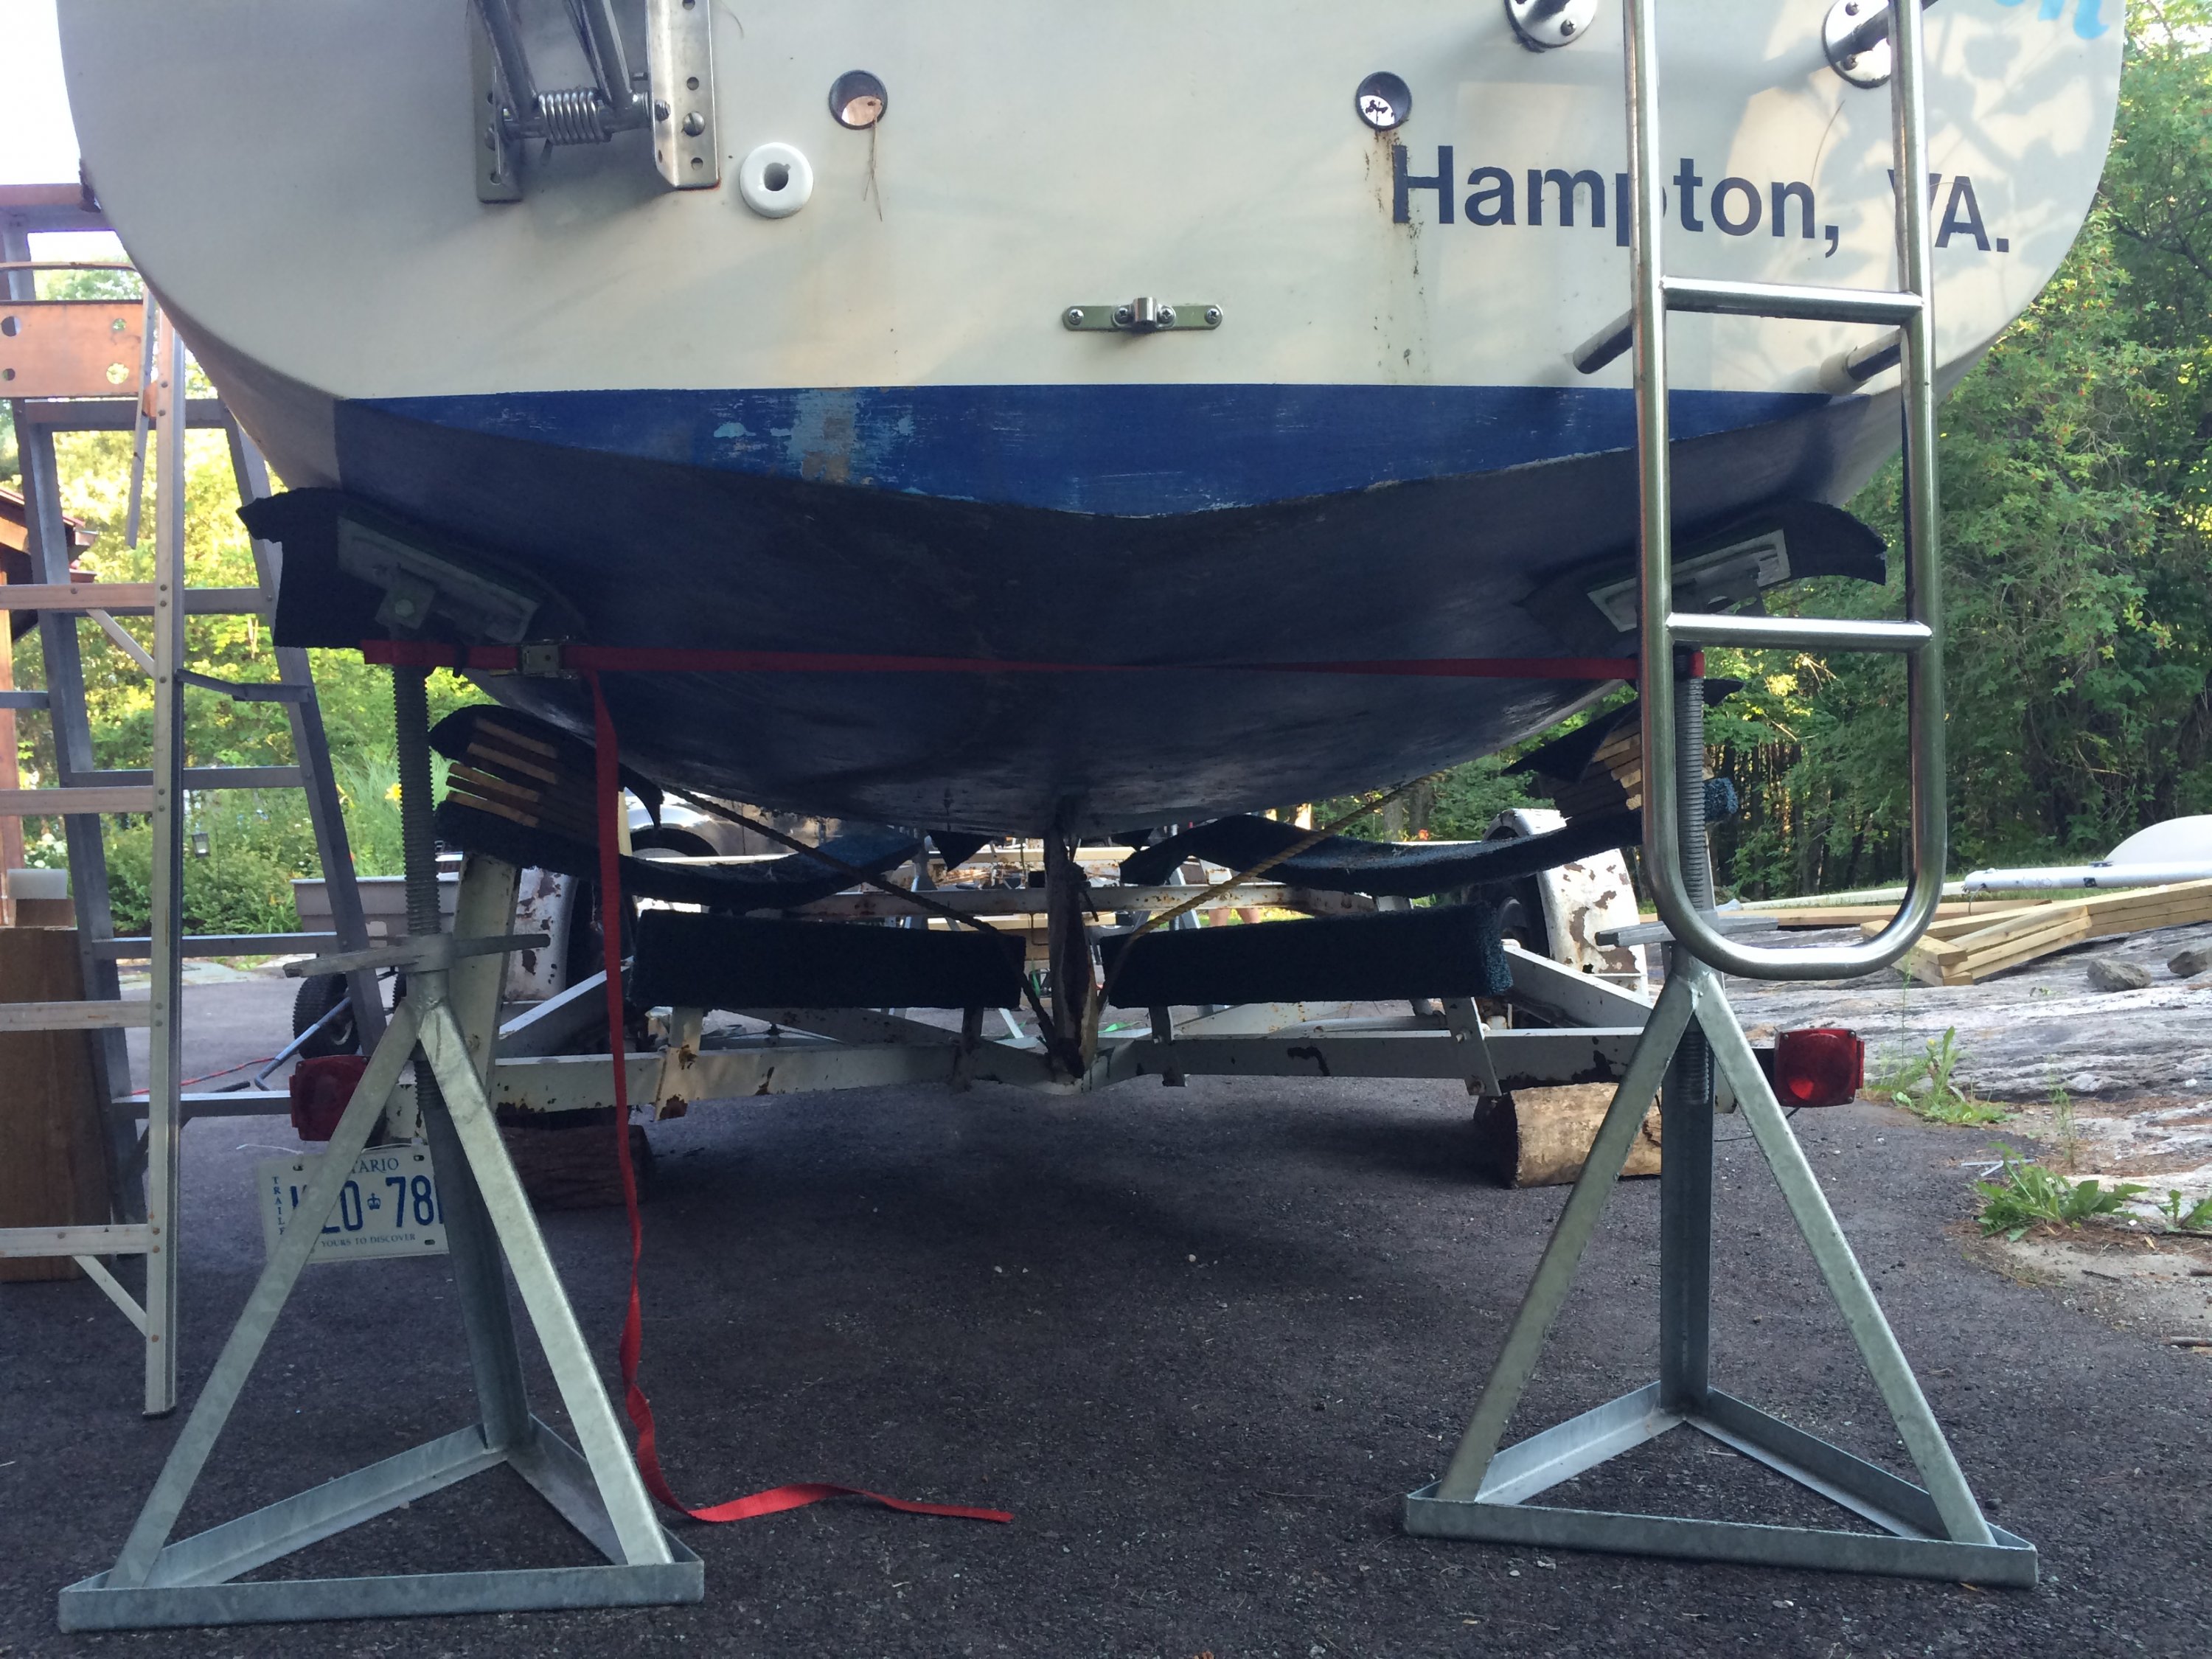
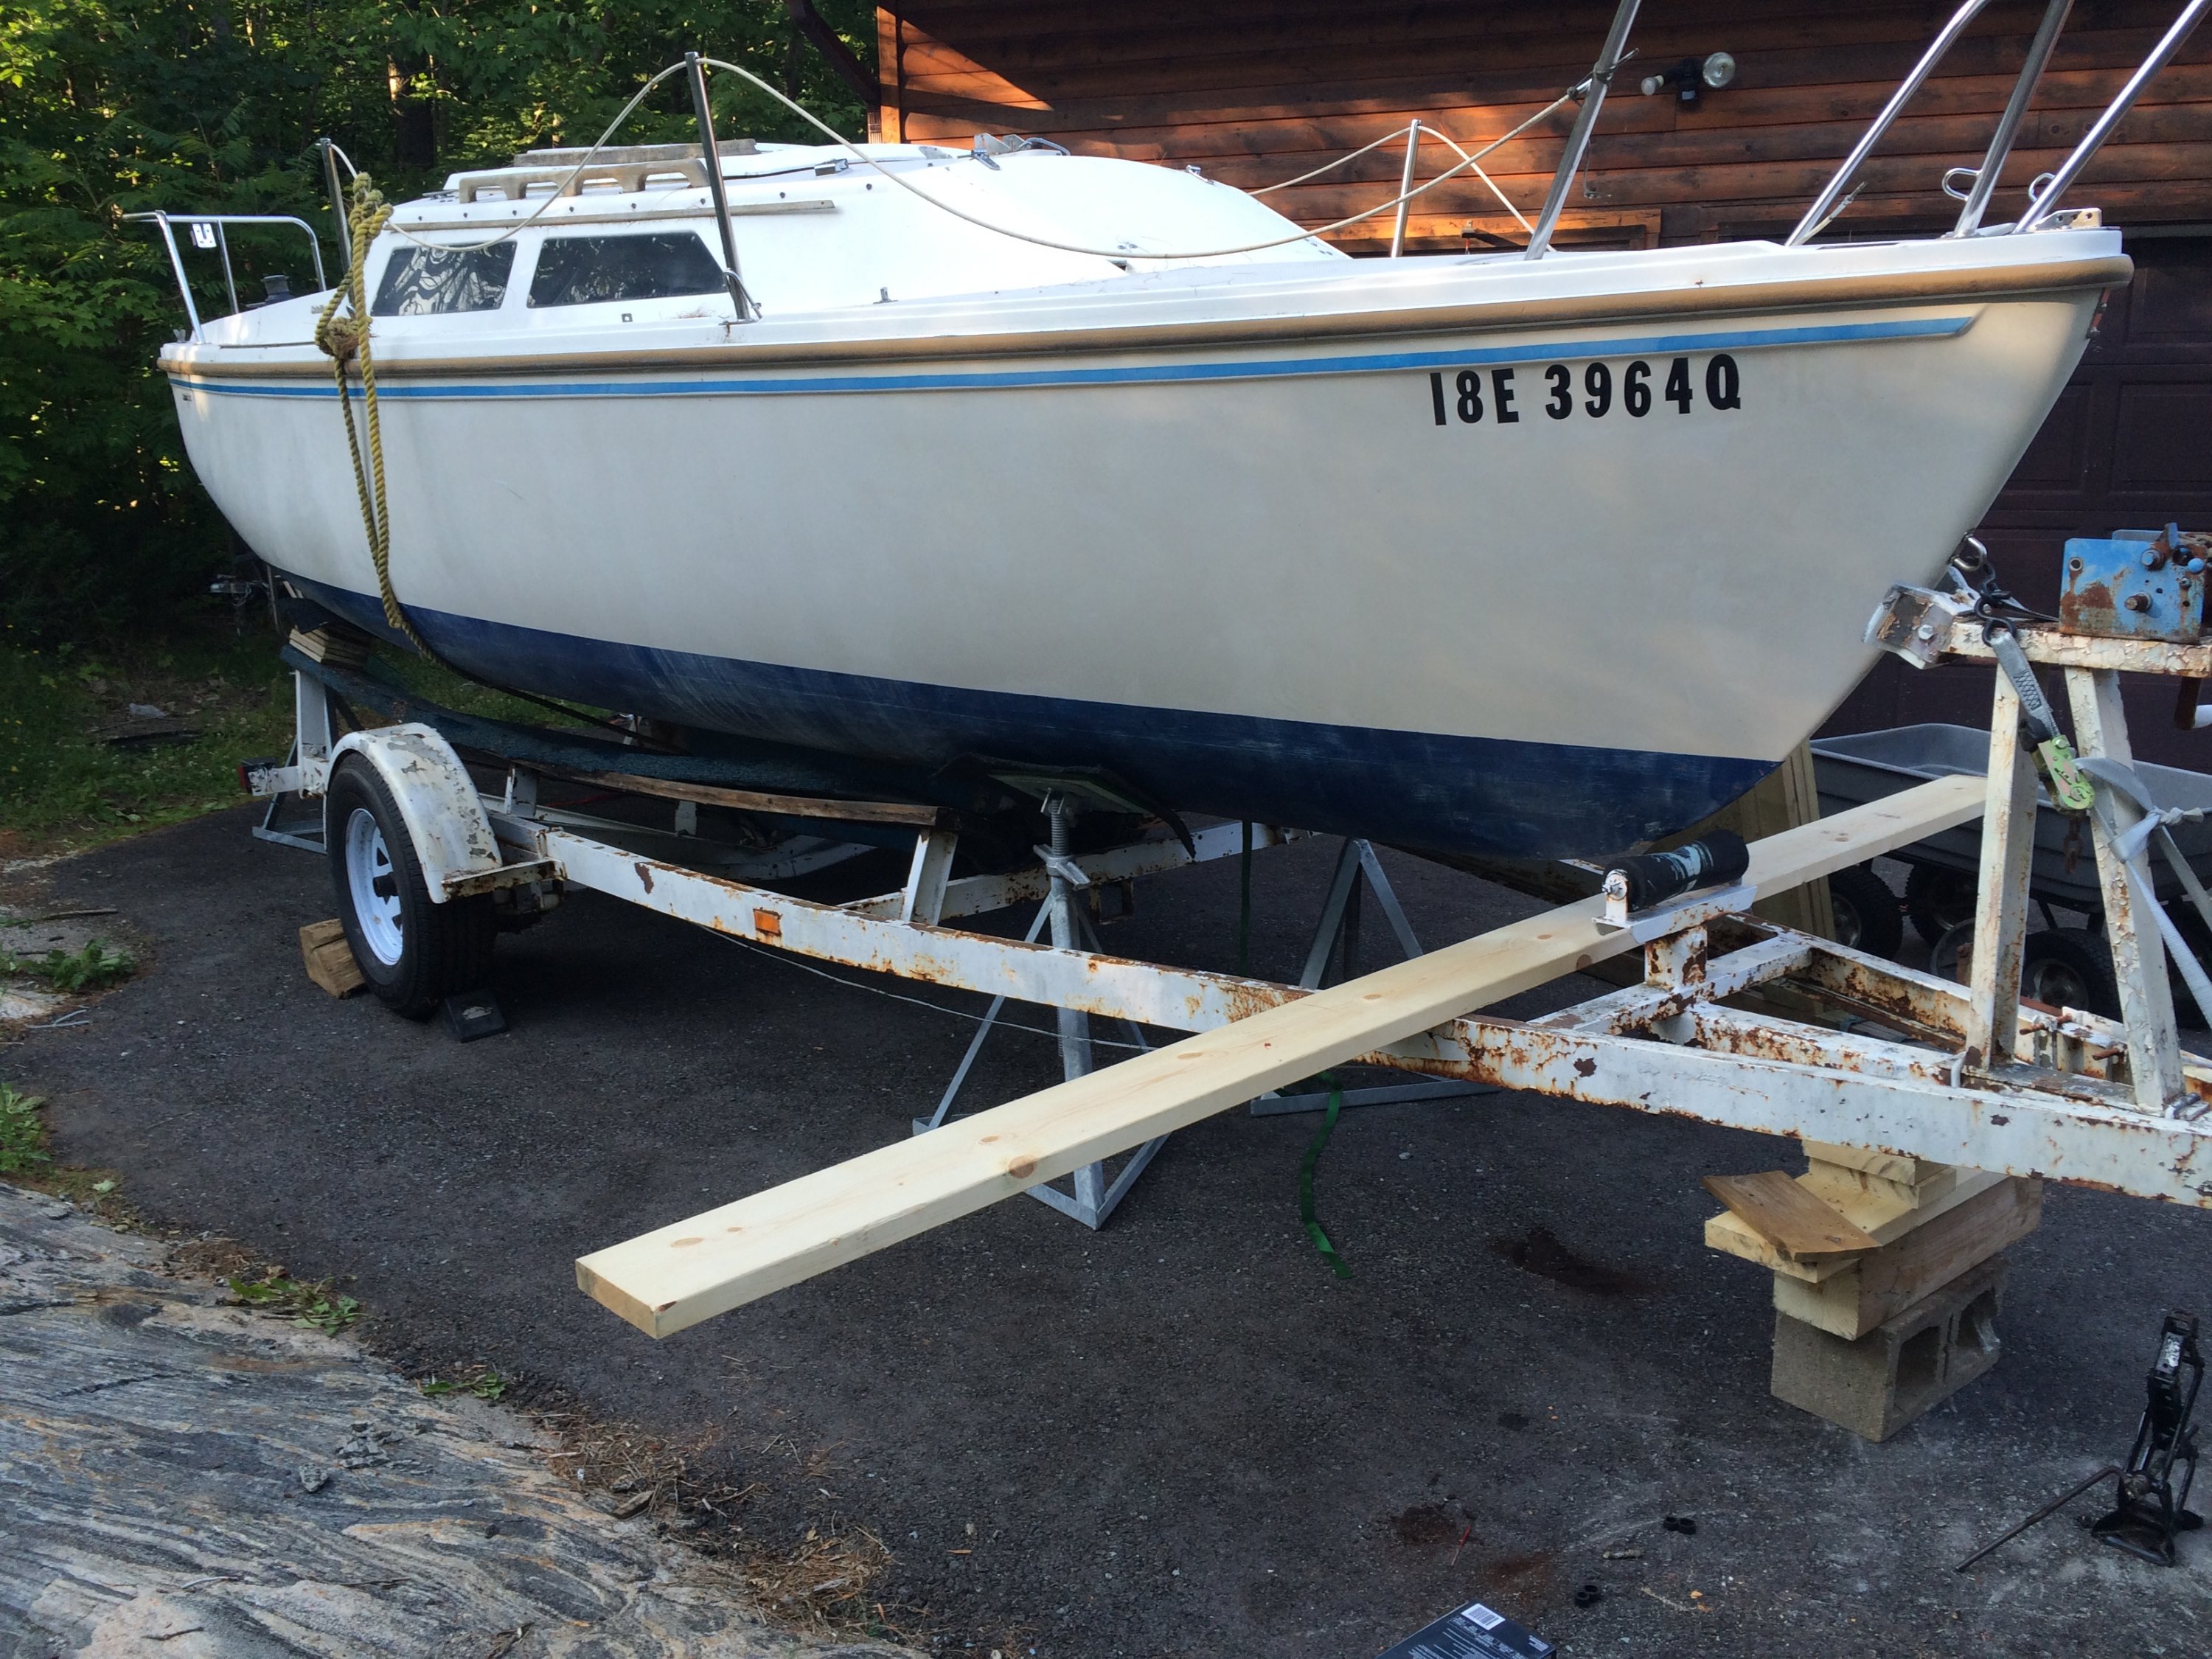
The 2x8 under the boat was what I planned to use to support the boat while I remove the front stands and roll the trailer out. I can't use it though, I would have to get the boat really high for the fenders to pass under. I might use 2 - 2x4s screwed together so it will fit easier. I might also remove the keel first to make the boat lighter.

The keel is very wobbly so I'm a little concerned what it's going to look like.
 
May 15, 2016
76
Catalina 22 Toronto
Another way I could get the trailer out is to lift the boat with my shop crane remove the front stands and trailer and replace the front stands.

The eyebolt is 3/8", I measured. I'm sure it's what came with the boat though.

I'm still nervous to lift from there but I guess it should be strong enough.
 
Jul 13, 2015
901
Catalina 22 #2552 2252 Kennewick, WA
One consideration given the number of stands you have:

with the boat firmly positioned forward against the stop and bow roller - you drop the trailer tongue (usually with the tongue jack -- but if you don't have one , whatever jack mechanism you have will work) as low as it can go (dirt). The stern will now be quite high and you can grab your rear stands just aft of the bunks, right at the edge of the transom (exceptionally strong in this location). Now back to the tongue-- jack it up level to the stern and place your cross beam.

Granted-- you can't pull the trailer out in one pass this way-- but you can now lower the trailer tongue, and pull the trailer forward until the bunks touch the back of your stands and the cross member. Now re-support the boat just forward of the Keel (very strong location again) you should be clear of the axle and trailer cross member-- pull your stand and the cross beam, Trailer will pull forward the rest of the way. Once out of the way re-support the bow again and you should have a very stable platform supporting the stern, forward of the keel and the bow.

Having the trailer gone will make your keel assessment much much easier and will be worth the effort.
 
May 15, 2016
76
Catalina 22 Toronto
Pclarksurf - I originally tried to put the stands just behind the bunks with the pads basically inline with the bunks. When I started jacking up the front of the trailer, I didn't like how it was slightly oil canning the boat so I moved them further out to the sides and back towards the transom figuring it would be strongest there. In the pic you can see the blocks I had placed to lower the boat enough to move the stands. Then I jacked the tongue up enough to get the front stands in and secure. I don't think I could have gone much higher like that and turning the jack turnbuckles seems safer and easier to me.

Maybe I didn't have the pads far enough to the outside of the boat?

If possible I'd rather not move them again but if it will make a big difference in safety or stability I will move them. There is still room to make the rear stands higher if I need to.

My plan was to rotate the adjusters on the front stands until the are high enough to fit the 2x4 cross beam and have it clear the fenders. The cross beam will be wide enough the wheels will pass inside the stand. The beam will be 2, 2x4's lag bolted to the frame staggered at the right angle to make a flat surface (because the stand is angled) Then I will screw in a 1x6 across the beam for a pad. Set it down on the beam, remove the front stands roll out the trailer and set up the front stands again. Hopefully I'll leave the beam in place for added safety. Once the trailer is out of the way I can put the front stands anywhere.

Let me know if you really think I should move the rear stands before going any further. This is my first time putting a boat on stands and its a little stressful
 
Jul 13, 2015
901
Catalina 22 #2552 2252 Kennewick, WA
I certainly don't think you have to -- your eye is the best judge. If you're stable and the hull isn't showing major deflection then you're good.
 
May 15, 2016
76
Catalina 22 Toronto
Got the trailer out. Everything went very smoothly. Did some extra reinforcements of the temporary stand and it was solid as a rock.

Had to remove the fenders for clearance but they need to be replaced anyways.
image.jpeg
image.jpeg
image.jpeg
image.jpeg


Thanks for all the help and advice. I couldn't have done it without it :)
 
May 15, 2016
76
Catalina 22 Toronto
Thanks

Got the cradle made and the keel off yesterday. It was actually a pretty easy job once all the set up is done.
image.jpeg
image.jpeg


Was a nice surprise to see the eyebolt was there and in good shape :) this was still attached:
image.jpeg


Also nice to see that my keel is fairly symmetrical not flat on one side like some of them.

The keel will probably need the bushing insert but should be fine once that's done.
image.jpeg
image.jpeg


Now to order parts and find a machine shop capable of doing the bushing.
 
Sep 8, 2014
2,551
Catalina 22 Swing Keel San Diego
Nice work... Your keel looks to be in pretty good shape. You won't need much filler or fairing compound on the shape. Good call on a machine shop to install the bushing, a 1.25" tapered ream and the tool to turn it is not easy to find.
 
  • Like
Likes: reefsider
Jul 13, 2015
901
Catalina 22 #2552 2252 Kennewick, WA
Beauty! Definitely good to get that lifting hardware rectified-- that poor thing has taken its share of abuse. Keel looks pretty good -- should fix up nicely.
 
  • Like
Likes: reefsider
May 15, 2016
76
Catalina 22 Toronto
Thanks guys

Yea the keel doesn't look to bad really. It's got a good shape for sure. The pivot hole definitely needs the bushing. The place that built the boat stands said they could sand blast and install the bushing.

So I'm ordering parts. I'm not sure if I should order the pivot casting kit or not. The ones that are there look pretty close to the keel on both sides. There are pics on page 2. Are the ones I have already upgraded? I have no idea what the originals looked like. The pivot pin looks almost new just some rust stains from the keel but hardly any wear.

The keel eyebolt looks fine but should I replace it anyways? It's like $20 same with the pivot pin?

Should I also buy the trunk spacer/centring kit?

Thanks
 
Jul 13, 2015
901
Catalina 22 #2552 2252 Kennewick, WA
A little hard to tell from your pics but I have to guess that you do not have the new replacement hangers. Whether you decide to replace or no is a matter of choice. I chose to replace everything keel hardware related while I have it off -- hopefully I don't have to come back anytime soon. spacers I would make yourself -- but if you don't have epoxy and fiberglass laying around purchasing is cheaper than laying in supplies just for spacers.

New eyebolt is more robust than the original-- definitely a good upgrade even if your current appears to be in good shape.

I would consider looking at the keel itself-- the outer remnants of its coating is compromised and rust has set in. Very typical and easy to rectify but definitely should address it now or in the very near term. Not sure I would do the bushing without addressing sealing the keel -- they go hand in hand in my mind.
 
May 15, 2016
76
Catalina 22 Toronto
I'm totally planning to refinish the keel. I am going to take it to the Place that built the stands. They said they would sand blast it to bare metal and install the bushing. They said I could wait for it and have it within 3 hrs of blasting.

I'm going to post a new thread about the choices of coatings and the order to apply them.
 
Sep 8, 2014
2,551
Catalina 22 Swing Keel San Diego
I'm totally planning to refinish the keel. I am going to take it to the Place that built the stands. They said they would sand blast it to bare metal and install the bushing. They said I could wait for it and have it within 3 hrs of blasting.

I'm going to post a new thread about the choices of coatings and the order to apply them.
Reef... You definitely already have the new style keel pivot hangers. The 86 and later 'new style' boats came with them. Just have the old ones lightly sand blasted along with keel to clean them off (make sure they do it LIGHTLY). It would be wise to order a new keel PIN and like Pat mentioned, a new Eyebolt too. If you need shims (and you only might need one or two) I can give you the part number to order a pack of Delrin Acetal Plastic washers w/ 1 inner diameter. They are pretty thin and slip on the keel pin nicely, I only needed one to get me keel nearly dead center (pics in my thread). They come in a pack of 10 from McMaster Carr for $13 or so.
As far as coatings for the keel, many of us have done keel refurbish jobs via sand-blasting and epoxy sealing... at least 4 have published on this forum. Its good that you will have the shop that will sand blast also install the bushing. They willy use a 1.25 inch tapered ream to open the hole, just make sure they cut the hole perpendicular to the keel. The tapered ream helps by using the existing path of the 1 inch hole to ensure the larger hole remains square to centerline. They won't screw it up unless there is no much material rusted away that the ream won't guide straight (which does not appear to be the case), or they use a different tool that they probably shouldn't. Just ensure they explain their process to you before they begin, show you the tools they plan to use, and make sure you drive home the point that the hole must remain square across the centerline.
 
Sep 8, 2014
2,551
Catalina 22 Swing Keel San Diego
As far as materials and order of coatings... Like I said check out the threads by others who have done this job. Your keel appears to be in great shape so you will probably use less filler than I did... Mine was pretty bad.
You need;
1 gallon of WEST System 105 Epoxy (you can use any quality brand of epoxy you like, but WEST is just easy to work with)
1 Quart of WEST System Hardener (The 205 FAST is usually fine, but 206 SLOW is ok too, up to you)
1 Mini Pump Set (this is what makes measuring and mixing so easy)
1 Can of 406 Colloidal Silica Filler (for strength when filling in holes or voids)
1 Can of 407 Fairing Filler (the red powder, don't use this until last. NOT as strong as the 406 Silica but easier to sand, only for smoothing out and sanding final shape)
Some disposable mixing quart size containers, the cheap ones from Home Depot
Grab a bunch of paint mixing sticks
You DON'T need the fancy epoxy rollers, but $8 for just one is OK for the first coat, up to you
A few of the disposable cheap chip brushes, 2 inch wide
Plastic drop sheet to protect the work area

This is all the 'Big Stuff' to get started, just so you have a shopping list
 
Sep 8, 2014
2,551
Catalina 22 Swing Keel San Diego
You can buy much of this stuff in the steps that you will need them, but you'll need the epoxy & hardener right away and at least 2 plastic buckets to mix, and the roller or two or three chip brushes.
The MOST important step is to get the first coat of epoxy on the keel as soon as you get it home from sand blasting. This is critical so that no moisture has a chance to start acting on the keel before you seal it with epoxy. So you have you need to have your materials ready to go and work space prepared. Hopefully you can pick up the sand-blast job right after they finish, take the day off work or pick up on a Saturday...
Get the keel home and set up hanging or laying on heavy Sawbucks, rinse with acetone (this is important to get the dust off and displace any moisture) and immediately roll or brush on the first un-thickened coat of resin. This is why I like the fast hardener over the slow hardener... It will only take 5 min to do a coating on one side, so unless you can hang the keel you'll have to wait to flip it on the other side but a heat gun will speed the curing process, just be careful not to boil it.
 
Sep 8, 2014
2,551
Catalina 22 Swing Keel San Diego
When you get the first coating complete on both sides of the keel you'll want to do a second coat immediately, but you won't use as much resin since it will be smoother. This called 'hot coating', if you coat when the epoxy is dry to the touch but not fully cure you do not have to sand between coats and it creates a chemical bond which is slightly stronger than a mechanical bond. If you get these two coatings done right away you have a sealed keel that won't start to rust, and you can take your sweet time on the follow-up filler and fairing coatings. After this pint you'll have to allow each coating to fully cure and sand with 80 grit between coats to get rid of Amine Blush.
A couple tips... Its ok to get epoxy in the Pin Hole, just wipe away excess and any epoxy that might build up can be gently smoothed with a round back file before you epoxy in the bushing.
Its also ok to get epoxy in the Eye Bolt threaded hole, just don't fill it up and allow it to cure. If any epoxy goes in there just be sure to swab it out with Q-Tips. Any epoxy that cures in the threads can be cleaned out later with a tap. The best idea is to use the old eye bolt as a plug with blue tape around the head. Remove it after each coat just in case any epoxy leaked in around the base, you don't want it stuck in there.
 
Sep 8, 2014
2,551
Catalina 22 Swing Keel San Diego
Ok... that just gives you a primer on what to think about to get this process going. Whatever you do, please dear LORD do not have the keel sand blasted and then sit around for days before you apply the first coat of epoxy! Be prepared to do the first 'Hot Coats' and then you can take your time on the rest of it.
I really should just write up a full guide on this whole process and publish it here so I don't keep re-hashing this whole process, LOL. Check out Stingy Sailor's web page too , he published his article there for his keel job. After you get the first steps done we can talk more about setting the new bushing in with epoxy, the filler and fairing coats, the barrier coat paint, and sealing the eye-bolt threads.
 
  • Like
Likes: Drinkmilk

SFS

.
Aug 18, 2015
2,070
Currently Boatless Okinawa
I am no epoxy expert (about to undertake my FIRST epoxy project) but I paid a little more for the WEST #207 Special Clear Hardener. It does not develop the amine blush, thereby saving me the sanding steps that I would have had in order to remove that blush with the other hardeners. According to the folks at WEST, it also can be "hot coated" after a fairly substantial delay, which was important to me, but may not matter in your case.