Hunter 34 Refit Help

chloe

.
Aug 2, 2024
14
Hunter 34 Toronto
Hello All,

This is my first time posting here so I apologize for any etiquette mistakes.

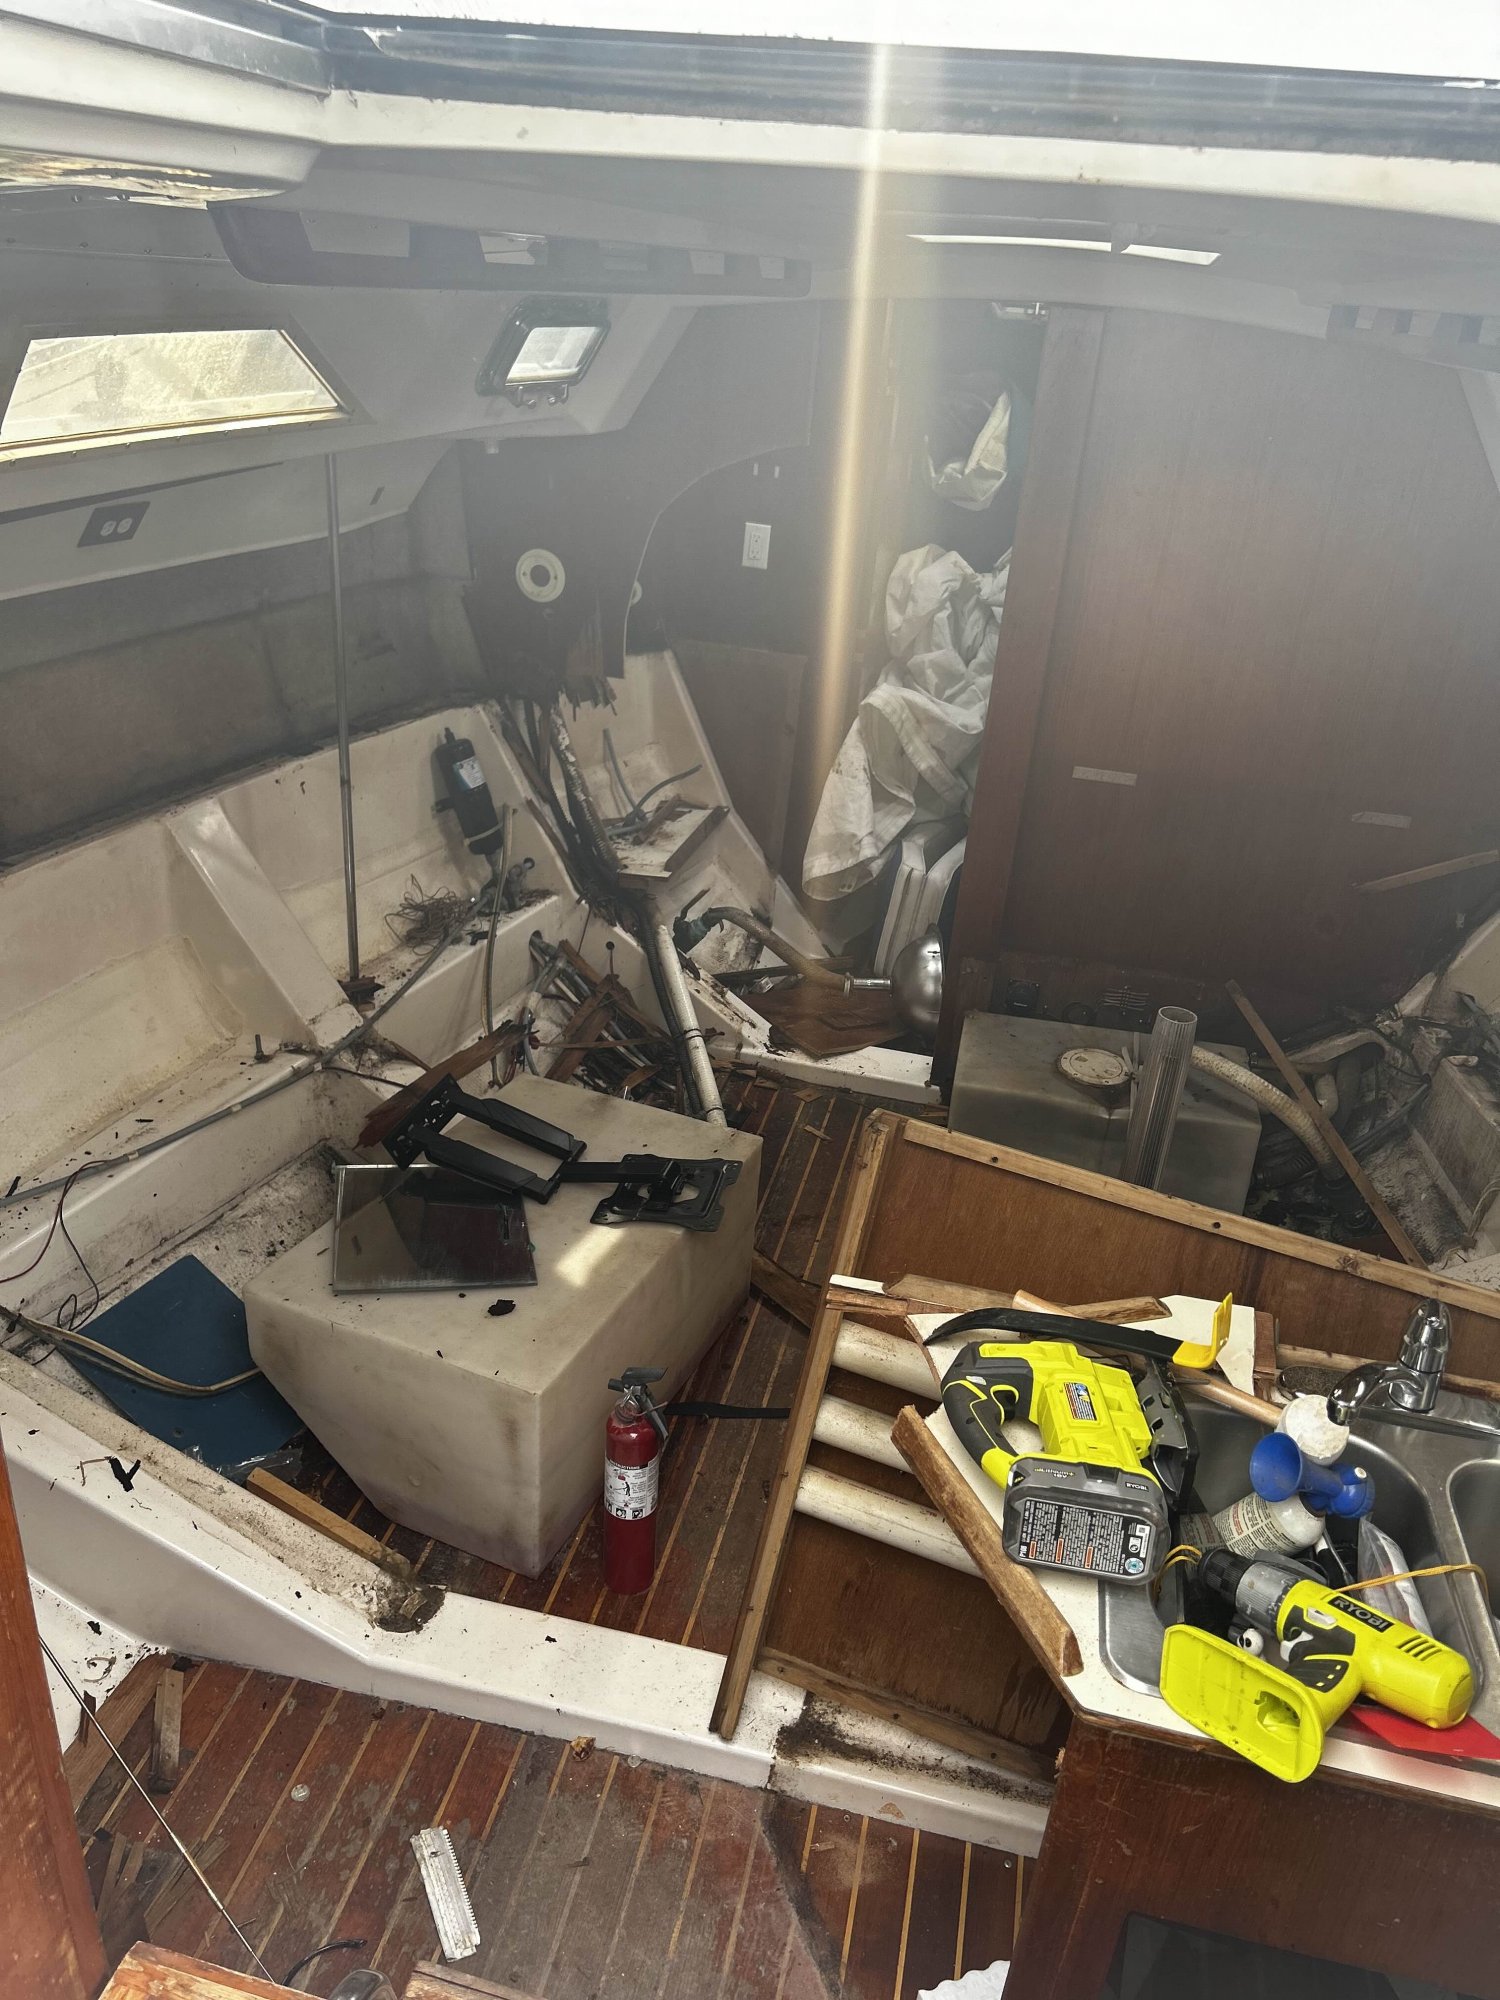
I recently purchased what is likely the most beat-up shoal draft 1983 H34 you have ever seen.

The entire cabin is full of mold and most of the wood in the boat, including bulkheads is rotting away from being left with leaking ports. On the upside, it has a solid rig, hull, and topside which is why I decided to purchase the boat.

I have begun pulling out every bit of plywood in the cabin, including cabins, head, and galley. I am here asking for some advice on getting this boat to a mold free and structurally sound point to become my long-time cruising/liveaboard boat on the Great Lakes.

Here's my list of questions for fellow H34 owners:

- In terms of the "hull liner", can It just be torn out? It seems to be stuck under the hull pan and molded headliner in a few places, It all has to go.

- I have had to essentially cut the bottoms out of the main bulkhead on both sides of the compression post due to excessive rotting. How do I remove these from the side of the compression post and the headliner? I know on some boats they just slide into the headliner however, I would like to know for certain before I try to brute force them out.

- for the false bilge, having the entire interior out of the boat means I have full access to the interior pan, are there areas where I should drill some holes near the top of the pan on each side to spray a bleach or bilge cleaner solution into to fully eliminate any growth in there?

- How involved is removing the toe rails? I do believe they are one of the main sources of water ingress.

I have attached an image of the cabin as it sits currently.
IMG_4226.jpg
 
Jan 7, 2011
5,120
Oday 322 East Chicago, IN
Welcome to the forum! You picked a fun way to get into sailing….or rather sailboat maintenance! I am afraid you won’t be sailing anytime soon ;)

Before I try to answer some of your questions, I have one of my own…
Is the mast up or down? You need to take the mast down to fix the bulkheads.

I can’t answer to many of your questions, but the fabric hull liner is basically glued to the hull and is as you found can be pinched behind other things fastened to the boat. The hard floor pan and head liner are structural.

I hope you keep us updated on your journey.

Greg
 

chloe

.
Aug 2, 2024
14
Hunter 34 Toronto
Welcome to the forum! You picked a fun way to get into sailing….or rather sailboat maintenance! I am afraid you won’t be sailing anytime soon ;)

Before I try to answer some of your questions, I have one of my own…
Is the mast up or down? You need to take the mast down to fix the bulkheads.

I can’t answer to many of your questions, but the fabric hull liner is basically glued to the hull and is as you found can be pinched behind other things fastened to the boat. The hard floor pan and head liner are structural.

I hope you keep us updated on your journey.

Greg
Thank you!

This is my first keel boat, I have had a good few dinghy's (420, laser 2, etc). I have spent a pretty good amount of time on keelboats though which should hopefully help me with my refit journey.

Unfortunately, the mast is up which I am well aware will make my life a whole lot more difficult. I have carefully inspected the compression post and the surrounding fiberglass on the headliner for hairline cracks and deformation and haven't found anything.
My current plan is to bevel and fiberglass patch pieces to the bulkheads and add half inch marine ply to each side for additional support.

I was surprised how thin and weak the bulkheads are when I cut the mold out.
 

jssailem

SBO Weather and Forecasting Forum Jim & John
Oct 22, 2014
21,880
CAL 35 Cruiser #21 moored EVERETT WA
Welcome to the SBO Forums. Giving a good old boat a renewed life takes patience and perseverance.

We had a member here rebuild his Hunter after a hurricane damaged her. He redesigned the interior to meet his needs and desires. Here is a link to his adventure. You may find inspiration from his efforts.

As you work on the pan, remember that it is critical to maintaining the shape of your boat's hull.
 
  • Like
Likes: BigEasy

chloe

.
Aug 2, 2024
14
Hunter 34 Toronto
Welcome to the SBO Forums. Giving a good old boat a renewed life takes patience and perseverance.

We had a member here rebuild his Hunter after a hurricane damaged her. He redesigned the interior to meet his needs and desires. Here is a link to his adventure. You may find inspiration from his efforts.

As you work on the pan, remember that it is critical to maintaining the shape of your boat's hull.
Thank you,

I plan to do the false bilge floor removal modification to fully open up the boat for mold remediation and flush bleach through all of the holes in the pan.

Otherwise I will be leaving the pan well alone I believe.
 
  • Like
Likes: jssailem
Nov 6, 2006
9,973
Hunter 34 Mandeville Louisiana
Welcome, Chloe!! There are a few H-34 owners on the forum and a lot of great photos and modification notes.. Don't know if you found it yet but click on "Owner Resources" then "downloads By Brand" then select "H-34".. and the modifications will show up along with other good stuff.. Looks like you have quite a project but she is a good sailing boat with good accommodations..
For some excellent pictures of a rebuild, look up the stuff posted by Fred Ficarra in the modifications section
The opening port that I can see in the picture looks like a NFM (NewFound Metals) port.. an excellent upgrade from the original Grey Ports ..
Many of us owners have lots of pictures of components etc .. In the "General Downloads" section there are some files of the original manuals for things like the Merriman steering pedestal and the winches and a shop manual file for the engine..
Again, WELCOME .. feel free to PM me ..
 

chloe

.
Aug 2, 2024
14
Hunter 34 Toronto
Welcome, Chloe!! There are a few H-34 owners on the forum and a lot of great photos and modification notes.. Don't know if you found it yet but click on "Owner Resources" then "downloads By Brand" then select "H-34".. and the modifications will show up along with other good stuff.. Looks like you have quite a project but she is a good sailing boat with good accommodations..
For some excellent pictures of a rebuild, look up the stuff posted by Fred Ficarra in the modifications section
The opening port that I can see in the picture looks like a NFM (NewFound Metals) port.. an excellent upgrade from the original Grey Ports ..
Many of us owners have lots of pictures of components etc .. In the "General Downloads" section there are some files of the original manuals for things like the Merriman steering pedestal and the winches and a shop manual file for the engine..
Again, WELCOME .. feel free to PM me ..

Thank you for the info!

The opening ports do appear to be NFM Tri-Matrix ports. Unfortunately, every single one of them leaks like a sieve which seems to be the main contributor to the absolutely destroyed rotted bulkheads, cabin sole and furniture.

I may take up your offer and send you some questions when they arise and I appreciate the warm welcome!
 
  • Like
Likes: kloudie1
Jun 21, 2004
2,624
Beneteau 343 Slidell, LA
This is my first time posting here so I apologize for any etiquette mistakes.
- I have had to essentially cut the bottoms out of the main bulkhead on both sides of the compression post due to excessive rotting. How do I remove these from the side of the compression post and the headliner? I know on some boats they just slide into the headliner however, I would like to know for certain before I try to brute force them out.
Welcome!
That’s quite a project that you have undertaken. I strongly recommend that you take @jssailem’s advice and read “repairing hunter 40 damage from Hurricane Mathew”, in entirety.
I know that you stated that you inspected the compression post & found it to be sound; however, your photo shows the compression post teak covering ( port side of starboard bulkhead) still in tact. Remove the mast or at least, slacken the stays / shrouds. Unfortunately, the only way to inspect the post is to remove the teak covering. Carefully cut through the teak, with a sharp utility knife & oscillating tool, where it it joins to the starboard bulkhead & carefully pry the cover away from the bulkhead; if you are successful, you can reuse the covering. I would be surprised if the compression post (two untreated 2x4s) is not compromised on a 40 year old boat. The post on my 1988 H 33.5 was rotted at 10 years. The cause is a leaking wiring race beneath the mast & unsuitable materials used to construct the post. Repairs consist of fabricating an aluminum post & re-wrapping in teak. Be sure to inspect the wood plate beneath the deck & the support at the bottom of the post to ensure those areas are not rotted. Now would be a good time to reroute the mast wiring outside the mast, a few inches above the bottom of the mast, and thru deck clamshell fittings to the inside of the cabin. With that mod, you can maintain an adequate seal without removing the mast.
Unfortunately, I can’t help with best method of removing the bulkheads; however, do inspect the bulkheads thoroughly, where the chainplates attach in the upper corners. If the above deck chain plate seals leaked, there is a good chance that there is rot on the bulkhead.
With regards to cleaning, power washing, vacuum, & forced air ventilation may be an option. I have used a cleaning formulation devised by a SBO contributor that works well for cleaning & inhibiting mold growth. (sorry that I forgot his name to give appropriate credit). The ingredients are 2TBSP borax, 2TBSP baking soda, & 1 TBSP TSP cleaner dissolved in 1 quart warm water.
Good luck with the project, please keep us posted on your progress.
 
Last edited:

chloe

.
Aug 2, 2024
14
Hunter 34 Toronto
Welcome!
That’s quite a project that you have undertaken. I strongly recommend that you take @jssailem’s advice and read “repairing hunter 40 damage from Hurricane Mathew”, in entirety.
I know that you stated that you inspected the compression post & found it to be sound; however, your photo shows the compression post teak covering ( port side of starboard bulkhead) still in tact. Remove the mast or at least, slacken the stays / shrouds. Unfortunately, the only way to inspect the post is to remove the teak covering. Carefully cut through the teak, with a sharp utility knife & oscillating tool, where it it joins to the starboard bulkhead & carefully pry the cover away from the bulkhead; if you are successful, you can reuse the covering. I would be surprised if the compression post (two untreated 2x4s) is not compromised on a 40 year old boat. The post on my 1988 H 33.5 was rotted at 10 years. The cause is a leaking wiring race beneath the mast & unsuitable materials used to construct the post. Repairs consist of fabricating an aluminum post & re-wrapping in teak. Be sure to inspect the wood plate beneath the deck & the support at the bottom of the post to ensure those areas are not rotted. Now would be a good time to reroute the mast wiring outside the mast, a few inches above the bottom of the mast, and thru deck clamshell fittings to the inside of the cabin. With that mod, you can maintain an adequate seal without removing the mast.
Unfortunately, I can’t help with best method of removing the bulkheads; however, do inspect the bulkheads thoroughly, where the chainplates attach in the upper corners. If the above deck chain plate seals leaked, there is a good chance that there is rot on the bulkhead.
With regards to cleaning, power washing & forced air ventilation may be an option. I have used a cleaning formulation devised by a SBO contributor that works well for cleaning & inhibiting mold growth. (sorry that I forgot his name to give appropriate credit). The ingredients are 2TBSP borax, 2TBSP baking soda, & 1 TBSP TSP cleaner dissolved in 1 quart warm water.
Good luck with the project, please keep us posted on your progress.
Hey!

Thank you for the reply,

Regarding the compression post, I had assumed it was a single piece of wood. I'm going to assume it's rotted as well being two 2x4's.
I can fairly easily slack up the rig and possibly jack up the cabin top with something. Unfortunately due to where the boat is sitting on the hard there's no way to get the mast unstepped without splashing it.

If I remember correctly, the mast wiring appears to have been relocated to two connectors roughly a foot forward of the step however I will confirm this when I go to the boat next.

My current plan with the bulkheads is to cut and patch a few feet from the cabin top and fiberglass new lower halves in and reinforce with extra wood glued and screwed to the backsides.

As far as I can see at the moment the bulkheads cannot be replaced without damaging the headliner. Nor can I fit the one through the companionway regardless.
 
Nov 6, 2006
9,973
Hunter 34 Mandeville Louisiana
Couple of pictures.. Looking aft at top of compression post.. The bungs and screws of the cover and hinge mount plank and the plank removed. The screws that hold the bulkhead to the hull grid beams are like the one visible at top left. The bulkhead is not really structural, it is held by screws..
P2040771.JPG
This the post showing the wire groove.. mine had a spot of rot in the top couple of inches
P2040779.JPG
 

chloe

.
Aug 2, 2024
14
Hunter 34 Toronto
Couple of pictures.. Looking aft at top of compression post.. The bungs and screws of the cover and hinge mount plank and the plank removed. The screws that hold the bulkhead to the hull grid beams are like the one visible at top left. The bulkhead is not really structural, it is held by screws..
View attachment 226625
This the post showing the wire groove.. mine had a spot of rot in the top couple of inches
View attachment 226626
Hello!

Thank you so much for the useful insight, I had assumed the bulkheads weren't all that structural as they are attached to the pan with a couple self tappers. They appear to be Furniture in these boats.

I will jack up the deck top and replace the compression post with an aluminum or iron one to ensure the boat is solid.

I was wondering if anybody has added those circular inspection ports to their hull pans for cleaning under the pan? I had thought that would be an excellent way to get all of the crap out from under the pan once and for all.
1723129015455.png


I am obviously not too concerned about blasting holes into this boat as I am basically saving it from being cut up at this point.

Thank you everybody for helping me out!
 
  • Like
Likes: jssailem
Jun 8, 2004
1,030
C&C Frigate 36 St. Margarets Bay, Nova Scotia
Hi Chloe, welcome aboard! There was a couple in Nova Scotia that restored an H34 a few years ago. Their YouTube channel has some videos that might address a few of your queries: Coast Life. Episodes 11 through 30 may be of interest. They sold that boat and moved on to a larger Hunter, but they seemed like a nice couple who were willing to take on any challenge. If you can get in contact with Chad, I sure he would be open to answering questions.
 
Last edited:
Jun 21, 2004
2,624
Beneteau 343 Slidell, LA
I was wondering if anybody has added those circular inspection ports to their hull pans for cleaning under the pan? I had thought that would be an excellent way to get all of the crap out from under the pan
Chloe,
I would be hesitant to cut into the pan / grid unless absolutely necessary. The pan is an important structural component of the hull assembly; large holes will compromise the integrity and unfortunately, those inspection plates will not restore it.. Cleaning the internal surfaces of the grid isn't going to affect the cleanliness & odor significantly; concentrate on the surfaces you can see & flush the bilges with cleaner - disinfectants & you should be good. One thing that made a noticeable difference on my Hunter was to clean the moldy carpet lining the interior of the hull; in your situation, I would remove it & replace.
 
Nov 6, 2006
9,973
Hunter 34 Mandeville Louisiana
Be careful about cutting into the beams in the hull pan. (big Easy beat me to that comment) These are the structural supports and not the bulkheads. A hole any bigger than about an inch will weaken the beams.. I have squirted detergent into the limber holes in the beams , and rinsed it out after an hour or so.. a couple of sessions like that can (almost) get them clean. A couple of things to consider early on ... : 1. very carefully check the angle iron beams that the big chainplate tie rods screws into in the port/stbd side beams.. if they are showing lots of rust from the water leakage, now is the time to fix them. ..2. make a door/access panel in the fore/aft bulkhead under the cockpit floor to allow access to that space.. .. 3 Consider putting your batteries in a place where they can be accessed more easily instead of in "the pit" as was original.
 

chloe

.
Aug 2, 2024
14
Hunter 34 Toronto
Chloe,
I would be hesitant to cut into the pan / grid unless absolutely necessary. The pan is an important structural component of the hull assembly; large holes will compromise the integrity and unfortunately, those inspection plates will not restore it.. Cleaning the internal surfaces of the grid isn't going to affect the cleanliness & odor significantly; concentrate on the surfaces you can see & flush the bilges with cleaner - disinfectants & you should be good. One thing that made a noticeable difference on my Hunter was to clean the moldy carpet lining the interior of the hull; in your situation, I would remove it & replace.
Totally agree, I noticed there are only a couple of holes in the pan to spray a cleaning solution into which is why I was wondering if it made sense to create a few more.
I react quite a bit to mold and would like to be rid of it completely if possible. Maybe I could fashion some kind of 360 degree nozzle and create small holes in the matrix to spray with. This product should run into the true bilge I assume over time. I plan to spend a pretty good chunk of change having the boat fogged and properly remediated so I want to ensure there are as few areas as possible that cannot be treated.

Be careful about cutting into the beams in the hull pan. (big Easy beat me to that comment) These are the structural supports and not the bulkheads. A hole any bigger than about an inch will weaken the beams.. I have squirted detergent into the limber holes in the beams , and rinsed it out after an hour or so.. a couple of sessions like that can (almost) get them clean. A couple of things to consider early on ... : 1. very carefully check the angle iron beams that the big chainplate tie rods screws into in the port/stbd side beams.. if they are showing lots of rust from the water leakage, now is the time to fix them. ..2. make a door/access panel in the fore/aft bulkhead under the cockpit floor to allow access to that space.. .. 3 Consider putting your batteries in a place where they can be accessed more easily instead of in "the pit" as was original.
I agree and would not be putting large holes in the beams. The chainplate anchors do look fairly decent from the top however I do agree it would be smart to make a small hole and use an automotive inspection camera or similar to check them out properly.

All of the boat's batteries are in the starboard aft locker which is, interesting.
 

chloe

.
Aug 2, 2024
14
Hunter 34 Toronto
Hi Chloe, welcome aboard! There was a couple in Nova Scotia that restored an H34 a few years ago. Their YouTube channel has some videos that might address a few of your queries: Coast Life. Episodes 11 through 30 may be of interest. They sold that boat and moved on to a larger Hunter, but they seemed like a nice couple who were willing to take on any challenge. If you can get in contact with Chad, I sure he would be open to answering questions.
Hi Jim, Thank you for the reply.
I have already watched their videos and found them very helpful.

My game plan is to finish tearing out the interior (not excited to figure out disposing of the 41 year old holding tank), Complete the false bilge modification and begin the flushing process, seal up all of the ports with shrink tape for the time being and slowly reseal all of the deck hardware. Then I will finally get my boat fogged and tested professionally for mold!

Once that whole nightmare is done, I can begin construction on the cabin and reseal all of the ports!


I am very excited about this project and will be sure to continue updating all of you along the way!

- Chloe
 
Jan 22, 2008
311
Hunter 34 Herrington South, MD
I'm just finishing the same full restoration on my 84 H34. Replacing the flooring, remounting the engine, replacing all the sanitary parts (due to smell), hull liner, lights, etc. I have it pretty much documented on the following link. https://photos.app.goo.gl/uycmbH9g73KQgU2KA

Having completed the restoration on the same boat, I can probably give you some advise on what I did right and what I did wrong as you proceed. I have also narrowed down some of the basic areas of leaks. As for the compression post, mine was fine so listen to others on this forum. As for the false bilge, CUT IT OUT! I wouldn't really touch any of the other panel panels, but many of us have cut out the bottom of the bilge and now no longer have ~40 years of water, ???? rolling around under the panel. ONce it is opened you can add some kind of cleaner, detergent,??? under the pan and really clean it out. Not sure of the laws in Toronto, but on the Chesapeake Bay you cannot discharge waste, so when I needed to replace the in and out through hulls I made a mistake and replaced both. SHould have just put in a plug for the discharge since I also tore out all the discharge piping. Now only have pipes from the head to the new holding tank and to the pump out on deck - which by the way leak through the deteriorated bedding and probably need to rebed.

While I replaced many of the panels due to rot, a few tools and sometime will enable you do duplicate those panels easily, see my link above.,

I've owned the boat with various partners since about 87 but we liked to sail and liked to ignore problems. I finally retired and started to tear the boat apart, make new parts and put it back together. The boat is GREAT and the carpentry is really very basic. You will love the boat and have a real sense of accomplishment.

I'm also available to discuss anything with you. PM me for contact information as I'm not always on the site.

PS NOT SURE THE TOE RAILS ARE YOUR SOURCE OF LEAKS. I believe that many have looked into this issue and found the design to be pretty good. There are other major leak spots, windows, water / water deck openings, drain pipe under anchor locker, sliding hatch, etc. It is a long process to find all the leaks, but having someone with a hose can help you alot.
 

chloe

.
Aug 2, 2024
14
Hunter 34 Toronto
I'm just finishing the same full restoration on my 84 H34. Replacing the flooring, remounting the engine, replacing all the sanitary parts (due to smell), hull liner, lights, etc. I have it pretty much documented on the following link. https://photos.app.goo.gl/uycmbH9g73KQgU2KA

Having completed the restoration on the same boat, I can probably give you some advise on what I did right and what I did wrong as you proceed. I have also narrowed down some of the basic areas of leaks. As for the compression post, mine was fine so listen to others on this forum. As for the false bilge, CUT IT OUT! I wouldn't really touch any of the other panel panels, but many of us have cut out the bottom of the bilge and now no longer have ~40 years of water, ???? rolling around under the panel. ONce it is opened you can add some kind of cleaner, detergent,??? under the pan and really clean it out. Not sure of the laws in Toronto, but on the Chesapeake Bay you cannot discharge waste, so when I needed to replace the in and out through hulls I made a mistake and replaced both. SHould have just put in a plug for the discharge since I also tore out all the discharge piping. Now only have pipes from the head to the new holding tank and to the pump out on deck - which by the way leak through the deteriorated bedding and probably need to rebed.

While I replaced many of the panels due to rot, a few tools and sometime will enable you do duplicate those panels easily, see my link above.,

I've owned the boat with various partners since about 87 but we liked to sail and liked to ignore problems. I finally retired and started to tear the boat apart, make new parts and put it back together. The boat is GREAT and the carpentry is really very basic. You will love the boat and have a real sense of accomplishment.

I'm also available to discuss anything with you. PM me for contact information as I'm not always on the site.

PS NOT SURE THE TOE RAILS ARE YOUR SOURCE OF LEAKS. I believe that many have looked into this issue and found the design to be pretty good. There are other major leak spots, windows, water / water deck openings, drain pipe under anchor locker, sliding hatch, etc. It is a long process to find all the leaks, but having someone with a hose can help you alot.

Hey Mike,

Thank you so much for all of the insight, it means a lot!

I plan on almost fully redoing the layout as unfortunately there is not a single piece of reusable plywood on the boat's interior. For my usages (solo sailor, cruiser) I can better use the space anyways.

The dumping laws in inland Canada are the same. I will likely just remove the thru-hull completely. I plan to move the head further forward and make everything in front of the main bulkhead (which I will have to fix or replace) into a bathroom, tool storage, utility sort of area and move to a bow holding tank similar to the one done in the modifications section.

I am very excited about this boat as I love the b&r with backstay configuration and the large sail area. They are also very nice looking in my opinion.

Thank you!
 

chloe

.
Aug 2, 2024
14
Hunter 34 Toronto
Hey everyone, quick question for you.

Has anybody tried removing the blue striping at the waterline and the toerail?
It is fairly deteriorated on my boat and seems smooth without a seam. Is it paint? I would like to try to get it off but would rather not repaint my boat as the gel coat is in good shape.

Thank you, Chloe.
Xnip2024-08-15_10-50-06.png
 

jssailem

SBO Weather and Forecasting Forum Jim & John
Oct 22, 2014
21,880
CAL 35 Cruiser #21 moored EVERETT WA
It is not paint. It is a gelcoat strip sprayed into the mold at the time the boat hull was built. To remove it you would need to sand it. Then you would need to barrier coat the hull and paint the hull. It is the same material as the white gelcoat.

On the other hand, if it is just oxidized and you want to make it pretty, you could wet sand and polish the stripe smooth like you would polish a car paint job. That often brings the gelcoat shine back.