Repairing Hunter 40 damage from Hurricane Matthew

May 8, 2013
629
Hunter 40 Dataw Island, SC
Attached is a photo of my rudder bearing on my H40. The steering quadrant is dragging on the stop angles. The UHMW bearing is not flush with the bearing surface and I am not sure if it was like that when it was built or if it has worn down and now the stop angles are holding it out of true.
Finally got out to the boat to get pics of my upper bearings for you. Rudder centered:


Rudder hard over:


And opposite hard over:


Mine does seem to have a slight angle relative to the post base but not nearly as severe as yours. One of your photos does seem to show some plastic dust that may be signs of wear that have dug into the base at the stops.

Have you checked the lower bearing for play? Also, have you checked the cables for wear and fraying? My cables are fraying and they are on the list to soon be replaced. I noticed that my cable guides on the pedestal are wildly mis-aligned so I will be readjusting everything with the new cables. I noticed also that the holes Hunter cut through the aft cabin top for the cable runs aren't quite centered relative to the cables.

Just brainstorming what else might be causing your issue.

Mark
 
May 8, 2013
629
Hunter 40 Dataw Island, SC
Companionway doors finished:

I had pondered for a few days how to finish the companionway doors - Paint? Epoxy and clearcoat? Grease? I hadn't decided but one fine day I was sitting in the cockpit wool-gathering when one of the regulars stopped by. She asked if I had any of the paint left over from the boot stripe and cove stripes. She thought it would look good. I agree!


With the doors reinstalled and the enclosure now watertight (it is - it rained a few days ago and not a drop or drip down below :dancing:) I could finalize the deal:


That's the old hatch and sliders now permanently removed and disposed of! I kept the sliders (you never know when a strip of aluminum can be repurposed) but the hatch itself was ceremoniously tossed in the garbage bin. Yay!! There's still some work left to do on the inside and I will be making some small changes to the entryway but the bulk of the fabricating is done. I need to source rope clutches to get the lines re-run yet, but I have started on the next (final) big project that has to be done before I can leave the dock:

Water tanks! And - oh, boy, have I got a story to tell!

Cheers,

Mark
 
Jan 17, 2010
19
Hunter Legend 40 Edgewater
Wow! Read all 54 pages over the last couple of days - Great Job Mark. I also own a Hunter 40 that had storm damage last year.
Couple questions: Sugar Scoop - Did you add this?
You have any photos of the Mast down and the Mast Plate on the deck? looking how the wires run thru the mast at the deck level.

Many thanks,
CSM
The cables all run down through a rubber fitting caulked to the deck and allows any leakage in the mast to drain out of the weep holes in the mast base. Unfortunately on my my base the hoses had clogged over the years.
 

Attachments

  • Like
Likes: Will Gilmore
Jan 17, 2010
19
Hunter Legend 40 Edgewater
The photos of the rudder bearing is helpful, I don't have any play in the rudder so I am at a lost to figure out how the surfaces are so out of square. The quadrant is making a lot of noise dragging on the stop angles but I don't see how that could explain all of the miss alignment. I will contact Edison to see if they can offer any information on the bearings so I can replace the one that appears to be supporting the shaft and get more clearance on the stop angles. Not sure if I will change the angle of the angle bearing or leave it as is. The existing lasted thirty years.
 
Mar 11, 2009
199
Hunter 40 Saint John
Wow! Read all 54 pages over the last couple of days - Great Job Mark. I also own a Hunter 40 that had storm damage last year.
Couple questions: Sugar Scoop - Did you add this?
You have any photos of the Mast down and the Mast Plate on the deck? looking how the wires run thru the mast at the deck level.

Many thanks,
CSM
Good Morning CSMCKILLIP
I to have a hunter 40, and remove my mast almost every year. I can tell you without a doubt, the original wires going to the mast ran under the floor boards, up through the mast step and protruded through a hole on the mast step itself. I changed this on mine by simply cutting a hole in the steel mast step below the deck, pulled the wires out and cut another hole just behind the mast step through the fibreglass . Then I installed waterproof box on top of the new hole and sealed it. Now all my mast wired are easily disconnected, without having to lift mast and have my hands underneath it.. Don't like doing that...
 
  • Like
Likes: Will Gilmore
May 8, 2013
629
Hunter 40 Dataw Island, SC
The photos of the rudder bearing is helpful, I don't have any play in the rudder so I am at a lost to figure out how the surfaces are so out of square. The quadrant is making a lot of noise dragging on the stop angles but I don't see how that could explain all of the miss alignment. I will contact Edison to see if they can offer any information on the bearings so I can replace the one that appears to be supporting the shaft and get more clearance on the stop angles. Not sure if I will change the angle of the angle bearing or leave it as is. The existing lasted thirty years.
If I might suggest trying one thing before tearing big stuff apart - pull your steering cables from the capstan and manually move the rudder through its full swing. At least that will confirm whether the pedestal/steering is causing or influencing a rudder problem.

You have an Edson pedestal? Lucky you - I'm still dealing with the old Merriman pedestal. Though so far no issues with it ;)
 
May 8, 2013
629
Hunter 40 Dataw Island, SC
Good Morning CSMCKILLIP
I to have a hunter 40, and remove my mast almost every year. I can tell you without a doubt, the original wires going to the mast ran under the floor boards, up through the mast step and protruded through a hole on the mast step itself. I changed this on mine by simply cutting a hole in the steel mast step below the deck, pulled the wires out and cut another hole just behind the mast step through the fibreglass . Then I installed waterproof box on top of the new hole and sealed it. Now all my mast wired are easily disconnected, without having to lift mast and have my hands underneath it.. Don't like doing that...
I will be doing something similar to that on mine as well :thumbup:
 
May 8, 2013
629
Hunter 40 Dataw Island, SC
Next project - water tanks:

Now that the semi-regular autumn rains are with us and I can rejoice inside a dry cabin thanks to the new deck enclosure, it's time to re-focus on some below-decks projects. A biggy which I have been delaying (for various reasons) has been the relocation of fresh water storage on the boat. As a short recap for those who have forgotten or haven't followed the thread from the beginning:

One of my long-term projects (even pre-Matthew) has been to eliminate the forward water tank and build new water tanks to fit in the voids in the grid under the floorboards. Three reasons: a, the factory water tank was made of aluminum and was slightly (;)) beyond it's life span. b, 800-ish pounds of water forward altered the boat's trim full vs. empty and moving even some of that weight midships and lower is a good thing. c, my intended ultimate use for the boat requires lots and lots of chain for anchoring and that chain weight combined with all the original water weight in the bow was causing handling difficulties.

So, the forward water tank was removed (somewhere back around page 5 or 6, I think). It was obviously installed before the deck was put on because I had to cut it up to remove it. That is pretty much as far as the progress boatside has gone in the years since.

Landside (or garageside) on the other hand has gone through several idea storms. My first thought was to just enclose the voids but generally potable water in fiberglass tanks will result in water that tastes like - fiberglass! My next attempt was making the tanks from polypropylene (food safe). I don't remember where in the thread that discussion panned out but my ultimate conclusion was that I could not either guarantee that my welds would hold up long-term or that, even though the PP itself was food safe, would my welds be? Final thought was to just go ahead and make the tanks out of Stainless so I ramped up for that. That was about two years ago - I bought a TIG welder and all the gear to go with it and started teaching myself (also had some professional instruction) to weld SS. This is where I'm at now.

Ok, here comes the big mea culpa - I can't weld stainless steel!!! :yikes:

To back up a bit and give a little background - I have been welding on and off for various projects since I was a kid. I have (and can) weld via gas torch, I have (and can) braze, I have (and can) stick weld, and I'm a self-proclaimed maestro with a MIG welder. And I can now weld (regular) steel with the TIG. But I have, over the last two years, only managed to turn stainless into Swiss Cheese! Repeatedly! The reasons are varied (please no hints, tips and tricks, my ego is already bruised :biggrin:) but I just don't have the right mojo.

So, what now? The original water tank is long gone so no going back and my idea is sound, I just have to find a viable way to make it happen. Plan D (or E or F, whatever) is to go back to the original idea of sealing off the original voids but make them truly safe. Some searching on the interwebs led me down the path of how municipalities care for and maintain those big steel water tanks that every town in America has. Low and behold, the latest methods for sealing the insides of these tanks is with - drumroll here - urethane paint!!

Insert caveat - the research went about 50/50 urethane vs. food-safe epoxy paint but no real hard consensus. Seems that once urethanes are cured (interwebs say about 30 days) they are safe to eat from. Same as the clear urethanes used on bar tables, etc.

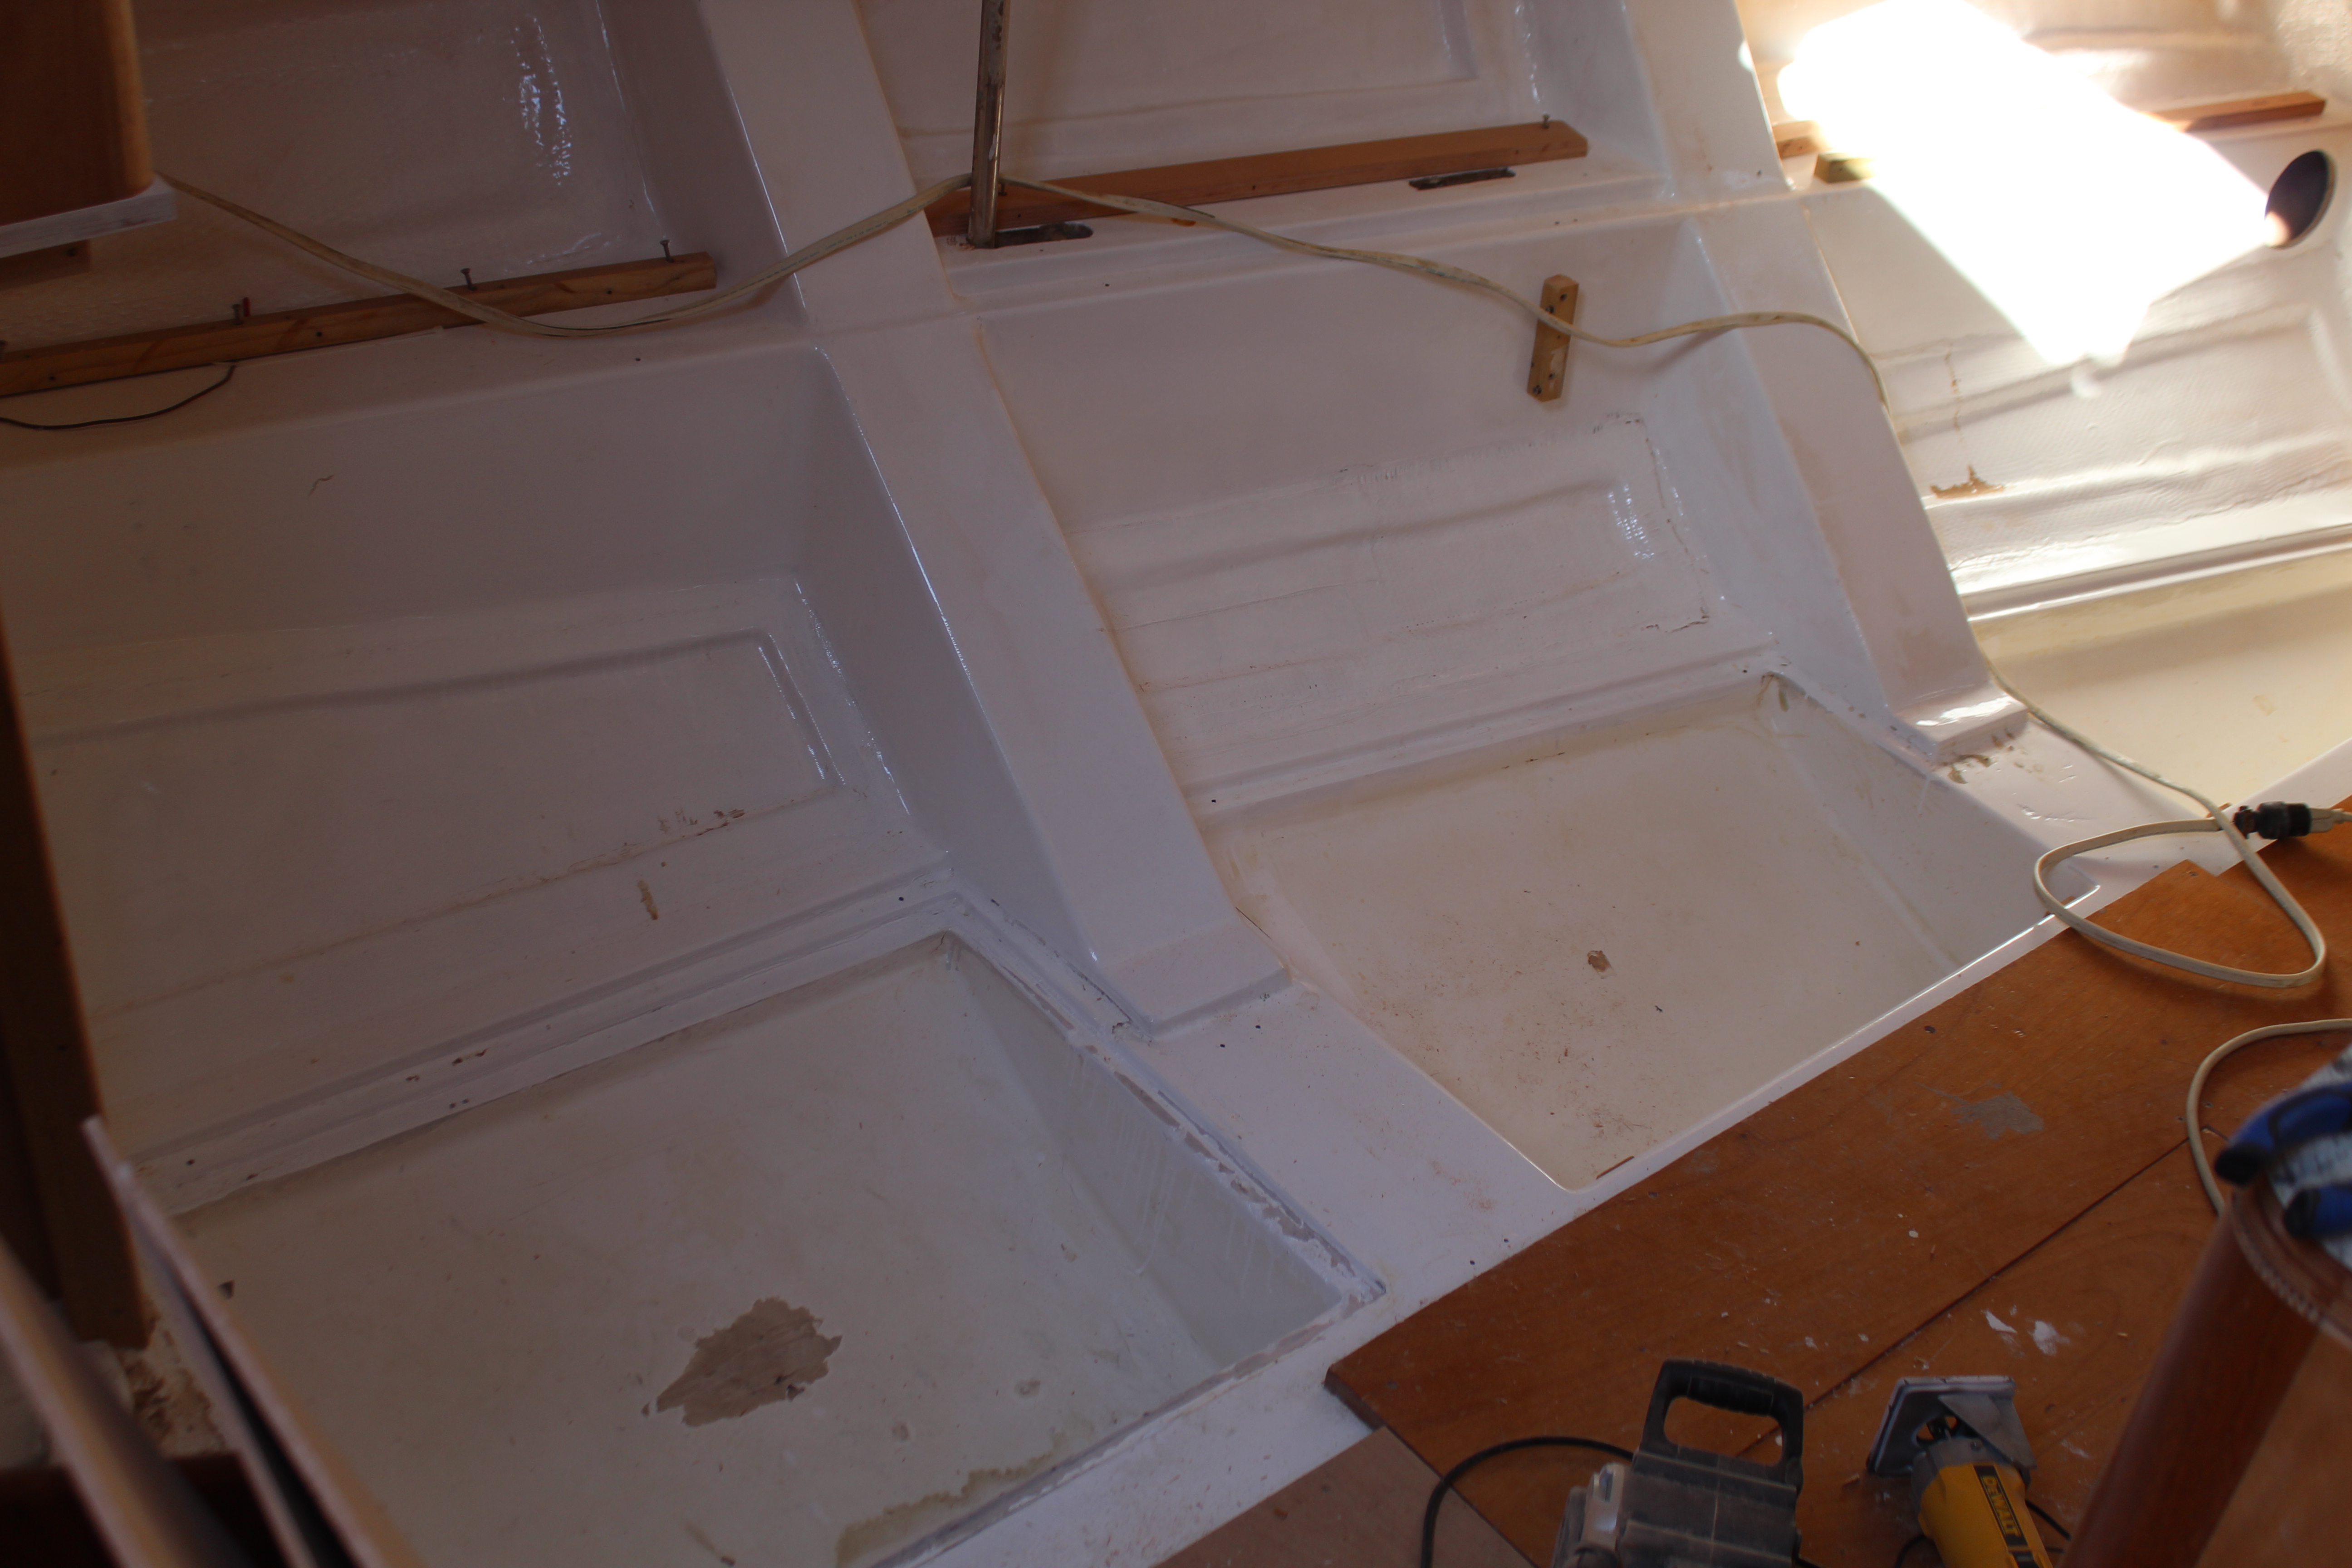
Now we're talking! Back to materials I am familiar with (and sorta good at). So first things first I had to remove the cabinetry to uncover the voids:


The plan starts with glassing over the existing gelcoat in the voids (I just want a fresh clean starting point), connect the voids (this essentially creates three pre-baffled tanks), add some plumbing and cover and seal the voids, then add a tank above the voids inside the forward seat to complete the port side tank(s).

Before I could make the covers I had to address one thing: the rear void had a built-in lip for the cover but the two forward voids did not. I fabbed up and glued in some braces for the covers to sit on and seal to:


Next up, cut and fit the covers:


Nothing fancy here, just marine grade 1/4" ply. These pieces are not structural nor will they be subject to any weight or vertical stress, they just have to block a few hundred pounds of water sloshing about :biggrin:. They do have to remain watertight though, so both sides got a layer of cloth & resin:


Next up, more water tank tom-foolery!

Cheers,

Mark
 
Jan 18, 2021
45
Hunter 40.5 Burnt Store Marina
Hey Mark,

Great work and love following it. Curious why you would go with built in tanks rather than a bladder?

My next project on my legend 40.5 is to rebuild the leaking port and starboard stringer tanks and while I don't think hunter construction quality was as good as yours on the leaky lids are making me consider bladders instead.
 
May 8, 2013
629
Hunter 40 Dataw Island, SC
Hey Mark,

Great work and love following it. Curious why you would go with built in tanks rather than a bladder?

My next project on my legend 40.5 is to rebuild the leaking port and starboard stringer tanks and while I don't think hunter construction quality was as good as yours on the leaky lids are making me consider bladders instead.
Thanks!

I thought long and hard about bladders and finally decided against them for two reasons: in the end there will be 7 tank compartments, 4 port and 3 starboard. All of different shapes and sizes. I could not find similar sized bladders so I would have either oversize bladders for a particular compartment - not sure how that would work out long-term because I suspect that the bladder performs best when filled to capacity, i.e., no permanent wrinkles and folds - or the bladder would be undersize for the compartment and be subject to unwanted movement within the space. I might be wrong there but the engineer in me started scratching the inside of the back of my head. And that's really annoying :biggrin:!!

I am not familiar with the 40.5 - you have built in tanks with lids? If so it reminds me of the way Hunter built in the aft (and forward) holding tanks into my boat. They utilized compartments molded into the liner (on of my repurposed water tank voids is the old aft holding tank) and glued lids onto these spaces. With 5200. And glued them badly. Really badly. I wonder if that's where your problem is. When I finally got the lids off the holding tanks let's just say I was glad I had not used them!

Part of my sealing solution is to use a proper flexible sealant - LifeSeal is fine here - and I glassed the ply lids so that they will remain somewhat flexible to allow for any flex the liner might induce. Hope it works! Let me know about yours, maybe we can brainstorm a good solution.

Mark
 
Jun 8, 2004
265
Hunter 49 60803 Lake Erie
Wow Mark

My 85 40 had the holding tanks in the same spot you are putting you water tanks .... weren't your holding tank set up that way? the problem I had was every time the boat flexed the lids over the voids would start breaking the loose and by the end of a season sewage would be leaking into my bilge. It became and annul project to tear up the floor and re-glass the lids to the stringers. I'll give you leaking water smells better than leaking sewage but I wonder if you'll be happy with this plan. I hope you are better at making a flexible seal that will deal with boat flex and keep the water in then I was.
 
May 8, 2013
629
Hunter 40 Dataw Island, SC
Wow Mark

My 85 40 had the holding tanks in the same spot you are putting you water tanks .... weren't your holding tank set up that way? the problem I had was every time the boat flexed the lids over the voids would start breaking the loose and by the end of a season sewage would be leaking into my bilge. It became and annul project to tear up the floor and re-glass the lids to the stringers. I'll give you leaking water smells better than leaking sewage but I wonder if you'll be happy with this plan. I hope you are better at making a flexible seal that will deal with boat flex and keep the water in then I was.
One of the voids used to be the aft holding tank and the only reason I didn't have a leakage problem was that I never used the holding tank. My thought on why Hunter's setup caused continuous leaks was that they made the top cover too rigid, the ledge in the liner too sloppy, and sealed it all with 5200. And they spaced the fasteners too far apart. Any flex was bound to break the seal over time. I filled and smoothed the liner lip to facilitate a better seal and purposely made the covers flexible. I will use LifeSeal so the sealer will flex more and used a bunch more screws to fasten everything down. Time will tell but I'm thinking it will work.
 
May 8, 2013
629
Hunter 40 Dataw Island, SC
More water tank tomfoolery:

A vital task in making multiple tanks work together is to connect them, so I needed a way for the water to flow downhill (as it were ;)). Since I procrastinated long enough and forgot to order some FG tubes, I figured - how hard can it be? Found a 1 1/4" dowel laying around, wrapped some plastic sheet around it and spiral-wrapped some fiberglass tape until it looked about right:


While that was drying I glassed in a layer of 6 oz (or 8 oz, can't remember) in all the cavities:


I did this only because I wanted fresh glass for the paint application - I just don't know about the old gelcoat. After all the glass was dry, time to connect the tanks:


You can see here the FG tube is glassed in between the forward and center cavities. I messed up and cut the rear tube too short (eyeball engineering failure :yikes:) so I had to re-glass that tube before installing it. Next I had to add a feed line to the water system. I had previously cut a hole in the rear cavity for that so I fabbed up a PEX fitting attached to an aquarium fitting attached to a block-off plate and glued everything in:


Once everything was dry, curiosity got the best of me and I just had to find out A: how much water will the tanks hold and B: are there any leaks so far?

Answer A: 28 gallons, give or take since the cavities are still open, and B: no leaks! Yay! I figure that the port side tanks, once I get the final tank (to sit above the floor under the forward seat) finished will hold 40 gallons, and I'm thinking I can get 40 or more on the starboard side. That will get me close enough to replacing the capacity of the old v-berth tank.

Next up, even more water tank tomfoolery!

Cheers,

Mark
 
Oct 29, 2016
1,915
Hunter 41 DS Port Huron
@B757Captain, its interesting how you have thrown in the towel as they say on welding SS, I would have thought that one who can braze could also TIG weld very similar process. May I ask what gauge material were you attempting to TIG? just for future reference......., what Inert gas were you using?
 
May 8, 2013
629
Hunter 40 Dataw Island, SC
@B757Captain, its interesting how you have thrown in the towel as they say on welding SS, I would have thought that one who can braze could also TIG weld very similar process. May I ask what gauge material were you attempting to TIG? just for future reference......., what Inert gas were you using?
I hate to give up as much as the next guy but after two years of trying I just figured it was a skillset I didn't have time for :(.
I was using 316 SS 14 gauge (.045 I think), 316 rod and pure argon gas. I had no trouble using the TIG for regular steel and even did some sheetmetal work on the Dakota and other projects. Best I can figure is I didn't have the capability to back-purge the weld - I don't know if that was the problem or not. I am looking for someone who wants to trade a MIG for my TIG.
 
  • Like
Likes: Will Gilmore
May 8, 2013
629
Hunter 40 Dataw Island, SC
Even more water tank tomfoolery:

After the glass layer in the tanks dried it was time to final-fit the tops and locate the vents. Each void needs a separate vent. I'll gang the vent lines together above the tanks to a single outlet:


I just had to make sure the vent outlet didn't interfere with anything that will sit on top of the flooring. The forward tank required a vent and an inlet for the water, which will drain from the tank sitting in the forward seat:


I thought hard about where to locate the vent and inlet since I would have to drop the tank in after securing the seat sides. I'll fabricate the upper tank so that I can access the lines:


With the vents done I could press on with the paint. First though, a coat of urethane primer:


After letting the primer cure, a little sanding prep and then paint:


Three coats here for good coverage.

Next up, the tomfoolery concludes!

Cheers,

Mark