Yes, the bottom layer on my sample was just to get a sense of the complete laminate. I was careful not to penetrate the bottom layer on the boat when I removed the plug and ended up leaving a bit of the original balsa core and mesh behind which is why the plug looks a bit narrower than the sample I created. The sample also doesn't have the fairing, paint and non-skid layers.Why do you need a bottom layer, isn’t it still part of the deck?
So It Begins: Deck Recoring Project
- Thread starter SailingCal21
- Start date
Slow but sure progress.
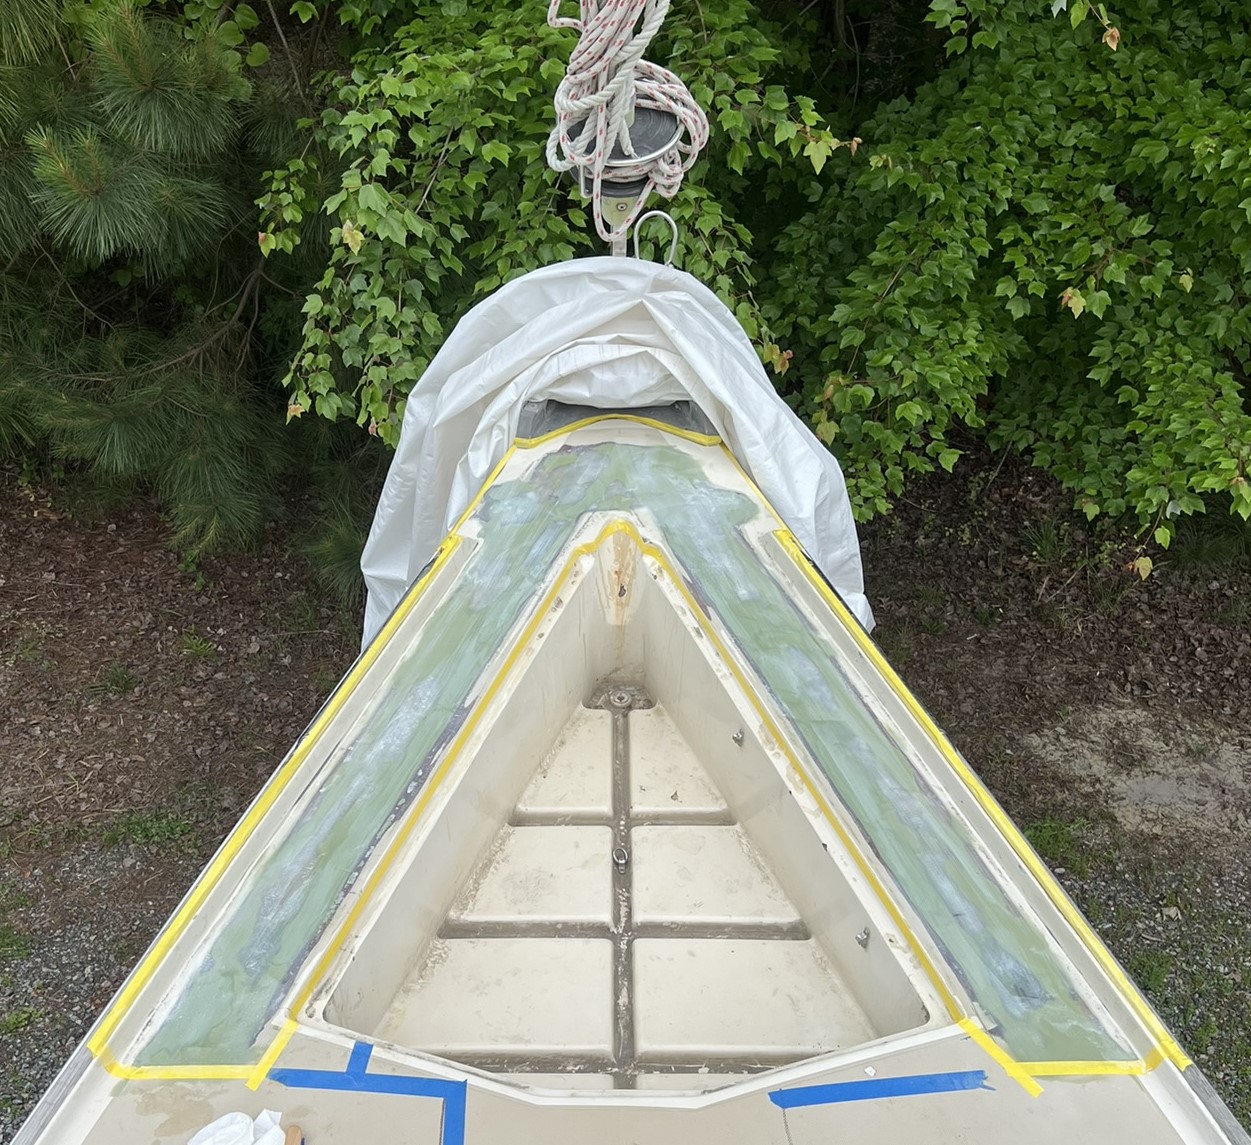
Balsa and coosa cores epoxied in place and gaps filled with thickened epoxy. Didn't take any pics of the laying the fiberglass was quite busy to stay ahead of the gel time. Fortunately, I had an epoxy mixologist keeping me supplied. I ended up with 6 total layers of 1708. In order maintain camber from the inside to outside edges, I used 5 layers at a starting width of 1 1/2" incrementing at 1 inch to 5 1/2". The last layer is 6 1/2" which is feathered to the existing glass.
Gonna be slow work if I have to do that for the entire deck, it pretty much doubles the amount of 1708, epoxy and time.
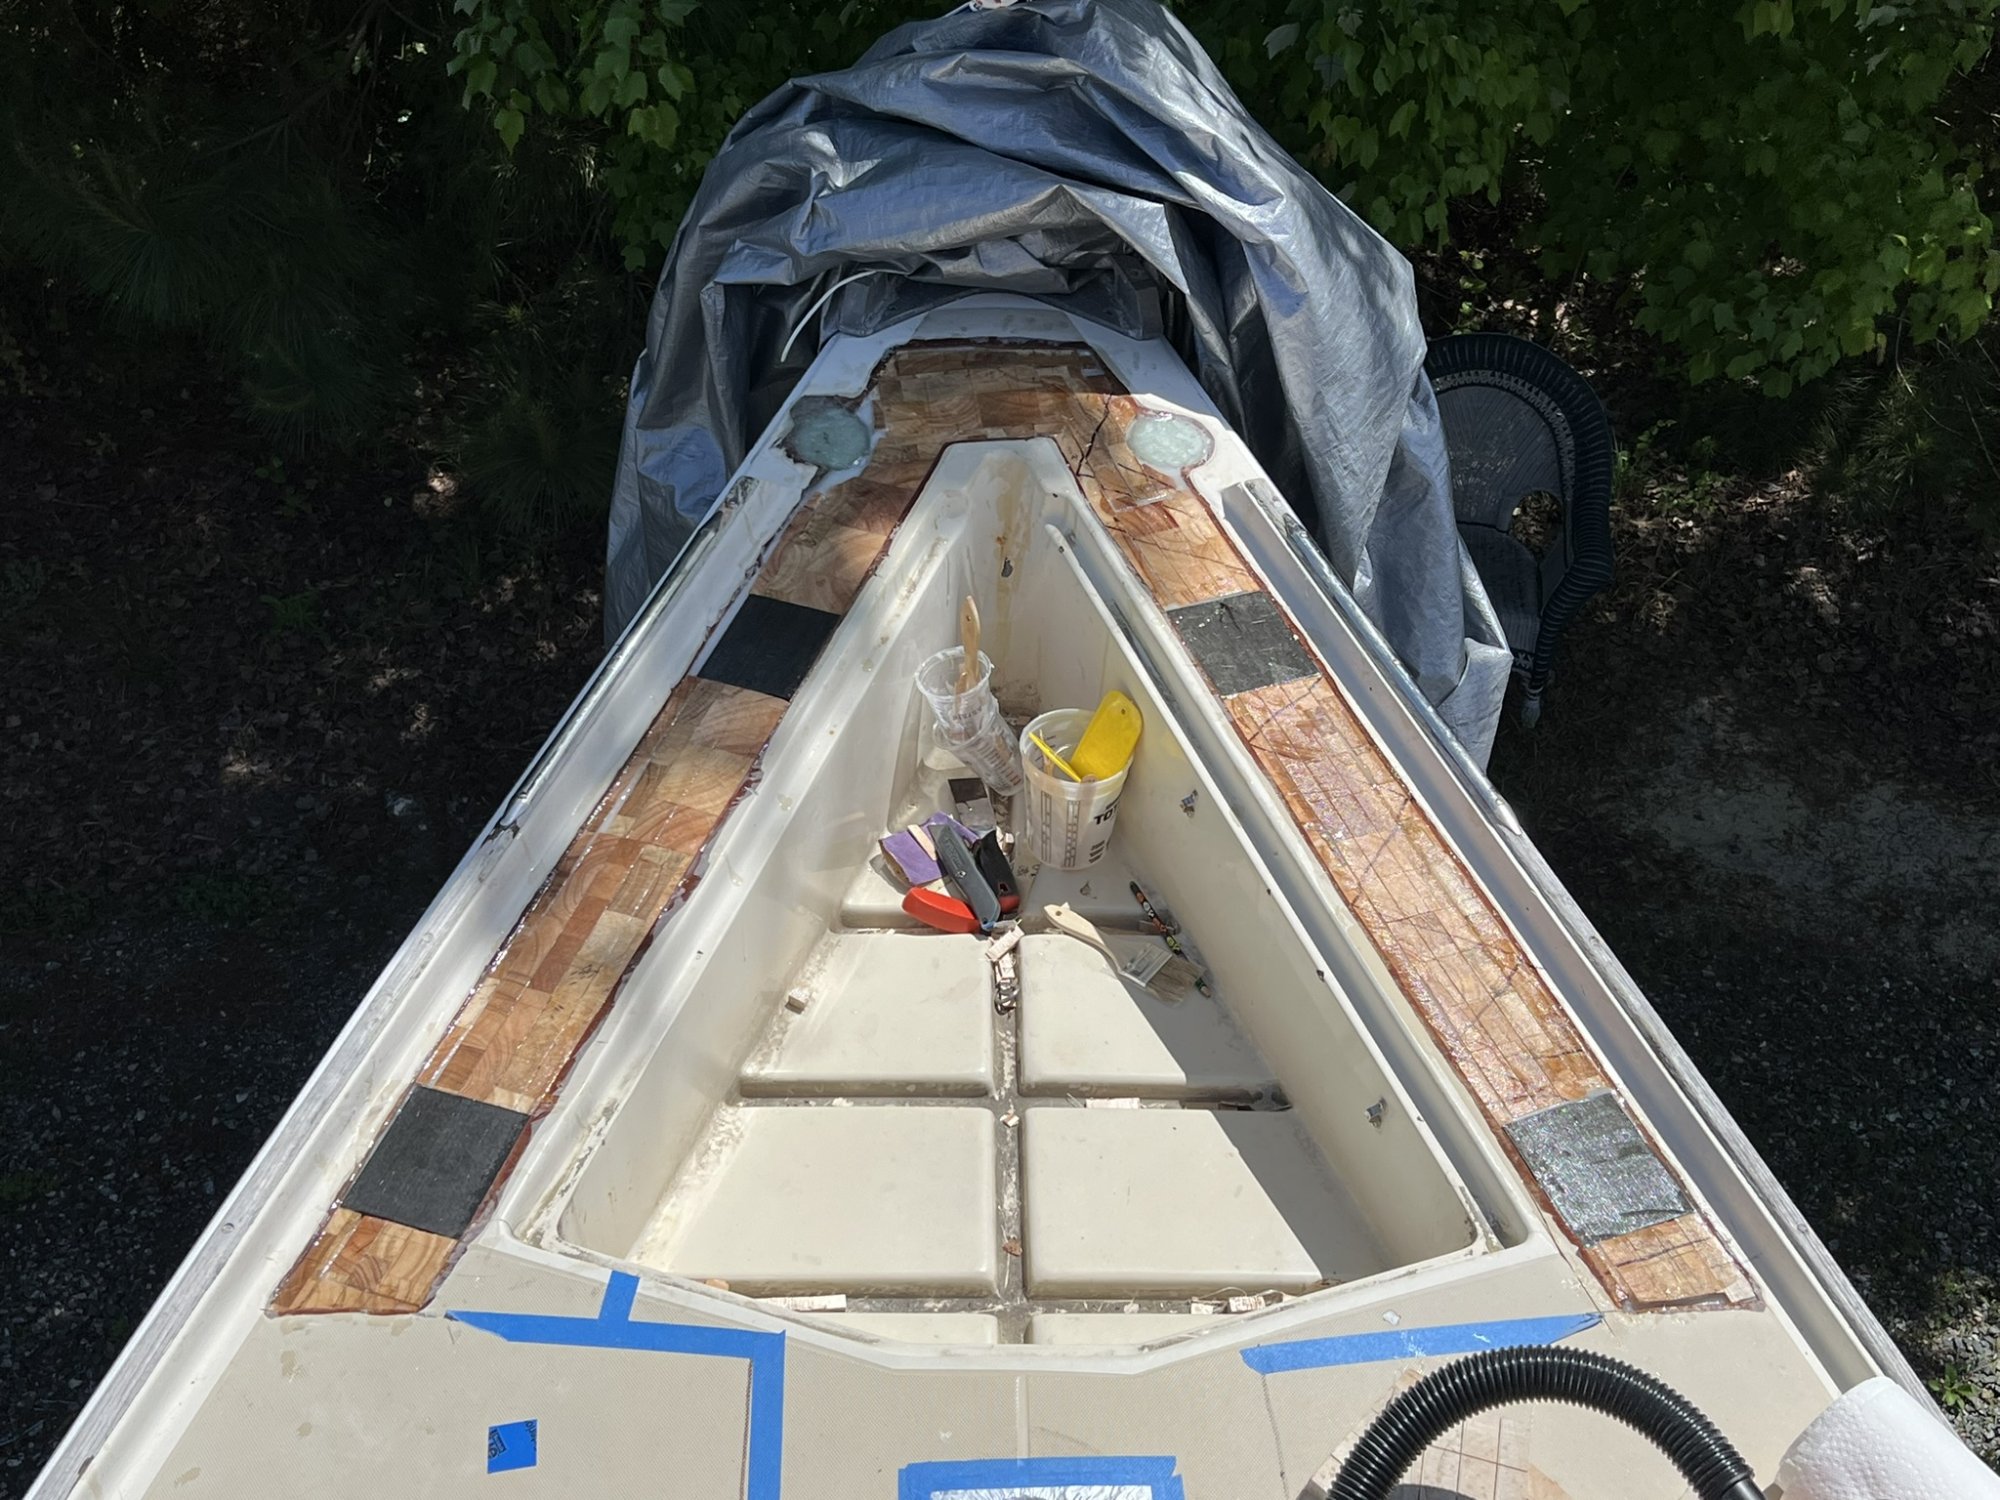
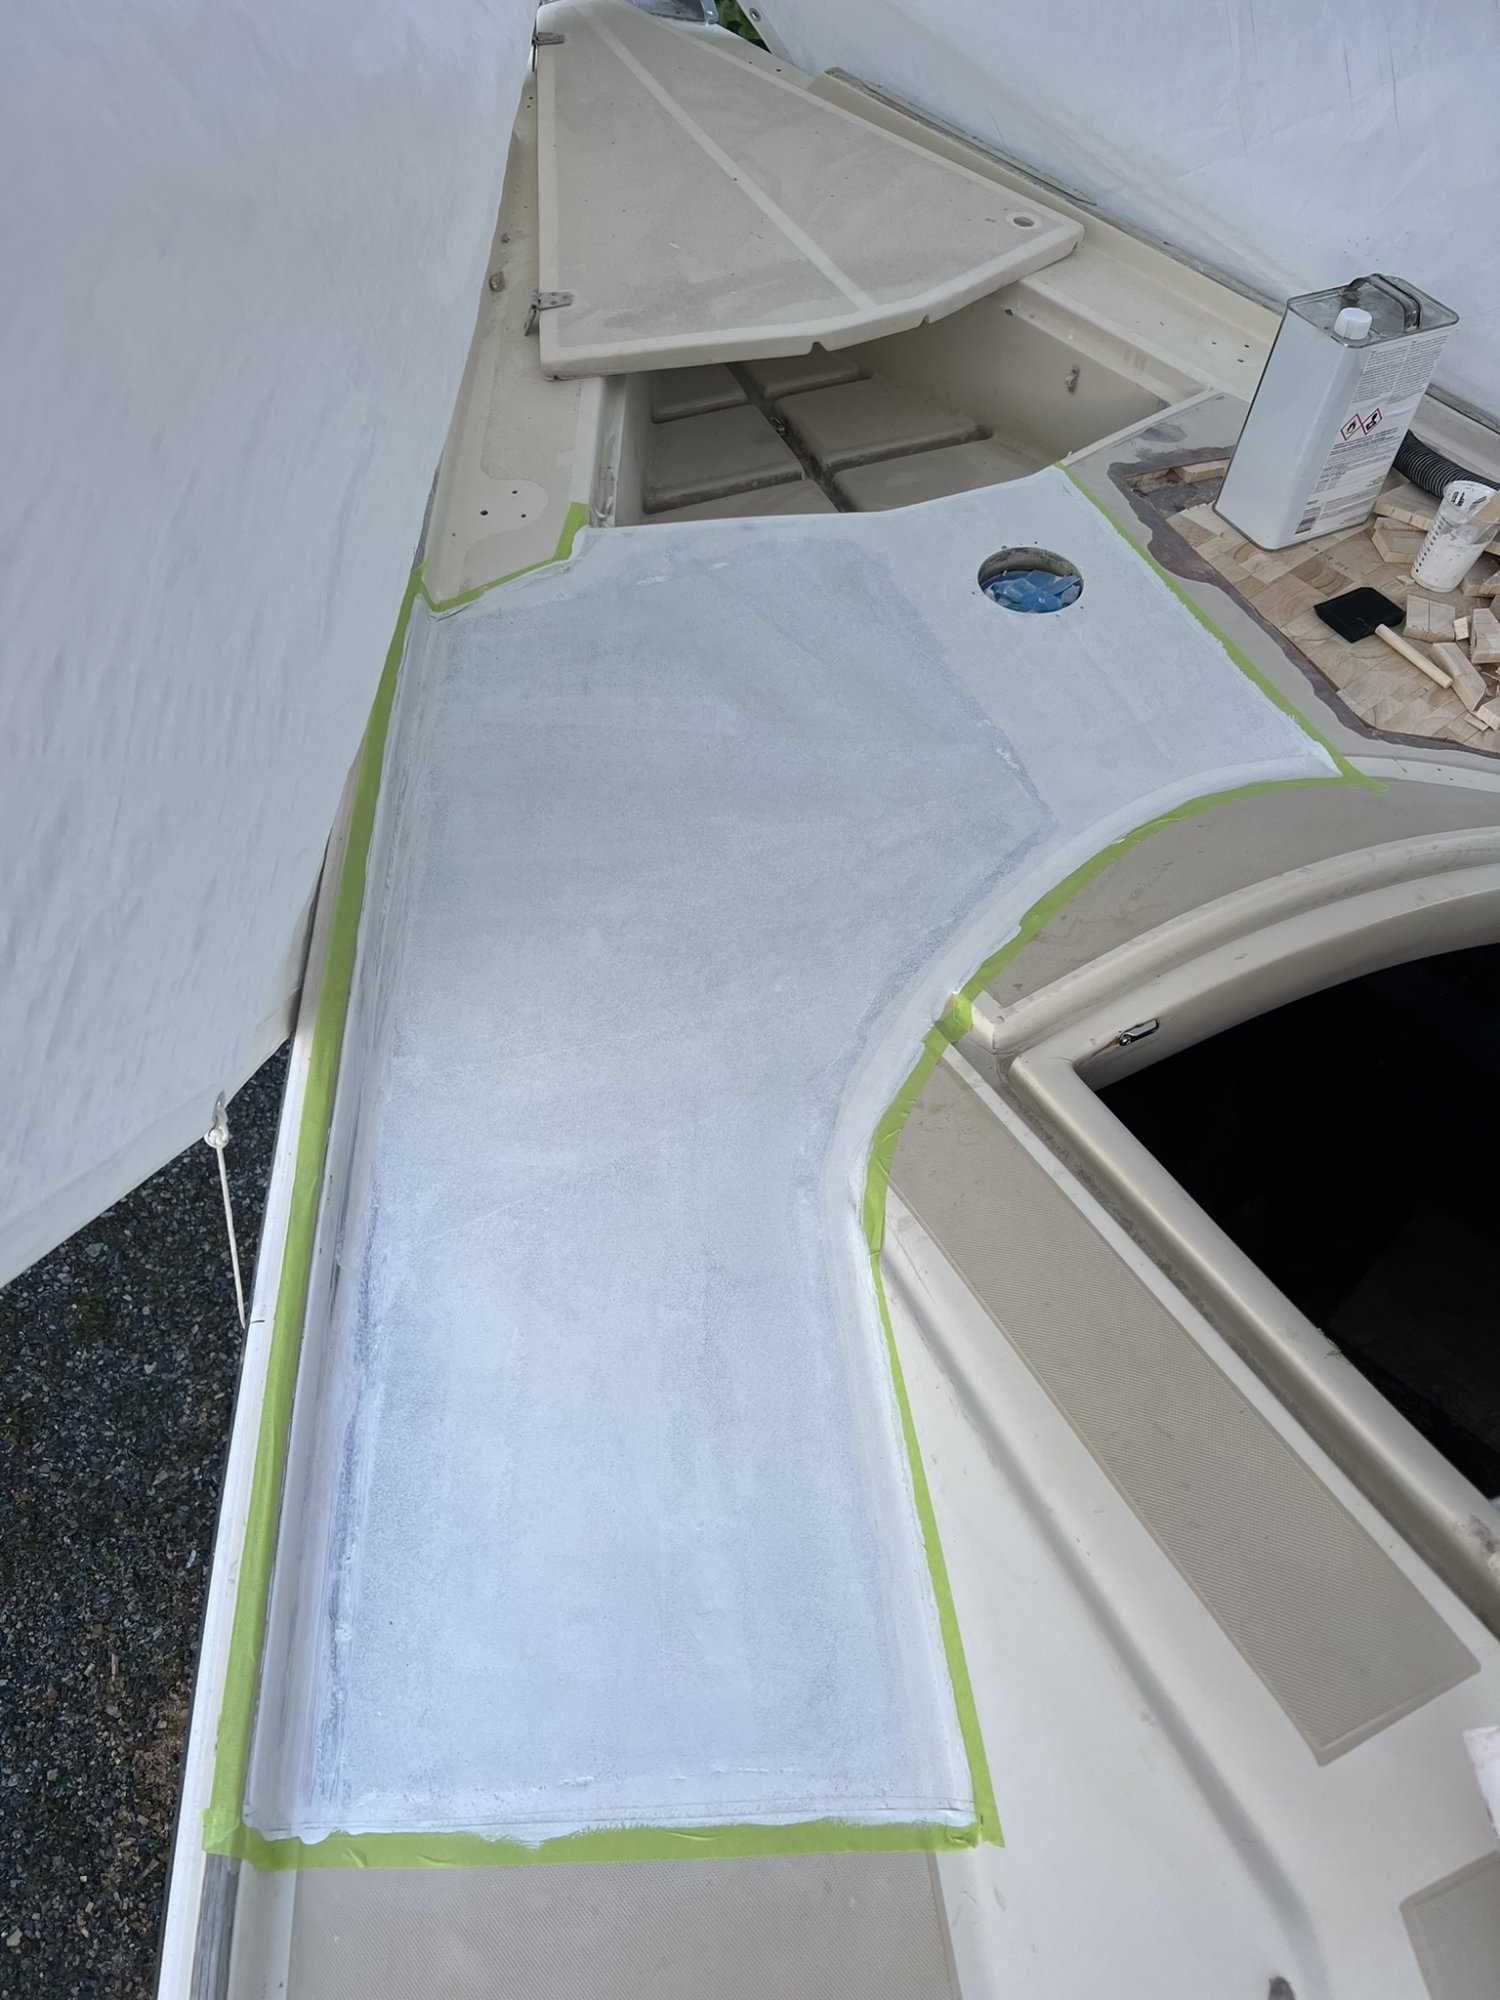
This next pic is after much sanding and two fairing layers (TotalFair) and more sanding. Taped and ready for primer (AwlGrip 545).
In all transparency, I did mix a batch of the primer, but stupid, stupid didn't stir the primer base to get the solids off the bottom. Fortunately I only mixed a total of 4 oz. (2 of "unmixed" base and 2 of the converter).
Question: The primer pour was from quart cans, in order to make up for the lost 2 oz from the base should I add a bit more reducer to the mix to make up for the loss or just press on? I'm rolling and brushing if that matters.
Balsa and coosa cores epoxied in place and gaps filled with thickened epoxy. Didn't take any pics of the laying the fiberglass was quite busy to stay ahead of the gel time. Fortunately, I had an epoxy mixologist keeping me supplied. I ended up with 6 total layers of 1708. In order maintain camber from the inside to outside edges, I used 5 layers at a starting width of 1 1/2" incrementing at 1 inch to 5 1/2". The last layer is 6 1/2" which is feathered to the existing glass.
Gonna be slow work if I have to do that for the entire deck, it pretty much doubles the amount of 1708, epoxy and time.
This next pic is after much sanding and two fairing layers (TotalFair) and more sanding. Taped and ready for primer (AwlGrip 545).
In all transparency, I did mix a batch of the primer, but stupid, stupid didn't stir the primer base to get the solids off the bottom. Fortunately I only mixed a total of 4 oz. (2 of "unmixed" base and 2 of the converter).
Question: The primer pour was from quart cans, in order to make up for the lost 2 oz from the base should I add a bit more reducer to the mix to make up for the loss or just press on? I'm rolling and brushing if that matters.
The bow section is done, just need to reinstall the hardware (pulpit and bow cleats).
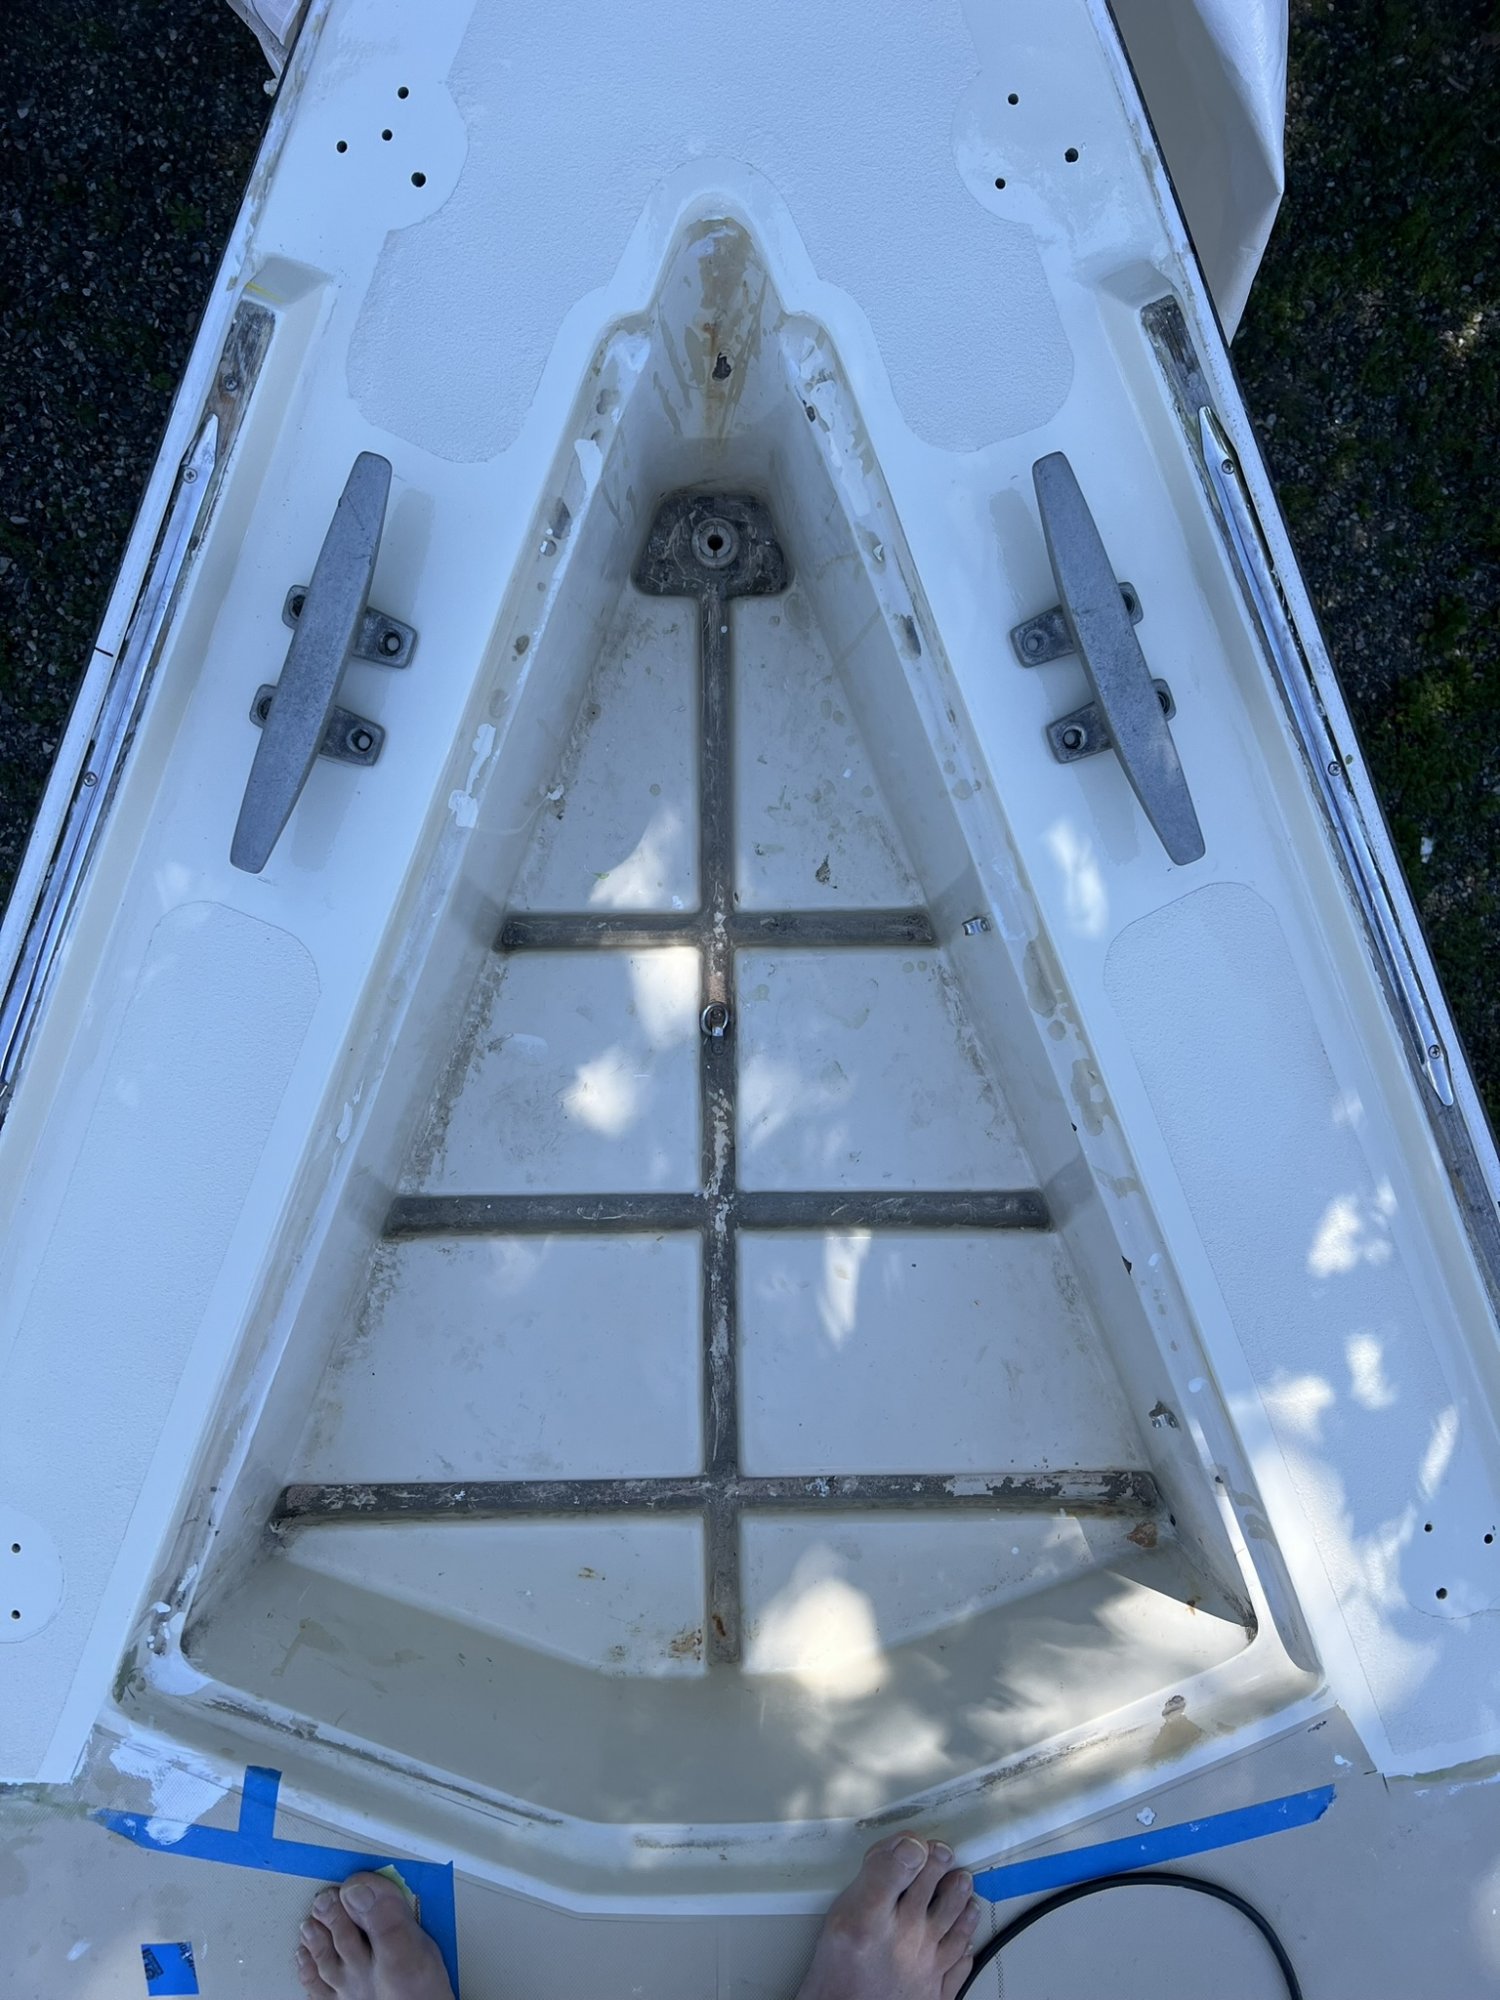

Working on the foredeck now.
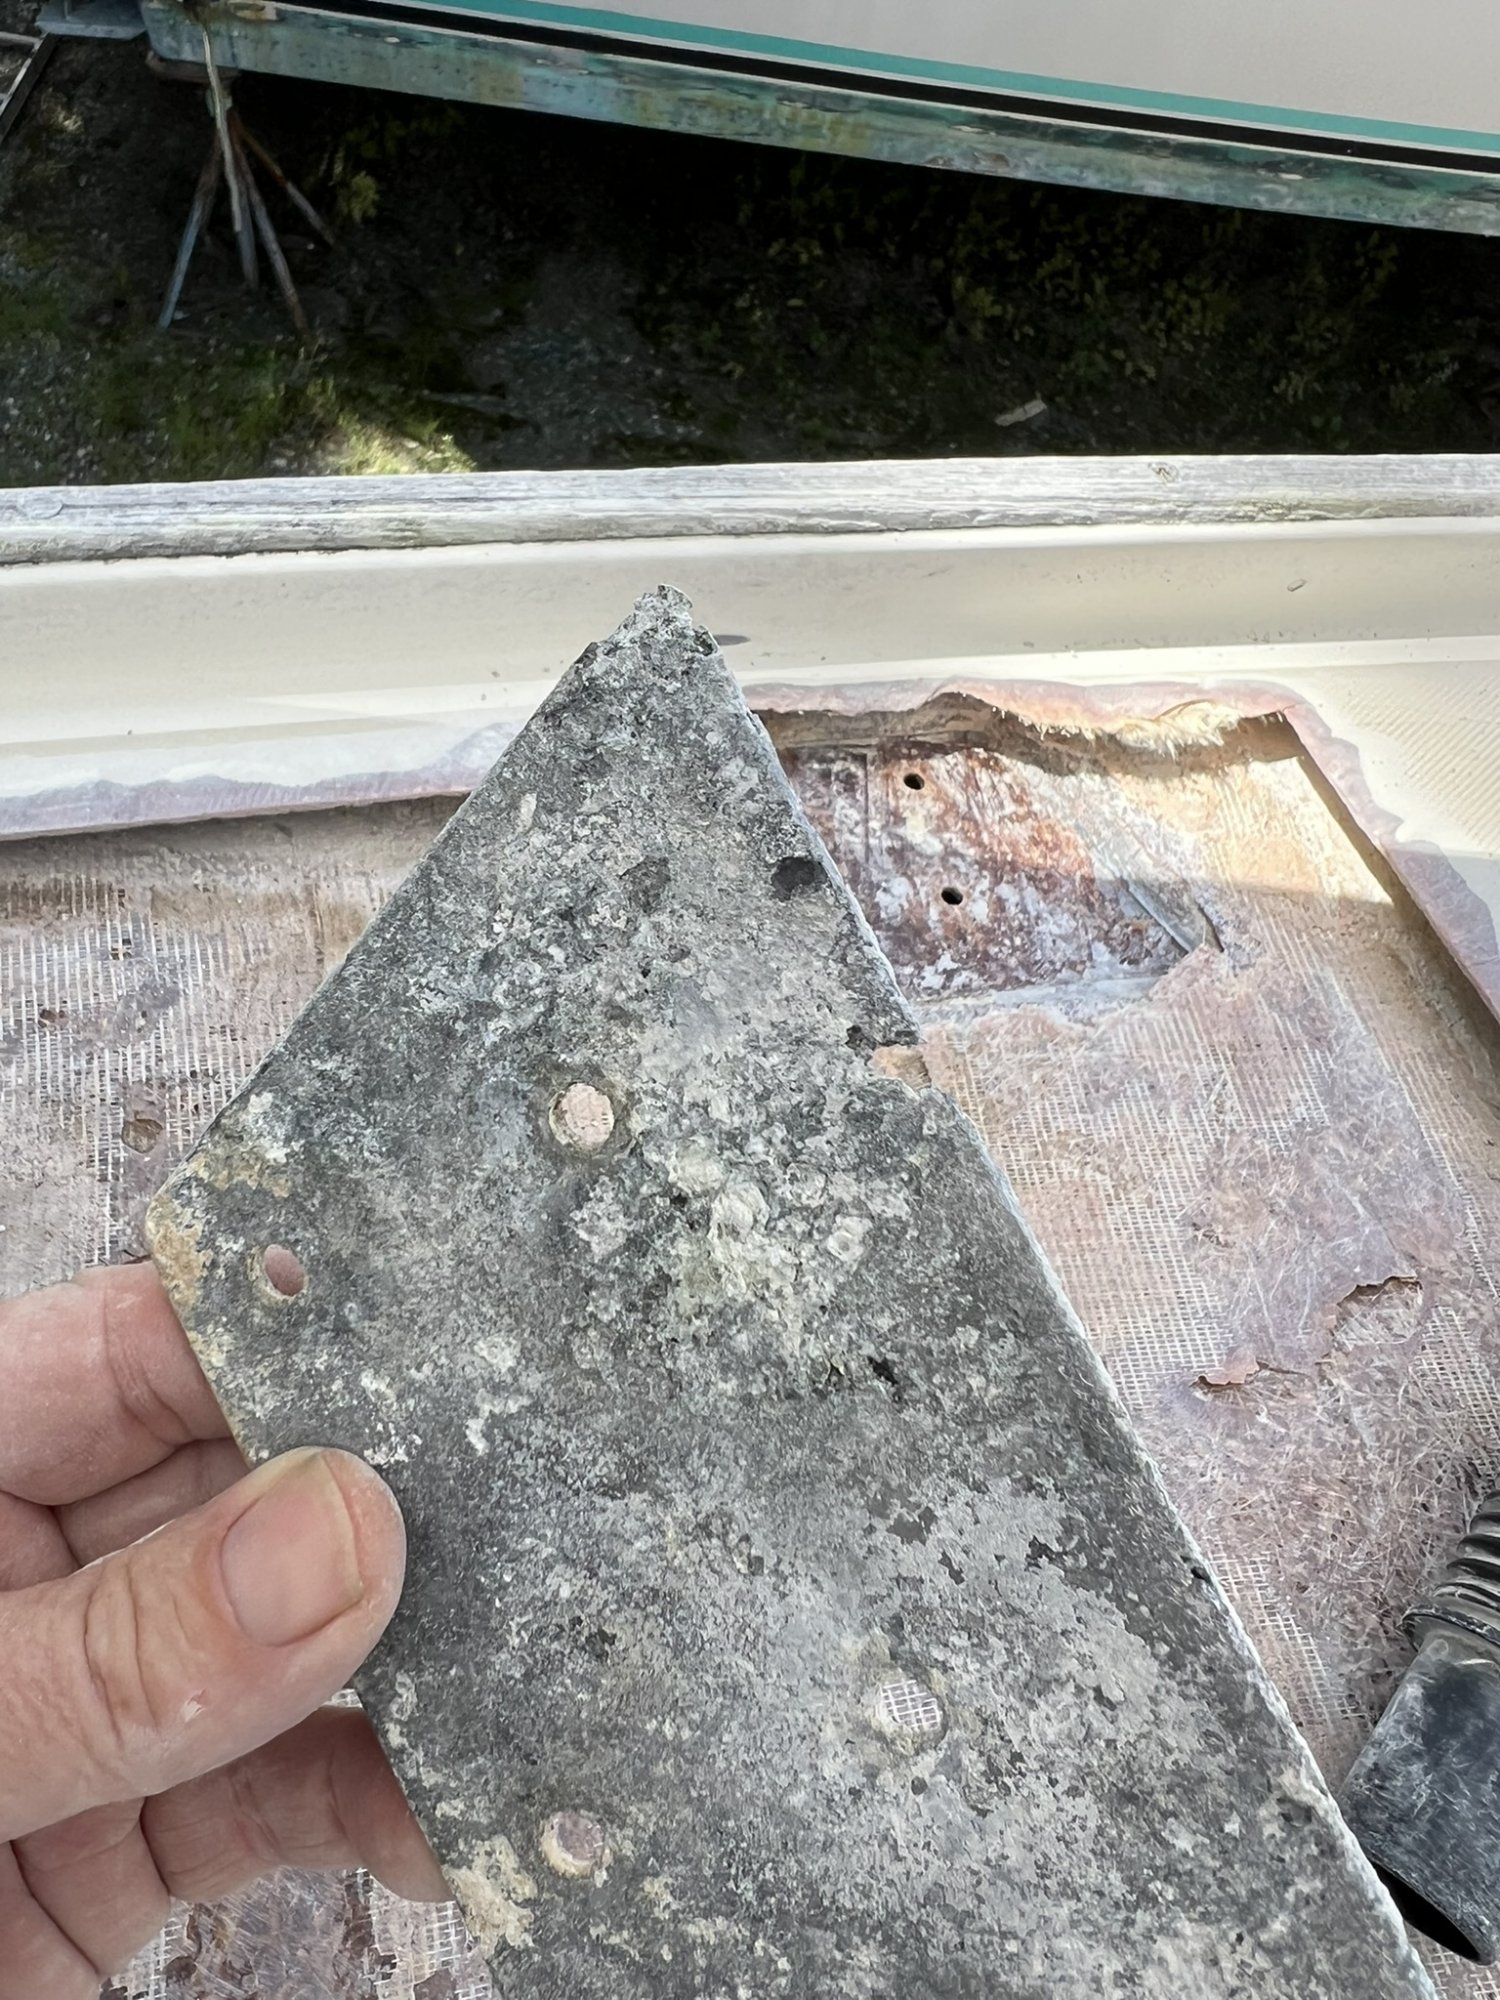
Found something interesting. While removing the stanchions, there were washers and no backing plates, which was kinda surprising to me.
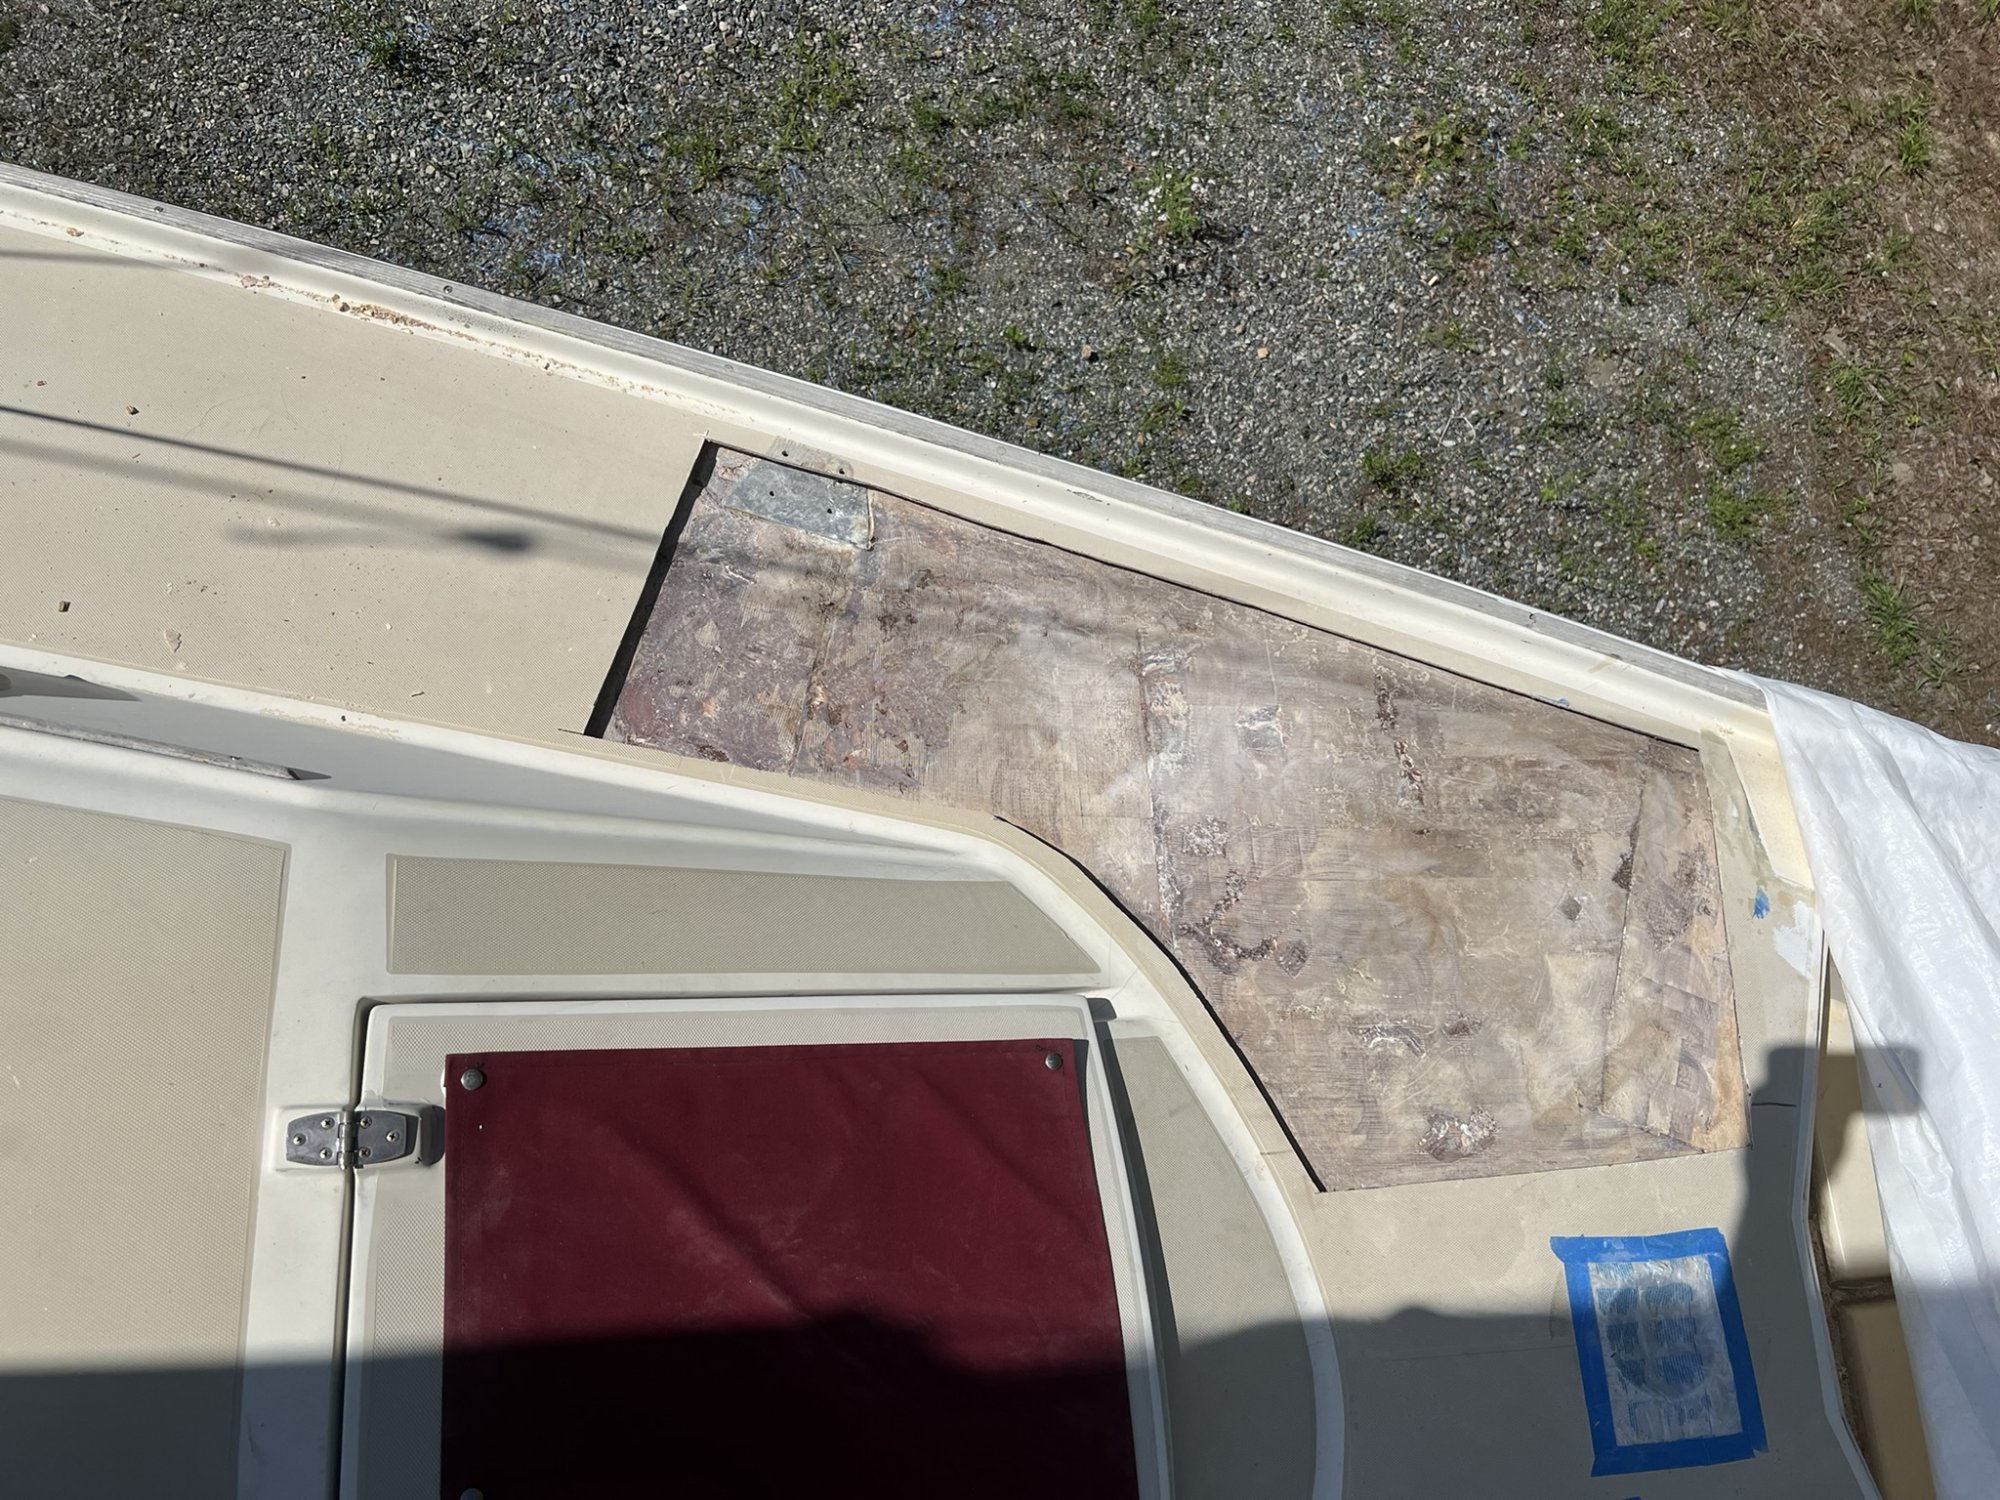
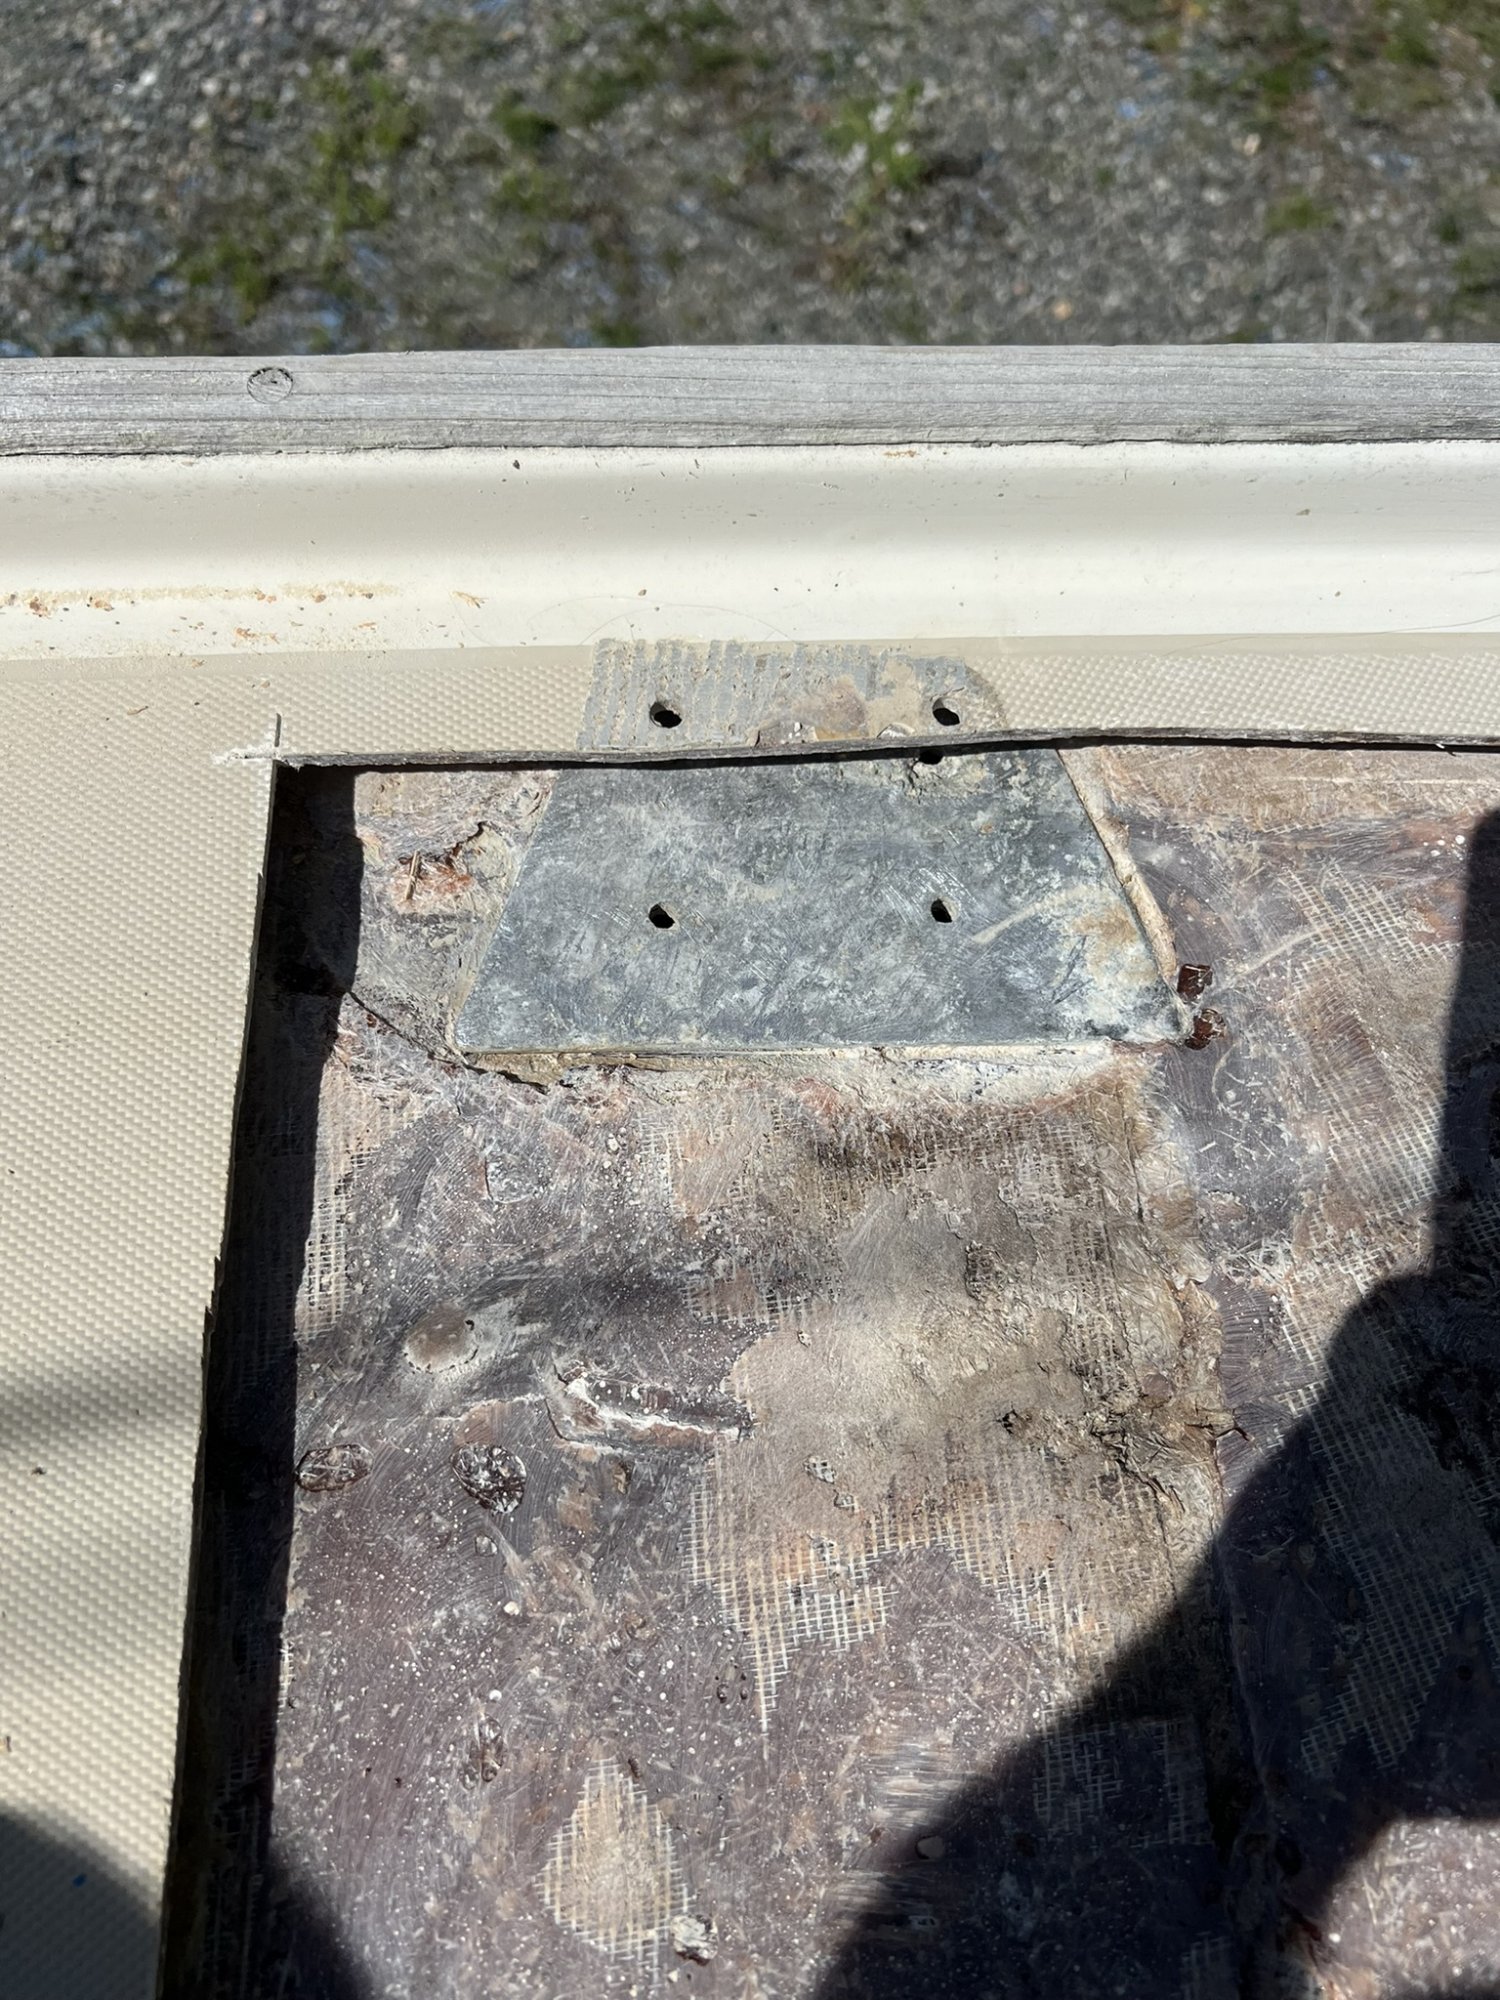
Upon demo'ing the port side foredeck, I found an embedded aluminum plate where the first stanchion is located.
I the O'Day production boys had a good idea, however woulda been nice if they had over-bored the stanchion mounting bolts and filled them to prevent water from migrating to the balsa core. Perhaps over-boring was a thing after 1984?
I kinda wonder if anyone who has rebedded their stanchions has run into this.
Found something interesting. While removing the stanchions, there were washers and no backing plates, which was kinda surprising to me.
Upon demo'ing the port side foredeck, I found an embedded aluminum plate where the first stanchion is located.
I the O'Day production boys had a good idea, however woulda been nice if they had over-bored the stanchion mounting bolts and filled them to prevent water from migrating to the balsa core. Perhaps over-boring was a thing after 1984?
I kinda wonder if anyone who has rebedded their stanchions has run into this.
Yes, the plate is embedded in the lower layer with the core on top.Great photos, and that bow section looks great!
On the photo with the aluminum plate, I assume that there was balsa core over all of that area?
Greg
Using Softsand by sprinkling over a wet layer of Awlgrip, letting it start to cure, then sweeping the excess off and applying two more layers of Awlgrip to encapsulate the sand. The first layer used double the amount of paint when compared to the bottom and final coats.Looks good!
How did you restore the deck nonskid?
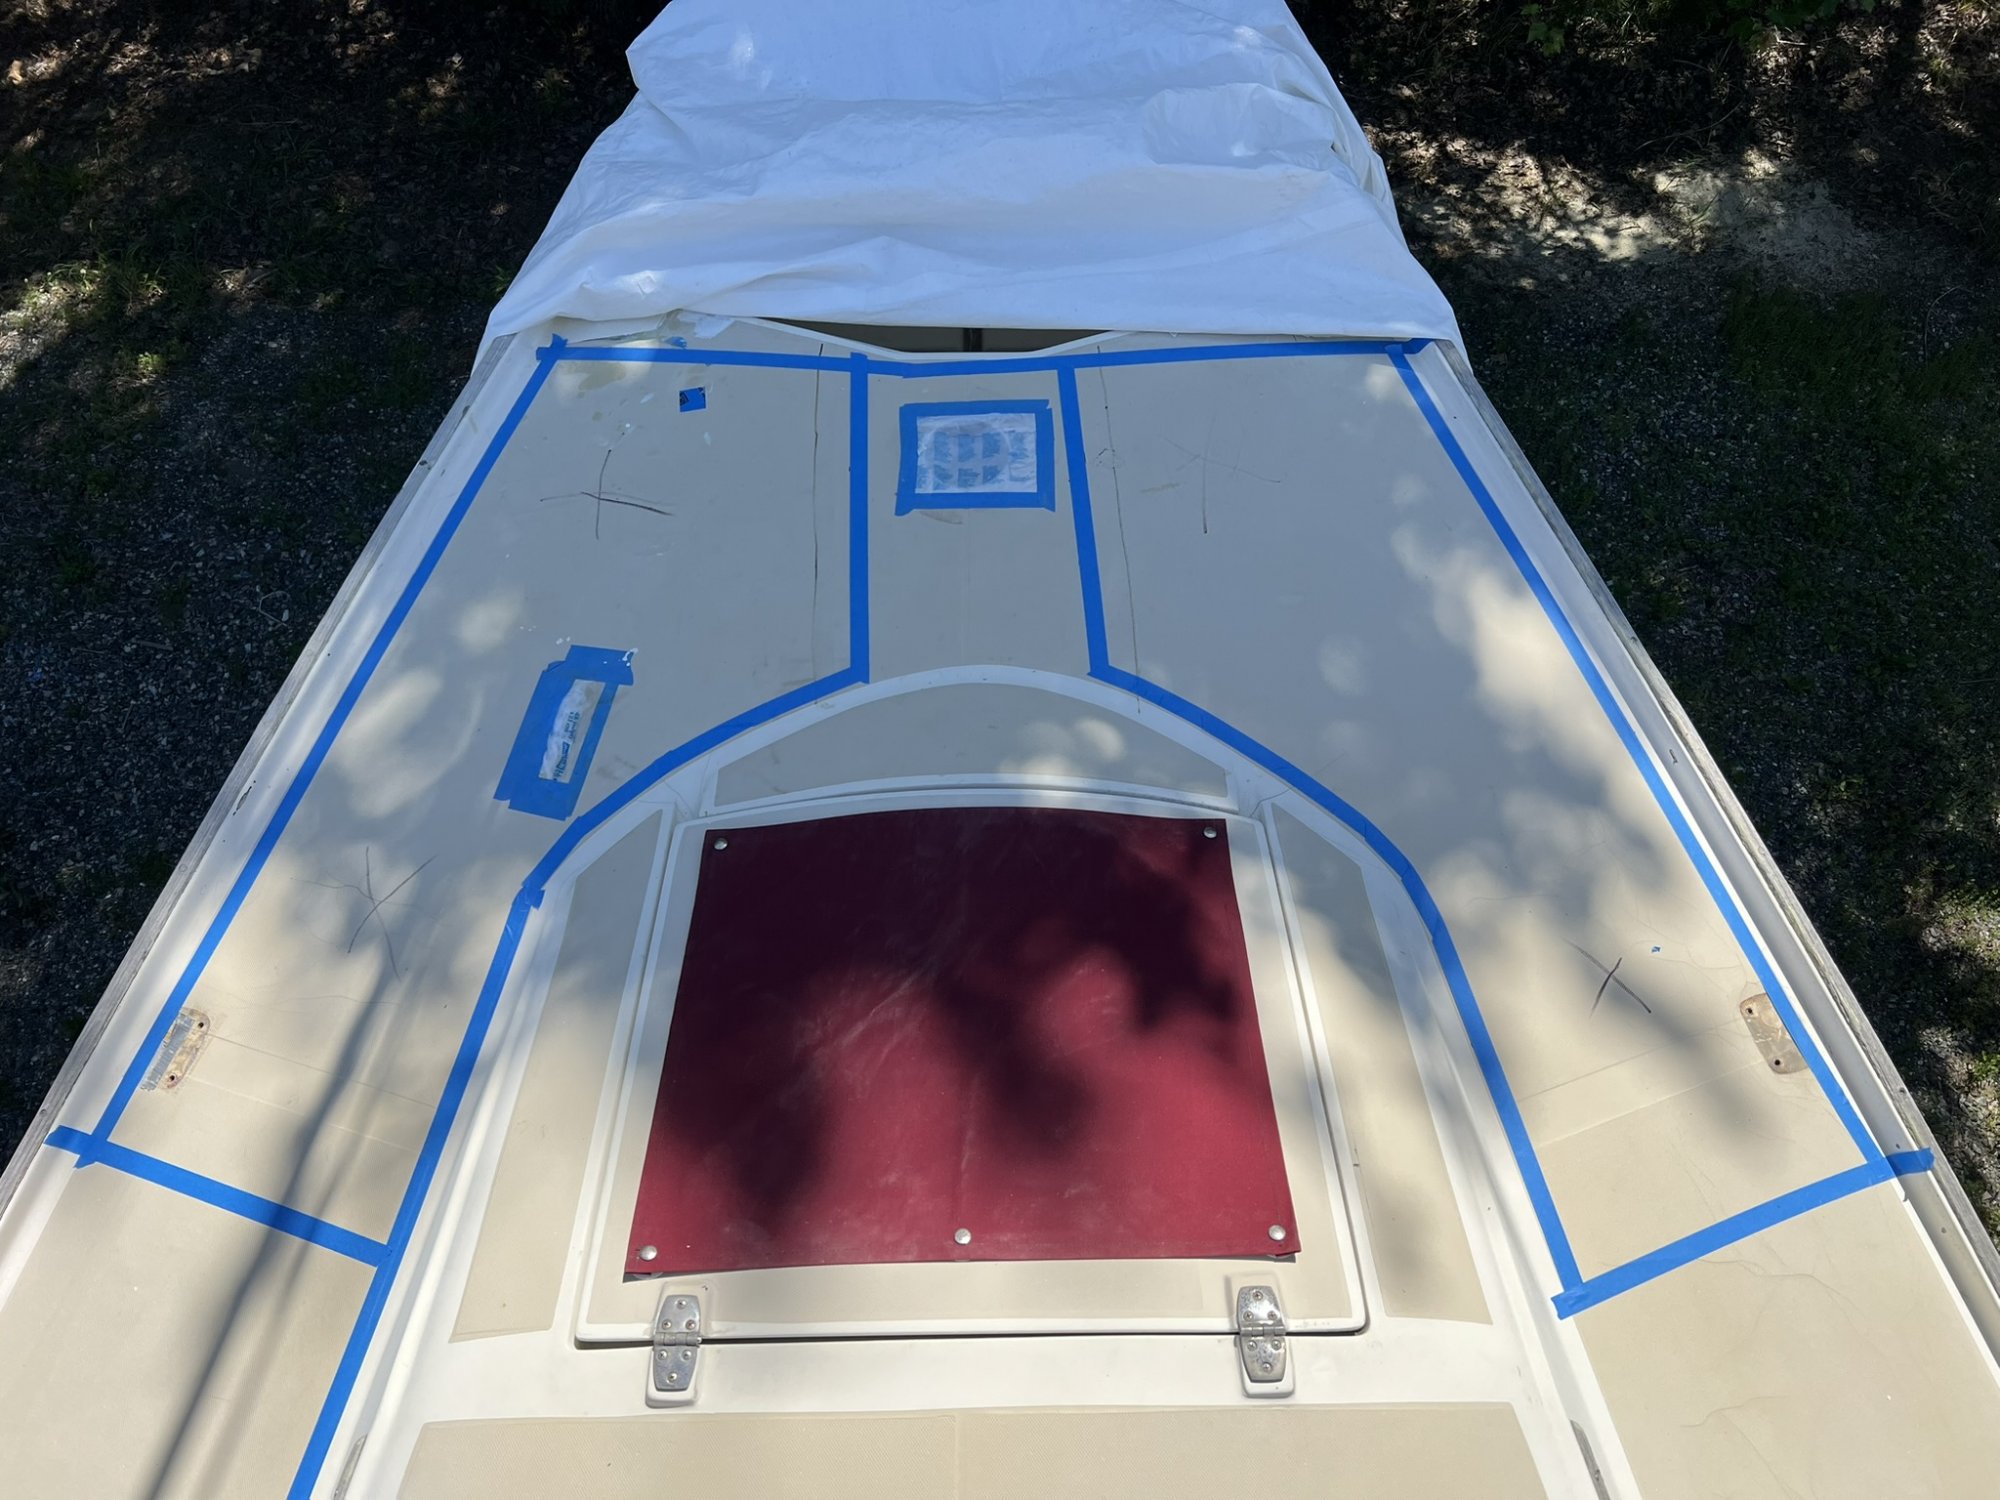
Making good progress. First coat of primer on port foredeck and excavated the starboard side.
The starboard stanchion aluminum plate has some serious crevice corrosion and deteriorated bedding.
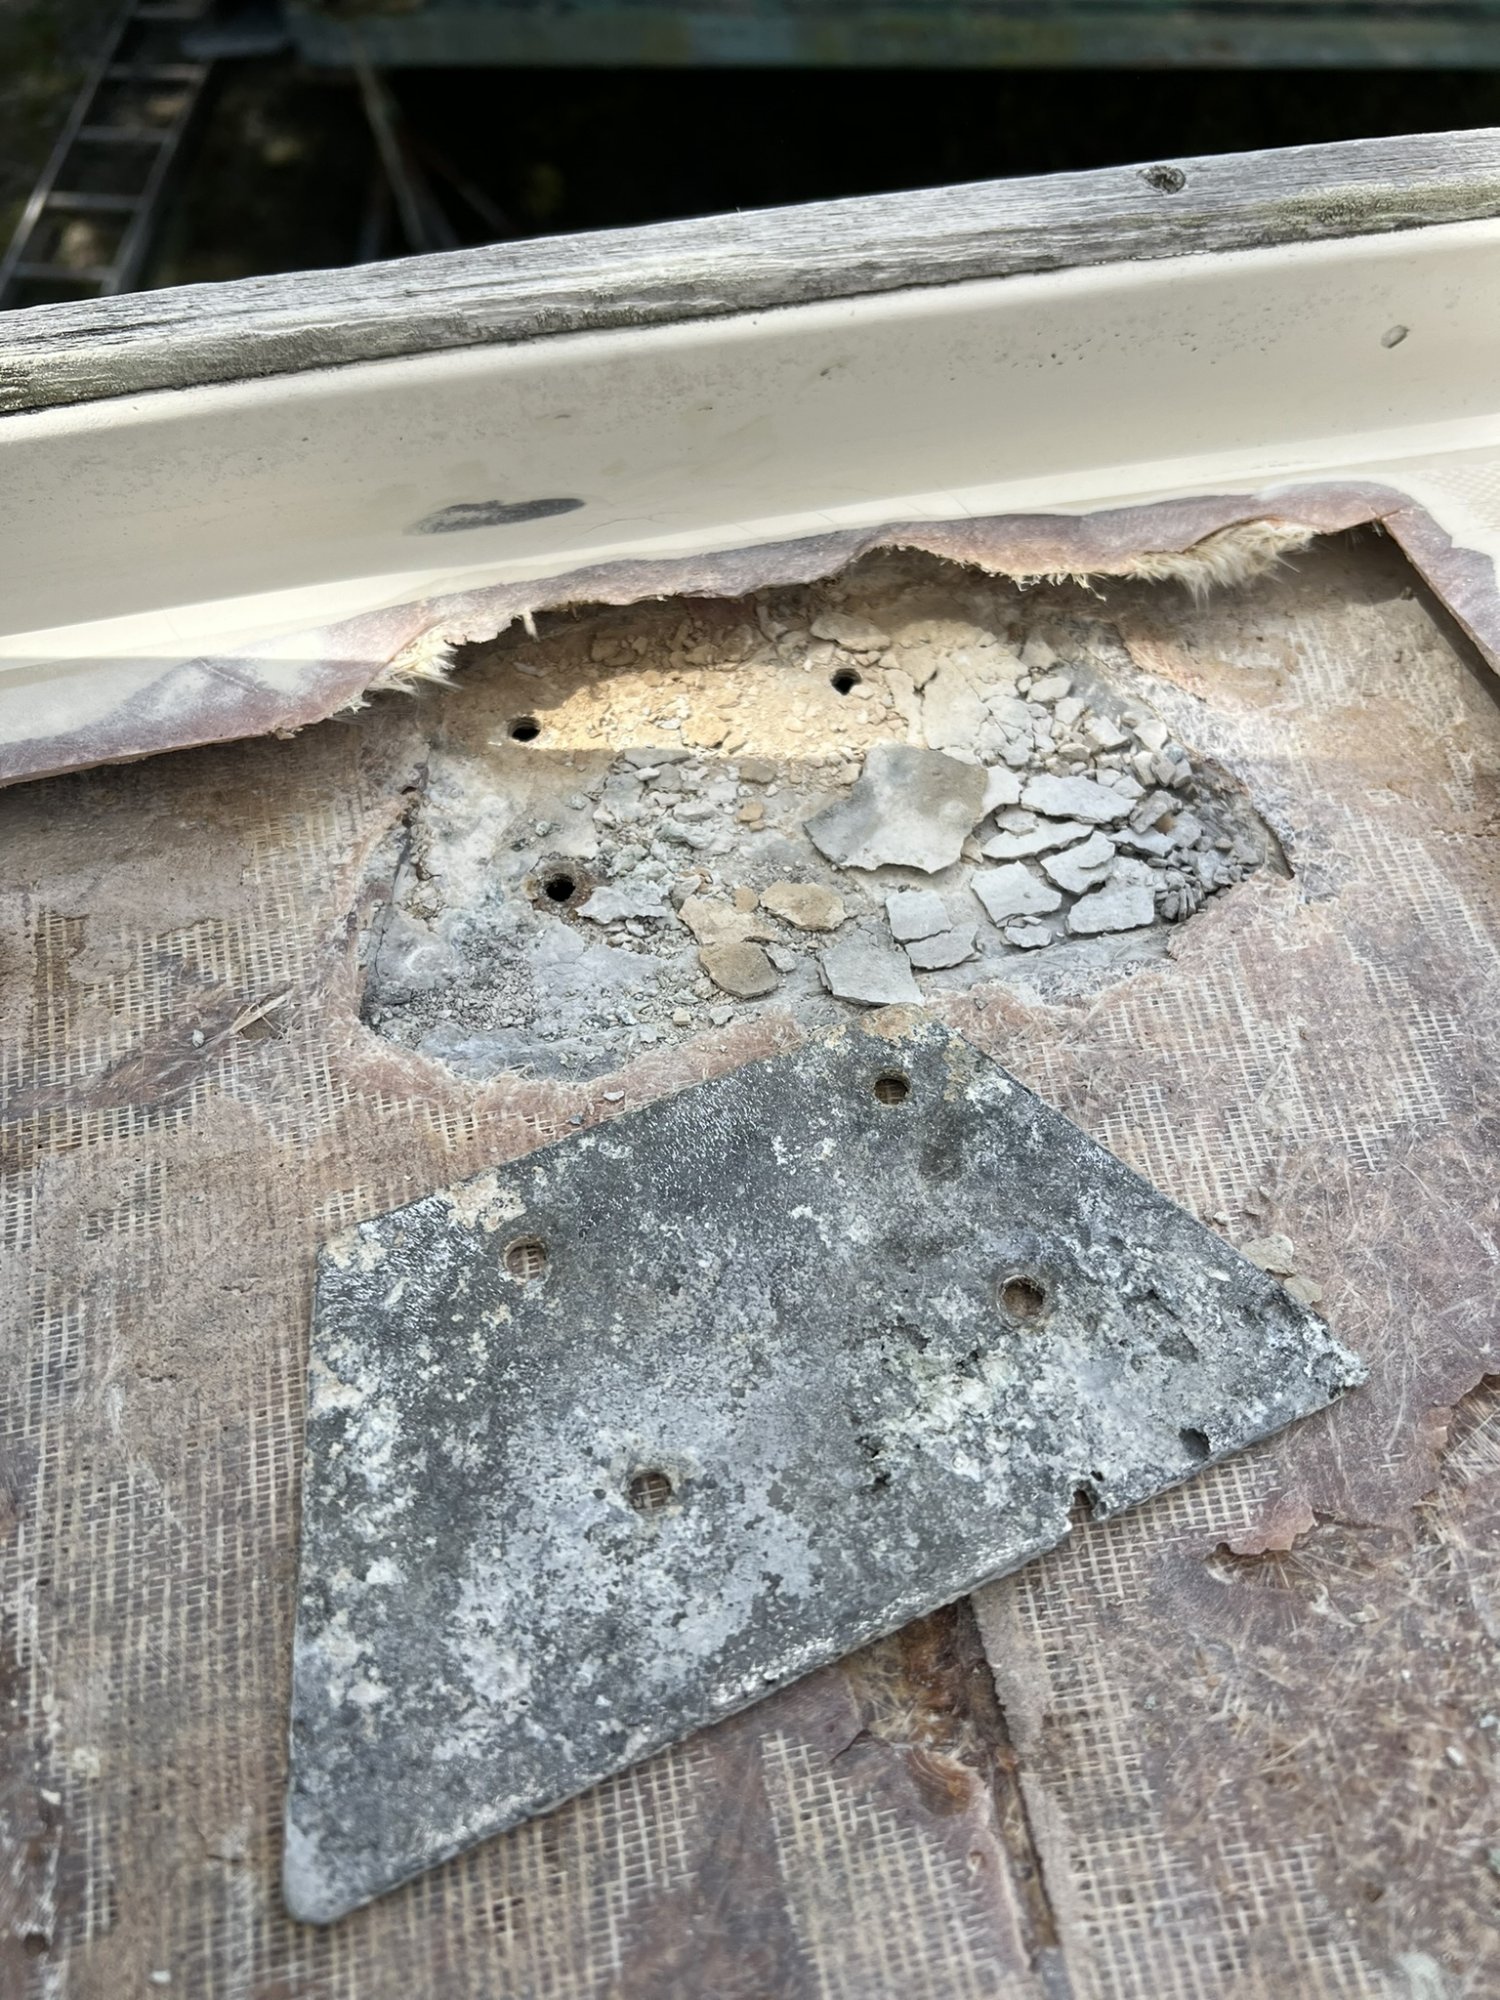
The starboard stanchion aluminum plate has some serious crevice corrosion and deteriorated bedding.
Not threaded. You're right, that explains why there were only nuts and washers with no backing plates. I've purchased several 1/4" G10 to fabricate backing plates for when I reinstall the stanchions. I'm thinking that the embedded backing plates aren't a good solution as you can't inspect their integrity because they're hidden in the core.
Thanks and errr... noThis project looks awesome! Want to come do mine next?")
Had my first major heatwave and had to bailout. Interior saloon temps exceed 100F, deck temps 107-125F. Evening temps at mid-80s, so not much chance to cool off till the bubble passes. Was able to erect scaffolding donated by a friend in anticipation of working on the side decks, way safer and easier this way. Used two "bucks", one to stand on and the other for shade.When we did a section of Skipping Stone's deck, we first found a section of the old non-skid deck in good condition. After a very thorough cleaning we covered it with mould release and took a copy to impregnate the gel-coat of the repair.
In the interest of reduced effort, I've decided to not do a wholesale removal of good core and only work back from wet to dry core. It is my hope that I will have an easier job fairing as well.

As I tap and check for delamination, it seems that the toe rail area is consistently wet, the areas toward the cabin are not. Tapped out the square section at the top of the picture which showed stress cracks and a dull thud when whacked. I was surprised to find no wet, however a section of the bottom layer that was cracked. I tried one attempt with thickened epoxy and a layer of 1708 which didn't come out so great ( as evidenced in the above pic) so decided to grind the crack out.

What you're seeing in this pic is the hole that I ground out, in the hole the shiny glob is left over epoxy from my failed attempt at a fix and also the top of the inter liner.
The ground out area matches the stress crack area of the outer layer. I was thinking that something heavy had landed on the deck at one time, as I ground the crack to what you see, I noted that the under layer of fiberglass mat was somewhat tacky and soft. So I've concluded that this area of the laminate has not cured in 40+ years! I think that my first attempt failed because I hadn't ground out all the uncured polyester resin and glass. At least that's my story and I'm sticking to it
Lesson learned is that not all delamination is due to moisture and can be caused by other issues.
As I tap and check for delamination, it seems that the toe rail area is consistently wet, the areas toward the cabin are not. Tapped out the square section at the top of the picture which showed stress cracks and a dull thud when whacked. I was surprised to find no wet, however a section of the bottom layer that was cracked. I tried one attempt with thickened epoxy and a layer of 1708 which didn't come out so great ( as evidenced in the above pic) so decided to grind the crack out.
What you're seeing in this pic is the hole that I ground out, in the hole the shiny glob is left over epoxy from my failed attempt at a fix and also the top of the inter liner.
The ground out area matches the stress crack area of the outer layer. I was thinking that something heavy had landed on the deck at one time, as I ground the crack to what you see, I noted that the under layer of fiberglass mat was somewhat tacky and soft. So I've concluded that this area of the laminate has not cured in 40+ years! I think that my first attempt failed because I hadn't ground out all the uncured polyester resin and glass. At least that's my story and I'm sticking to it
Lesson learned is that not all delamination is due to moisture and can be caused by other issues.
jssailem
SBO Weather and Forecasting Forum Jim & John
- Oct 22, 2014
- 24,598
Sounds like you found that a sticky mess of uncured resin can spoil as finished surface.uncured polyester resin and glass. At least that's my story and I'm sticking to it

Makes you wonder what were they thinking?
It is a journey fixing a Good Old Boat.
You can buy the original female (reverse) pattern, called O'day Weave from JNJ Composites, dba Gibco Flex-Mold, 6657 East Peden Rd. Fort Worth, TX 76179 (817)236-5021. The pattern is GFRW 319. See 319 | Gibco Flex-Mold, Non Skid SurfacesWhen we did a section of Skipping Stone's deck, we first found a section of the old non-skid deck in good condition. After a very thorough cleaning we covered it with mould release and took a copy to impregnate the gel-coat of the repair.
I bought a 1-foot square and it is a perfect match. I then provided that square to a "professional" to complete a 2" repair on my companionway hatch. This "professional" CUT THE MOLD into three pieces because he was an idiot! I did not pay him for his "service."
Eherlihy, good to know the details for the OEM nonskid. I'm not enough of a craftsman to replicate the pattern so committed to the sanding approach.