Good to know even Superman can take a day off. It really was a gorgeous day in South Carolina. I'm happy for you.Yesterday's update: We had such a gorgeous day I decided to play hooky! Dropped the top on the convertible and went for a drive.
Repairing Hunter 40 damage from Hurricane Matthew
- Thread starter B757Captain
- Start date
Sorry! This past summer I bought an H380 in North Charleston. It was on the hard at a boat yard. It was surveyed ( in water). Needed some work ( I was doing all new electronics, davits/solar and etc). 2 weeks before launching the yard was moving another large racing sailboat into the space beside me. It fell over on my boat, both boats were de-masted, all standing and running rigging lost along with rub rails, graphics and fiberglass damage on sides and deck. The boat 7 months later still not repaired, about $60K in damage so far, before indirect cost. I was insured and the boat yard is insured.
Oh and then Mathew came thru.. which my boat survived. So I know you are heart broken.... Best of luck, maybe some day I will actually sail the boat.
Oh and then Mathew came thru.. which my boat survived. So I know you are heart broken.... Best of luck, maybe some day I will actually sail the boat.
Ouch!! Accidents in the yard always worry me - boats on jacks/stands are like dominos. I hope the yard can get you fixed and back in the water.Sorry! This past summer I bought an H380 in North Charleston. It was on the hard at a boat yard. It was surveyed ( in water). Needed some work ( I was doing all new electronics, davits/solar and etc). 2 weeks before launching the yard was moving another large racing sailboat into the space beside me. It fell over on my boat, both boats were de-masted, all standing and running rigging lost along with rub rails, graphics and fiberglass damage on sides and deck. The boat 7 months later still not repaired, about $60K in damage so far, before indirect cost. I was insured and the boat yard is insured.
Oh and then Mathew came thru.. which my boat survived. So I know you are heart broken.... Best of luck, maybe some day I will actually sail the boat.
Mark
This week: Bilge paint and bulkheads
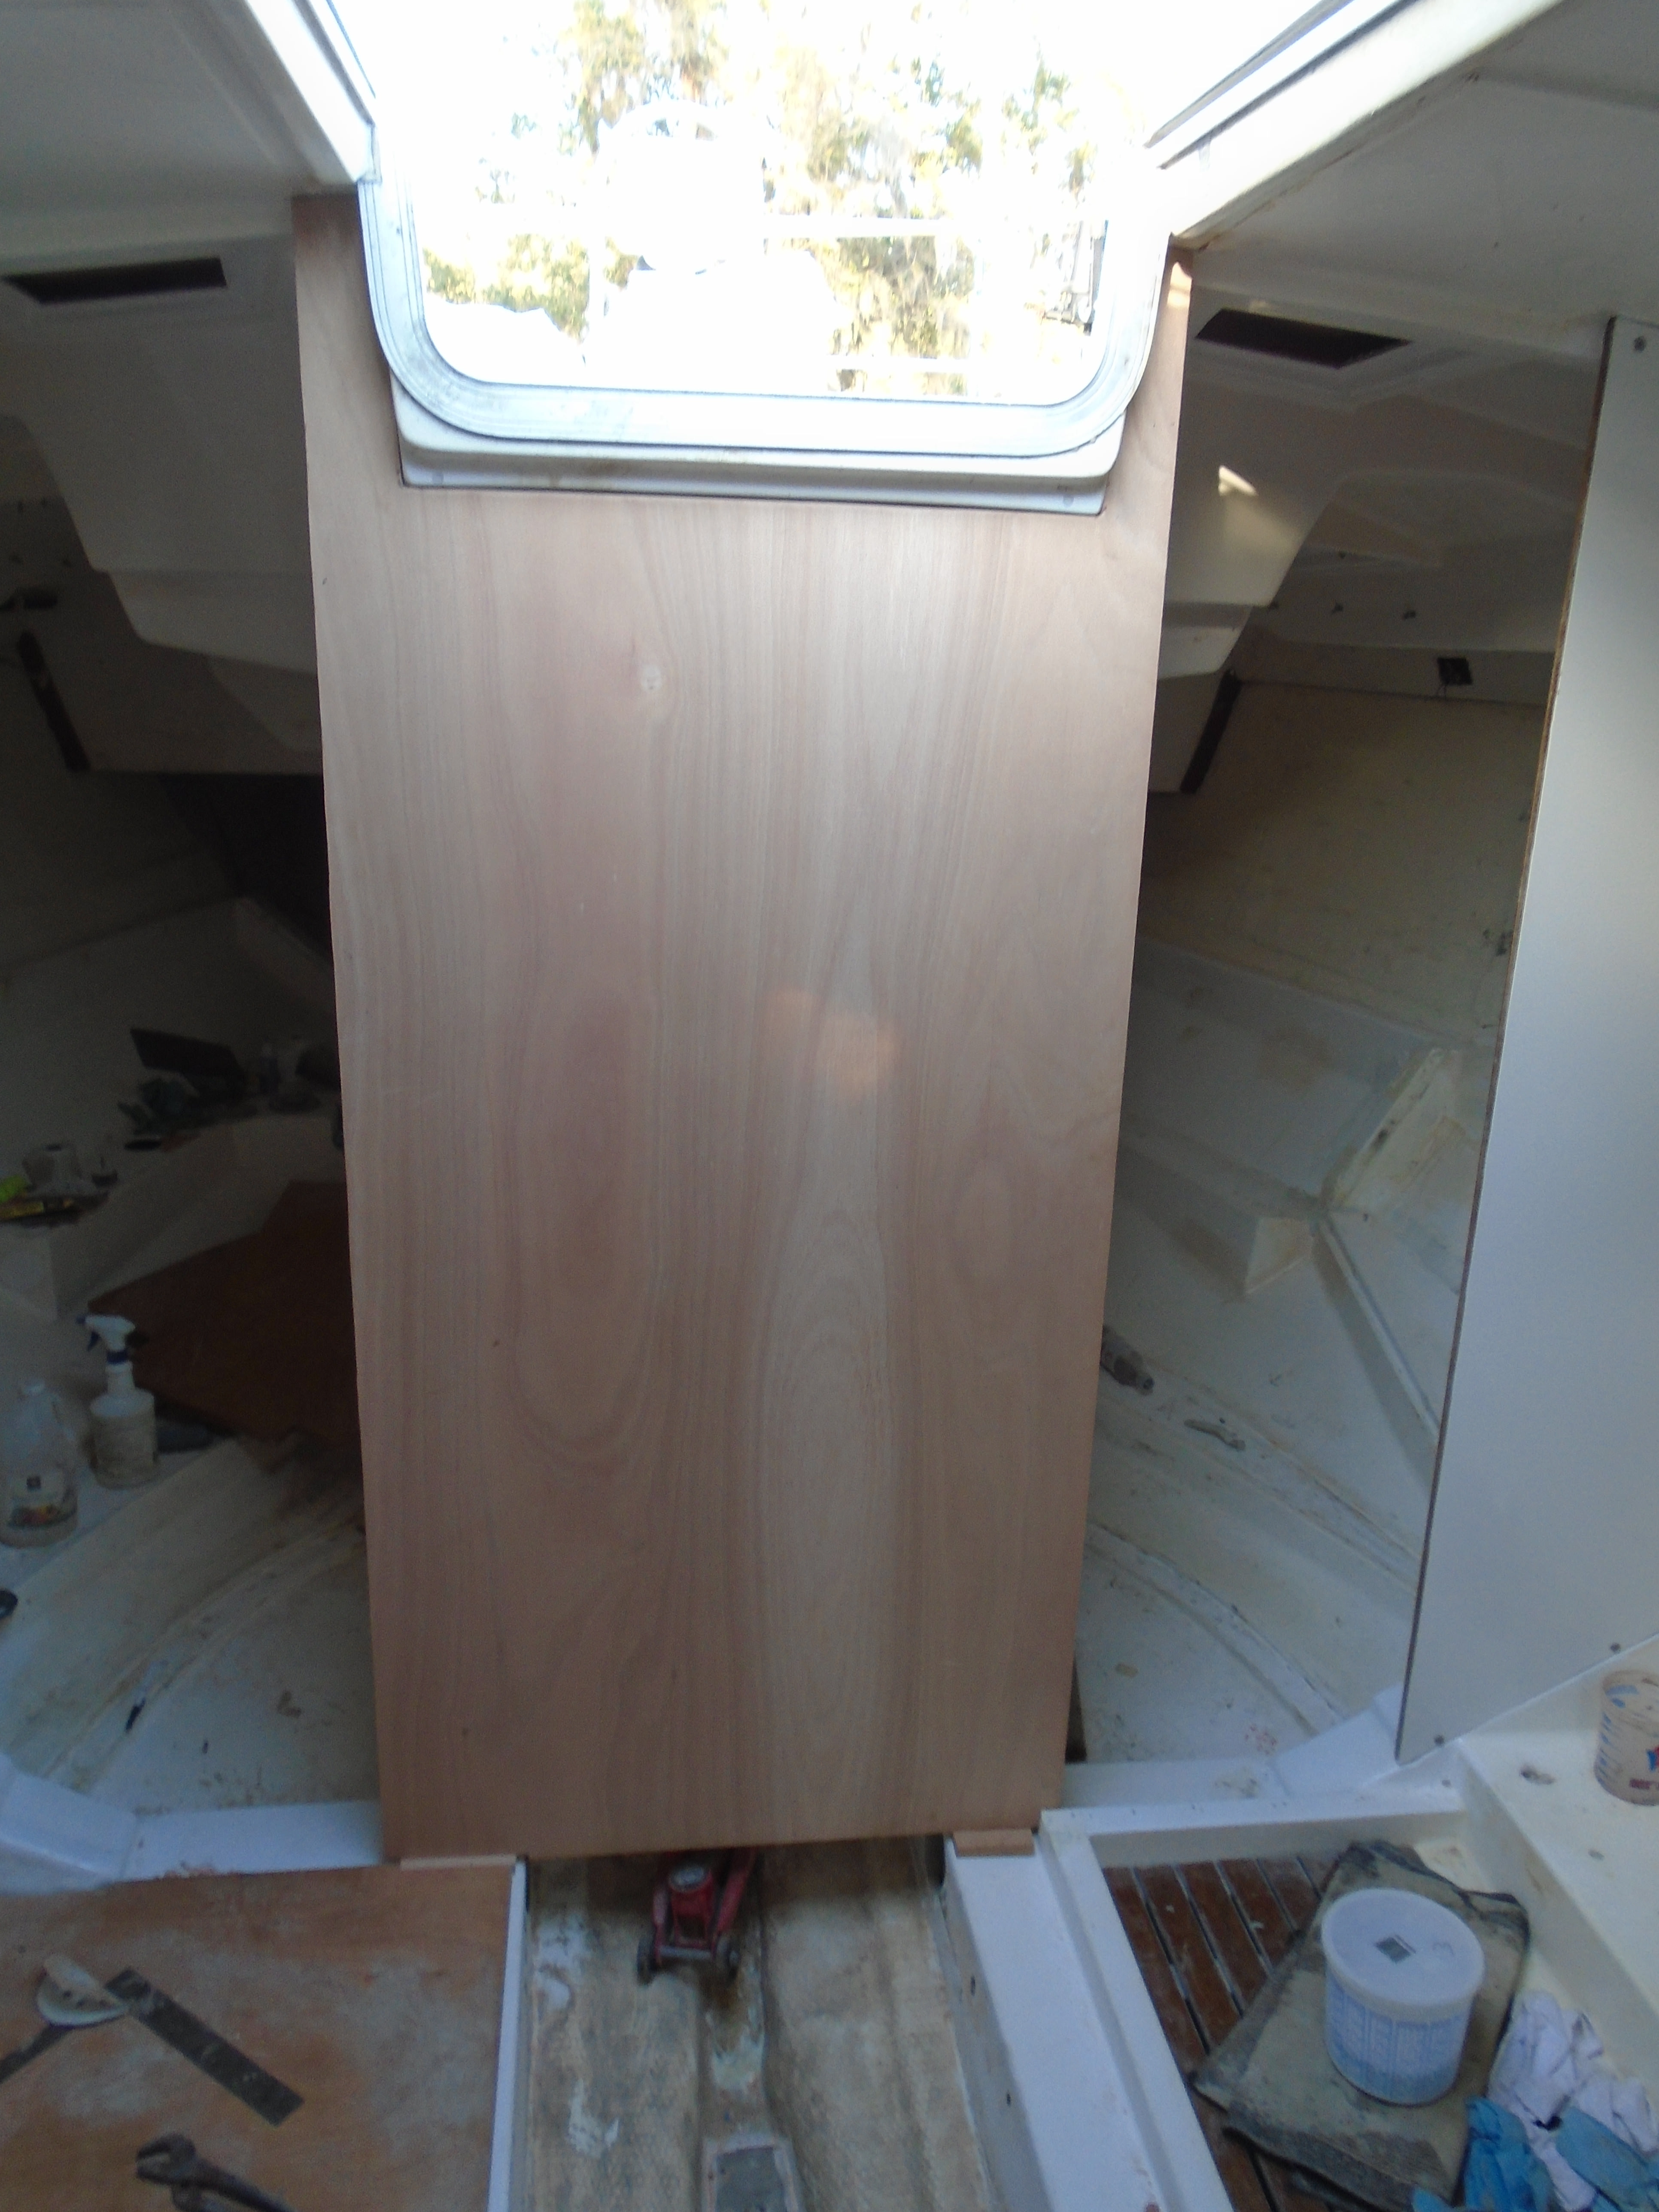
I've been working on the engine bilge and companionway bulkheads this week. First task was to start cleaning and sanding the bilge to get to ready for paint. Once that was ready I made a rough cut and fitted the bulkhead directly under the companionway:
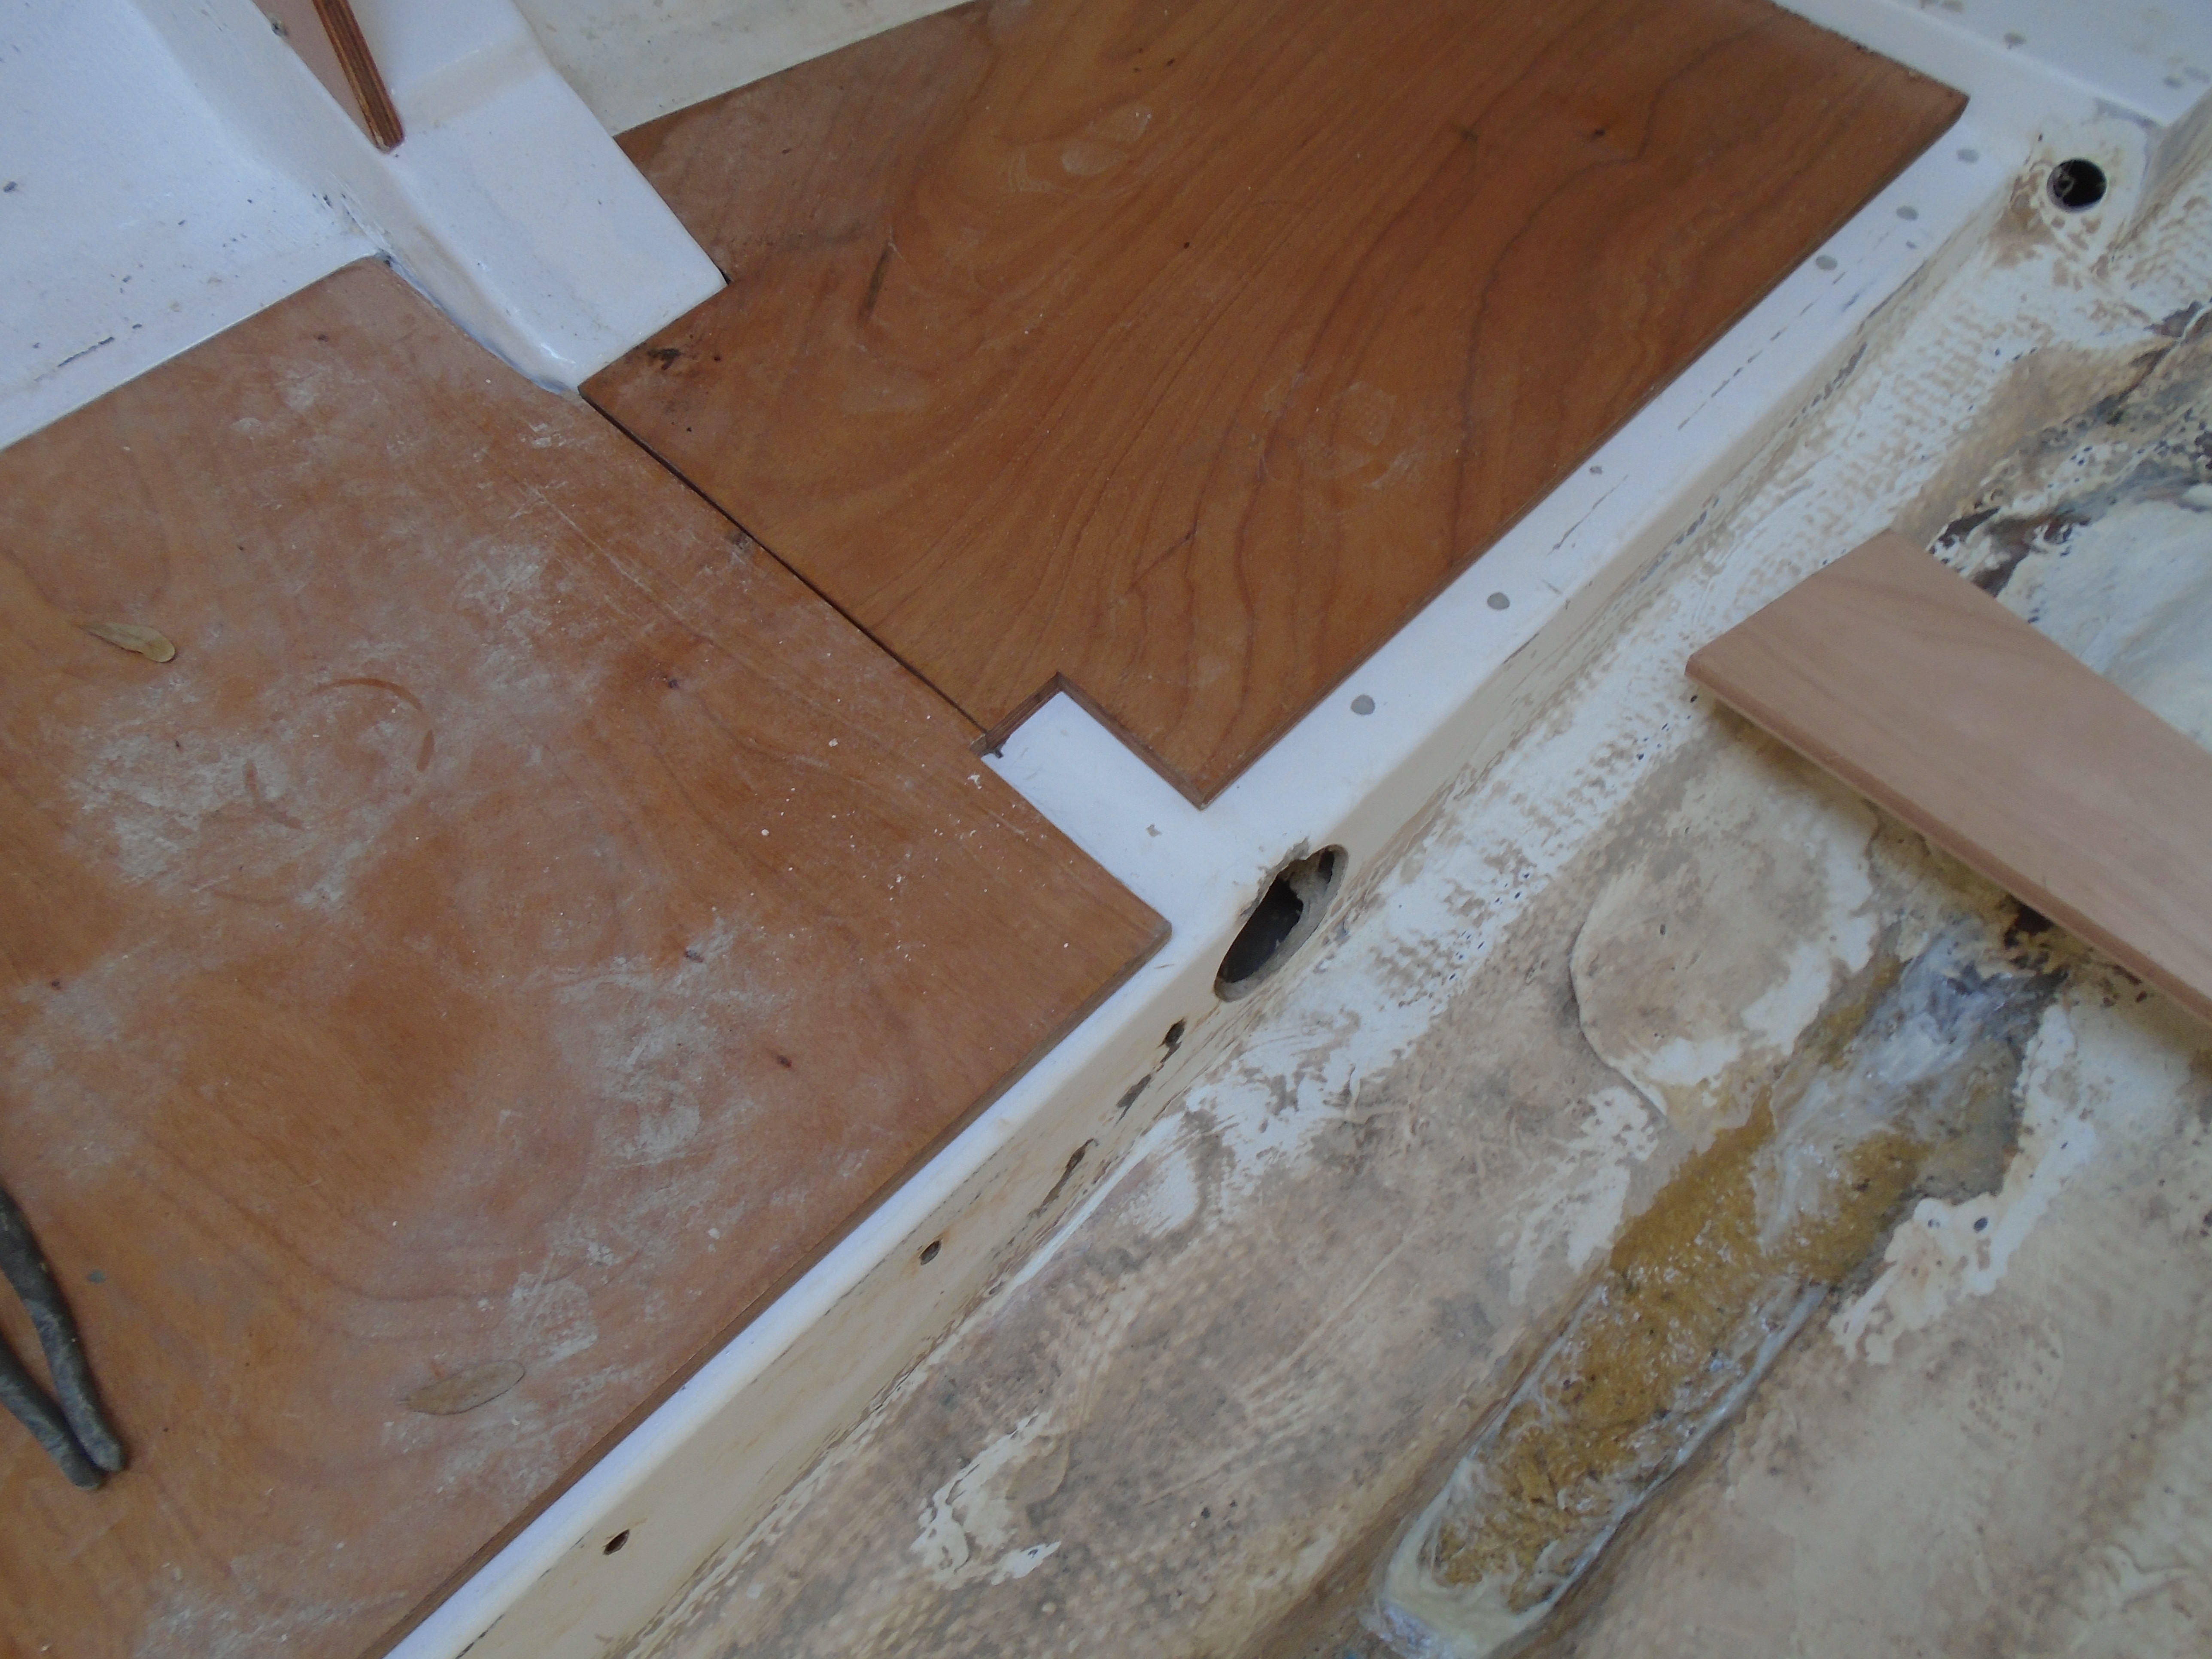
I decided to address a (what I consider) design flaw in the floor/bulkhead "interface". As assembled originally, the companionway bulkhead "feet" rested on pre-installed floorboards. Problem one was that the floorboards were OSB ply. Not a material of choice for a boat for multiple reasons but really a bad idea in this spot due to the inherent water ingress common around the companionway. Problem two was that if for any reason the floorboard needed to be removed (like if it rots due to water ingress!) the bulkhead prevents its removal.
I had a solution for this when I cut the replacement floors. I was going to cut and fit replacement "feet" separate from the floorboards:
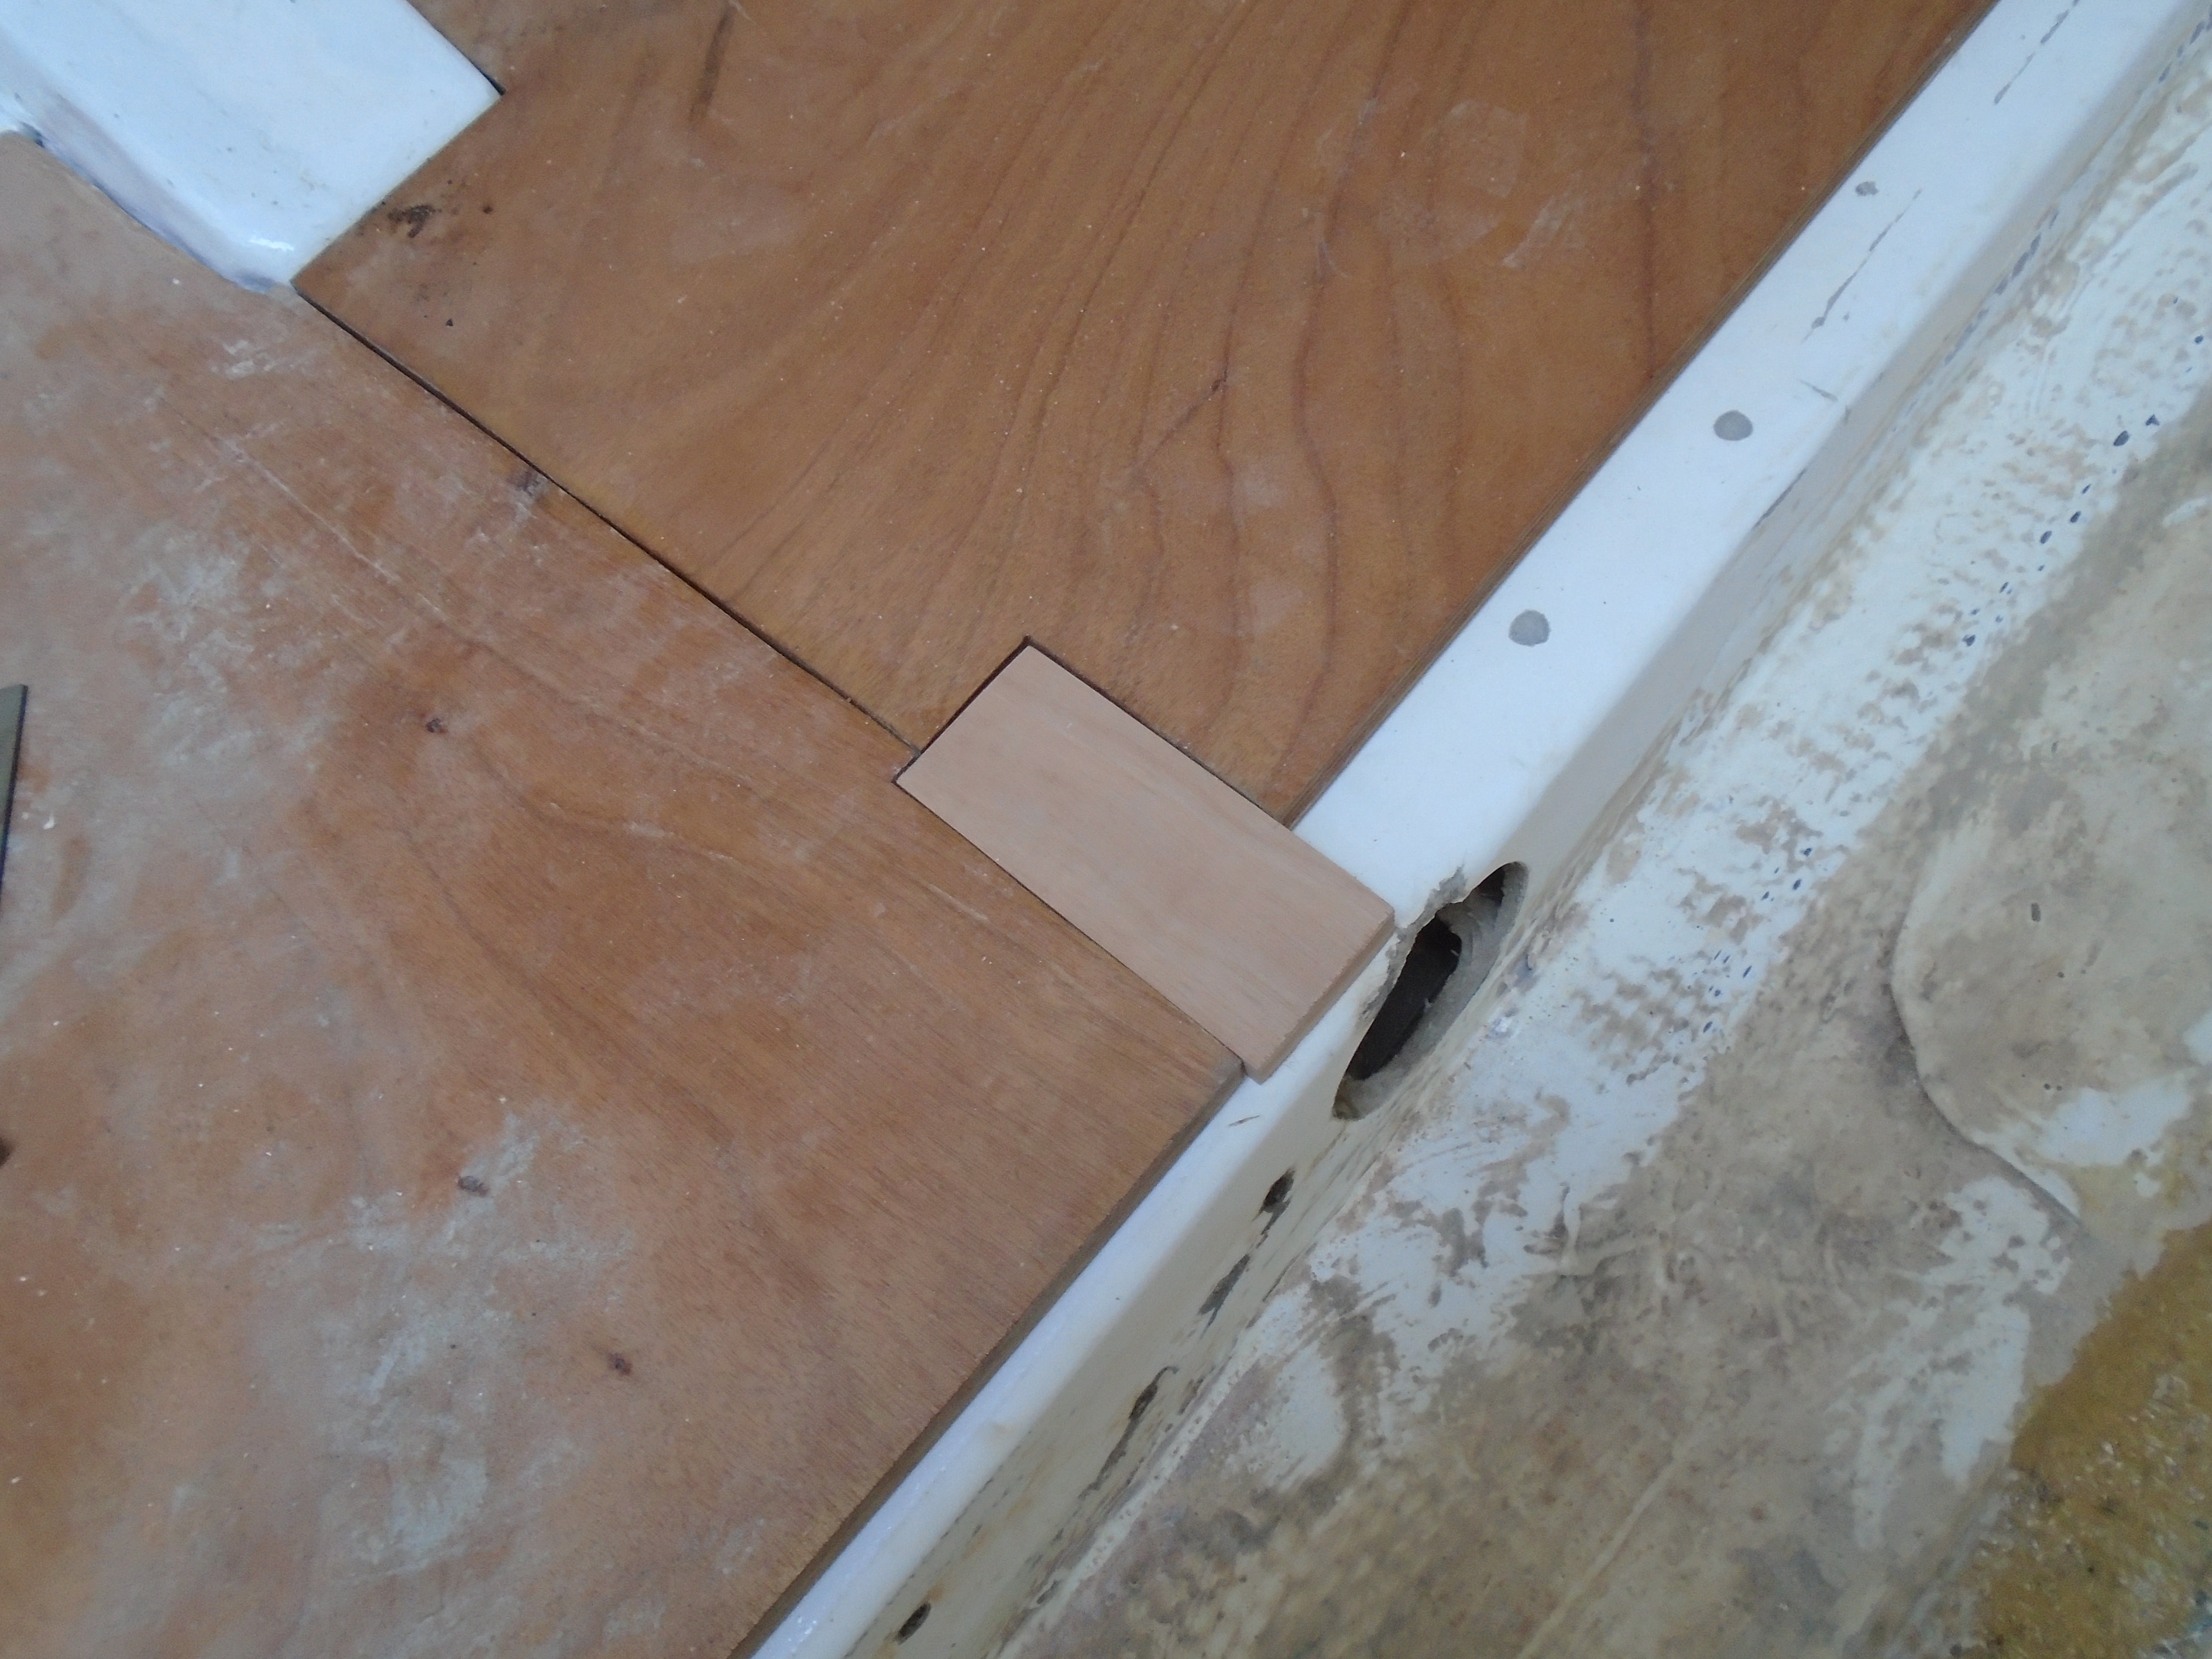
The footpad will be sealed with epoxy and screwed to the grid, with the bulkhead resting on and affixed to this pad.
I only rough cut the doorway openings on the center bulkhead so I could measure for the door openings after mounting. With this done, measured and marked, and measuring for the center cutout for the engine, I removed the bulkhead for finishing. Now for bilge paint!
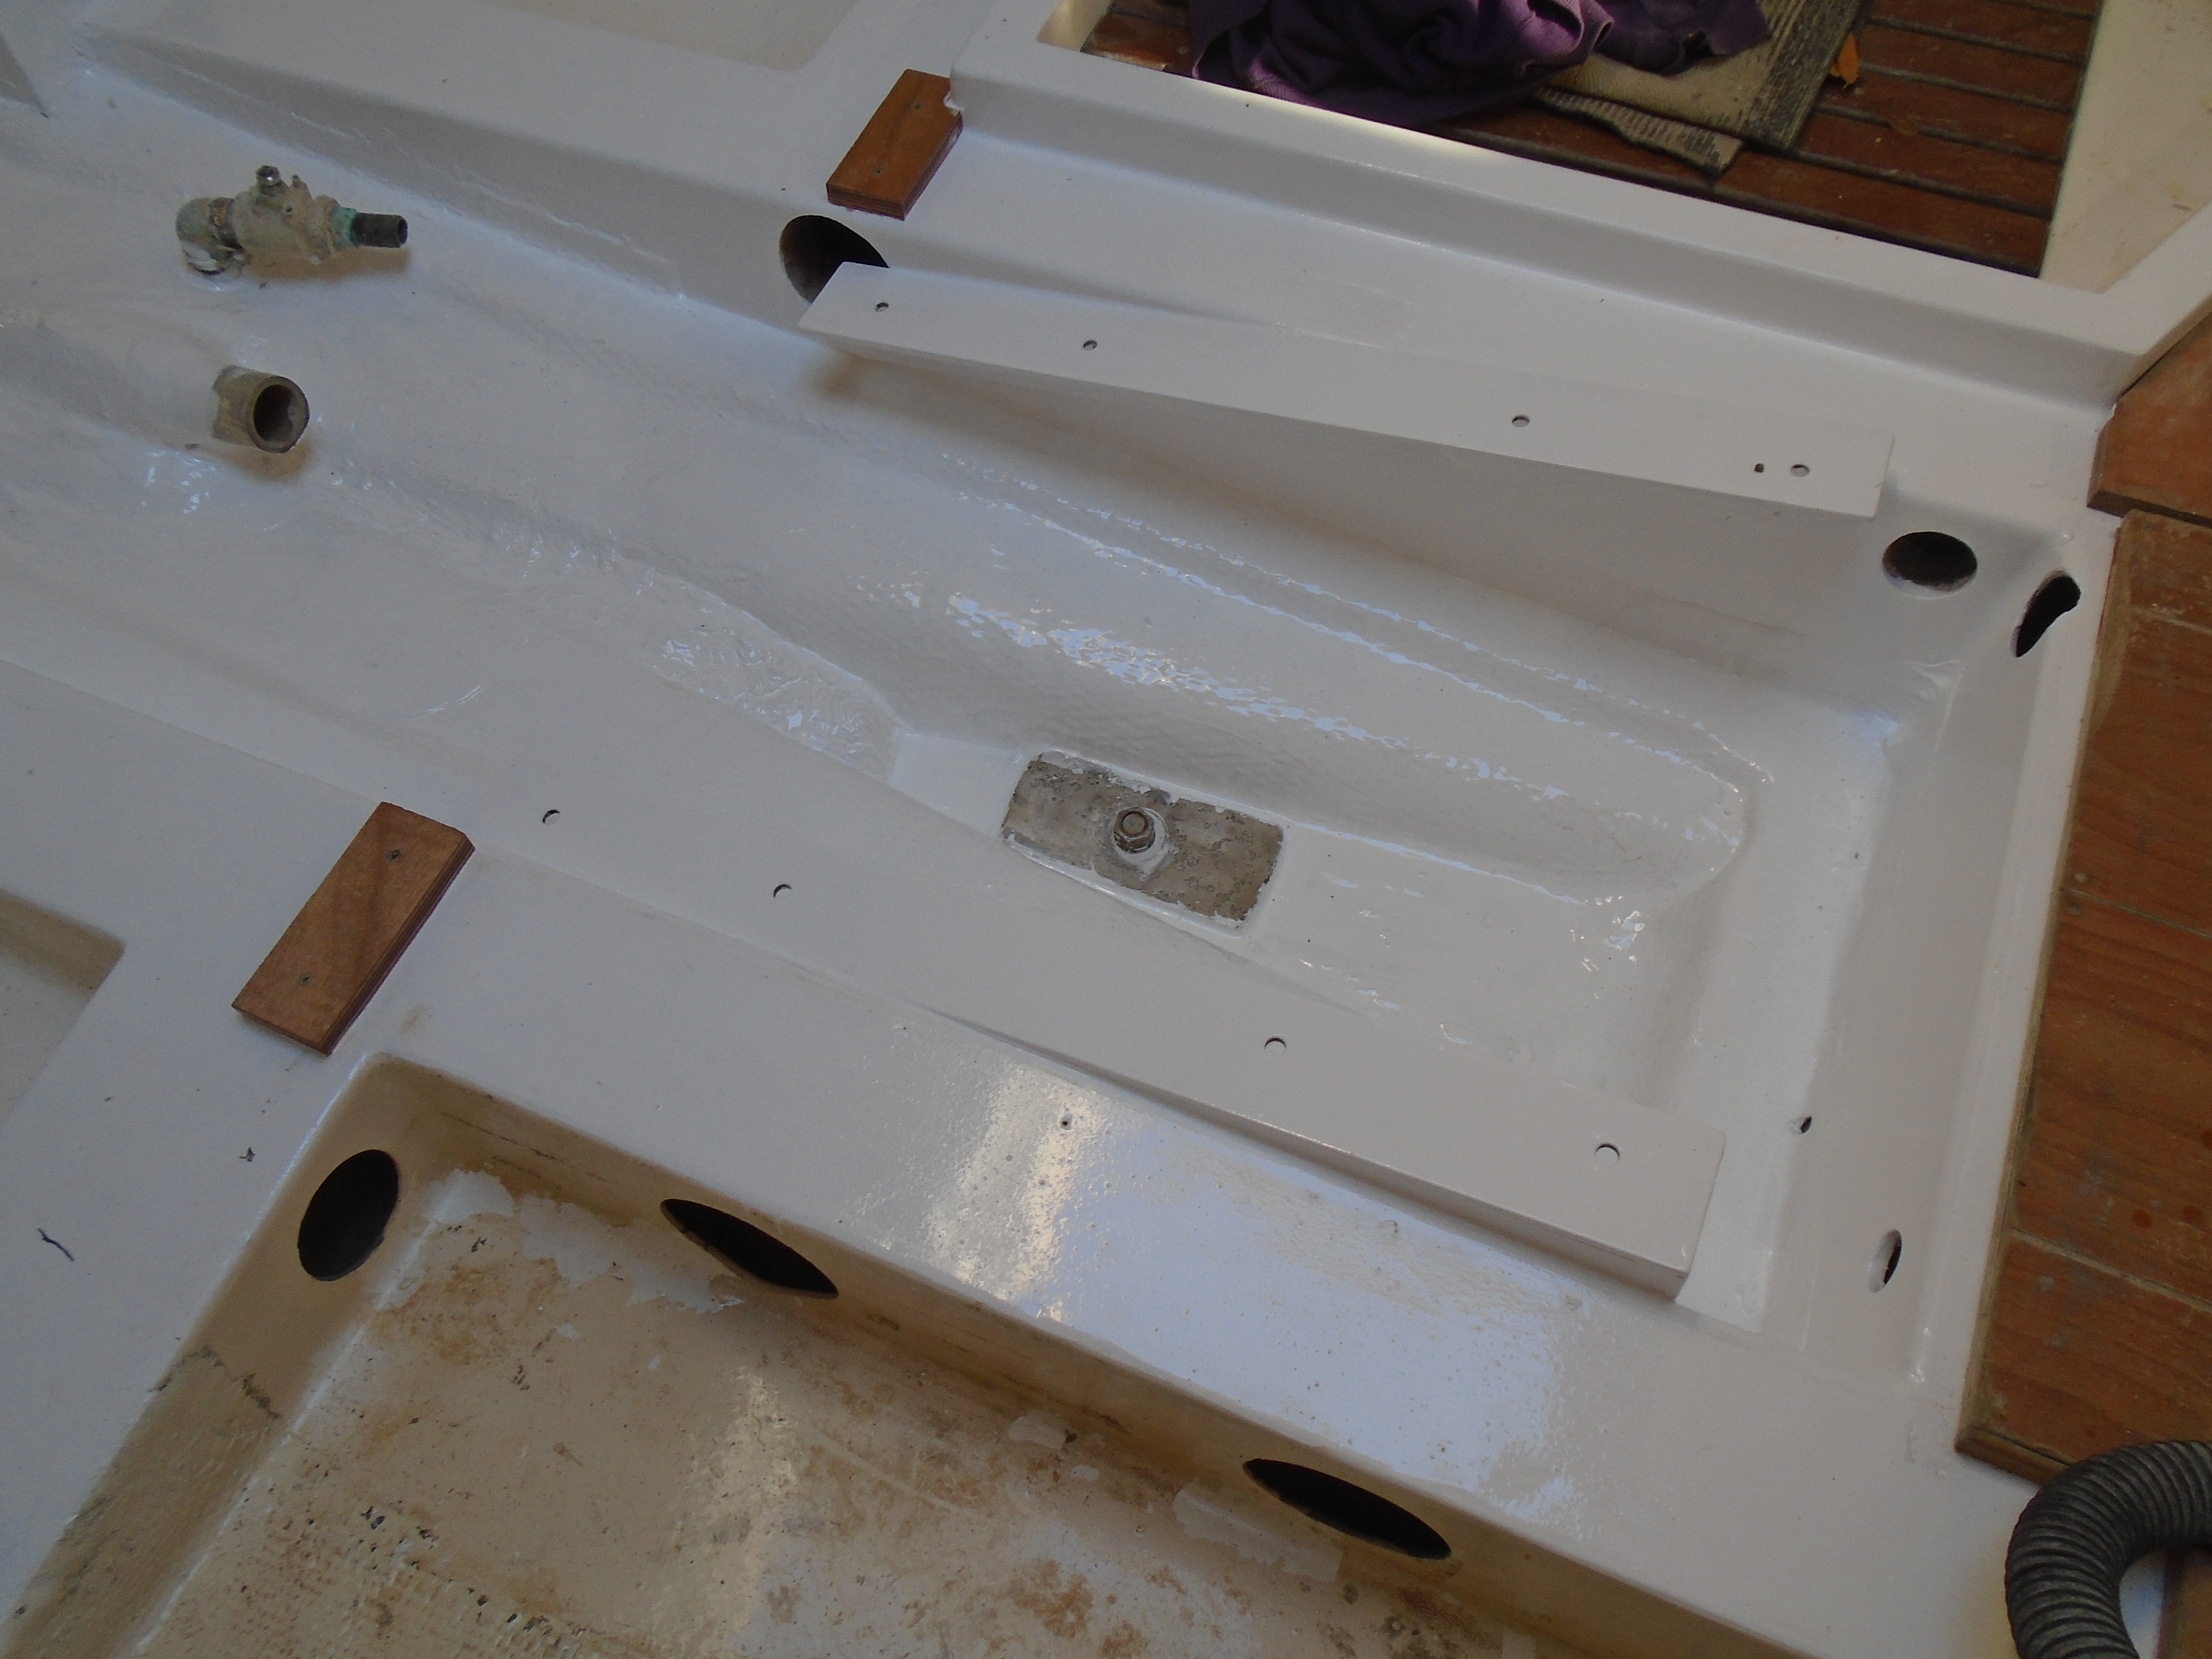
Two coats of epoxy primer and two coats of paint and the bilge is ready:
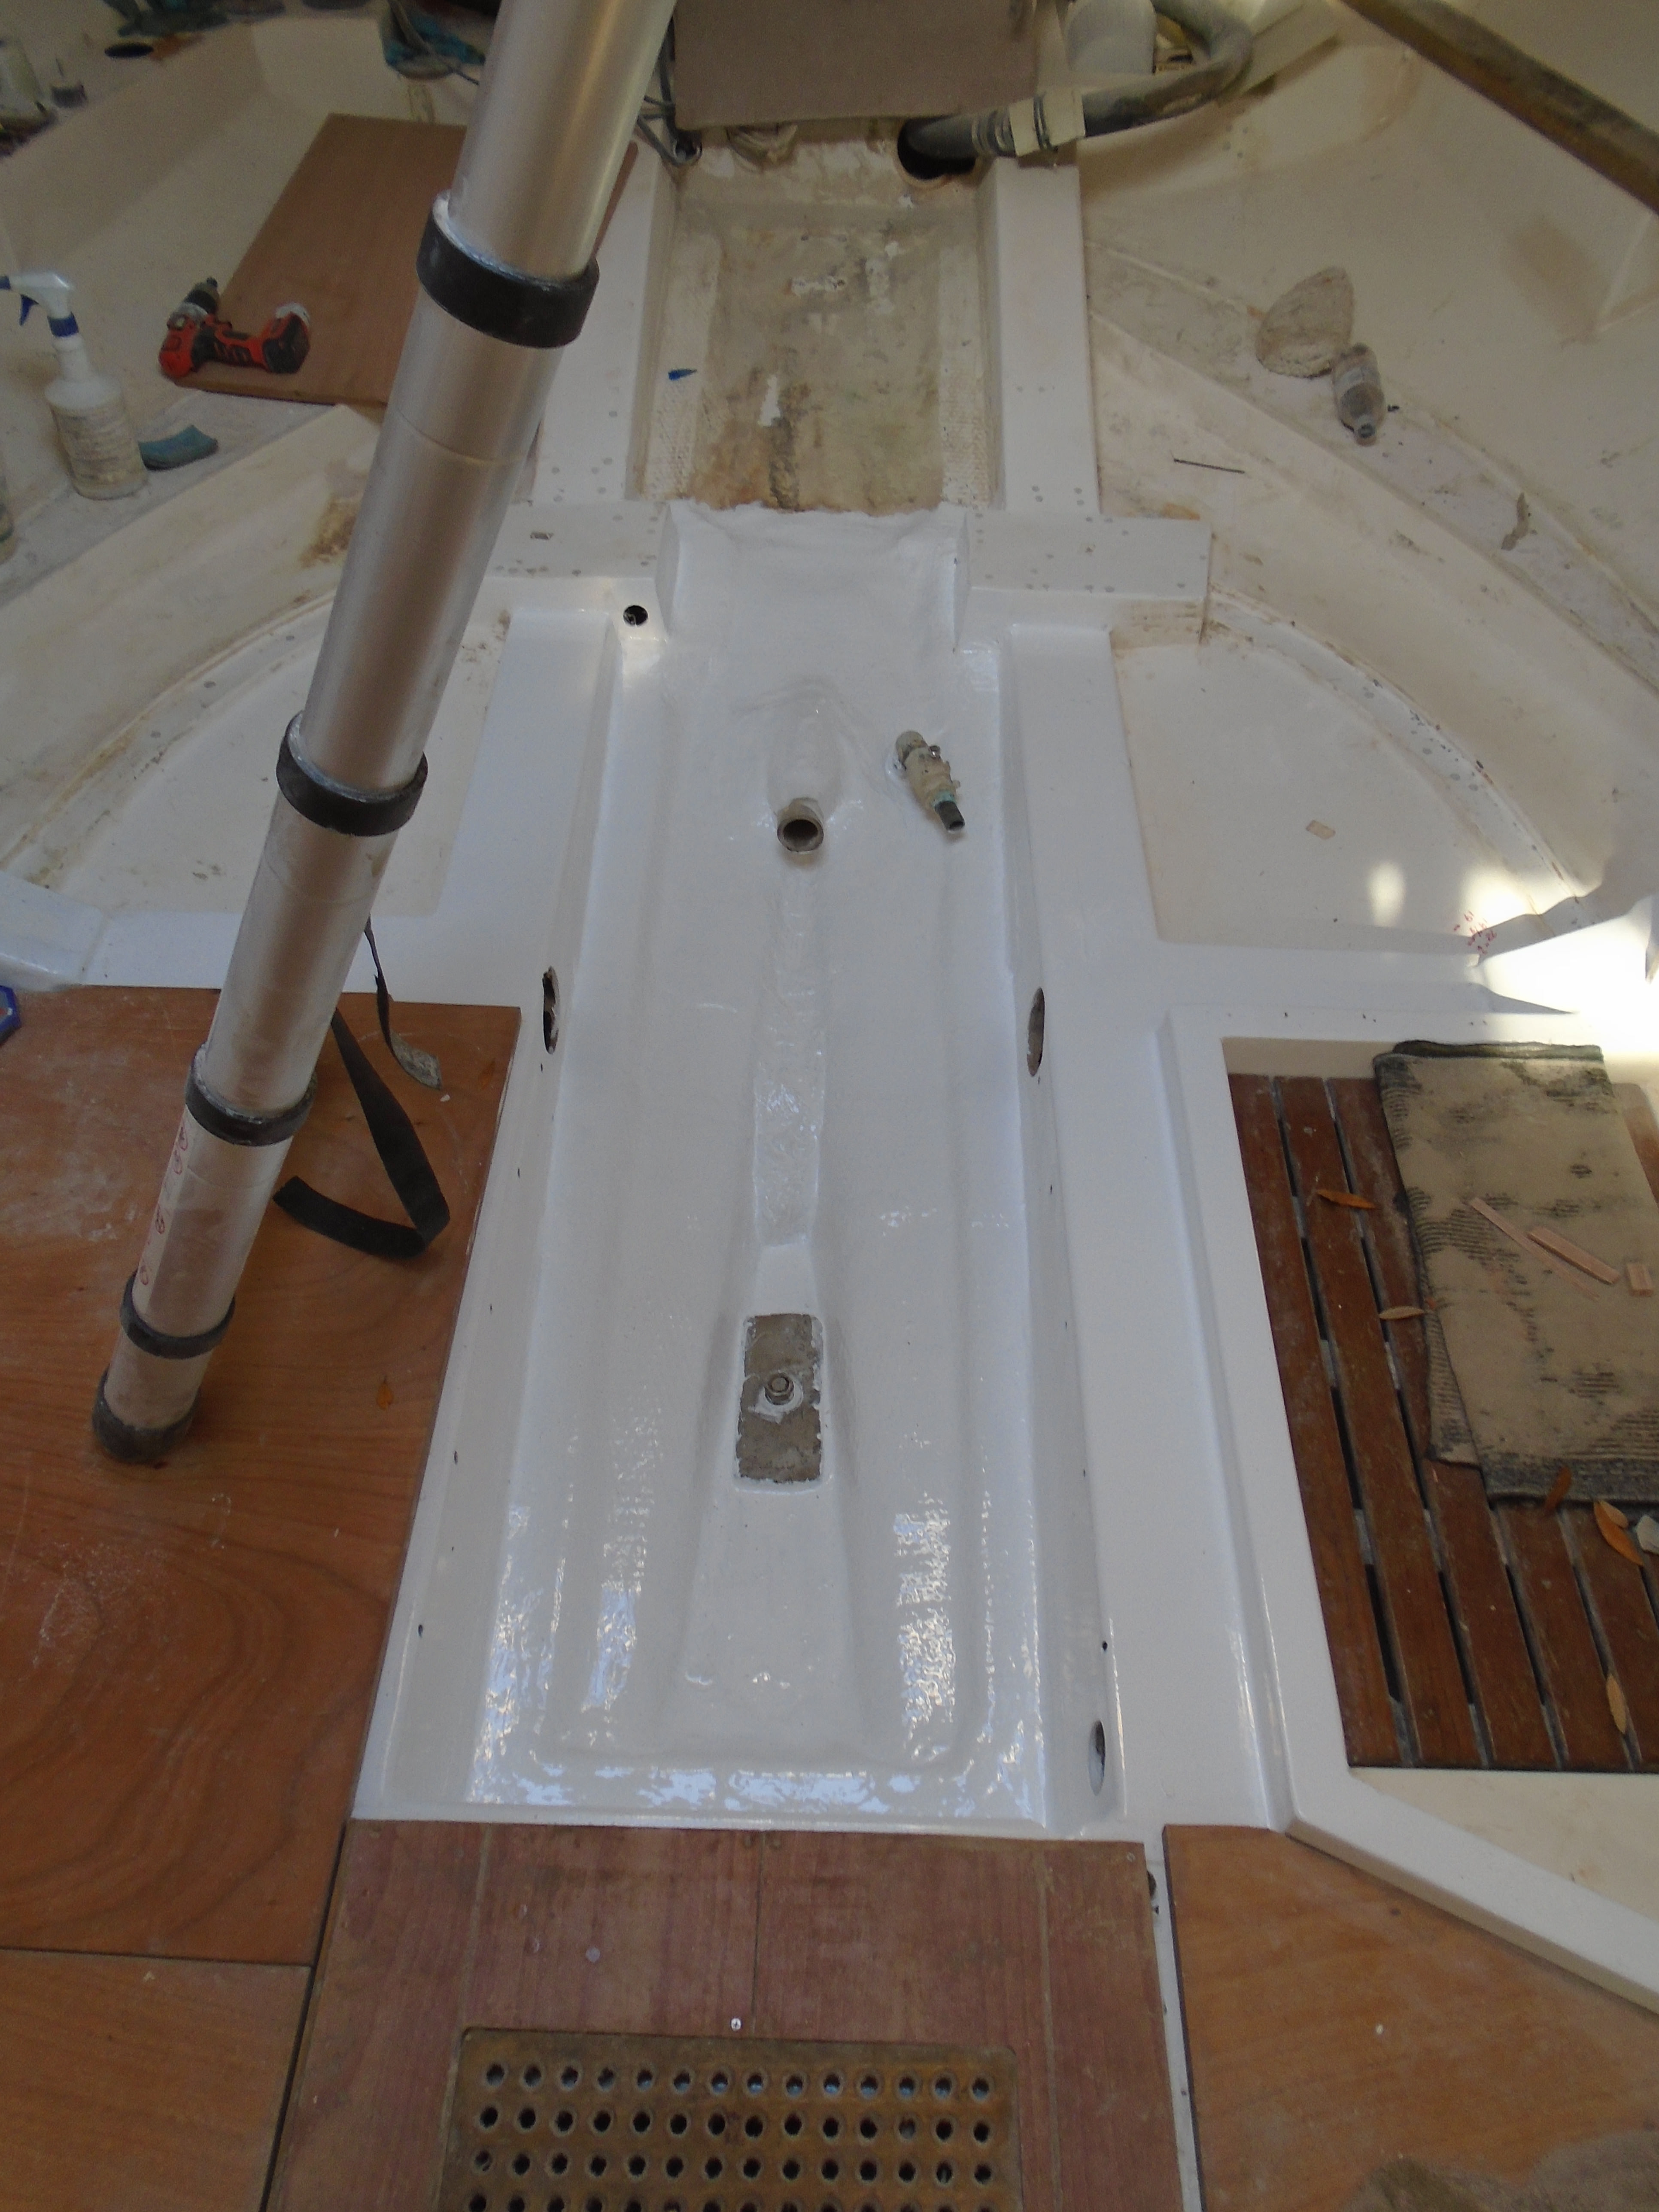
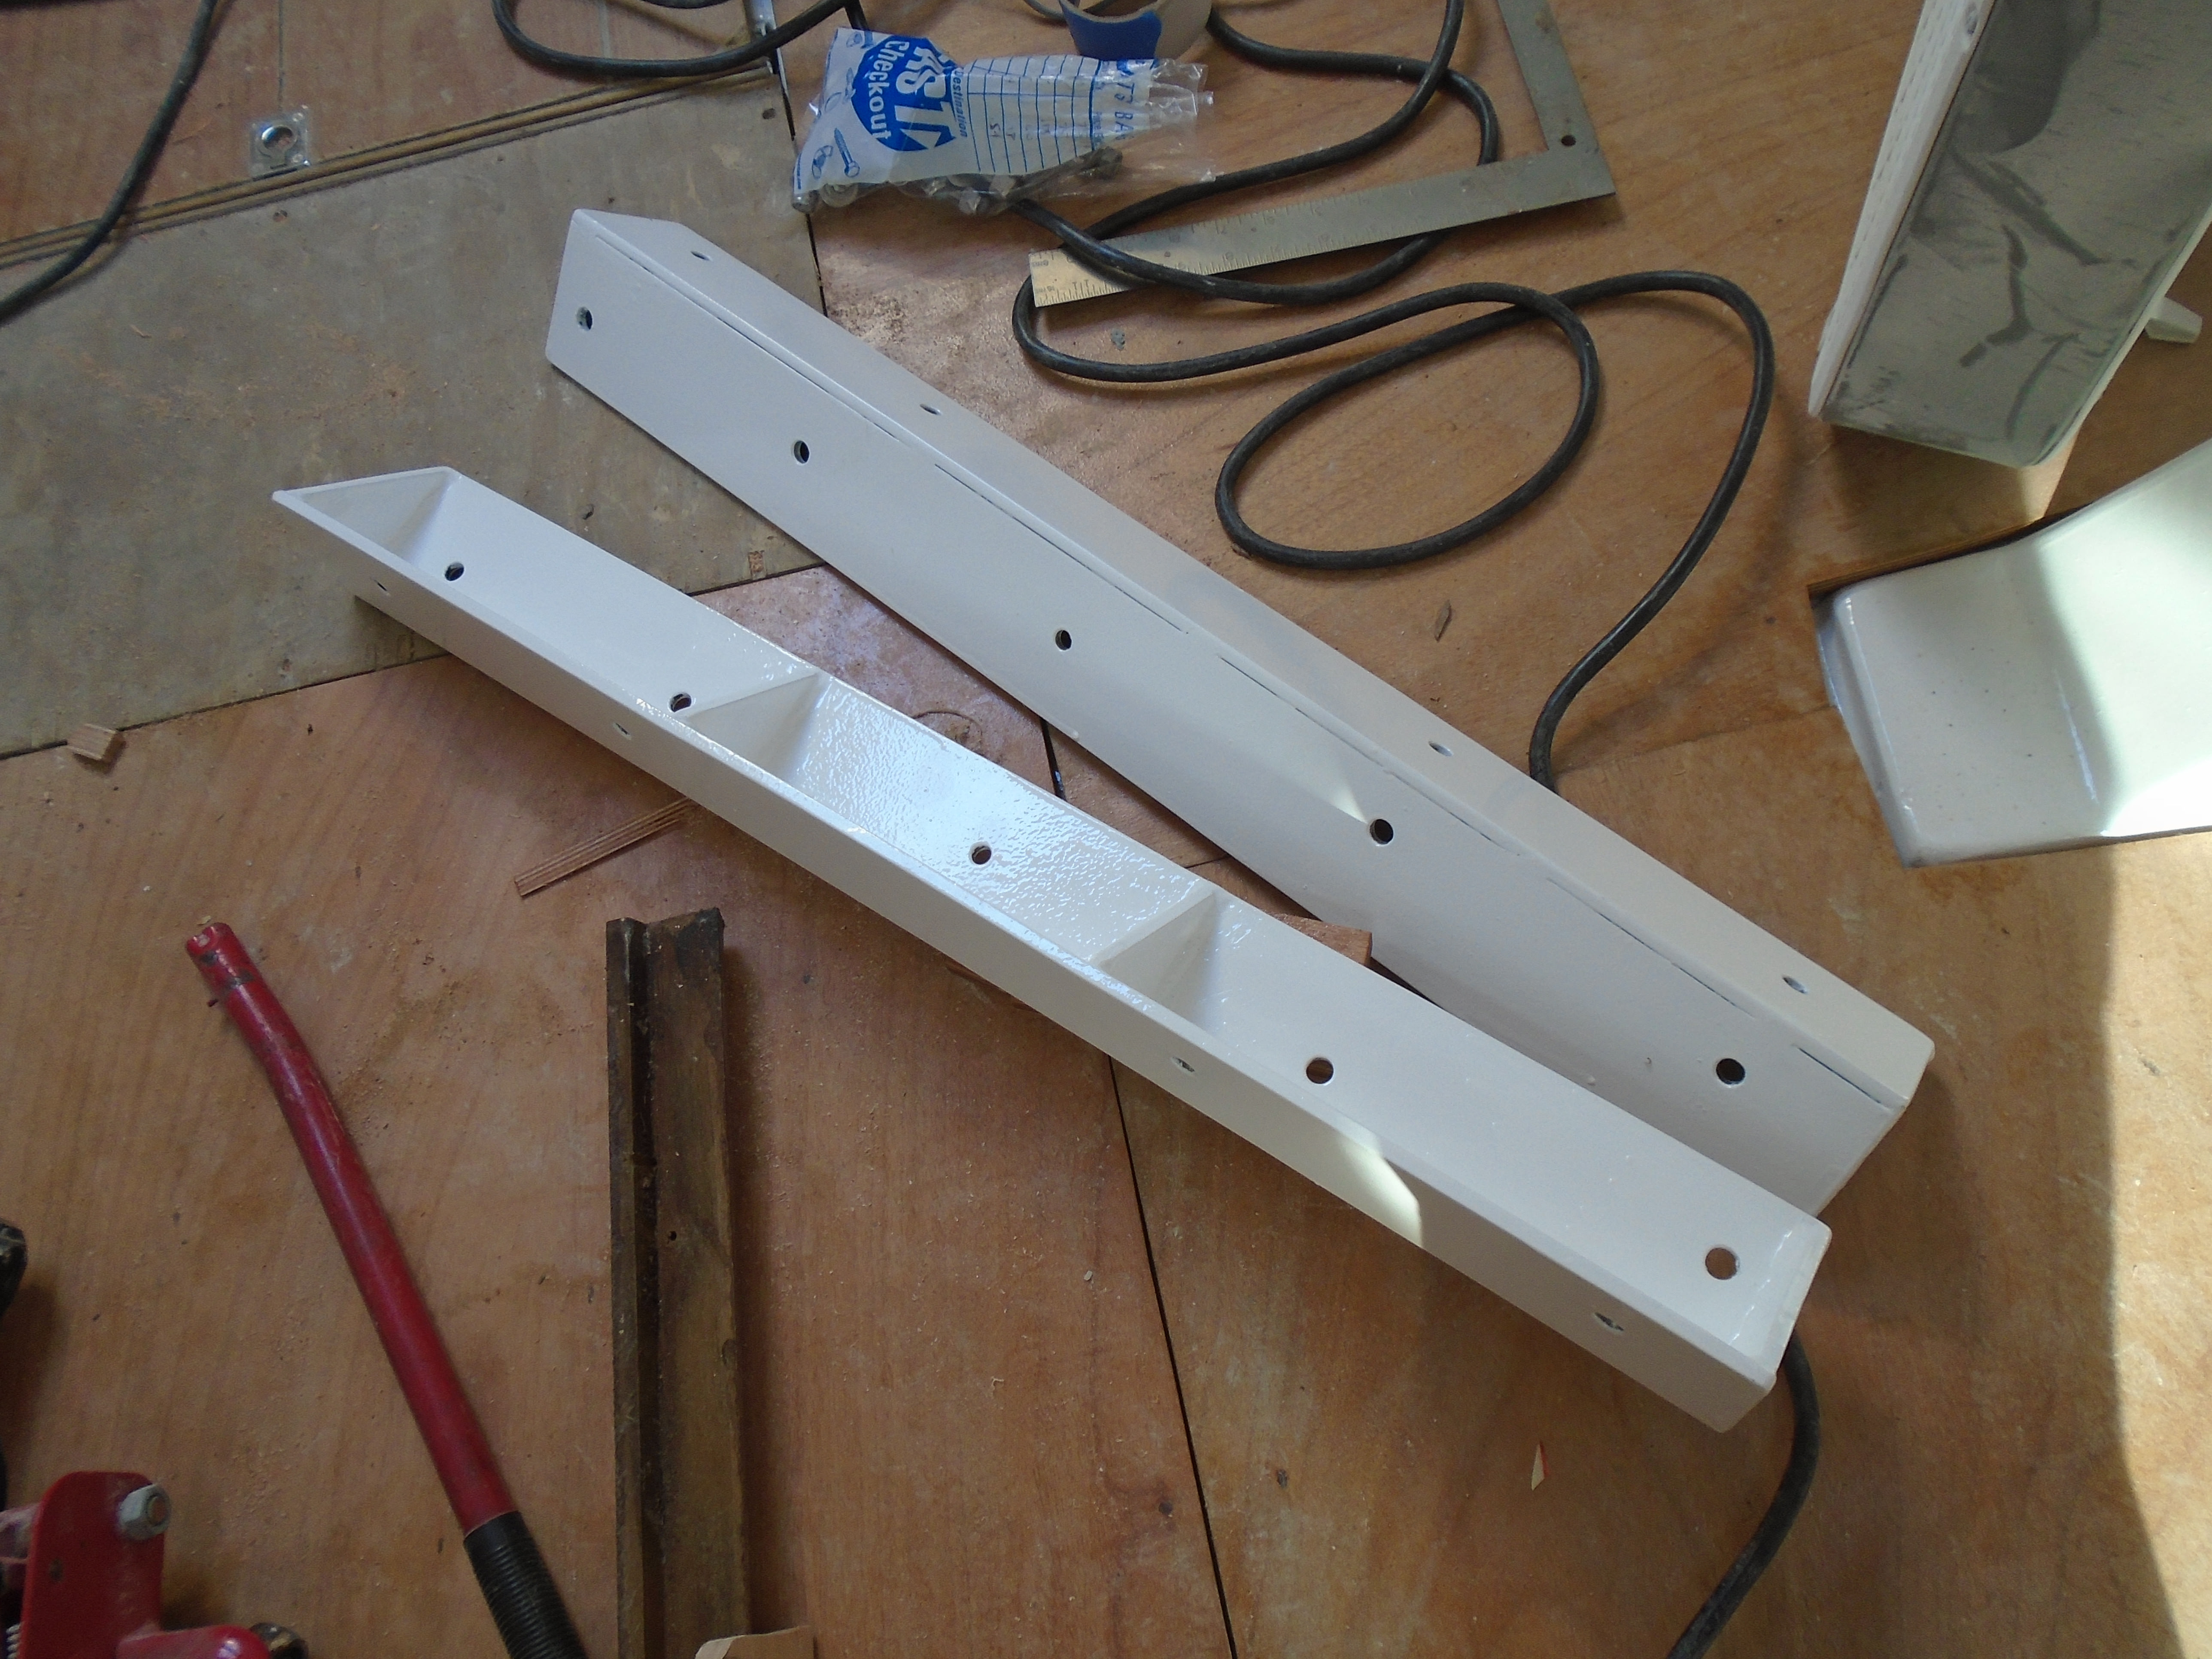
As are the new engine bearers:
I wanted to wait for a few days for the paint to cure before permanently mounting the engine bearers - that's today's task along with a few more coats of clear for the bulkhead.
Cheers,
Mark
I've been working on the engine bilge and companionway bulkheads this week. First task was to start cleaning and sanding the bilge to get to ready for paint. Once that was ready I made a rough cut and fitted the bulkhead directly under the companionway:
I decided to address a (what I consider) design flaw in the floor/bulkhead "interface". As assembled originally, the companionway bulkhead "feet" rested on pre-installed floorboards. Problem one was that the floorboards were OSB ply. Not a material of choice for a boat for multiple reasons but really a bad idea in this spot due to the inherent water ingress common around the companionway. Problem two was that if for any reason the floorboard needed to be removed (like if it rots due to water ingress!) the bulkhead prevents its removal.
I had a solution for this when I cut the replacement floors. I was going to cut and fit replacement "feet" separate from the floorboards:
The footpad will be sealed with epoxy and screwed to the grid, with the bulkhead resting on and affixed to this pad.
I only rough cut the doorway openings on the center bulkhead so I could measure for the door openings after mounting. With this done, measured and marked, and measuring for the center cutout for the engine, I removed the bulkhead for finishing. Now for bilge paint!
Two coats of epoxy primer and two coats of paint and the bilge is ready:
As are the new engine bearers:
I wanted to wait for a few days for the paint to cure before permanently mounting the engine bearers - that's today's task along with a few more coats of clear for the bulkhead.
Cheers,
Mark
Last edited:
This week: Room in the garage again!
For the last few weeks the garage has been full of old interior panels, tools, the engine and parts & pieces, plus my usual setup for working on and finishing new panels and bulkheads. So it was time to clear some of it out!
With the paint on the engine bearers dry and cured I remounted them:
I checked the bearer alignment several times while tightening the bolts to make sure everything stayed in place. That template I made came in handy! Next up was to screw in the bulkhead foot pads. I sealed these on the bottom and edges with Life Seal To prevent water intrusion.
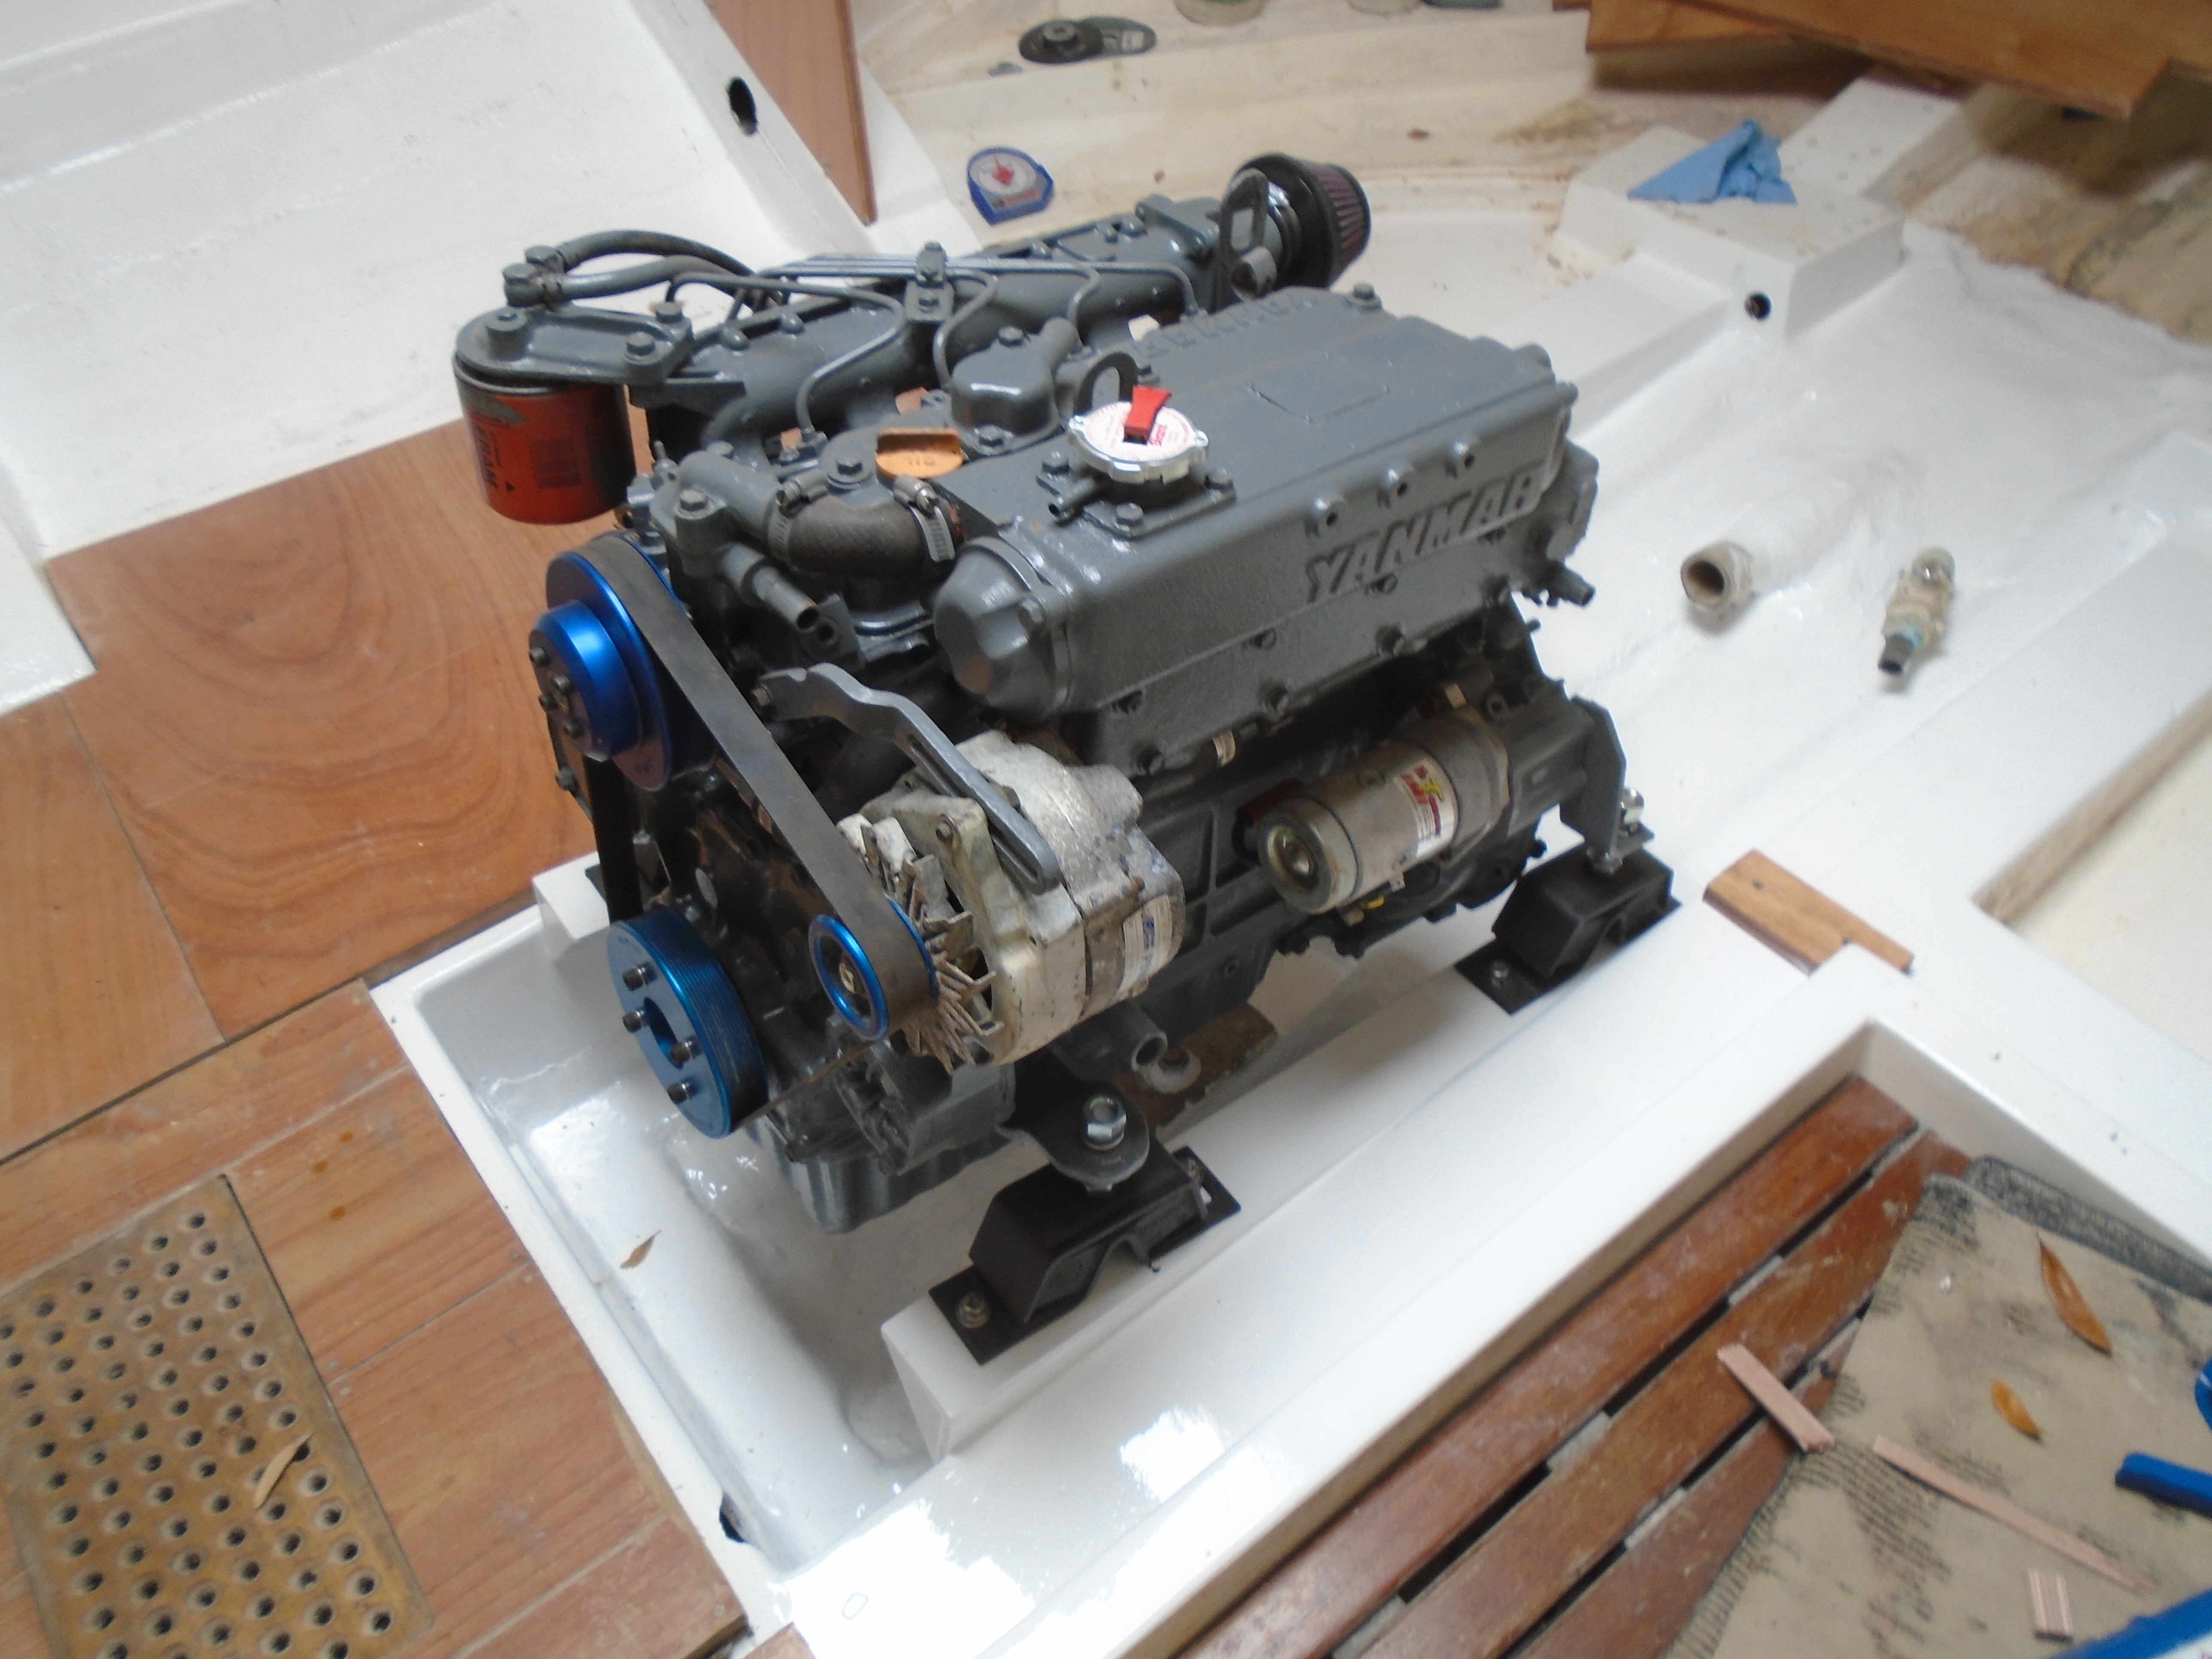
Now with the engine bay ready I enlisted help from the marina staff to run the forklift and got the engine in position. I figured it would be easier to drop the engine onto pre-positioned mounts so I removed the mounts and loosely bolted them to the bearers. After that the engine dropped right in, easy-peasy!
The bulkhead was next. Now I have some room in the garage to move around!

As a side note, one of the reasons I decided originally to pull the trans was to replace the damper plate due to a rattle I had been hearing with the engine running at some rpms. Turns out it wasn't the damper plate after all, it was the cooling fan! Of course I already had a new damper plate and since the old one was pretty corroded it was a no-brainer to replace it anyway. I cleaned up the cooling fan, re-bent it into a serpentine-like shape so the areas between the bolts would stay in tension, and put everything back together:

Next up: The last structural bulkhead (the big one forward and boy, it's gonna be a PITA!) gets replaced.
Cheers,
Mark
For the last few weeks the garage has been full of old interior panels, tools, the engine and parts & pieces, plus my usual setup for working on and finishing new panels and bulkheads. So it was time to clear some of it out!
With the paint on the engine bearers dry and cured I remounted them:
I checked the bearer alignment several times while tightening the bolts to make sure everything stayed in place. That template I made came in handy! Next up was to screw in the bulkhead foot pads. I sealed these on the bottom and edges with Life Seal To prevent water intrusion.
Now with the engine bay ready I enlisted help from the marina staff to run the forklift and got the engine in position. I figured it would be easier to drop the engine onto pre-positioned mounts so I removed the mounts and loosely bolted them to the bearers. After that the engine dropped right in, easy-peasy!
The bulkhead was next. Now I have some room in the garage to move around!
As a side note, one of the reasons I decided originally to pull the trans was to replace the damper plate due to a rattle I had been hearing with the engine running at some rpms. Turns out it wasn't the damper plate after all, it was the cooling fan! Of course I already had a new damper plate and since the old one was pretty corroded it was a no-brainer to replace it anyway. I cleaned up the cooling fan, re-bent it into a serpentine-like shape so the areas between the bolts would stay in tension, and put everything back together:
Next up: The last structural bulkhead (the big one forward and boy, it's gonna be a PITA!) gets replaced.
Cheers,
Mark
Last edited:
There's a cooling fan that bolts to the flywheel. It's painted black (though the color contrast doesn't show it well in the photo) on the outer circumference of the flywheel. I assume it's there to help cool the transmission.Cooling fan? The one on alternator
Greetings all, from Narita, Japan!
This update will be the last one for a while as I have started back to work finally. I'll probably be here for the next 4 or 5 months before I get leave to go back home. I did get some more work accomplished on the boat before leaving but due to various tasks needing to get done to prepare for my stay over here I just wound down some things that needed to be finished up. I held off on jumping into anything that would leave the boat a mess. That will have to wait for later!
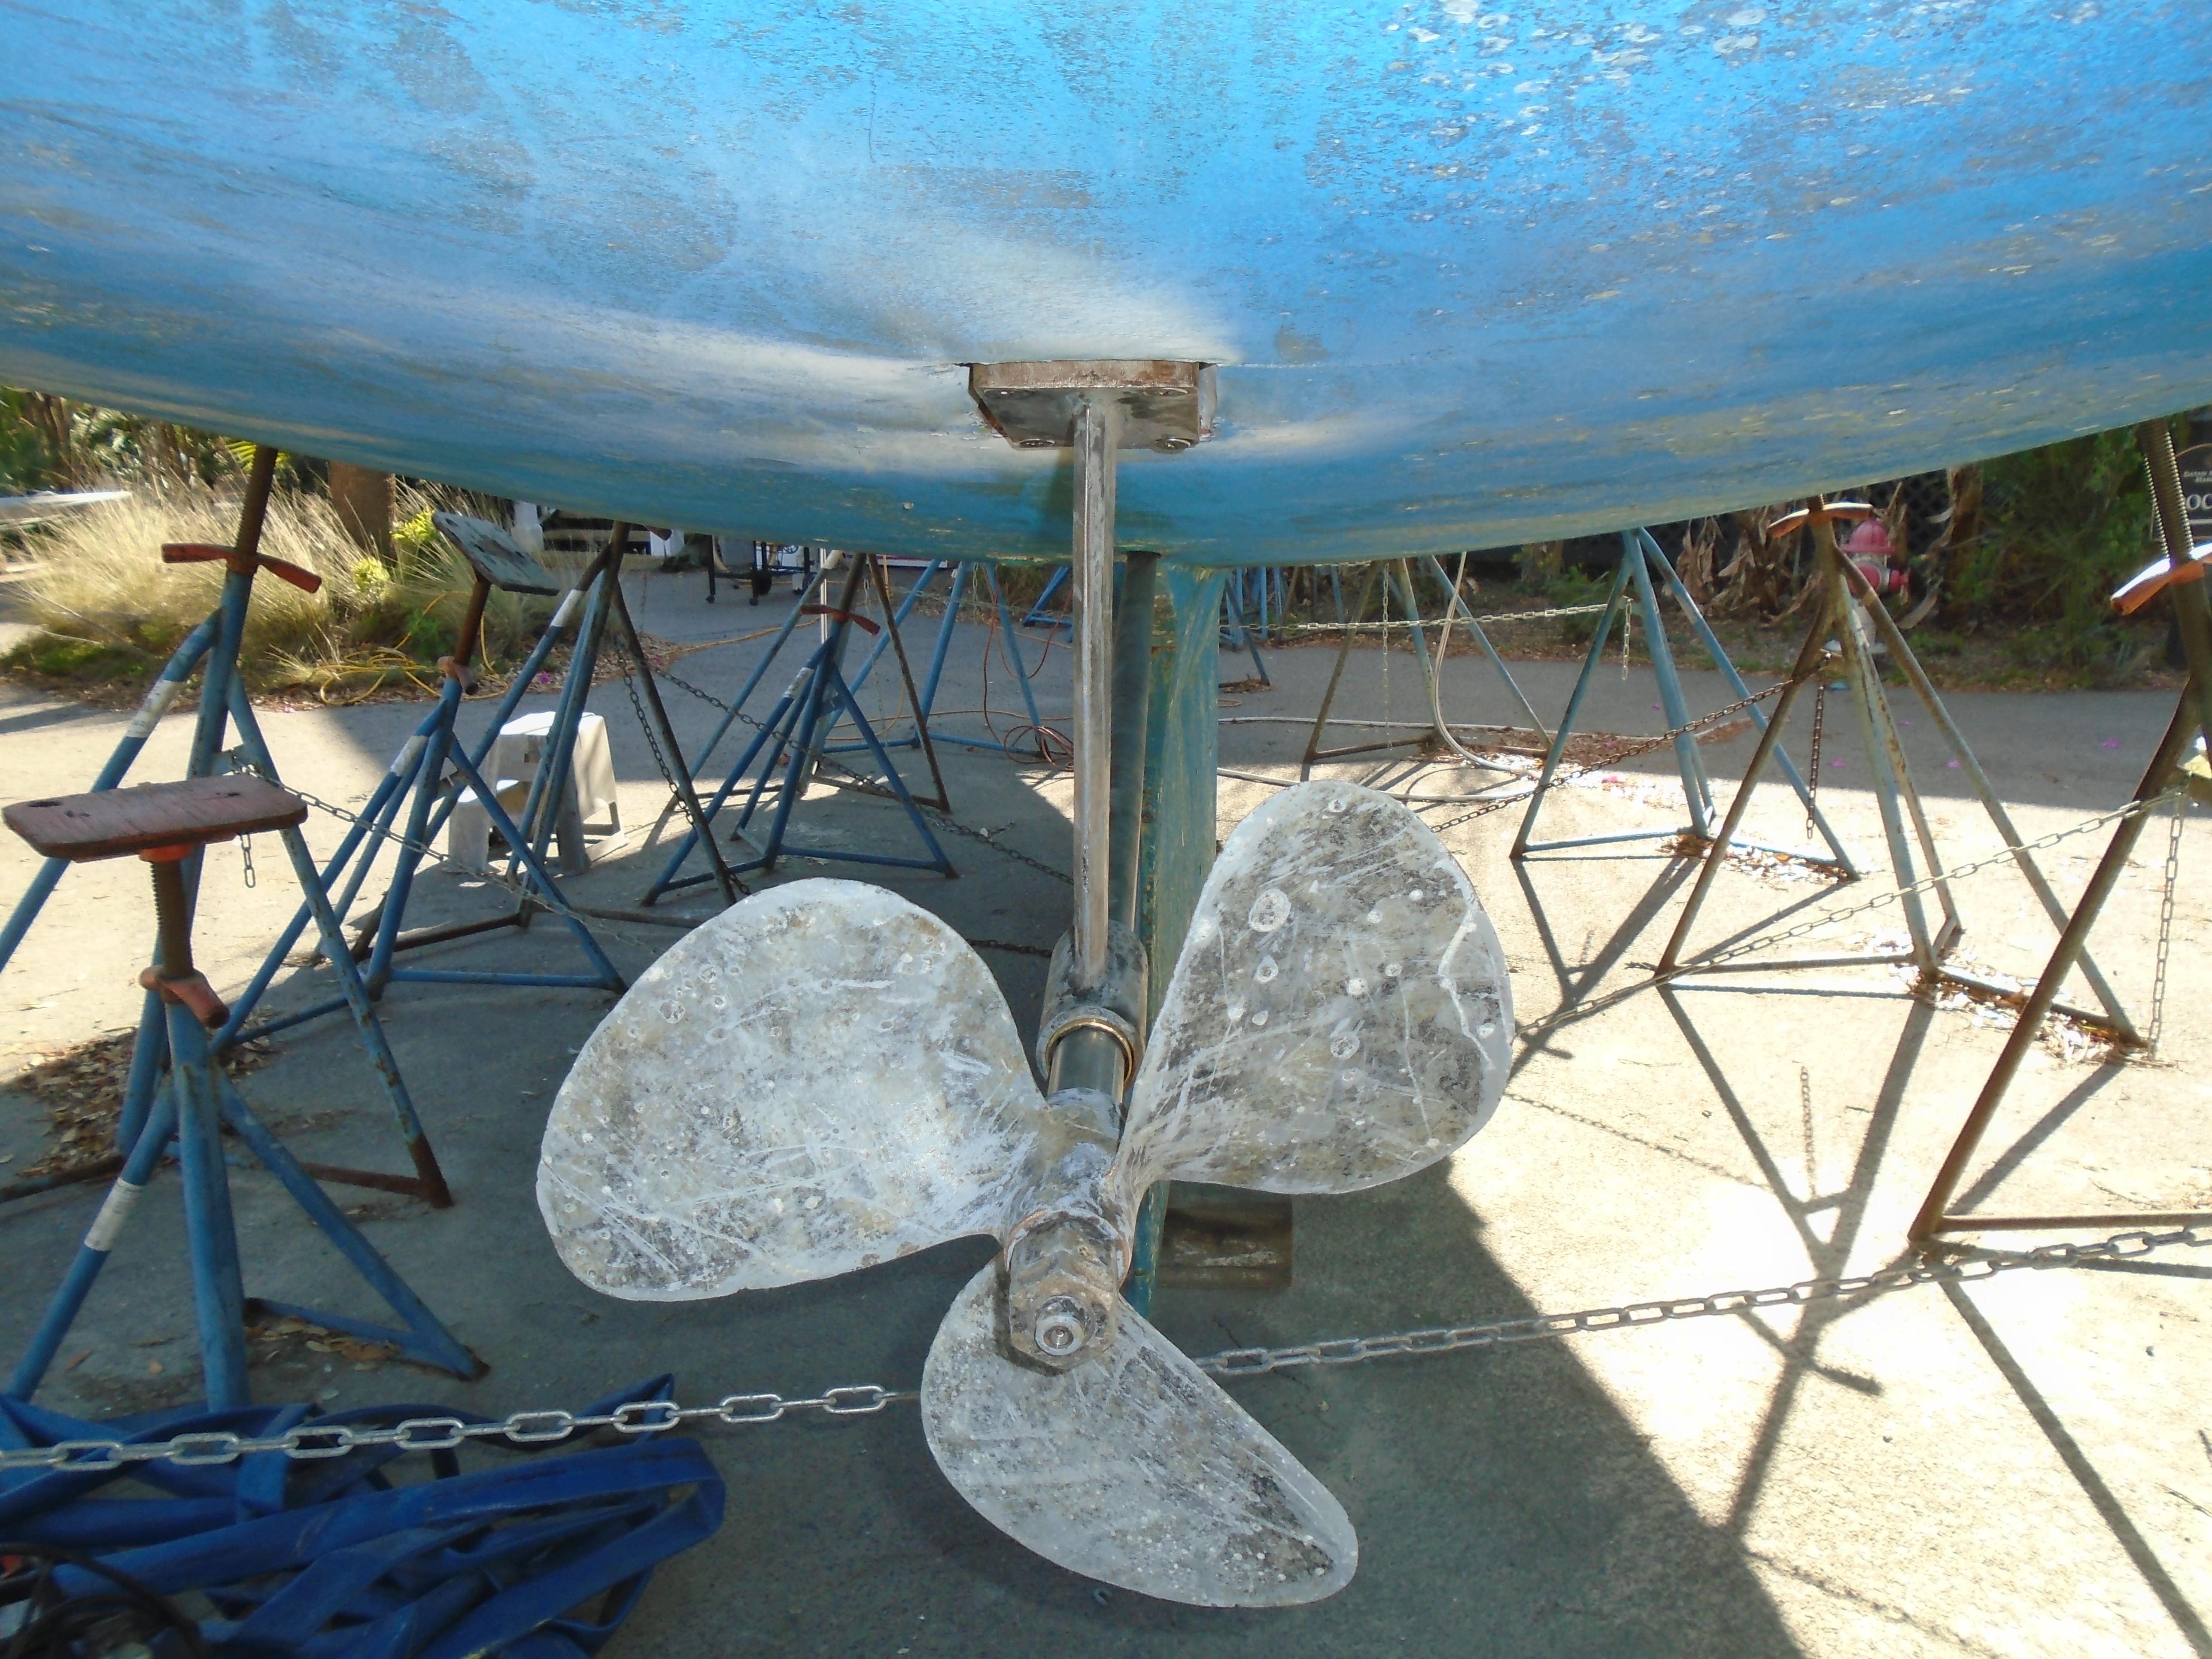
So, after getting the engine dropped back in I worked on reinstalling the shaft. First up was an issue that arose from the recovery - we bent the strut in the process of re-floating the boat. This was due to attaching the lift bags to the shaft (it's pretty much the only place to attach to so...
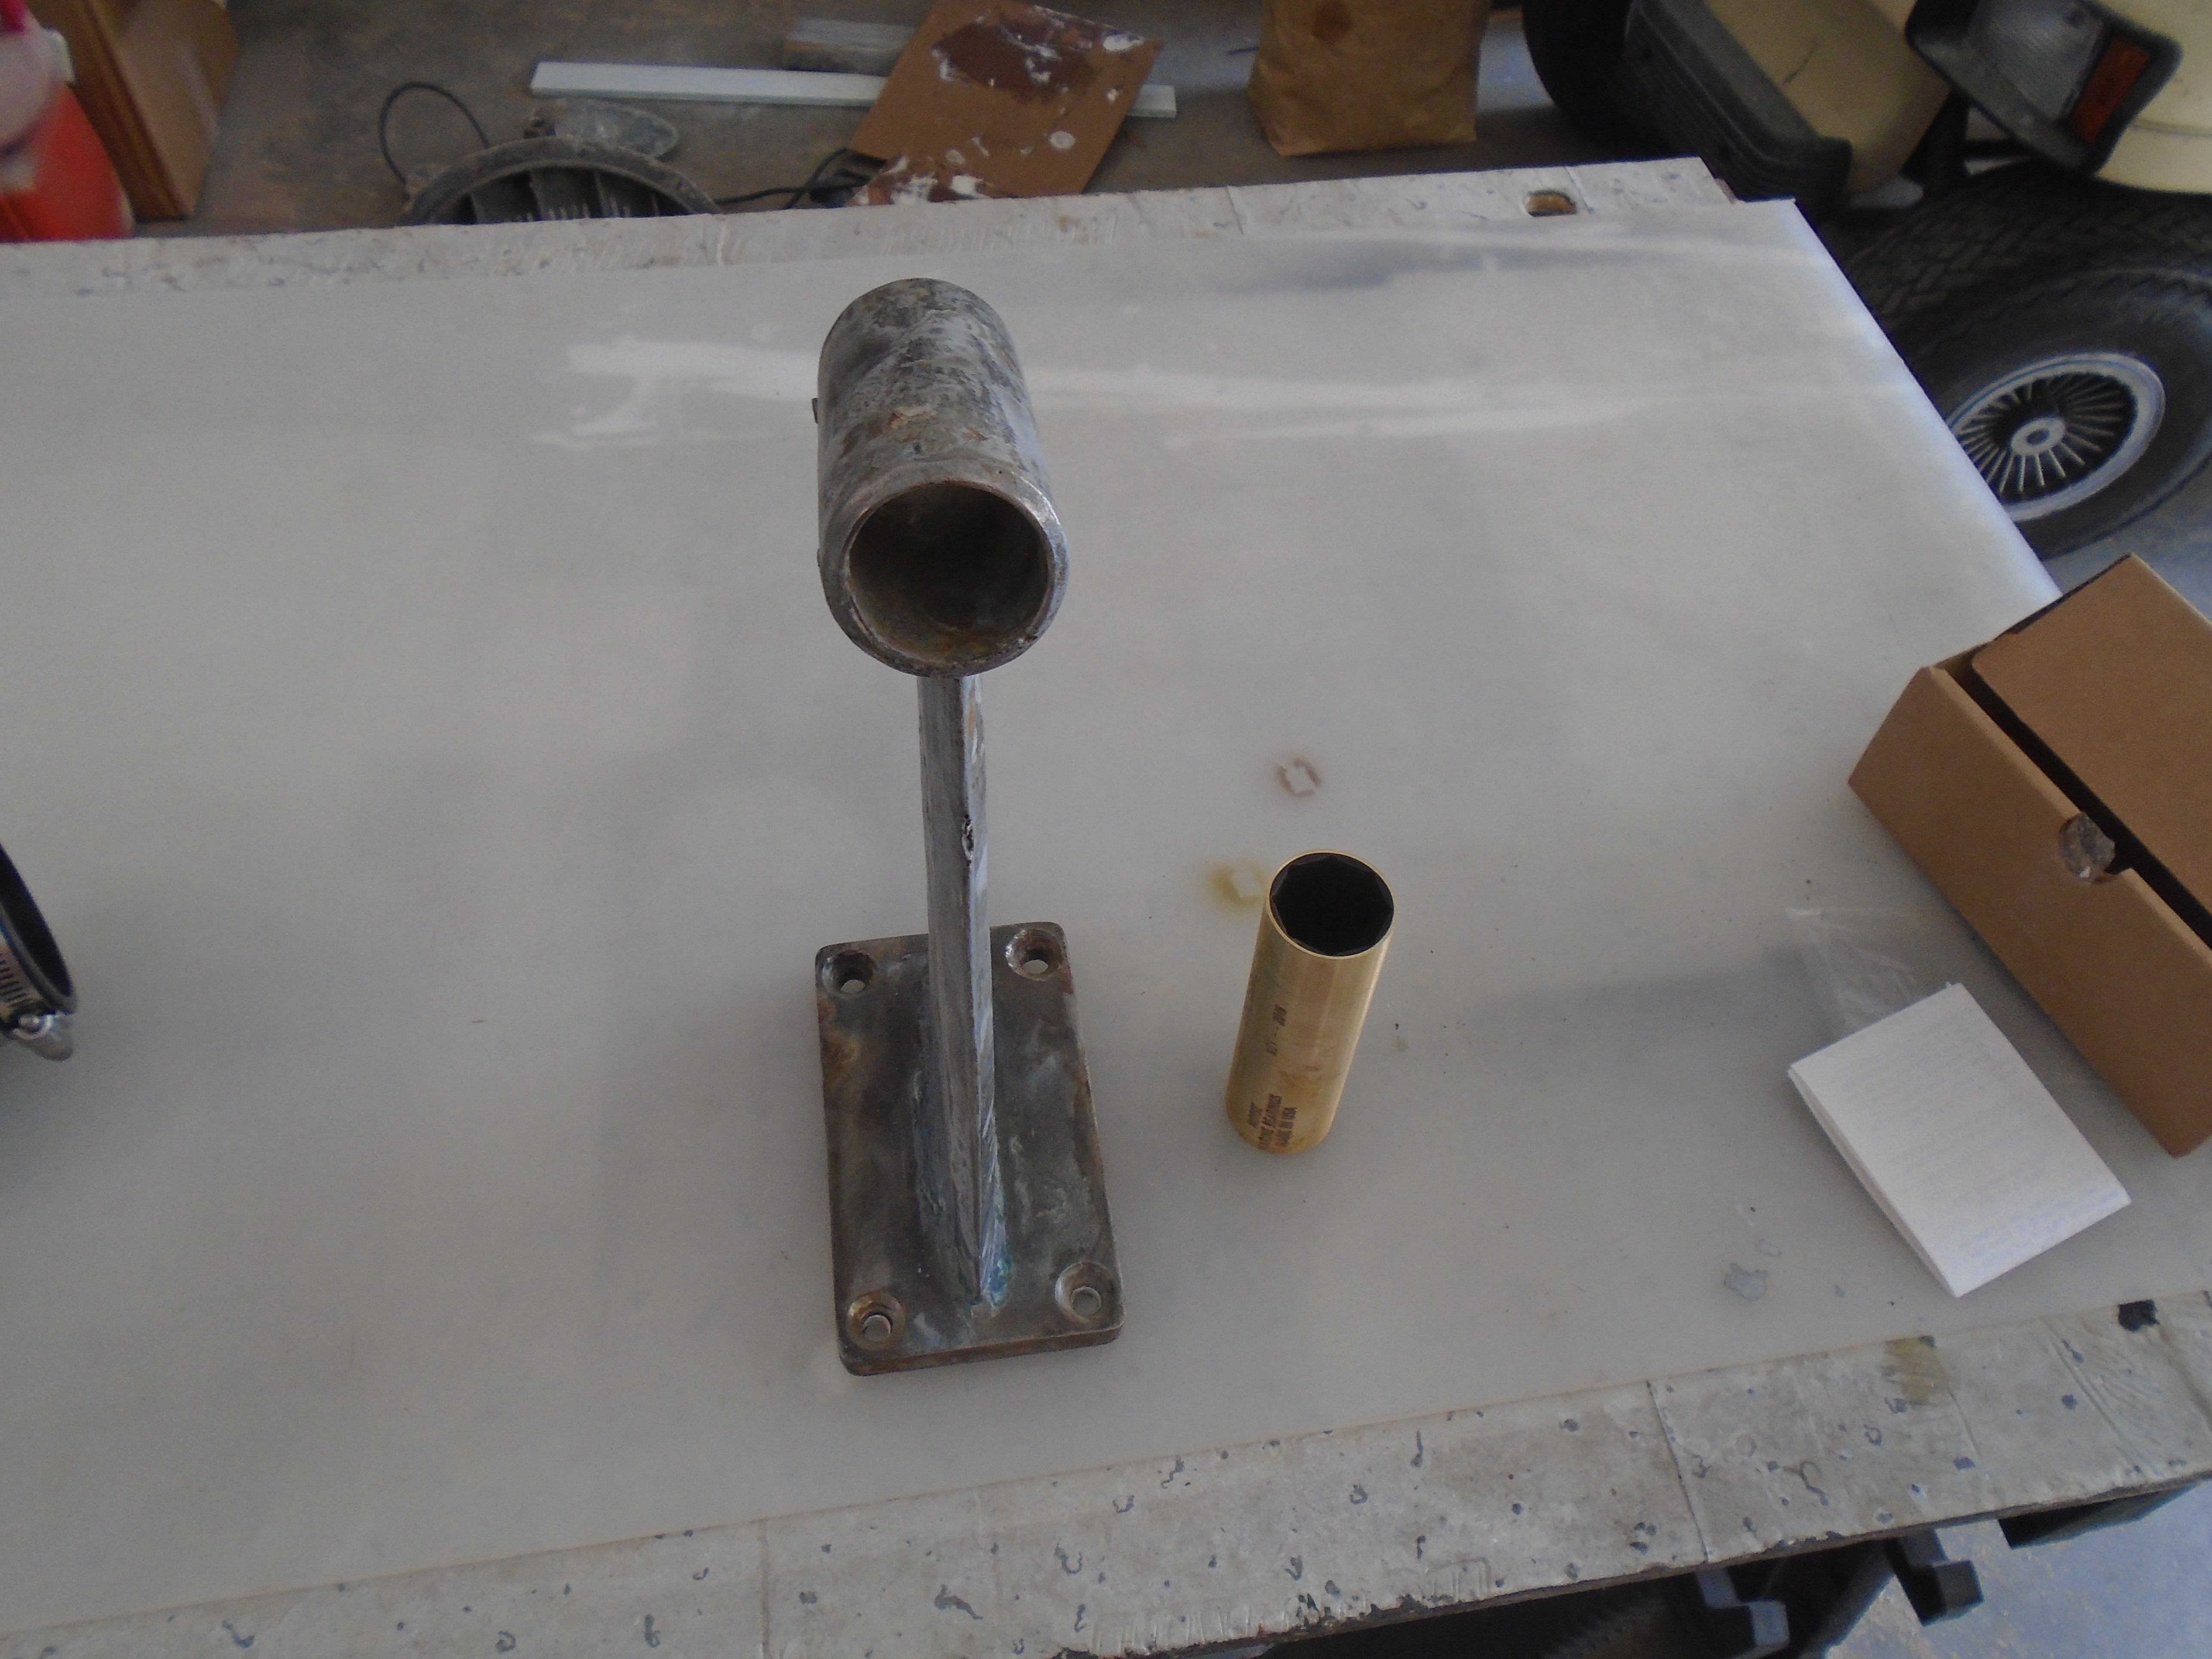
So the strut needed to be removed and straightened and the shaft checked. What a major PITA! The strut is epoxied and bolted in and not easy to remove, but I finally got it out and sent to the machine shop. They heated it and used the press to straighten it out. I cleaned up the pocket in the hull and prepped the strut, shaft and prop for reinstallation. First chore was to get a maintenance kit for the PSS dripless seal. It consists of a new accordion boot, new seals and clamps:

After replacing the seals and prepping the boot, I turned back to the strut and replaced the cutlass bearing:
And I cleaned up the shaft, prop and transmission coupler. With this all done all I needed was new bolts for the strut. Just a quick trip to the hardware store, right? Uh, nope! Noplace anywhere in the area carried the size I needed (they are phillips head screws, 3" long with 3/8ths threads). A search online found the right fasteners so I ordered them. I had noticed when I took everything apart that the screws were over an inch too long when installed so I figured that I might not need the full length of 3" so I ordered both 4 3" screws and 4 2 1/2" screws. Good thing I did because when they arrived there were only 3 of the 3" screws! I guess counting to 4 is too much to ask these days
With all the hardware ready I remounted the strut, shaft and prop:
And reinstalled the shaft seal and coupler:
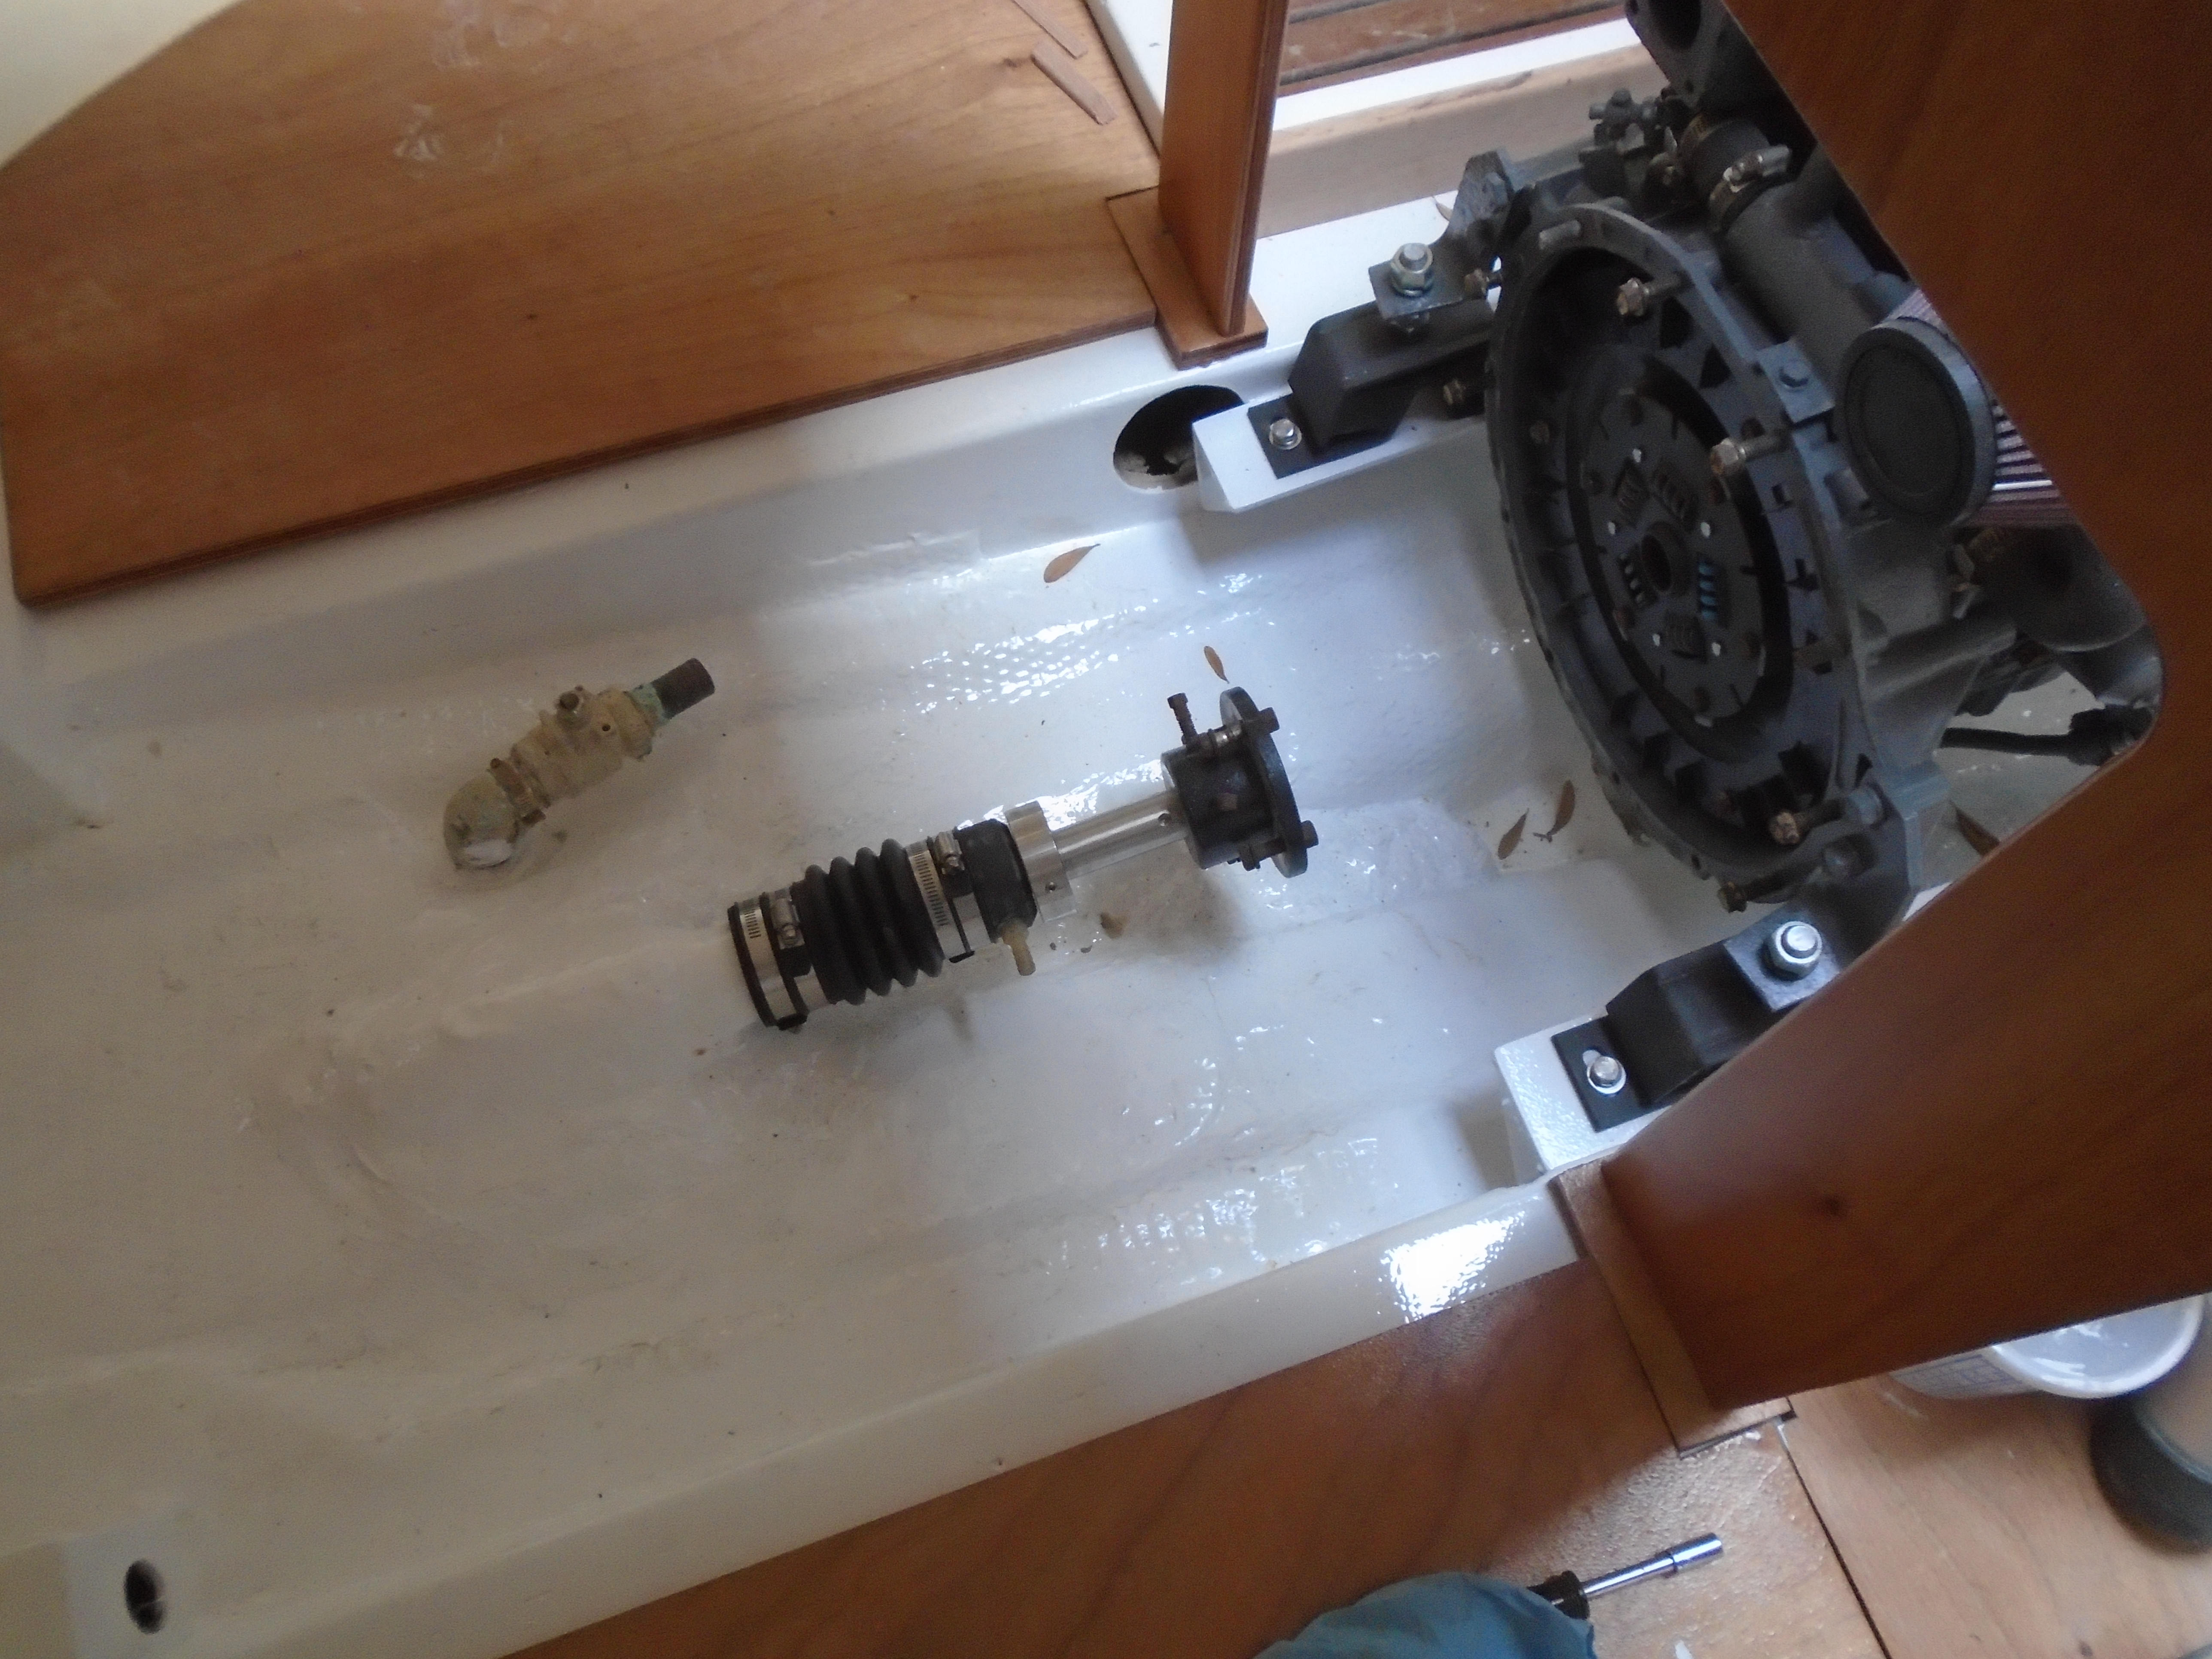
All of this is loosely mounted for now. I still have to reinstall the transmission before re-aligning everything. That is a task for my return.
The final jobs I got done were to replace the last forward bulkhead and the broken lifeline stanchions. I didn't get good pics of that, though, so that will have to wait for the next update. Right before I left I cleaned everything up, hooked up a bilge pump and float switch and the de-humidifier. She's all closed up now and hopefully will be in good shape when I get back to her!
I sure appreciate all the feedback from you guys and I keep any comments or questions coming!
Cheers,
Mark
This update will be the last one for a while as I have started back to work finally. I'll probably be here for the next 4 or 5 months before I get leave to go back home. I did get some more work accomplished on the boat before leaving but due to various tasks needing to get done to prepare for my stay over here I just wound down some things that needed to be finished up. I held off on jumping into anything that would leave the boat a mess. That will have to wait for later!
So, after getting the engine dropped back in I worked on reinstalling the shaft. First up was an issue that arose from the recovery - we bent the strut in the process of re-floating the boat. This was due to attaching the lift bags to the shaft (it's pretty much the only place to attach to so...
So the strut needed to be removed and straightened and the shaft checked. What a major PITA! The strut is epoxied and bolted in and not easy to remove, but I finally got it out and sent to the machine shop. They heated it and used the press to straighten it out. I cleaned up the pocket in the hull and prepped the strut, shaft and prop for reinstallation. First chore was to get a maintenance kit for the PSS dripless seal. It consists of a new accordion boot, new seals and clamps:
After replacing the seals and prepping the boot, I turned back to the strut and replaced the cutlass bearing:
And I cleaned up the shaft, prop and transmission coupler. With this all done all I needed was new bolts for the strut. Just a quick trip to the hardware store, right? Uh, nope! Noplace anywhere in the area carried the size I needed (they are phillips head screws, 3" long with 3/8ths threads). A search online found the right fasteners so I ordered them. I had noticed when I took everything apart that the screws were over an inch too long when installed so I figured that I might not need the full length of 3" so I ordered both 4 3" screws and 4 2 1/2" screws. Good thing I did because when they arrived there were only 3 of the 3" screws! I guess counting to 4 is too much to ask these days
With all the hardware ready I remounted the strut, shaft and prop:
And reinstalled the shaft seal and coupler:
All of this is loosely mounted for now. I still have to reinstall the transmission before re-aligning everything. That is a task for my return.
The final jobs I got done were to replace the last forward bulkhead and the broken lifeline stanchions. I didn't get good pics of that, though, so that will have to wait for the next update. Right before I left I cleaned everything up, hooked up a bilge pump and float switch and the de-humidifier. She's all closed up now and hopefully will be in good shape when I get back to her!
I sure appreciate all the feedback from you guys and I keep any comments or questions coming!
Cheers,
Mark
Last edited:
Yep, shaft run-out checked, straight as an arrow. The shaft is relatively new, I had to replace it back in 2007 when I first installed the PSS shaft seal. The old packing had cut a groove in the old shaft and was not reusable.I am sure you did but I have to ask, you did check the run-out of the shaft right?
Mark-san
I haven't done it yet but the K&N filter housing is rubber so I'll just cut a hole in it and attach a fitting and hose for the breather.4JH3E Cap, see you mounted a K&N on your intake, nice. What did you do with your crankcase breather hose?
Mark-san