
I wish I could get my boat high enough on the stands to extend the keel all the way down... Can't win em all!
Restoration of 1981 C-22 swing keel #10580
- Thread starter CloudDiver
- Start date
Shims for keel pin / hangers
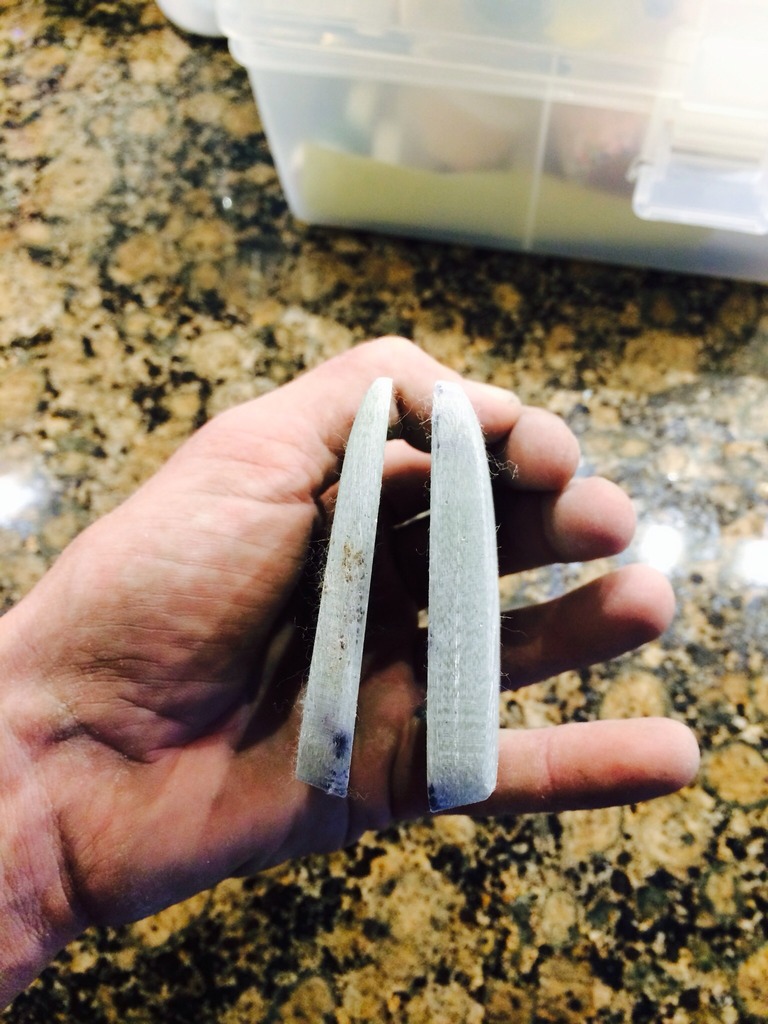
During the three test fits my keel hangers were hugging the keel so tight that that paint would get shaved off the starboard side when the keel swings. I've already taken down the Port side enough but probably still need yet a bit more off the Starboard hanger. This will create a gap so the paint won't get shorn off, but then I end up with side play.
I know Stingy Sailor had used some washers to deal with this, and of course anyone having the old style hangers would need to do this as well. The question is what material would you use and how thick do they need to be? On my lunch break yesterday I went to my fav industrial surplus store and picked up a pair of stainless washers with a 1 inch I.D., they were only 56 cents. Turns out that are .090 thick and just checking them in the gap between the hanger and the keel without actually putting them on the pin; yes they are way too thick.
So this morning I ordered a pack of Delrin Acetal washers from McMaster Carr, link below. The thickness on these is .057 to .067, I.D. is 1.025 and O.D. is 1.75 inch. I'm fairly certain these will do the trick!
http://www.mcmaster.com/#95647a149/=wumgr1
For anyone needing these, or possibly thicker washers to use on old style hangers, review this page on McMaster Carr of all types of washers in various materials that are sized for 1 inch applications;
http://www.mcmaster.com/#standard-washers/=wumnt0
Last edited:
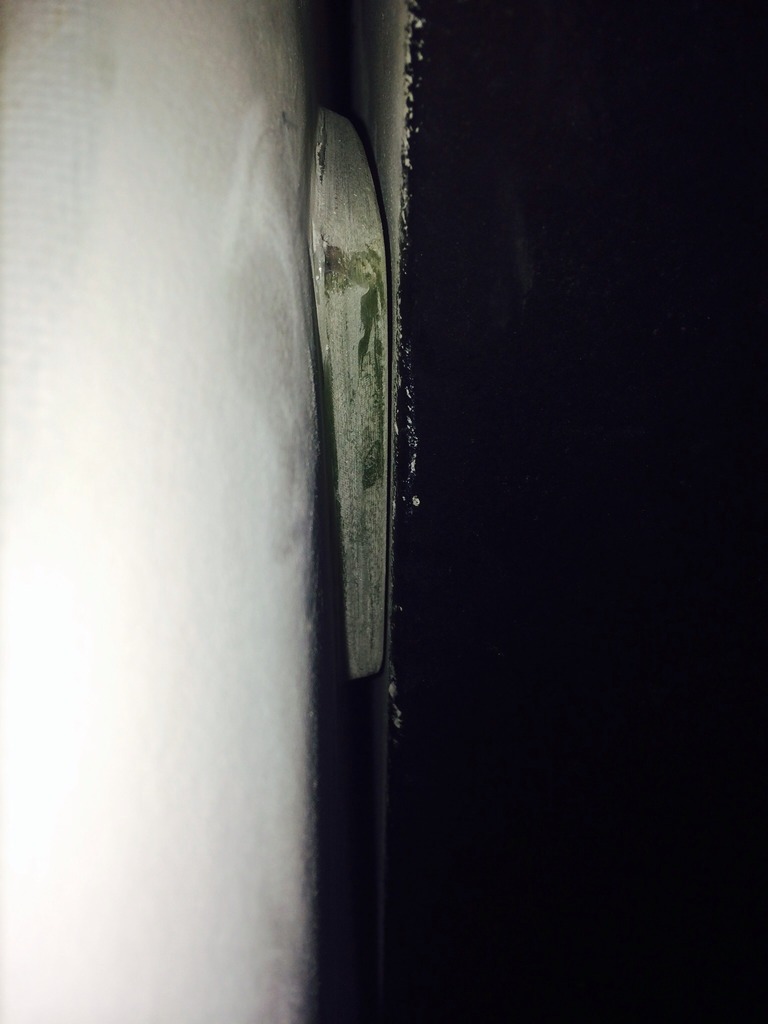
In my case, I needed a 1/8" thick washer to eliminate that much lateral play and to push the keel to starboard to prevent scraping in the trunk. I had the fiberglass cutouts on hand from my cabin storage door projects and just cut one out of with 1" ID and 2" OD and sanded it down to thickness.

More installation tricks will be in next weekend's blog post that finishes the series:
More installation tricks will be in next weekend's blog post that finishes the series:
- Three keel hanger defects from the factory to watch out for

- Make your own keel centering spacers
- Proper keel hanger torque specs
- How to save 70% on a replacement keel cable :dance:
- Materials list for my entire keel refinishing project
- Final cost analysis
I cut down a milk jug as a spacer and to keep the keel from scraping the hangars. It was still in perfect condition 3 years later when I sold the boat.
Attachments
-
 376.3 KB Views: 476
I cut down a milk jug as a spacer and to keep the keel from scraping the hangars. It was still in perfect condition 3 years later when I sold the boat.
Winner!
They are 1.025, that 25/1000ths of an inch.
Luke, Why washers with an I.D. of 1.25?
James
I'm too anal to save money, lol!
I cut down a milk jug as a spacer and to keep the keel from scraping the hangars. It was still in perfect condition 3 years later when I sold the boat.
A dangerous game...
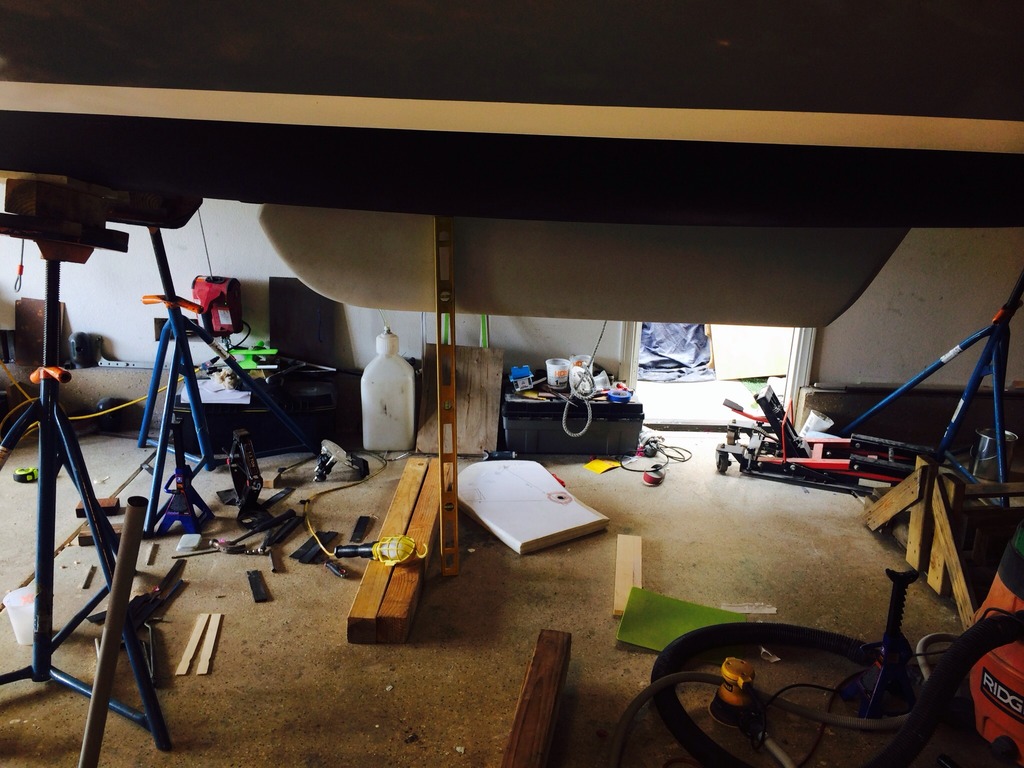
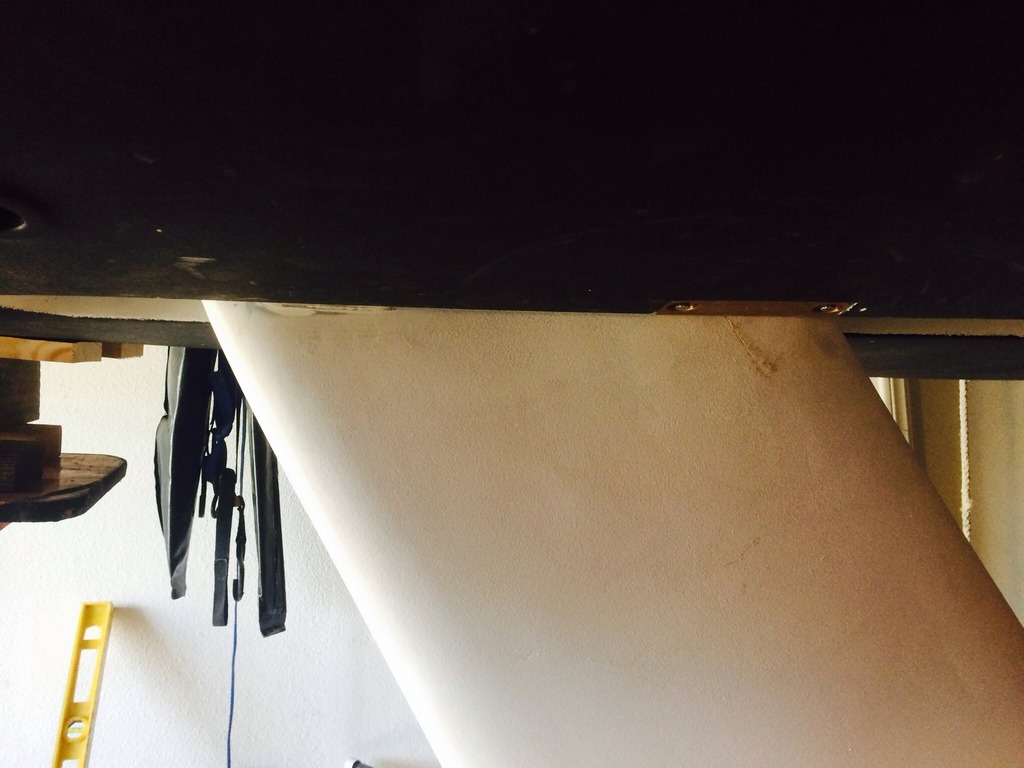
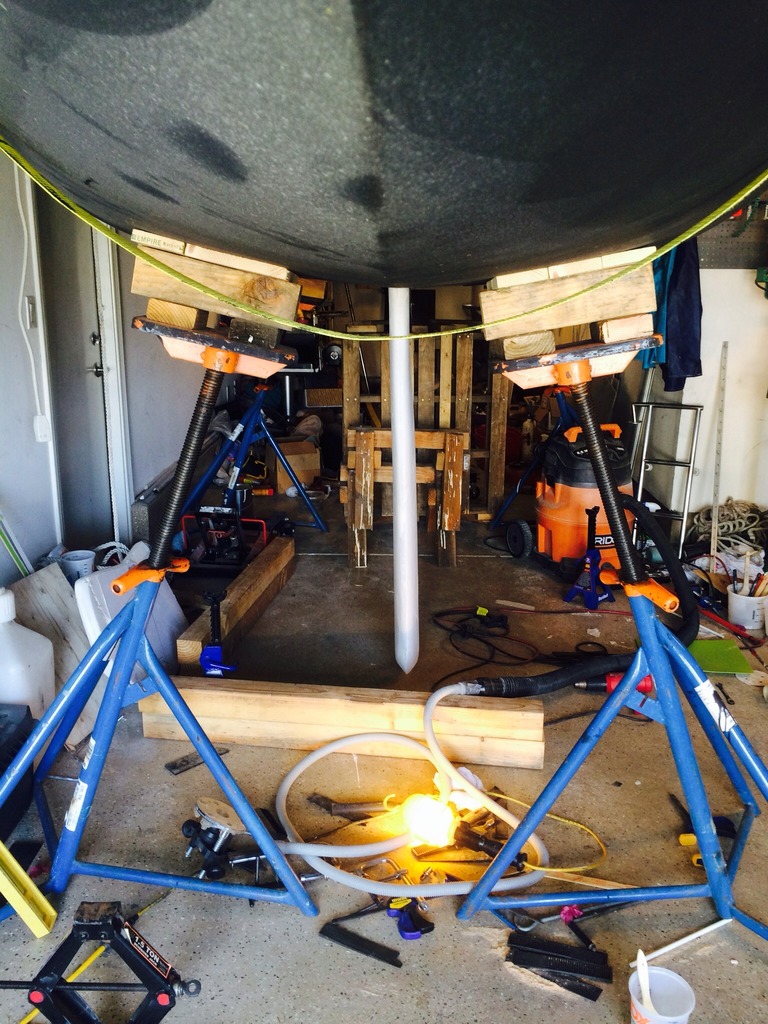
After a week of slow or no progress and feeling like I have stalled out, I finally decided to try out a theory... somewhat of a dangerous game to play. Before I install new keel spacers I want to know what my actual clearances are but the only way to do that and know for sure is to fully extend the keel. I thought the only way possible to do that out of the water was to lift the hull up via crane, and that expense is just out of the question.
Some time ago when I had cleaned and greased the acme threaded posts of my stands I measured how much extension they had, total of 18 inches so realistically I could have 17 inches of exposed thread until they were maxed out. So doing some rough math in my head, considering the exposed keel below the hull is 60 inches but at 60 degree angle I would need somewhere around 50 to 52 inches of vertical clearance directly below the keel hangers.
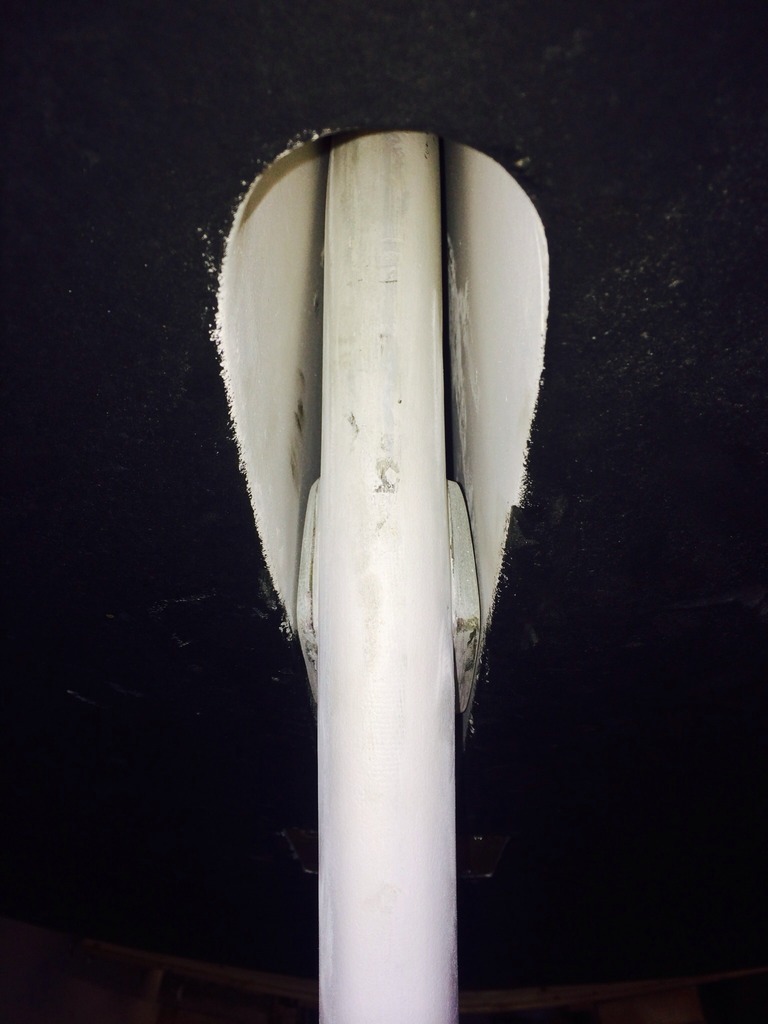
So with some additional blocking under the stand pads and slowly lifting the bow and the stern alternately I finally got the hull high enough to lower the keel into the full down position with 1/2 inch to spare. It took me at least 3 hours of lifting each end, using my power winch in the front to assist and and engine crane on the stern while cranking up on the stands to keep stability, adding blocking as needed and lowering the winch to check progress. Finally the keel is fully settled at a 60 degree sweep, its vertical back at the head resting against the keel trunk and the cable slack.
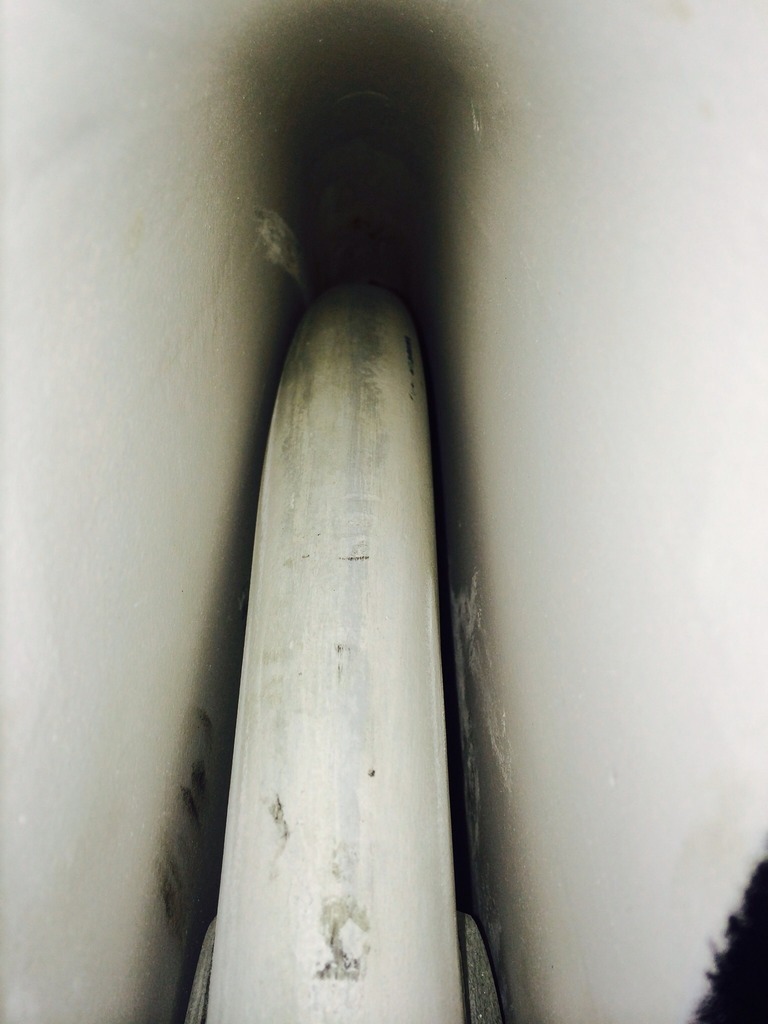
Looking in the keel pocket I can see that the keel is favoring the starboard side, the gap being larger on the port side. The head of the keel is planted firmly at the top of the trunk and, as I suspected from keel pocket template, it is firmly planted with no play. I am going to try to put one more shim on the starboard side to get it to move over to port just a bit as I can already see the scrape in keel pocket on the starboard side exactly the way Stingy showed the picture of his.
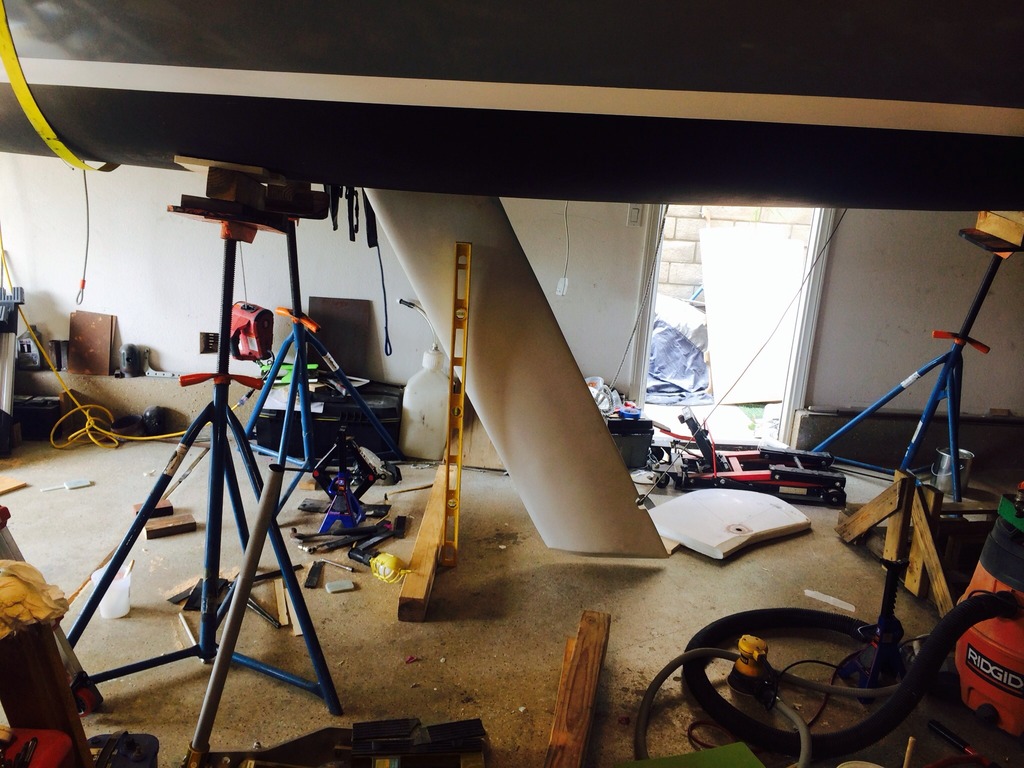
In the pic, the 48 inch rule/level helps with scale. You can see the stands are maxed out on extension. This was earlier when I only had about 50 inches of clearance.
Now here is where I reached just over 54 inches vertical and got the keel all the way down;
After a week of slow or no progress and feeling like I have stalled out, I finally decided to try out a theory... somewhat of a dangerous game to play. Before I install new keel spacers I want to know what my actual clearances are but the only way to do that and know for sure is to fully extend the keel. I thought the only way possible to do that out of the water was to lift the hull up via crane, and that expense is just out of the question.
Some time ago when I had cleaned and greased the acme threaded posts of my stands I measured how much extension they had, total of 18 inches so realistically I could have 17 inches of exposed thread until they were maxed out. So doing some rough math in my head, considering the exposed keel below the hull is 60 inches but at 60 degree angle I would need somewhere around 50 to 52 inches of vertical clearance directly below the keel hangers.
So with some additional blocking under the stand pads and slowly lifting the bow and the stern alternately I finally got the hull high enough to lower the keel into the full down position with 1/2 inch to spare. It took me at least 3 hours of lifting each end, using my power winch in the front to assist and and engine crane on the stern while cranking up on the stands to keep stability, adding blocking as needed and lowering the winch to check progress. Finally the keel is fully settled at a 60 degree sweep, its vertical back at the head resting against the keel trunk and the cable slack.
Looking in the keel pocket I can see that the keel is favoring the starboard side, the gap being larger on the port side. The head of the keel is planted firmly at the top of the trunk and, as I suspected from keel pocket template, it is firmly planted with no play. I am going to try to put one more shim on the starboard side to get it to move over to port just a bit as I can already see the scrape in keel pocket on the starboard side exactly the way Stingy showed the picture of his.
In the pic, the 48 inch rule/level helps with scale. You can see the stands are maxed out on extension. This was earlier when I only had about 50 inches of clearance.
Now here is where I reached just over 54 inches vertical and got the keel all the way down;
Last edited:
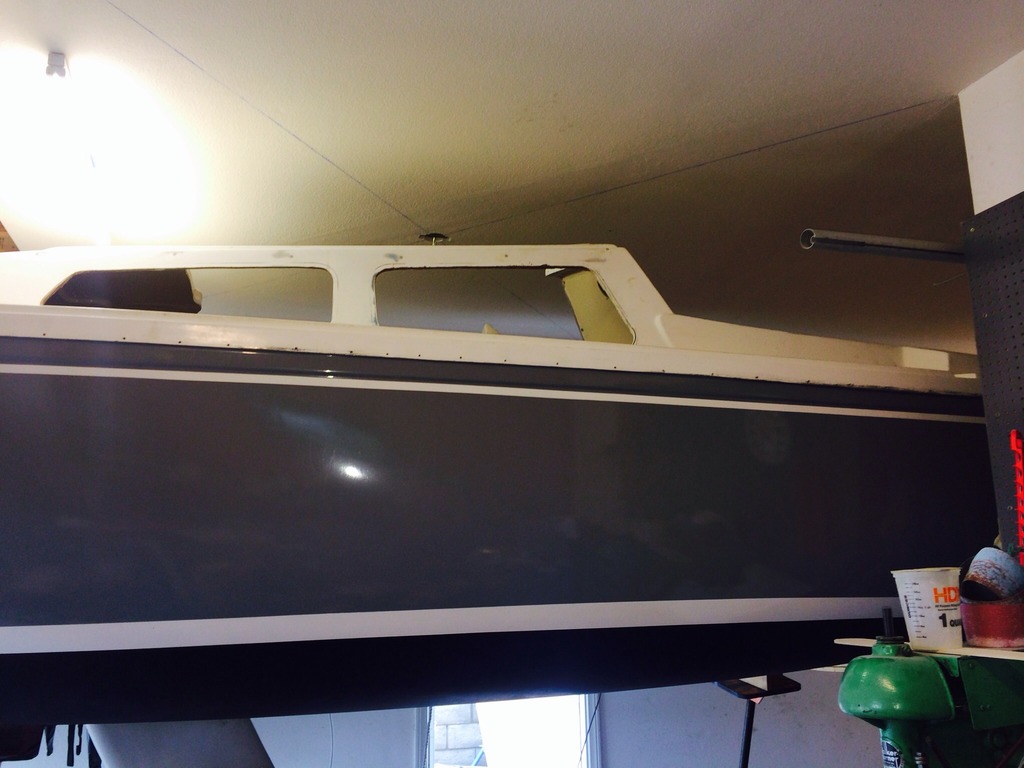
Just for some perspective, this how close the cabin roof is to the ceiling of my shop, its just shy of 10 feet;
Last edited:
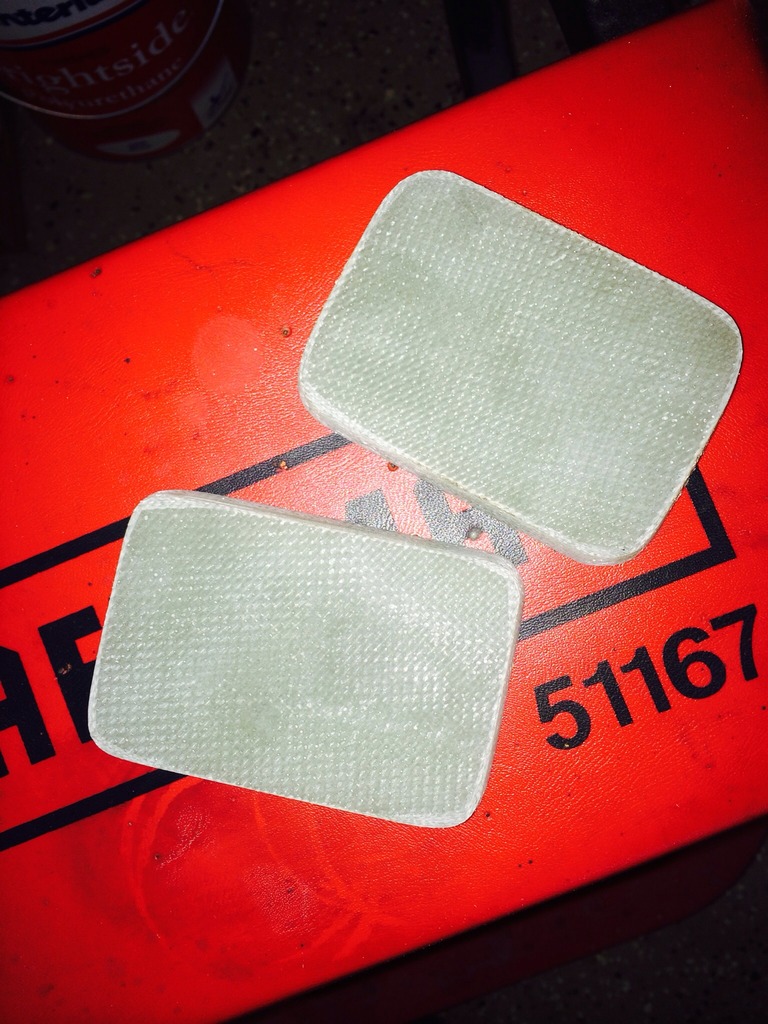
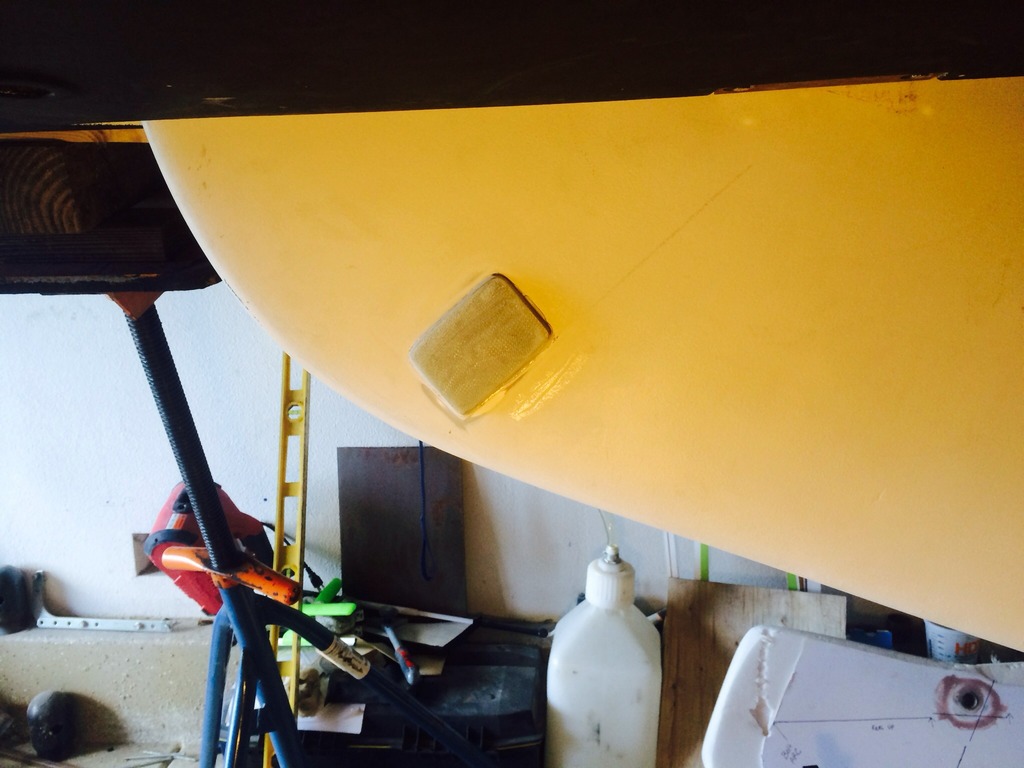
Here is the new set of keel spacers I made. I wet out 14 layers of the left over 8.5 oz cloth and pressed them between small sheets of plywood with wax paper and placed two car batteries on top. I trimmed the edges square and cut that pice in half and epoxied them together. Once cure I cut that in half and beveled the edges at 15 degrees giving me these two spacers that are 3/8" thick. These will be attached so they sit just inside the keel pocket flush with the bottom when the keel is down. The way the keel sits in the pocket now the spacer is too thick for the starboard side and too thin for port. I will try adding one more of the Delrin shims to the starboard side and see if I can even it out, then shape the spacers as needed. With the hull sitting as high as it is I will have to modify my lifting equipment to detach the keel to add my additional spacer, but its worth it to be able to test the final set up before it goes in the water.
Last edited:
That's using yer noggin'! Glad you got it up and can see exactly what's going on up in there. There's so much variation in how these older boats were made that it seems no one size truly fits them all. Every keel is a custom fit if you want to get it tight.
Now you got me really wanting to hoist mine up so I can check it dry. I could do it relatively easily in my barn if I had four chain hoists or winches and a couple cargo straps. If I thought I'd use them again once in a while, I'd buy 'em. But since it's probably a one-time job and being the cheapskate that I am, I won't
Now you got me really wanting to hoist mine up so I can check it dry. I could do it relatively easily in my barn if I had four chain hoists or winches and a couple cargo straps. If I thought I'd use them again once in a while, I'd buy 'em. But since it's probably a one-time job and being the cheapskate that I am, I won't
Do not try this at home. This is being done by a professinal stunt man!
Good show Luke. But I am just gonna center mine at the hangers as best I can and bless it. I will add the washers as you mentioned above and some home made centering pads ah la Stingy.
James
Good show Luke. But I am just gonna center mine at the hangers as best I can and bless it. I will add the washers as you mentioned above and some home made centering pads ah la Stingy.
James
Thanks Guys... I certainly did some heavy lifting today. Its a good thing, now I feel very confident about the way the keel fits and the spacing I have. I was able to put my lift up onto my heavy duty saw bucks which got the keel cradle high enough to support it while I lowered the hangers and added one more shim on the starboard side. I should have snapped a pic after I lowered the keel again, but I will do that tomorrow. The keel is much more center in the pocket now and I was able to shape the new spacers to get a good fit. The pic below is starboard to port, left to right. I only had to reduce the starboard a little bit. Better to to subtract than to have to add more thickness. I mixed up a pump of epoxy and some colloidal silica and clamped them in place. I'll do some final checks when they are are cured, so if all goes well I should be able to drop the keel one last time then put on the last hot coat of Interprotect and bottom paint the keel and the keel pocket.
Last edited:
Keel spacers are on!
This morning I sanded and faired the residual epoxy that squeezed out the sides (most was cleaned up with a spatula when initially clamped). So with fingers crossed it was time to test my work and see what clearances I would have as well as if any additional shaping was needed. Notice where the spacers are relative to where CD recommends them, and to where others have placed theirs. Remember, as Stingy has pointed out several times here and on his web page, there are so many variations in these keels so one size does not fit all. My spacers are placed so they just tuck into the pocket only in the full down position, directly forward of the keel pin. I feel like the union between the bottom and the keel pocket is the strongest area of the hull to have these spacers pushing against vs the lateral forces on the keel and transferring that energy to the hull.
Now You See Em'....
Now You Don't!
Last edited:
You can see the variation in thickness from port side to starboard side in this pic. The Keel is very close to dead center now, its really my keel that is not symmetrical that account for the difference. I put some taper in them so as they rise into the slot they don't catch.
Last edited:
Here are some shots keel full down so you can see the clearances I ended up with. I haven't done it yet, but before I remove the keel one last time for paint I'll use some feeler gauges to see what I've got. I'm sure some paint will close up any remaining gap, if it scrapes well then so be it!
Last edited:
This is a rare view that few people to get too see with boat dry. If anyone is doing a full keel job I'd highly recommend doing it this way, getting the boat high enough to test the keel at full swing. Looking at it from this view I can see my keel shape is far from perfect, it appears there is a pronounced difference on the port side. Well... sh!t happens. I replaced my shape and faired it by eye without a template. It is 500% better than it was before. Will it effect the speed or handling of the boat? It might, but I doubt to any degree than my level of experience will be able to notice. The good news is I've accomplished the major repairs with a solid epoxy job, so I won't have to repeat this circus. In doing so I also developed my various methods for 'dry docking' my boat in my shop and getting it sky high as you can see. So, I'll sail it this way for a season or two and IF I really want to get the shape perfected I can dry dock again and just add fairing compound via the guide lines Stingy Sailor has developed. That is a project for another winter!
Last edited: