Repairing Hunter 40 damage from Hurricane Matthew
- Thread starter B757Captain
- Start date

Mark this is turning out very nicely, but who would have not guessed that of you, I am wondering why you didn't continue up on the leading angle raising the dodger high enough to allow better vision through your new windows? I understand that if the addition was higher it would somewhat impede vision, but with bigger windows it would make up for that loss and the dodger leadin would offer more protection from the weather. I am guessing that it would not have allowed enough forward space for the companionway hatch to slide forward.
Next question is any of your new vision panels going to open to allow a breeze into the cockpit?
I have often thought about finding a (I dare say) a power boat windshield arrangement who's dimensions would would in place of my dodger and then build that into a custom hard top, I know dreaming is dangerous......
Sometimes necessity is the mother of inventionI wish I had your talent ... then I wouldn't be afraid to tear stuff apart and dive right into changes
 . Tearing into it is the first step!
The height was, as is pretty normal with boats, airplanes, etc., a compromise. I spent lots of time sitting at the wheel picturing how high I could, or should, make the dodger. Where it is now allows good vision over the top, still good vision through it (though higher would have made that better). I am planning for some clear panels in the closeout canvas cover connecting the dodger and bimini - that's where I was planning for vision and weather protection.Mark this is turning out very nicely, but who would have not guessed that of you, I am wondering why you didn't continue up on the leading angle raising the dodger high enough to allow better vision through your new windows? I understand that if the addition was higher it would somewhat impede vision, but with bigger windows it would make up for that loss and the dodger leadin would offer more protection from the weather. I am guessing that it would not have allowed enough forward space for the companionway hatch to slide forward.
Next question is any of your new vision panels going to open to allow a breeze into the cockpit?
I have often thought about finding a (I dare say) a power boat windshield arrangement who's dimensions would would in place of my dodger and then build that into a custom hard top, I know dreaming is dangerous......
I originally planned opening windows for the front but changed my mind - it added a level of complexity that I'm not sure will be that beneficial. I don't think the dodger will cut off airflow to badly to the cockpit and opening windows will not add any airflow below. I won't know for sure until it's finished of course
Possibly! A few smaller panels should fit nicely, especially the flexible panels.Nice! Looks like a good place for some solar too!
Deck enclosure/hard dodger, Part 10:
I patterned and cut the rear panels and secured them temporarily. Needed them in place in order to continue with the door opening structure and the hatch itself. Next up was to start on the hatch. I cut the frame and clamped everything in place, checked and double checked the measurements, added some temporary braces to line everything up and broke out the glue:
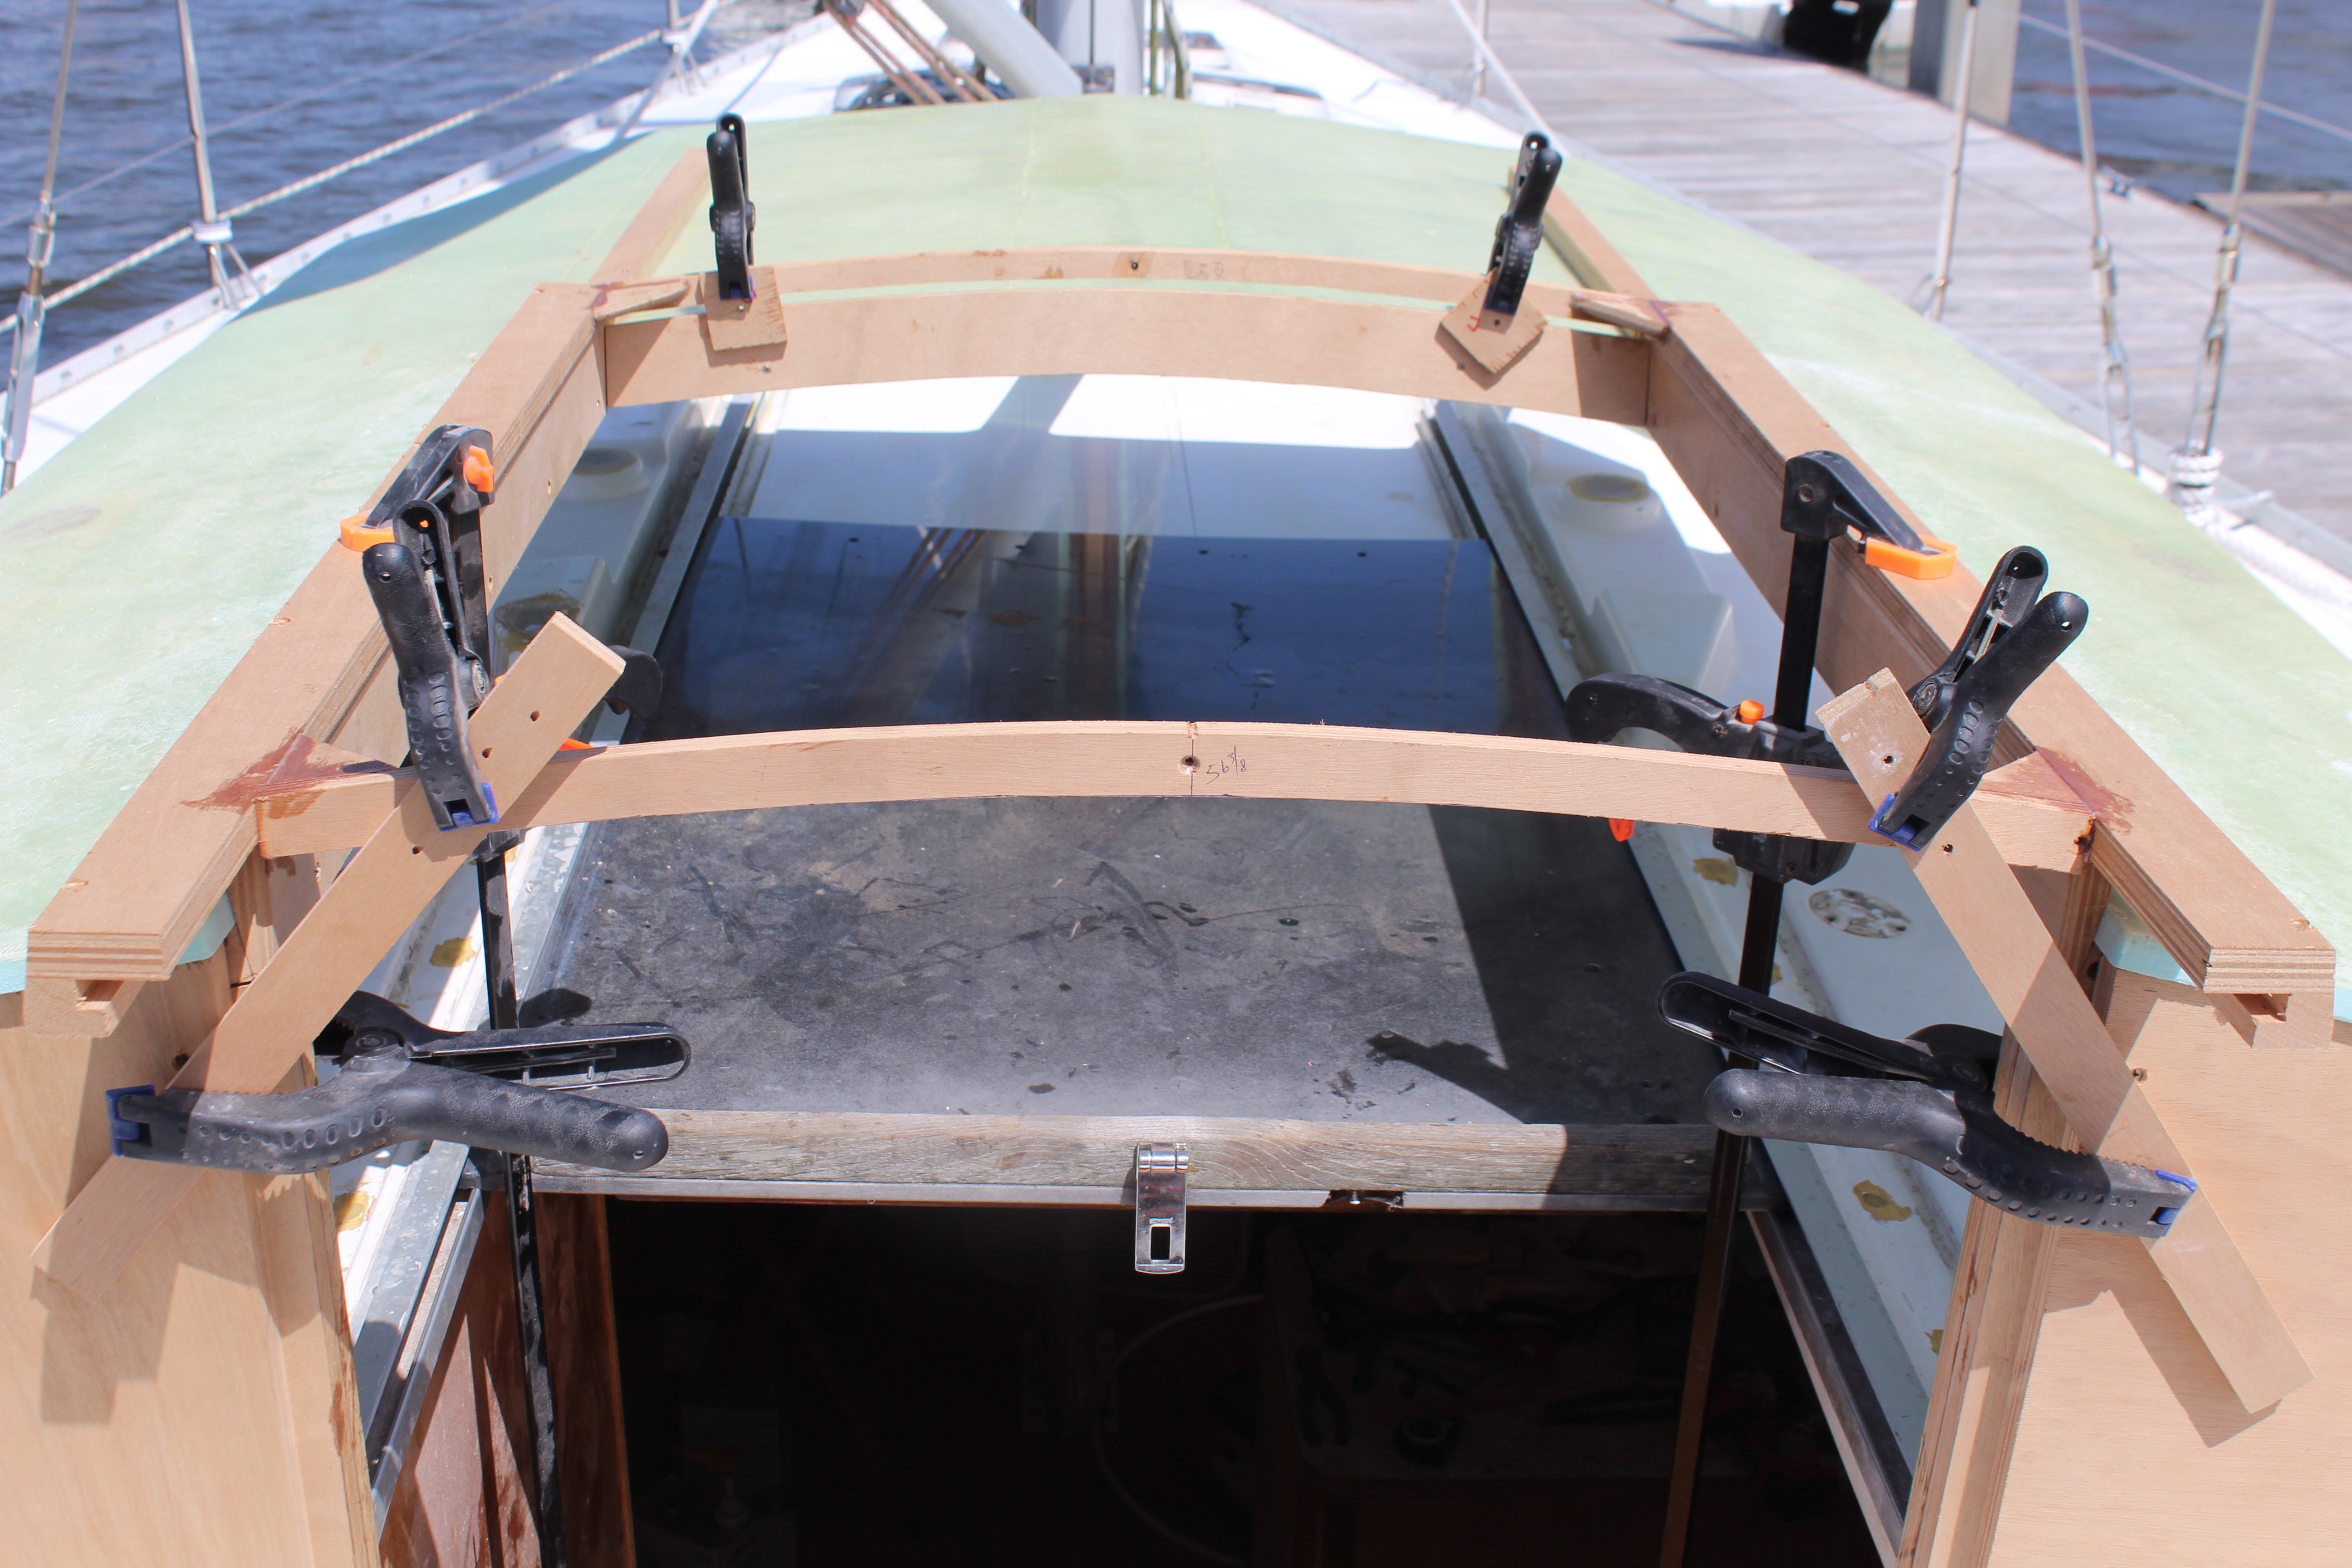
With the hatch frame dry, time to check that it slides! And it does:
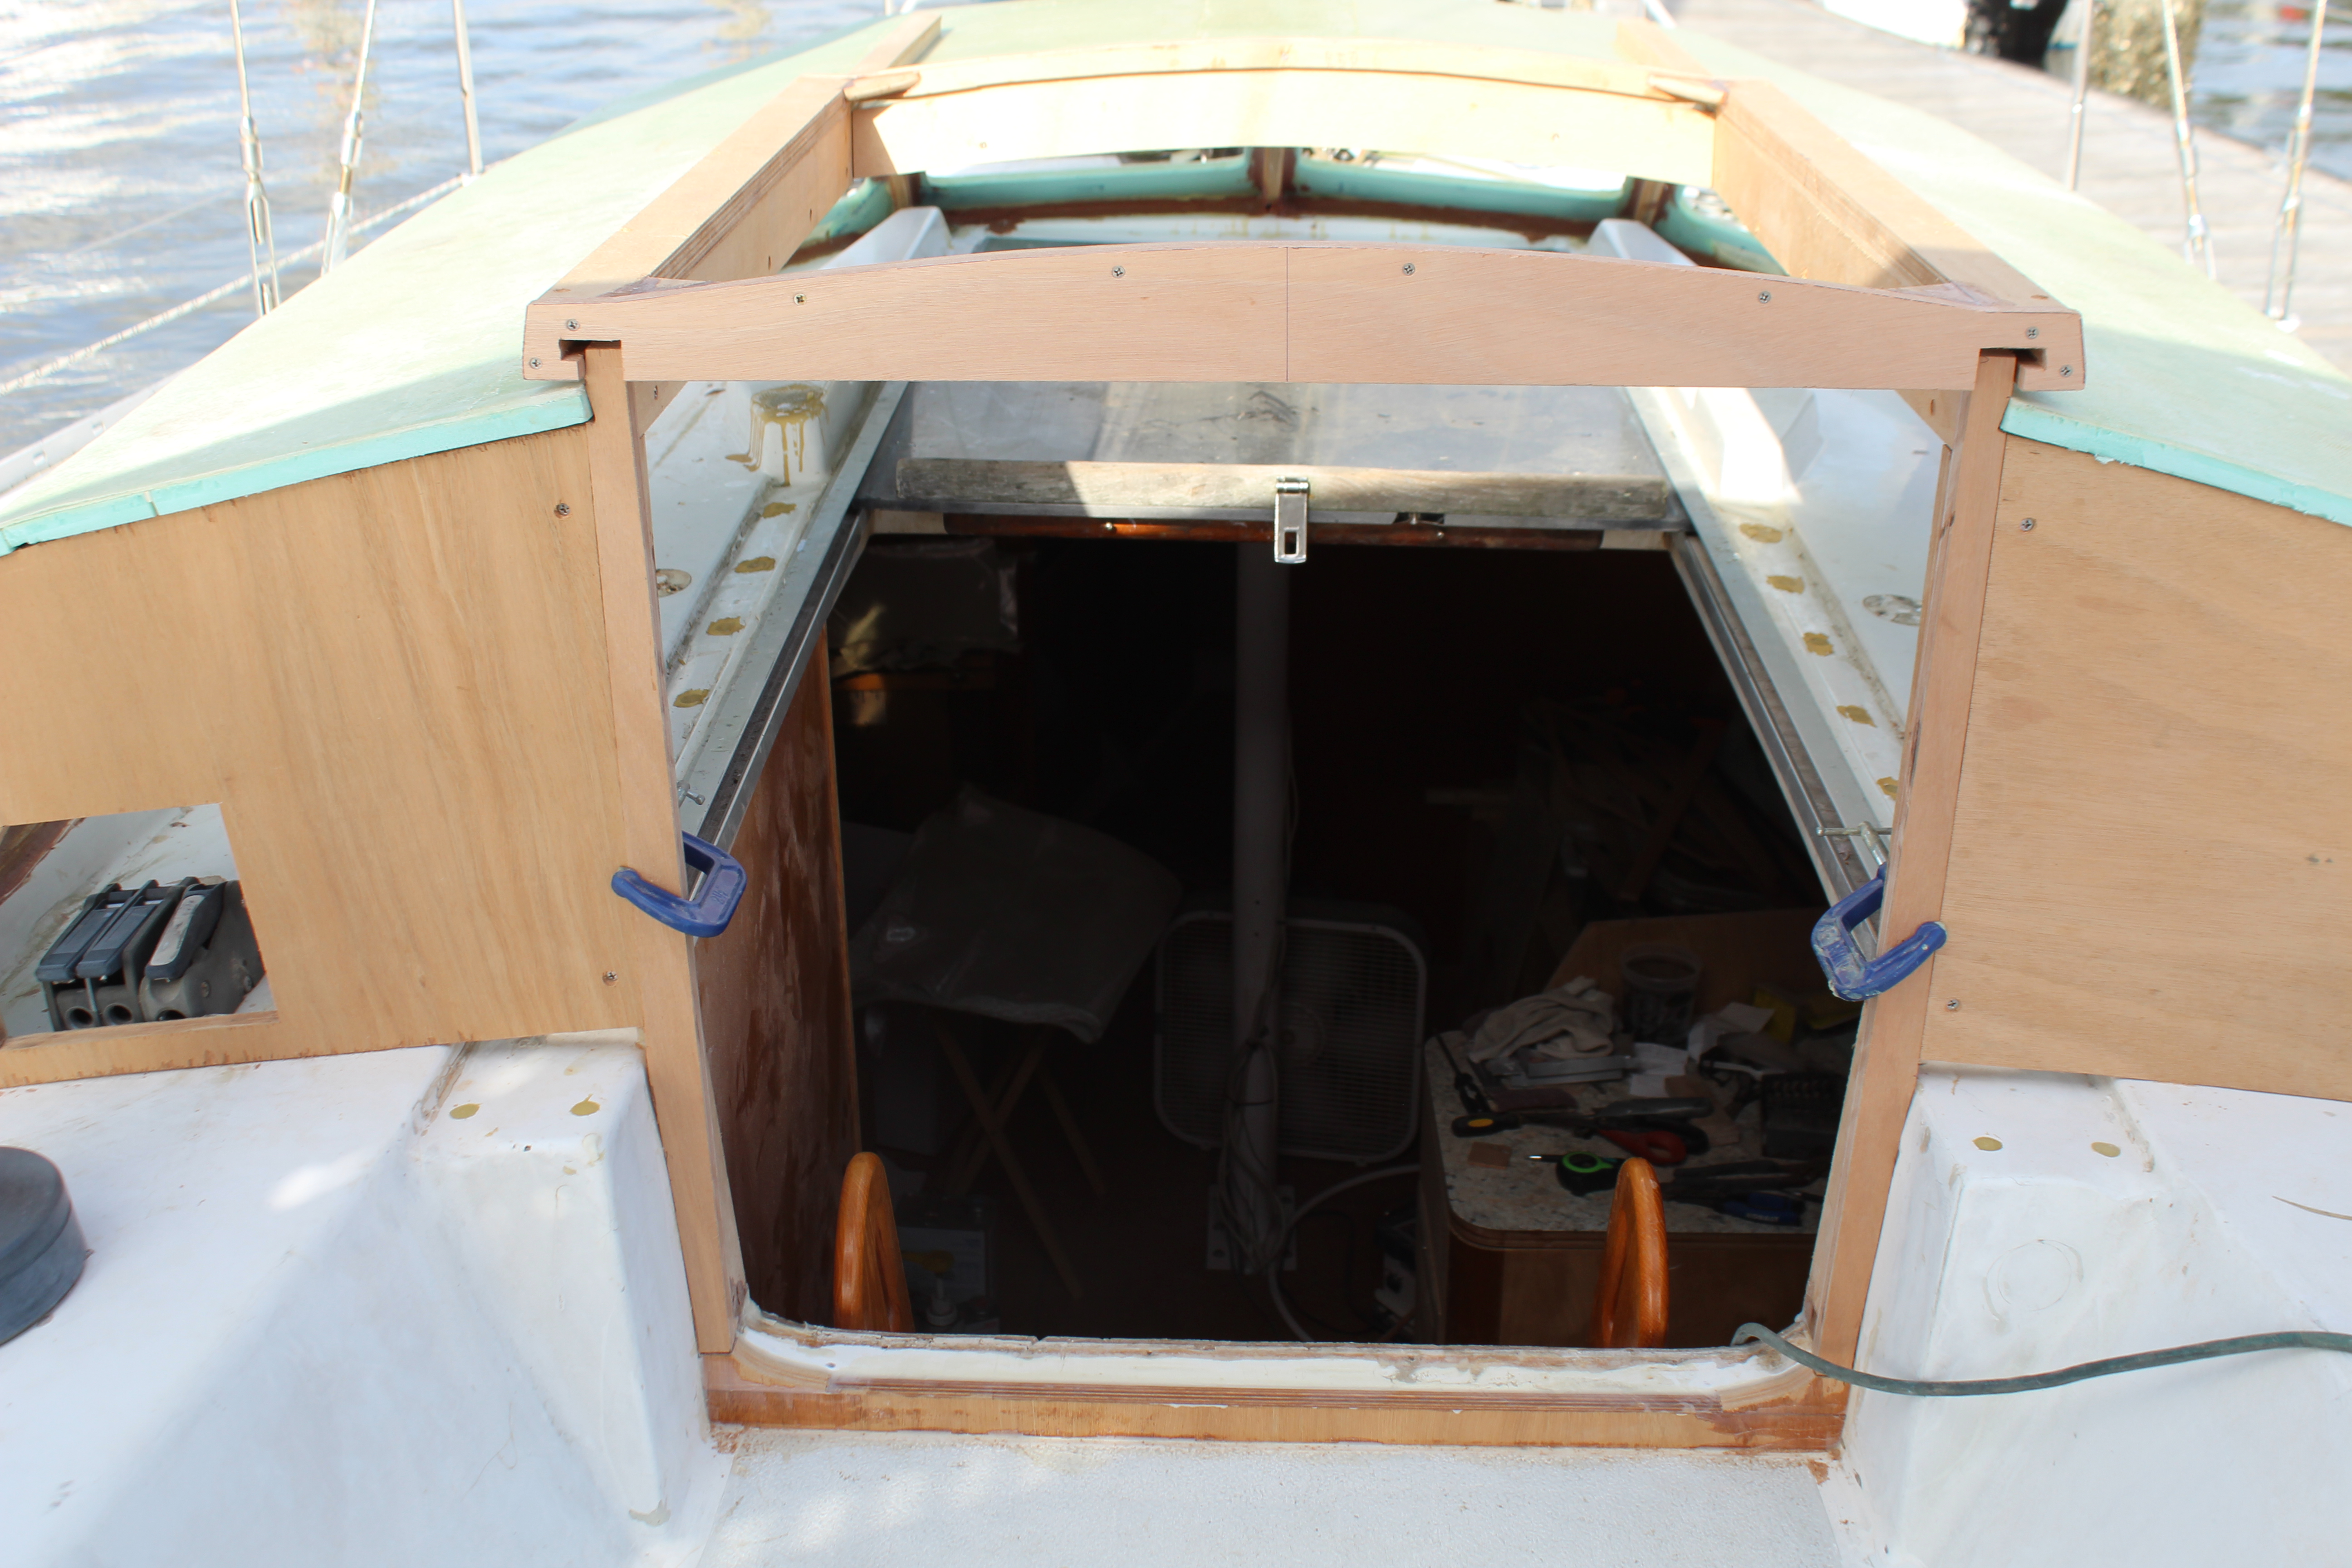
I then removed the frame and took it home - finally I can work on something in the garage. With air conditioning!
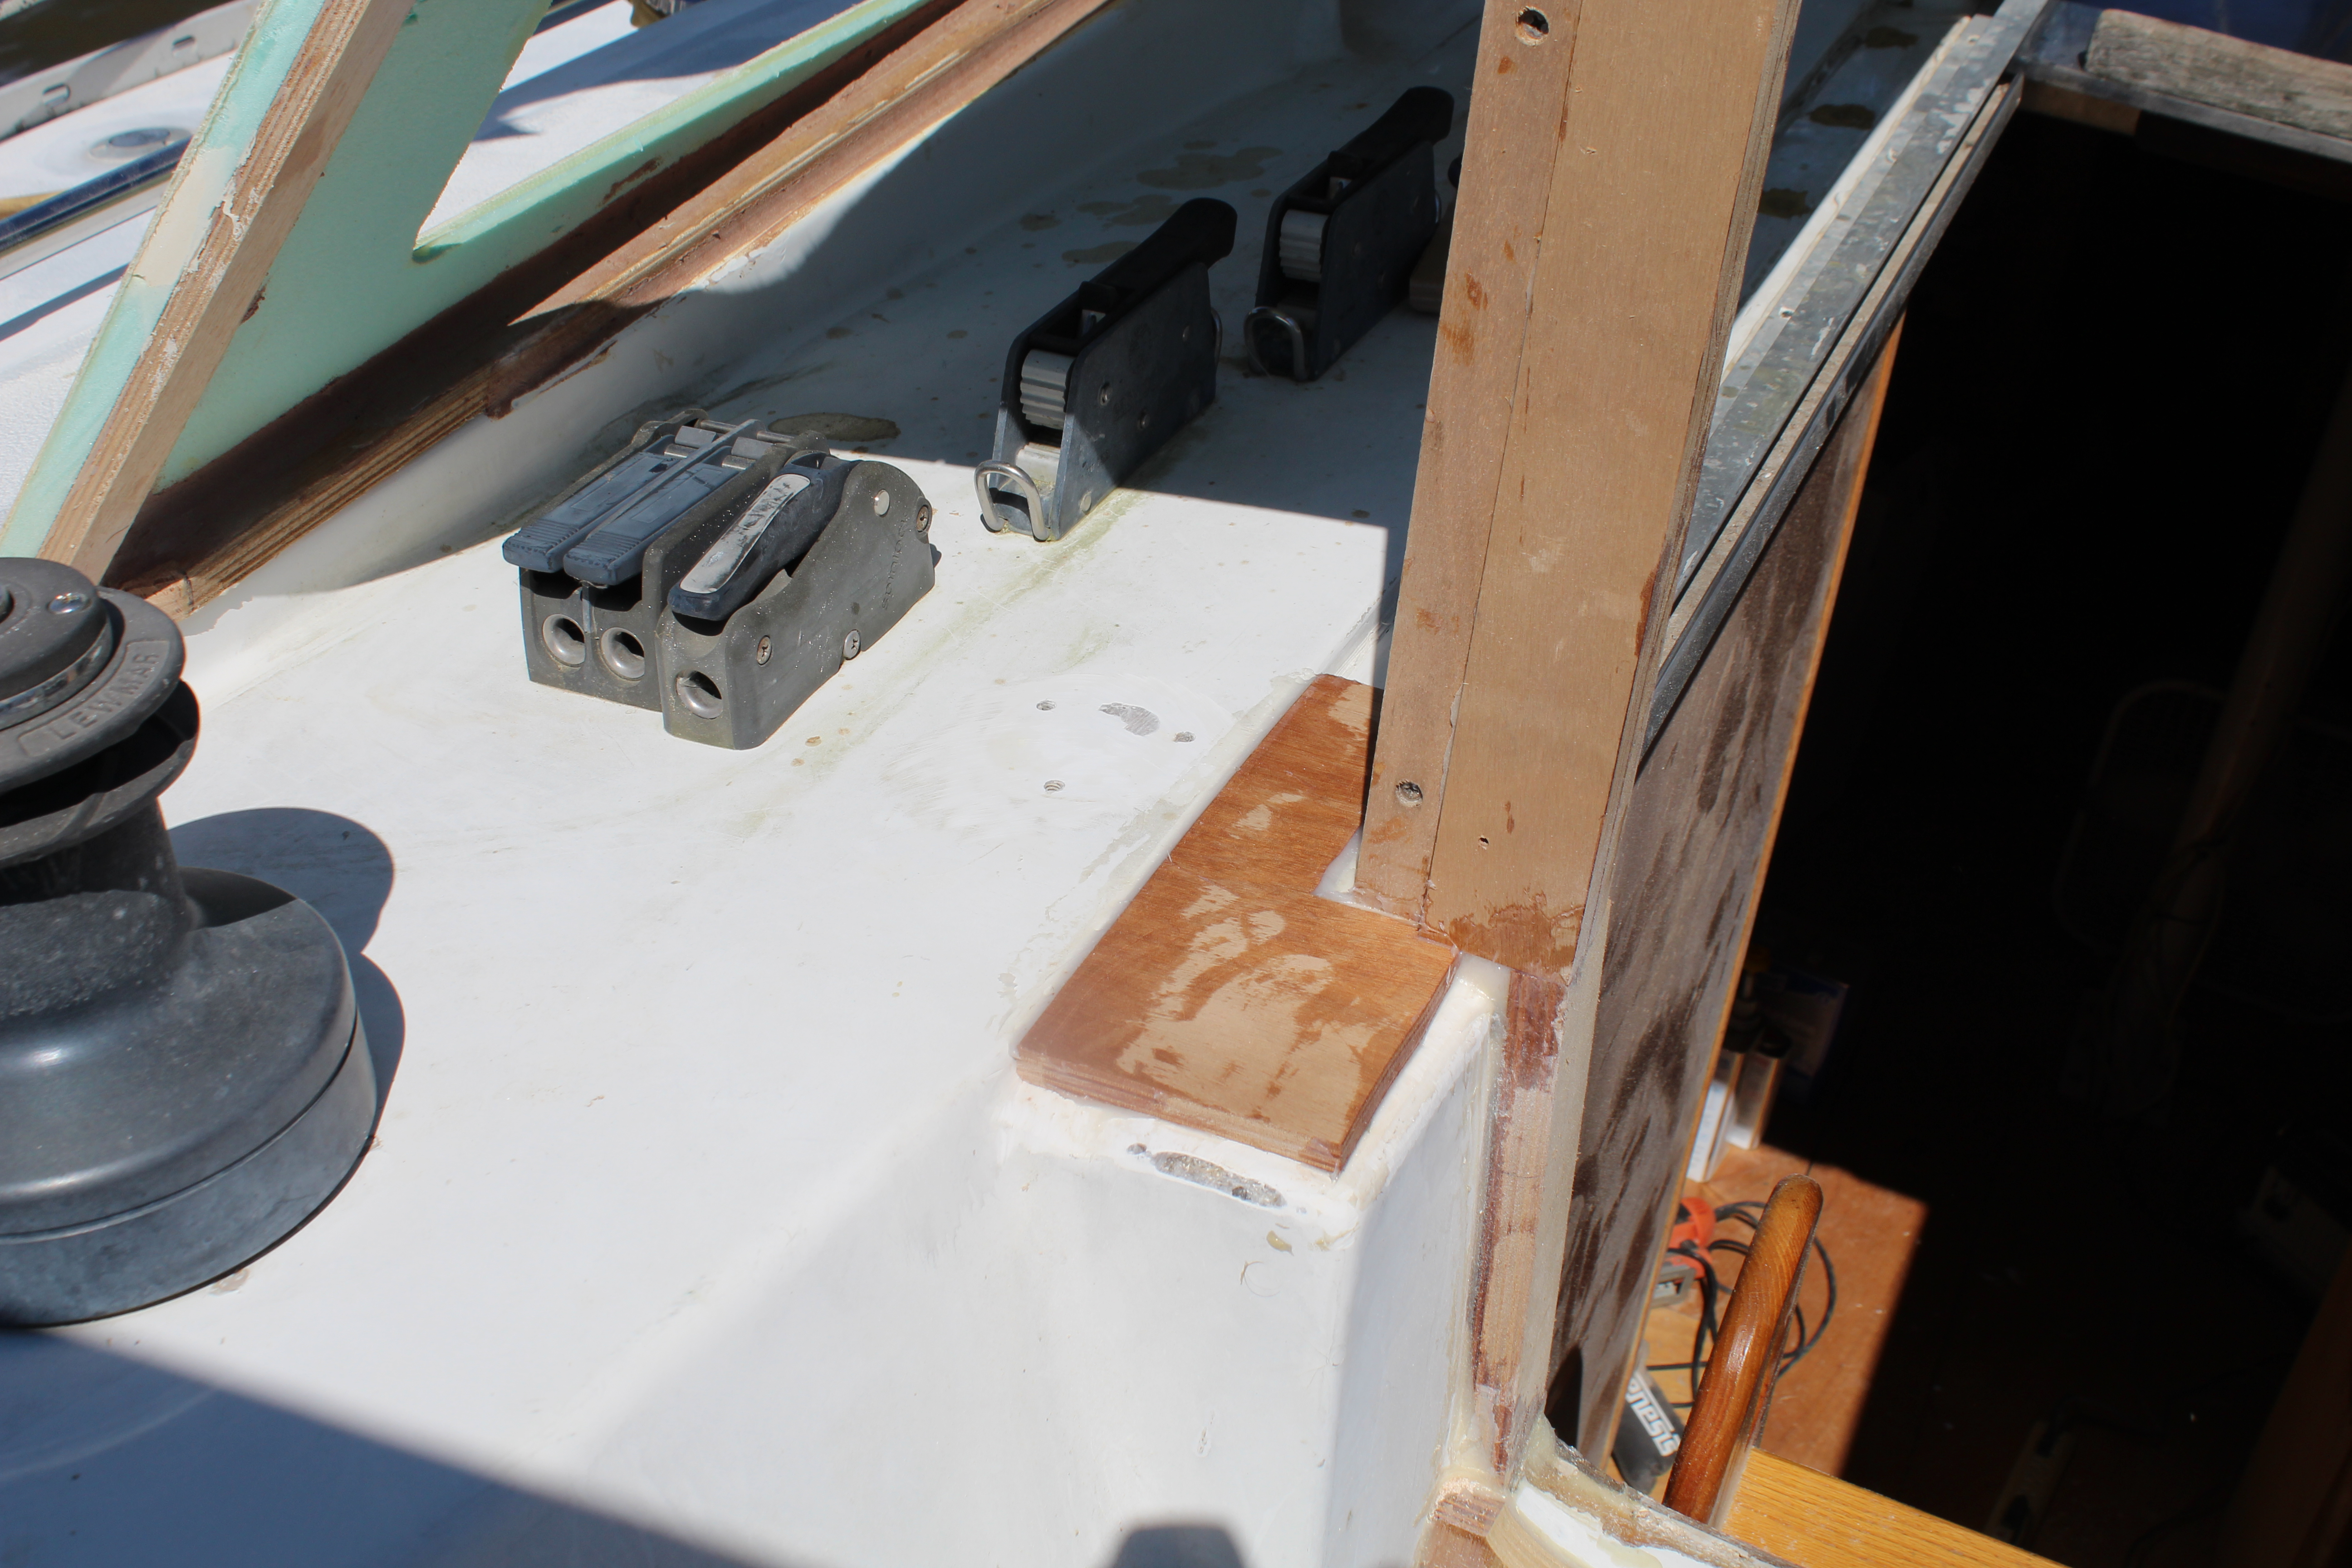
One last thing needed was to locate the hand rails for the top:
I just needed to locate the screw holes before filler and primer obscured the plugs I glued into the foam. The rails came back off right after.
During all this I have been glassing underneath to seal the foam and frame - lots of drudgery here and not very photogenic but the undersides are almost done.
Next up, finishing the hatch.
Cheers,
Mark
I patterned and cut the rear panels and secured them temporarily. Needed them in place in order to continue with the door opening structure and the hatch itself. Next up was to start on the hatch. I cut the frame and clamped everything in place, checked and double checked the measurements, added some temporary braces to line everything up and broke out the glue:
With the hatch frame dry, time to check that it slides! And it does:
I then removed the frame and took it home - finally I can work on something in the garage. With air conditioning!
One last thing needed was to locate the hand rails for the top:
I just needed to locate the screw holes before filler and primer obscured the plugs I glued into the foam
. The rails came back off right after.During all this I have been glassing underneath to seal the foam and frame - lots of drudgery here and not very photogenic but the undersides are almost done.
Next up, finishing the hatch.
Cheers,
Mark
Beautiful work! These photos prompt a question I do not remember you addressing. Where are the winches and clutches going to be relocated to?
Sometimes, tearing into it creates the necessity.Sometimes necessity is the mother of invention
-Will
So, will this basically replace the existing hatch ( so you can remove it)?The height was, as is pretty normal with boats, airplanes, etc., a compromise. I spent lots of time sitting at the wheel picturing how high I could, or should, make the dodger. Where it is now allows good vision over the top, still good vision through it (though higher would have made that better). I am planning for some clear panels in the closeout canvas cover connecting the dodger and bimini - that's where I was planning for vision and weather protection.
I originally planned opening windows for the front but changed my mind - it added a level of complexity that I'm not sure will be that beneficial. I don't think the dodger will cut off airflow to badly to the cockpit and opening windows will not add any airflow below. I won't know for sure until it's finished of course
Your craftsmanship is extraordinary.
Greg
Just came across your thread about three days ago and it is super good! I'm capturing some good things to remember along the way. (lunch just arrived so trying to finish the post before it gets cold or I get timed out, whichever comes first)
One of the big problems I had was with the 00 cables and room for the cable bends, fuses, and the battery switches. Was a squeaker. I'm sure my loads are not near what yours will be due to the forced air diesel heater (more important for our area) vs air conditioning, and me with a smaller boat.
Really appreciate your get-up-and-go on the projects, the write-ups with good pictures, and the willingness to "let it all hang out". Some people are really good at just diving in and doing it; as for myself, I tend to think and plan for what seems like forever, and still run into unforeseen problems.
(meanwhile, Back to Post #474)
EDIT: Just read Post #484 so the reply takes care of my concern. Just learned something new ... The Fireflys are new and improved technology from the flooded golf-cart days. Very interesting!
Good move!The battery box:
The sharp-eyed among you will notice that the batteries are angled the wrong way! Yep, I got the box backwards!
Insert a few choice words here! No sweat, I flipped the box over, made the bottom the top and the top the bottom. All fixed!
Very nice to have!One final assembly to check for fit, and the cover made and set in place so I finally have a place to sit in the cabin!
Worked on my battery boxes (2) about 30 years ago and at the time the requirement was that they be impermeable for flooded batteries and strapped down. Still using golf carts and found a "plastic" (Lexan?) box that holds a pair of golf carts complete with a lid. This after spending untold hours making a plywood box lined with fiberglass. Don't have the code reference handy. This may be covered by the time I get up to page 54 (whew!)At least for a while, it will all need to come back out for finishing. I'm debating on the finish for the inside of the battery box - I'm not sure it needs glassing, it's plenty strong, and the Fireflys shouldn't leak. I think a few coats of epoxy paint might do, but I'm still undecided.
One of the big problems I had was with the 00 cables and room for the cable bends, fuses, and the battery switches. Was a squeaker. I'm sure my loads are not near what yours will be due to the forced air diesel heater (more important for our area) vs air conditioning, and me with a smaller boat.
Really appreciate your get-up-and-go on the projects, the write-ups with good pictures, and the willingness to "let it all hang out". Some people are really good at just diving in and doing it; as for myself, I tend to think and plan for what seems like forever, and still run into unforeseen problems.
(meanwhile, Back to Post #474)
EDIT: Just read Post #484 so the reply takes care of my concern. Just learned something new ... The Fireflys are new and improved technology from the flooded golf-cart days. Very interesting!
Last edited:
Winches are staying in their current location. I will be doing a complete overhaul of the rope clutches but I'm not sure yet where everything is going to go. The old setup was too complex with way too many lines that never got used. Looking to simplify quite a bit but it's going to take a few sailing outings to get my thoughts refocused on that. Plus most of the clutches are worn out (and so old that parts do not exist for them anymore) which will give me the excuse for re-aligning the linesBeautiful work! These photos prompt a question I do not remember you addressing. Where are the winches and clutches going to be relocated to?
.Thanks Greg! Yep, existing hatch and sliders will go away. I committed myself last year by tossing the old hatch cover in the trash - lost any excuse not to make the hard dodger!So, will this basically replace the existing hatch ( so you can remove it)?
Your craftsmanship is extraordinary.
Greg
Welcome aboard John!Just came across your thread about three days ago and it is super good! I'm capturing some good things to remember along the way. (lunch just arrived so trying to finish the post before it gets cold or I get timed out, whichever comes first)
Good move!
Very nice to have!
Worked on my battery boxes (2) about 30 years ago and at the time the requirement was that they be impermeable for flooded batteries and strapped down. Still using golf carts and found a "plastic" (Lexan?) box that holds a pair of golf carts complete with a lid. This after spending untold hours making a plywood box lined with fiberglass. Don't have the code reference handy. This may be covered by the time I get up to page 54 (whew!)
One of the big problems I had was with the 00 cables and room for the cable bends, fuses, and the battery switches. Was a squeaker. I'm sure my loads are not near what yours will be due to the forced air diesel heater (more important for our area) vs air conditioning, and me with a smaller boat.
Really appreciate your get-up-and-go on the projects, the write-ups with good pictures, and the willingness to "let it all hang out". Some people are really good at just diving in and doing it; as for myself, I tend to think and plan for what seems like forever, and still run into unforeseen problems.
(meanwhile, Back to Post #474)
EDIT: Just read Post #484 so the reply takes care of my concern. Just learned something new ... The Fireflys are new and improved technology from the flooded golf-cart days. Very interesting!
It's been quite a while since I looked at the requirements for battery boxes so I can't say for certain, but I think AGMs and gel cells (Fireflys are considered AGMs) are treated somewhat differently vs. wet cells. I did line the box with fg plus epoxy paint just in case. The box is built more to secure and contain 300+ pounds of batteries and their inertial moments as the boat moves but a little leak protection can't hurt
.Cabling is easy, my loads shouldn't be any tougher than yours (A/C is shore power a/c only) and the battery distribution busbars will be on the bulkhead directly aft of (and above) the batteries. It makes a difference when I can start with a clean slate and plan everything out without having to work around an existing system.
Deck enclosure/ hard dodger, Part 11:
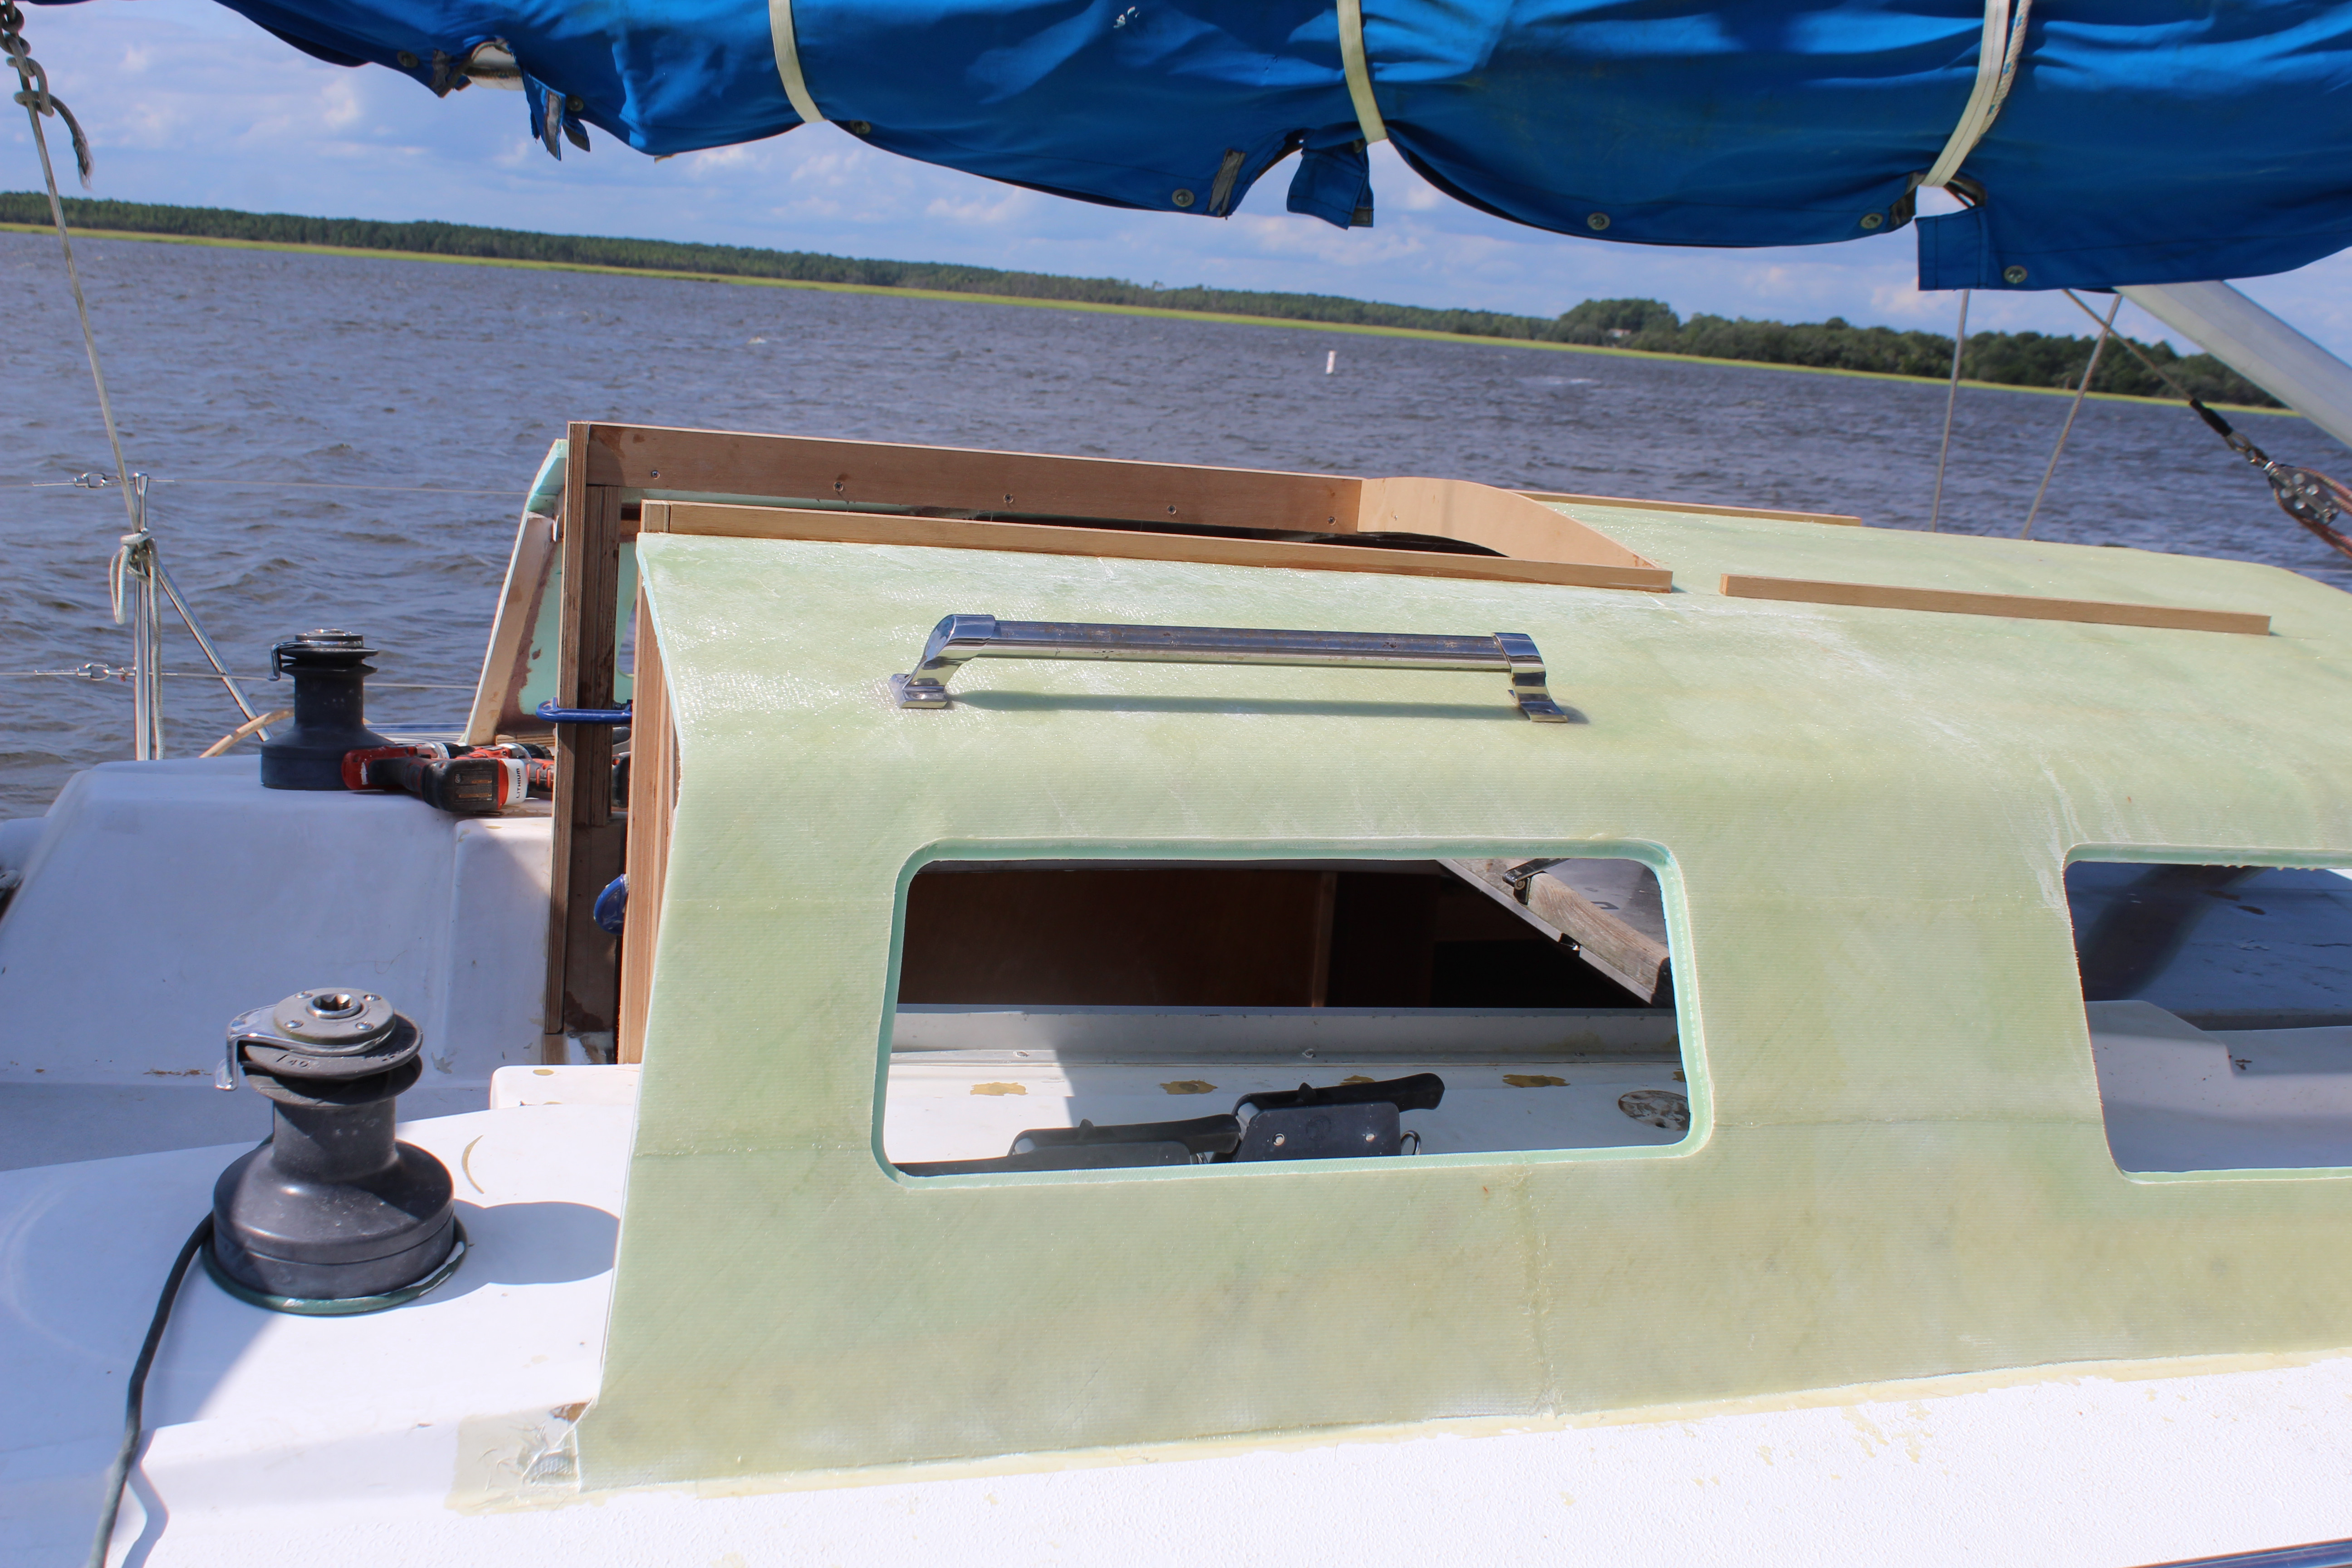
Since the hatch itself, once the frame was dry, didn't need to be finished on the boat I could finally get out of the heat for a bit and work in the garage - where I have air conditioning! The frame was plenty sturdy but I didn't have a foam piece remaining that was big enough to fit as one piece so I glued a piece to each side before relocating to the garage. Once there, trim to fit and the foam is glued down:
As you can see I missed a tiny bit on one edge but a little filler will fix that! After that dried I ran out of excuses and glassed the hatch - bottom first with 8 ounce cloth and top with 1708:

I also got a few coats of resin on the rear filler panels to prep them for final fitting. I left the hatch alone for a few days to allow the epoxy to harden - right after it dries and for a few days after the epoxy is flexible enough that the center of the hatch might have sagged a bit, which I didn't want. So, back out to the boat and the heat!
Before fitting the rear filler panels I needed to take care of the old hatch drain channels, so I started filling those:
Eventually the entire channel will be filled since it will no longer be needed but for now this is all I could do. The old hatch and sliders will have to be removed to get to the rest of the drain channel. Next up is final fitting of the rear panels before gluing them in:
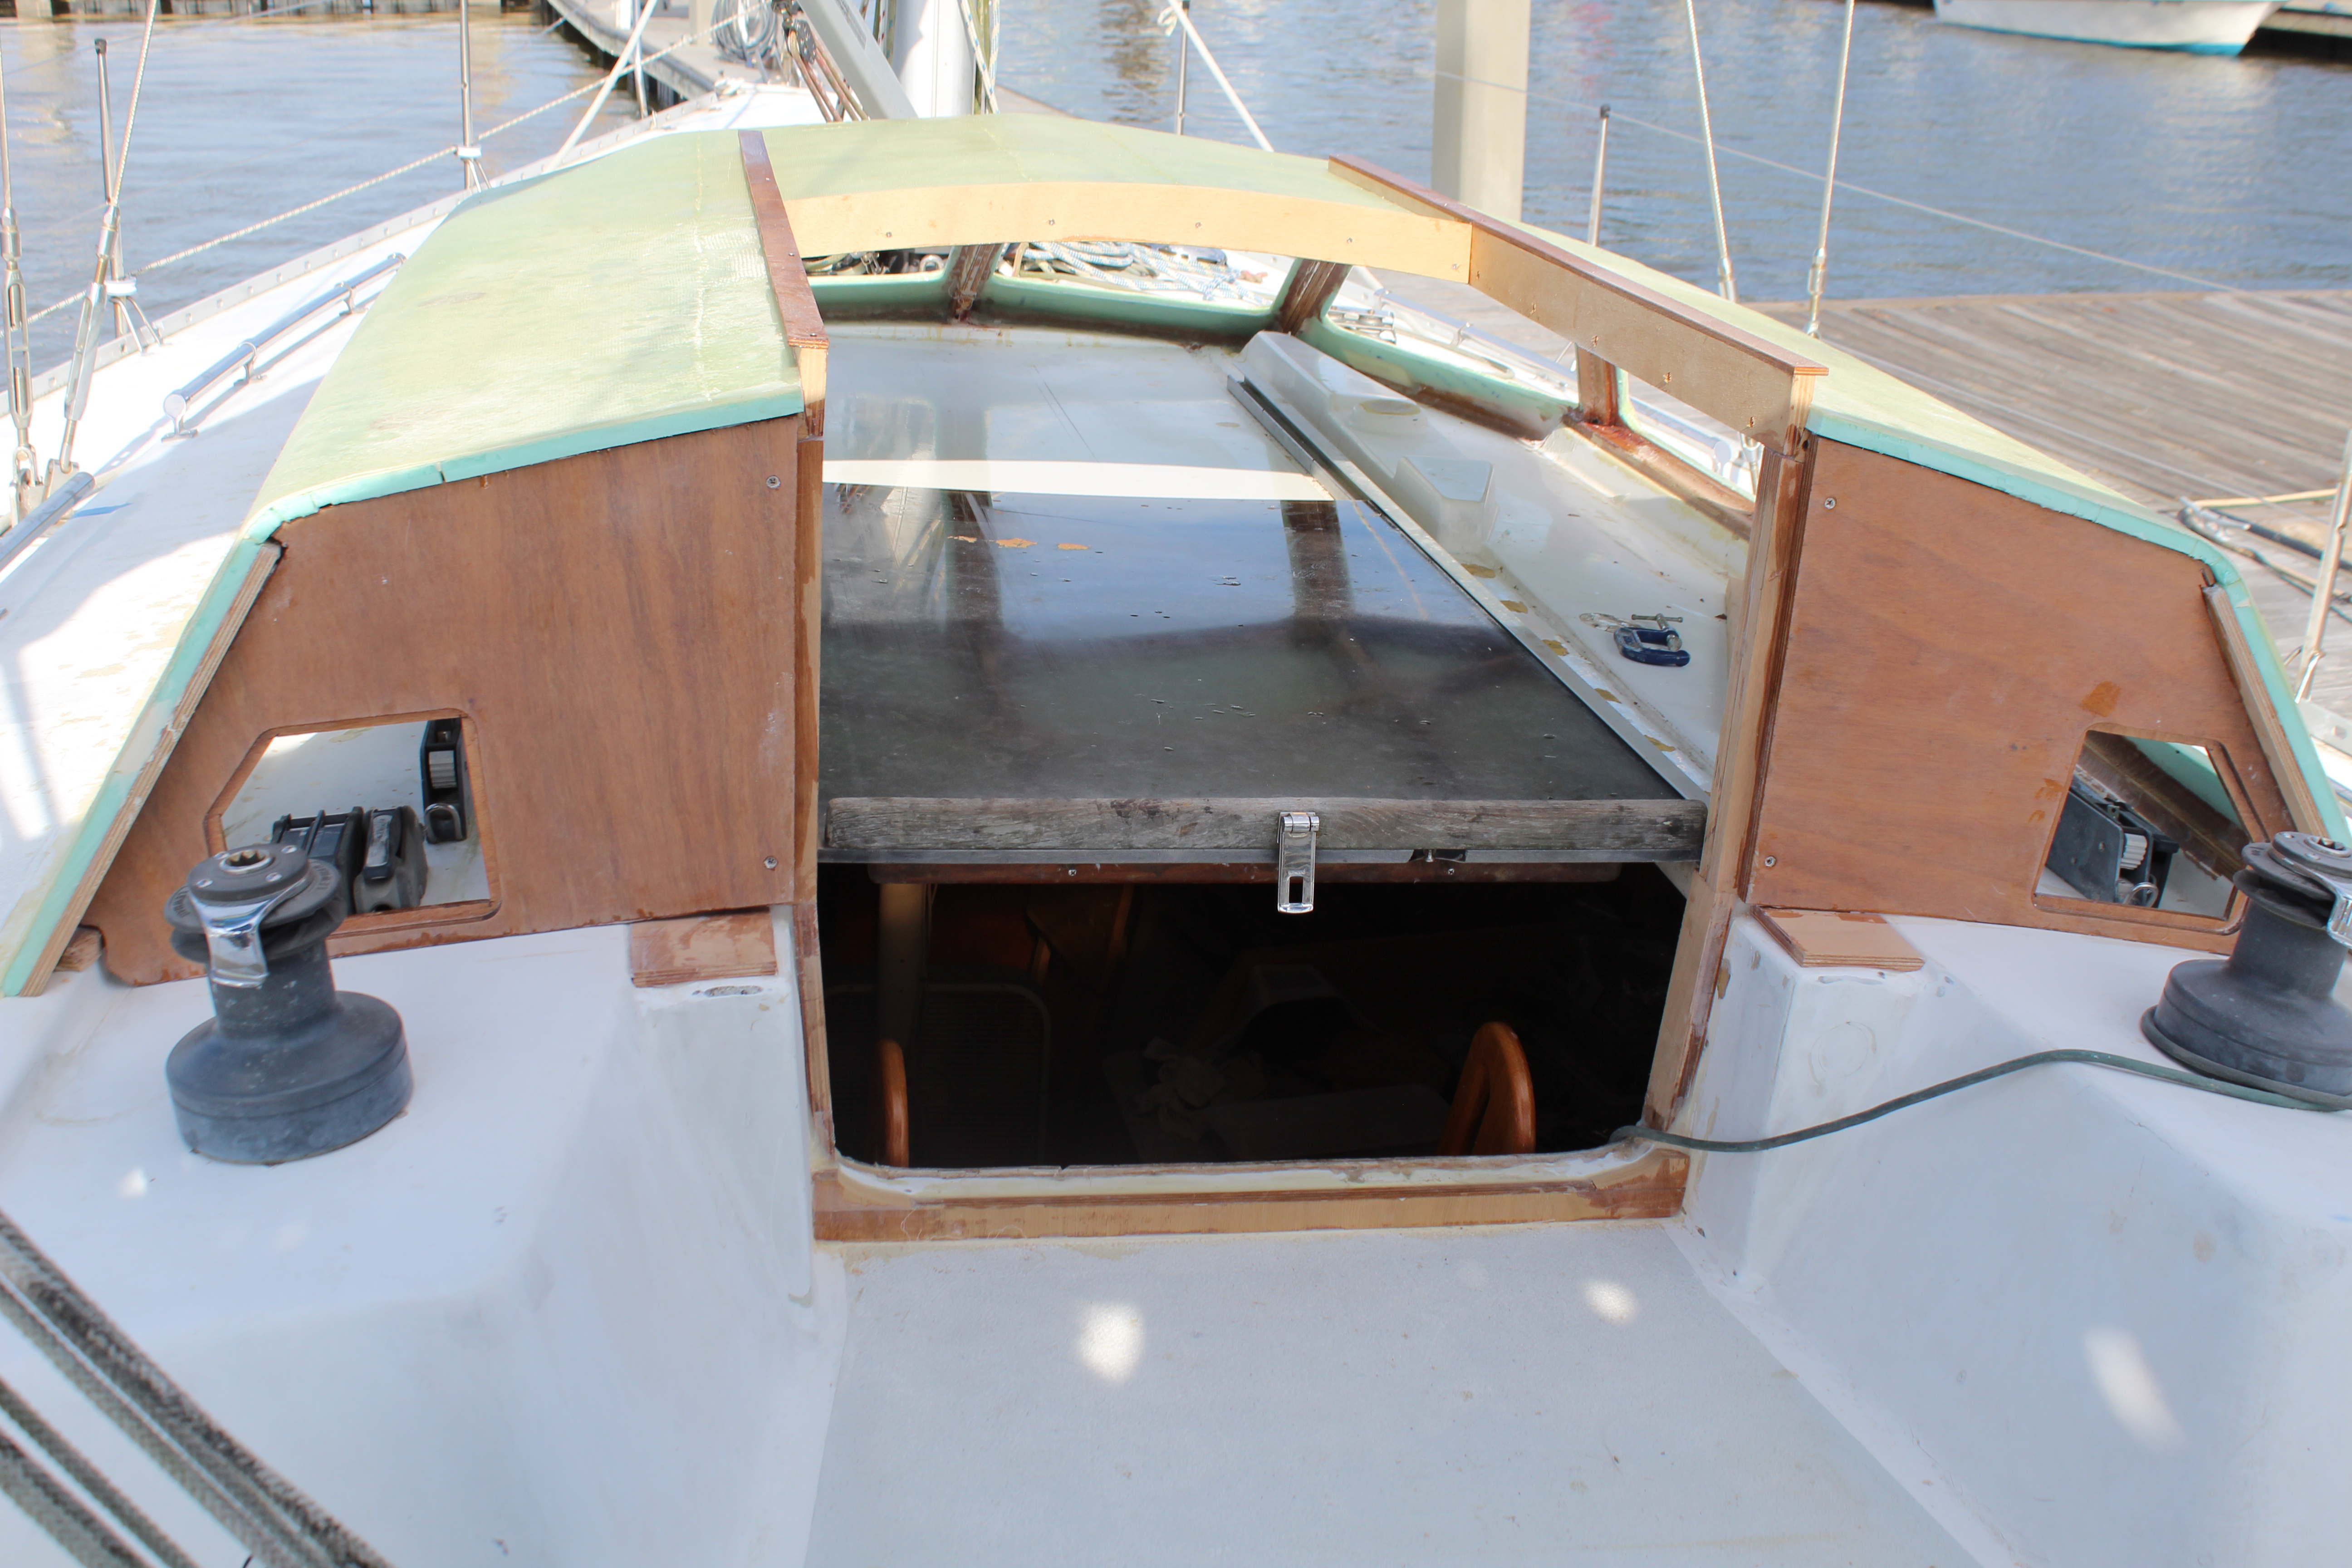
Work progresses! Next up, umm, more work progress.
Cheers,
Mark
Since the hatch itself, once the frame was dry, didn't need to be finished on the boat I could finally get out of the heat for a bit and work in the garage - where I have air conditioning! The frame was plenty sturdy but I didn't have a foam piece remaining that was big enough to fit as one piece so I glued a piece to each side before relocating to the garage. Once there, trim to fit and the foam is glued down:
As you can see I missed a tiny bit on one edge but a little filler will fix that! After that dried I ran out of excuses and glassed the hatch - bottom first with 8 ounce cloth and top with 1708:
I also got a few coats of resin on the rear filler panels to prep them for final fitting. I left the hatch alone for a few days to allow the epoxy to harden - right after it dries and for a few days after the epoxy is flexible enough that the center of the hatch might have sagged a bit, which I didn't want. So, back out to the boat and the heat!
Before fitting the rear filler panels I needed to take care of the old hatch drain channels, so I started filling those:
Eventually the entire channel will be filled since it will no longer be needed but for now this is all I could do. The old hatch and sliders will have to be removed to get to the rest of the drain channel. Next up is final fitting of the rear panels before gluing them in:
Work progresses! Next up, umm, more work progress
.Cheers,
Mark
jssailem
SBO Weather and Forecasting Forum Jim & John
- Oct 22, 2014
- 24,578
It is looking nice, Mark. Truly talented.
I understand your thoughts of going with doors/door to enter the companionway. More pleasant and less of a storage issue.
Only thought/issue doors are weaker than boards in a storm event. Hatch boards tend to hold up better, and are more stout against boarding seas than doors.
As always it is a compromise.
The PHRF NW racing saftey checklist requires hatch boards to be carried. I have Doors on Papillon but carry the hatch boards to comply.
Hull Openings 2.1.1 A boat's companionway(s) shall be capable of being blocked off to main deck level. The method of blocking should be solid, watertight and rigidly secured, if not permanent.
Hull Openings 2.1.2 A boat's hatch boards, whether or not in position in the hatchway, shall be secured in a way that prevents their being lost overboard.
My reading of 2.1.1 would still allow for saloon-style doors if water intrusion can be assured. I believe this section is not calling for drop boards exclusively.The PHRF NW racing saftey checklist requires hatch boards to be carried. I have Doors on Papillon but carry the hatch boards to comply.
Hull Openings 2.1.1 A boat's companionway(s) shall be capable of being blocked off to main deck level. The method of blocking should be solid, watertight and rigidly secured, if not permanent.
Hull Openings 2.1.2 A boat's hatch boards, whether or not in position in the hatchway, shall be secured in a way that prevents their being lost overboard.
I asked that of our race committee and was told to carry the boards as a backup to the doors. The reason given was that the windows could pop out of the door frames given that they were mounted to the inside face of the frame.My reading of 2.1.1 would still allow for saloon-style doors if water intrusion can be assured. I believe this section is not calling for drop boards exclusively.