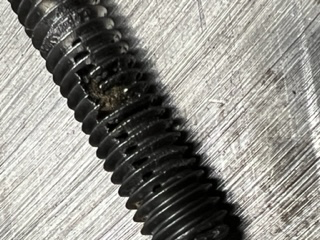
@Alan2210- Thanks for that info. My original bolts on the strut were Phillip's head flat head bolts. When I pulled them out, one of them was seriously corroded, not enough to fall apart, but enough to make me concerned, that perhaps the stainless quality was not 316. So I have purchased new 316 with Allen flat hex heads. I think this is the correct terminology. Below is the damage clearly visible
34/35 Prop Shaft Strut?
- Thread starter eherlihy
- Start date
Question here, I am not at my boat to inspect but the screws holding the strut seem very difficult to turn. Could you tell me if the bolts to which they are attached are glassed into the hull or are there bolts on the inside?@Alan2210- Thanks for that info. My original bolts on the strut were Phillip's head flat head bolts. When I pulled them out, one of them was seriously corroded, not enough to fall apart, but enough to make me concerned, that perhaps the stainless quality was not 316. So I have purchased new 316 with Allen flat hex heads. I think this is the correct terminology. Below is the damage clearly visible
View attachment 202395
Thanks for any info. Tom
So in your opinion, do you think they are solid enough to use rachet screw driver or light impact driver to loosen the screws without damaging or loosening the nuts? I understand you can't guarantee anything, just your opinion. My boat is far away and im just trying to develop a plan. Also what is the bedding material you suggested ?Mine are glassed in.
Thanks again
@TJSmith: I started with a large Philip's head on a ratchet tool. I wanted to make sure I did not break the bolt, as I did not have any idea of their conditions until they were all out. I loosened two of the four machine screws. The other two needed some "talking" to as in "MOVE YOU BASTARD"! with an impact tool. Once loosened, I backed them out with a large screw driver. I then pulled a little on the strut and with a Stanley knife I removed some or most of the 4200. I came away nicely. Turned it upside down on the shaft and slid it off. The nuts are captured inside. Of course I had already removed the keyway for the prop. I course brushed the strut and then hand sanded. My intent was to get the blue ablative paint off. I used 4200 to bed the strut and added some down the holes to the nuts. I really over did the amount of 4200 and wiped the excess away with a plastic scraper, trying to create an encapsulated area. Waste, yes, but in my mind well worth it.
Thanks much! Really appreciated!@TJSmith: I started with a large Philip's head on a ratchet tool. I wanted to make sure I did not break the bolt, as I did not have any idea of their conditions until they were all out. I loosened two of the four machine screws. The other two needed some "talking" to as in "MOVE YOU BASTARD"! with an impact tool. Once loosened, I backed them out with a large screw driver. I then pulled a little on the strut and with a Stanley knife I removed some or most of the 4200. I came away nicely. Turned it upside down on the shaft and slid it off. The nuts are captured inside. Of course I had already removed the keyway for the prop. I course brushed the strut and then hand sanded. My intent was to get the blue ablative paint off. I used 4200 to bed the strut and added some down the holes to the nuts. I really over did the amount of 4200 and wiped the excess away with a plastic scraper, trying to create an encapsulated area. Waste, yes, but in my mind well worth it.

Thanks for all if the insight. I have met Rudy and he is a great guy. I sincerely hope that if he does decide to retire, he will find someone to keep the business running.