Try an oscillating tool with a scraper blade.I decided while the mast is off and I'm rebedding deck hw I should do the mast fitting in the cabin top. The mast is keel stepped with a frame on the cabin top held down with 4 bolts. I removed the bolts and the plate remains secure to the cabin top. Maybe someone used 5100 on it sometime since 1984? Any tips on removing this or should I just put some caulk in the bolt holes and secure it back down since it is not leaking?

1984 Refurbishing Project
- Thread starter Randall Schmidt
- Start date

Finished most of the teak replacement but now see I have the companion way hatchboard retainers and the slider rails. If I go with Plasteak again (which I'd like to do) I'd have to ship them the current part and wait of the return part about 2 weeks. I worry about how to cover up the exposed boat during that time. Wonder what other options there are or how to cover it up well - tape and plastic or canvas? Also does anyone have a good recommendation for a canvas maker for a pedestal cover? Local shops charge $500 which seems high to me
Finished most of the teak replacement but now see I have the companion way hatchboard retainers and the slider rails. If I go with Plasteak again (which I'd like to do) I'd have to ship them the current part and wait of the return part about 2 weeks. I worry about how to cover up the exposed boat during that time. Wonder what other options there are or how to cover it up well - tape and plastic or canvas? Also does anyone have a good recommendation for a canvas maker for a pedestal cover? Local shops charge $500 which seems high to me
Check the SBO store. About half the quote you got.


If I had to make a choicebecause of money I would do the standing rigging first. Almost lost my rig in a storm when stbd shroud separated at the swaged fitting at the mast.
Had I been daysailing or even coastal cruising no big deal get the sails down and motor home. But we were in the windward passage and it was 2 am and dark! My rigging was new with the boat and only 5 years old so I assume it was bad craftsmanship from US Spars. Still, replaced all with new rigging and feel a whole lot better for it
Had I been daysailing or even coastal cruising no big deal get the sails down and motor home. But we were in the windward passage and it was 2 am and dark! My rigging was new with the boat and only 5 years old so I assume it was bad craftsmanship from US Spars. Still, replaced all with new rigging and feel a whole lot better for it
Glad you got thru it. Love to hear the story. Where were you sailing? did you use the spinnaker halyard as your jury-rigged stay?
Ok, got the traveler in place. Garhaurer built it from the old one. Two of the six mounting bolts were slightly off from the original pattern but the equipment looks of high quality. The traveler is bit taller meaning the 8" bolts no longer do the job. I need 8.5" bolts to enable me to put the wooden blocks under the bolts in the cabin ceiling. At $13 a bolt looks like I'll go back to Nutty.com to see if they have longer ones, probably have to cut them down to size. Or, I could skip the blocks. they provide some head bumping protection vs leaving the naked bolt bottom and nuts exposed. thoughts?
other mis from a custom made job trying to match what I had was the handrails. I sent the originals to Plasteak, each had 8 holes for fittings. Two of the 16 were slightly off. We are making it work but it took a good bit of effort. It does look nice. After photos are forthcoming.
other mis from a custom made job trying to match what I had was the handrails. I sent the originals to Plasteak, each had 8 holes for fittings. Two of the 16 were slightly off. We are making it work but it took a good bit of effort. It does look nice. After photos are forthcoming.
Ok, on to the topsides non-skid fiberglas regions... remember it is a 1984 boat and looks a bit weathered in terms of oxidation and fiberglass gleam - mostly missing, but much better than some boats I've seen and owned. I had a 1975 Oday 25 that I tried waxing multiple times to no avail. I resorted to Poliglow that brought back a nice finish but then takes an annual project of up keep to prevent it from peeling. I'm not inclined to go back to poliglow if I can help it. We tried Megulars 44 fiberglass restoration stuff in a small spot on the cockpit and it did leave a smoother more finished feel but no gleam or shine. We are going to try boat wax on top of the treated area and on the untreated fiberglass. Does anyone have recommendations for my situation? I know paint is one option but I've blown the boat budget this year already 2 to 3 times over.
I have a storm dodger set of rails but no canvas. The rails fold up and go forward resting on the cabin top, actually on the slider hatch preventing it from sliding. I bungeed an 8" long 2X4 to the dodger rails and rest this on top of the cabin to enable the slider to be used. What is supposed to be there to keep the dodger from resting ont he slider?
she is coming along. New standing and running riggings, harken jib fuller, steaming light, flood lights, tricolor mast head light, nav/auto-pilot system, Gaharuer traveler, fiddle mainsheet block, rebedded deck hardware, replaced stove, VHF radio, antenna, clutch in the tranny, shifting and power cables, heat exchanger, fresh water pump, impeller, hoses, some wiring redone in side, rub rails, eye brows, tie rails, hatch, gaskets in opening ports, repaired cockpit where core was rotting. new main sail cover ordered. Geez that is most of what I can recall at the moment. Here is a shot of the near done boat before I post the remaining issue for advice.
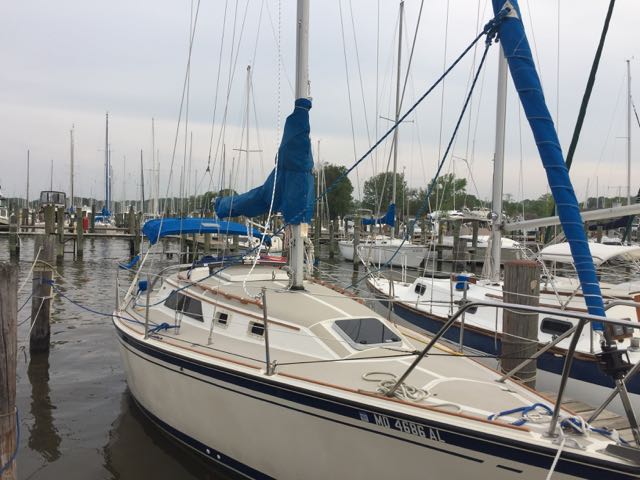
So before I glue the in-cabin wall carpet back to the sides (had to remove to get access to the nuts for rebedding stanchion and pulpit hardware) I took a look from inside and I find moisture around the nuts and bottom or bolts and along the underside of both bow edges that I can see. I'll post photos here then go on in an additional posting about what I think I may do to tackle this outstanding moisture issue.
Attachments
-
 43.9 KB Views: 133
 -
 35.7 KB Views: 128
 -
 33.6 KB Views: 129
 -
 55.7 KB Views: 136
 -
 59.2 KB Views: 129
 -
 73.6 KB Views: 142
 -
 111.1 KB Views: 140
I have many more photos but you get the idea. the inside ceiling area about the Vee berth is a moulded finished fiberglass layer - it does not appear to be bottom of the deck fiberglass surface. In the gap the edges I can see while laying in the Vee berth are the bottom of the deck hardware bolts and bolts coming in horizontally which are spaced about 6 inches apart - these seem to me to be what holds the deck top of the hull. There are no matching fittings on the outside gunnel area of the boat. The rub rail is held in with screws in the fiberglass - not bolts with nuts. One way to fix this is to rip up the fiberglass from the top and remove any rotten wood then re-core and re-glass it with an attempt to do a non-skid surface that will not match the rest of the boat. That may be the right way but it is very expensive and time consuming and I want to sail the boat now, I've had it with work. so what about these ideas for an easier way to handle the situation. Please read-on to my next post. By the way the deck shows high moisture in a meter but feels strong and does not flex when standing on it.
Ok to deal with the deck moisture here are my less expensive thoughts...
1. if I can get a drill up into the exposed edges from the V berth, put a bit stop on to keep the depth from going thru to sunlight and put some drain holes in to let the moisture out. To get to the middle of the bow I'm thinking I could use a hole saw and cut a 3 - 4 " diameter hole as an inspection view (later cover with a plastic inspection port covering). Once the hole is opened, get it with a drill bit and stop and put holes in here for drainage. After letting things drip out then squirt some denatured alcohol in the holes as a drying agent. then inject some epoxy that will set in a potentially wet core to make it strong again. I guess I also need to determine if the moisture is just left over from before I rebed the deck hardware or if I still have leaks meaning I need to remove and reseal the hardware, maybe with more caulk. At first I was heavy with the sealant and it made a mess. The pro I hired to help was more sparing with the caulk but now I wonder if he put enough in place.
1. if I can get a drill up into the exposed edges from the V berth, put a bit stop on to keep the depth from going thru to sunlight and put some drain holes in to let the moisture out. To get to the middle of the bow I'm thinking I could use a hole saw and cut a 3 - 4 " diameter hole as an inspection view (later cover with a plastic inspection port covering). Once the hole is opened, get it with a drill bit and stop and put holes in here for drainage. After letting things drip out then squirt some denatured alcohol in the holes as a drying agent. then inject some epoxy that will set in a potentially wet core to make it strong again. I guess I also need to determine if the moisture is just left over from before I rebed the deck hardware or if I still have leaks meaning I need to remove and reseal the hardware, maybe with more caulk. At first I was heavy with the sealant and it made a mess. The pro I hired to help was more sparing with the caulk but now I wonder if he put enough in place.
Don't sweat the wet core too much, go sailing and enjoy your boat. Lots of boats out there with wet cores that are sailing with owners having fun!
Have you used a moisture meter to identify the wet areas and how wet they are? Is the deck spongy? Identify those areas. That would be the first step.
Next make sure you have located the source of the water ingress and then repair that area. Water migrates, where you see it come out may not be anywhere near where it entered.
If you decide to do the repair, drill the holes in the fall, cover or better store the boat indoors, and finish the repair in the spring. Winter is a better drying time as the humidity is lower and the freeze thaw cycle helps to dry things out.
Have you used a moisture meter to identify the wet areas and how wet they are? Is the deck spongy? Identify those areas. That would be the first step.
Next make sure you have located the source of the water ingress and then repair that area. Water migrates, where you see it come out may not be anywhere near where it entered.
If you decide to do the repair, drill the holes in the fall, cover or better store the boat indoors, and finish the repair in the spring. Winter is a better drying time as the humidity is lower and the freeze thaw cycle helps to dry things out.

Garhauer! If the traveler is curved, buy a flat traveler with control lines, and have stainless risers built to lift it above the slider. You will not be sorry.
If it is already flat, buy the Garhauer. I think it is the MT 2. It has control blocks. I love mine.
If it is already flat, buy the Garhauer. I think it is the MT 2. It has control blocks. I love mine.
Also, removing hardware and a section of deck, replacing the core, and refitting the deck is not that bad. That is the surest way to know you have solid decks. All sorts of problems come from soggy decks.
You have the rig down. You could fix your decks in a few days of hard work.
You have the rig down. You could fix your decks in a few days of hard work.