Restoration of 1981 C-22 swing keel #10580

Sep 8, 2014
2,551
Catalina 22 Swing Keel San Diego
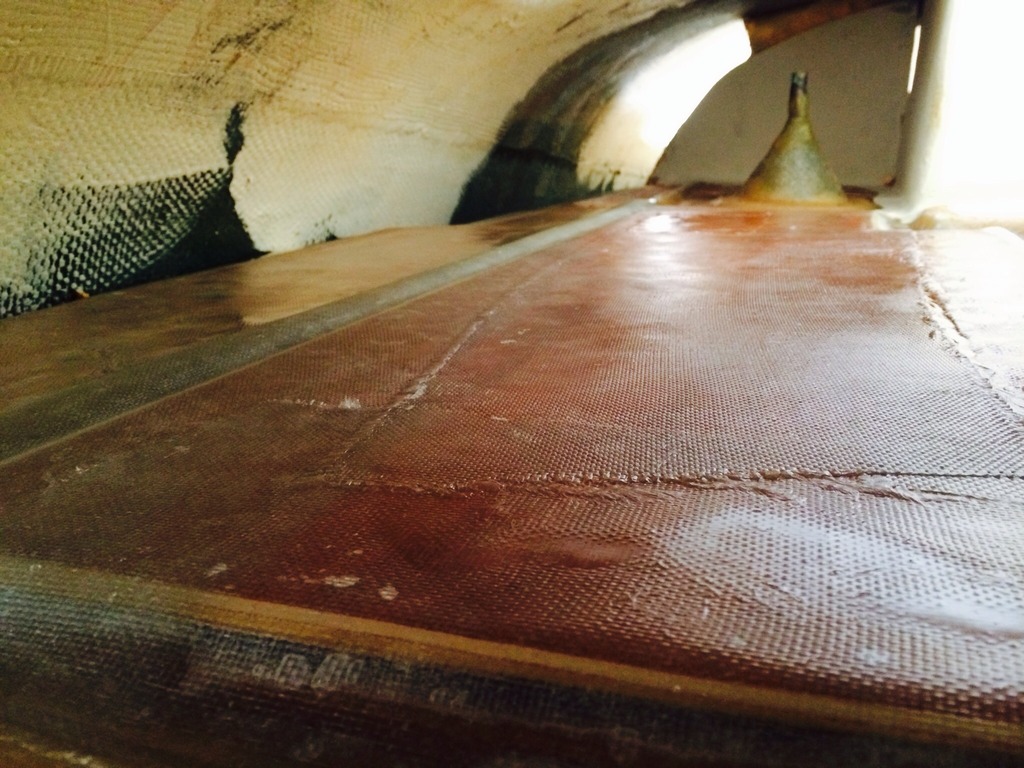
This was done last weekend but I finally snapped a pic. This is the underside of the cabin liner on the starboard side that would support the sliding galley (if I had one). I noticed that it had a great deal of flex and wondered how it could support the weight of a loaded sliding galley. I doubt it would collapse but I imagine that is source of the cracking in the gelcoat.

Same as I did with the cockpit bulkhead, I laminated in another piece of thin plywood cut to fit the area. The area is strong enough to support a person's body weight if they were to use that section as quarter berth (not likely since the cushions on that side are long enough to sleep on anyway). I had an idea that instead of a sliding galley I could make a sled that utilizes the sliding galley track to stow and secure a large cooler. As long as the drain is on the correct side I can still utilize the built in sink drain to empty the ice melt when needed.

Cabin Seat flexing backing.jpg
 
Last edited:
Sep 8, 2014
2,551
Catalina 22 Swing Keel San Diego
Port side lazarette locker (overhead) painted out with white Bilge Kote;

Inverted under cockpit painted.jpg
 
Last edited:
Sep 8, 2014
2,551
Catalina 22 Swing Keel San Diego
This is gap between the overhead cabin liner and the rest of the cabin liner. I cleaned this out with my bleach mildew & stain cleaner to make sure any residual mold or spores were gone. Painted out gloss white because it adds a nice touch and so much easier to accomplish while inverted!

Inverted paint outboard joint under genoa track.jpg
 
Last edited:
Sep 8, 2014
2,551
Catalina 22 Swing Keel San Diego
I have to put the second coat of white on the port side locker overhead pictured above, and 2 coats on the starboard side locker overhead. After that I should be done and I will flip the hull back over this weekend!
 
Apr 1, 2010
398
Cal 33 and Sea Pearl 21 . Crystal River, FL
looking good!! have an anticipated splash date yet??

the first pic further up where you are reinforcing the cockpit wall... I looked at the pic for like an honest 1.5minutes the WTF is that in the boat!?!?!? then I remembered your boat was upside down.... and it all clicked!!:bang:
 
Sep 8, 2014
2,551
Catalina 22 Swing Keel San Diego
I'm still hoping I can get her in the water mid June. Keeping my fingers crossed that the 'hard work' is done...

And I'm sick of bangin my noggin on the hull with it being inverted! So ready to get her back up-right, lol!


looking good!! have an anticipated splash date yet??

the first pic further up where you are reinforcing the cockpit wall... I looked at the pic for like an honest 1.5minutes the WTF is that in the boat!?!?!? then I remembered your boat was upside down.... and it all clicked!!:bang:
 

jmczzz

.
Mar 31, 2013
515
O'Day 26 CB New Orleans
What an amazing job you are doing on this boat. It is going to be much better than new when you are done.
James
 
Sep 8, 2014
2,551
Catalina 22 Swing Keel San Diego
Hull is back right side up and on stands. Good news is I got the flip on video this time around. Once I edit it a little I will post here or a youtube link.

Here is the link to flip video, posted 3 years later, LOL;

Paint Topsies finished bow view.jpg
 
Last edited:
  • Like
Likes: Sanctuary2
Sep 8, 2014
2,551
Catalina 22 Swing Keel San Diego
This is my current nightmare, see pic below. I've been stripping all the parts off my mast a few at a time. Many things have been cleaned and are reusable, other things will be replaced. One of the spreader tubes came out fairly easily, the other as pictured below is stuck fast with galv corrosion. I've been soaking it for days in descaled to try to break up the scale and alternated between Liquid Wrench and back into the solution to soak. No luck getting it free after a week. I won't be paying CD prices ($60 each I think) for new spreaders, I can easily fab my own new ones with stock tubing from my local metal supply. I just hope CD will sell me just the part of the speeder bracket I need since there is nothing wrong with the other 3 pieces of my set.

Spreader bracket corrosion before.jpg
 
Last edited:
Sep 8, 2014
2,551
Catalina 22 Swing Keel San Diego
On to more positive progress, I'm concentrating on getting the keel back on, so that means the new volcano tube need to be installed.

Where I had cut out the old one I filled the hole with a healthy dose of epoxy so it was nice and thick. I drilled a pilot hone in the center and used a forstner bit to drill the new hole, but I was careful to stop just shy of going all the way through;

Volcano repair first fill and redrill.jpg
 
Last edited:
Sep 8, 2014
2,551
Catalina 22 Swing Keel San Diego
Leaving that last bit at the bottom, and being careful to hold the drill straight and plumb, left a nice flat bottom to the hole so the new tube went in and stood free on its own. I cleaned up the bronze tube with my stationary wire wheel which actually nicked up the threads pretty good and helps the epoxy with mechanical bonding. The second pic is thickened epoxy applied.

Volcano new tube dry fit.jpg


Volcano tube repair taped for glass.jpg
 
Last edited:
Sep 8, 2014
2,551
Catalina 22 Swing Keel San Diego
I heated the epoxy with my heat gun to accelerate the curing. I didn't want to have to worry about amine blush cleaning and sanding between steps, so I heated between steps but not totally cured, giving me a good chemical bond between steps of epoxy.
I took some of the left over 8.9 oz cloth from the bottom job and cut about a dozen strips, about an inch to one and a half inches wide. I glassed the tube in place with these strips and again heat cured the epoxy. I used my oscillating tool to sand away the glass that overlapped my tape line and cleaned up a nice square line around the tube, making a flush mating surface where the flexible tube will meet it.

Volcano Rebuild completed.jpg
 
Last edited:
Sep 8, 2014
2,551
Catalina 22 Swing Keel San Diego
After the previous pic I did an additional application of fiberglass cloth, taking the strips farther down the sides. You can see in the detail pic below that the resulting flange of built up GRP is at least 1/8th inch thick around the base of the tube. The result is very strong and I'm glad I decided to go ahead and replace this critical part. In the pic of the final product you'll notice the wire isn't center in the tube because there is no tension on it. The turning ball is deeper in the tube which kind of makes a real pain to install vs the higher position it was in before from the factory. The lower position gives a much better lead angle for the wire when the keel is the full down position, and as soon as the keel is attached and the wire has tension it tracks straight in the middle of the tube.

Volcano repair detail.jpg


Volcano repaired.jpg
 
Last edited:
Sep 8, 2014
2,551
Catalina 22 Swing Keel San Diego
I also finalized the position of my motor mount and re-drilled the holes. Its pretty much in the factory position, the lower holes you can see that were filled in must have been put there when a P.O. tried to run a short shaft motor. When I got the boat those holes were sealed with bolts and silicone... poorly.

I'm not liking the position of the tiller arm so much. When I bed the motor mount I may go up a notch on the 3 position holes of the mount bracket.

Also, a shot of my backing plate on the inside, just 1/2" marine plywood coated in epoxy.

Engine Bracket Test with OB.jpg


Engine Bracket Backing Plate.jpg
 
Last edited:

jmczzz

.
Mar 31, 2013
515
O'Day 26 CB New Orleans
Beautifle work Luke. I may have missed it but is that starbord on your motor mount?
James
 
Sep 8, 2014
2,551
Catalina 22 Swing Keel San Diego
No, that is the plastic motor mount board sold by Catalina Direct. It is like cutting board plastic but over an inch thick and heavy. You have to drill your own holes in it.

Beautifle work Luke. I may have missed it but is that starbord on your motor mount?
James
 
Sep 8, 2014
2,551
Catalina 22 Swing Keel San Diego
Test fitting the keel

This weekend was dedicated to completing the keel job and getting it back on and buttoned up. I really only got about half way to where I wanted be, but its ok. I was hoping to have the last coat of barrier coat on so I could apply the bottom paint to the keel and the keel pocket but I didn't get that far. I did do a test fitting to have my plan ready for lifting it into place square so the bolts go in without binding, cross threading, or galling. I got that worked out by using some some solid fiberglass dowels laying on blocks. I use my lift to roll the keel in its cradle athwart ships to get it center. Then I jack the keel up higher in the cradle and lay 4x4 blocks across the pocket so it sits higher with the fiberglass dowels on the blocks. That allows me to roll the keel fwd or back up to 2 inches. By the way, I tried using the threaded rod method to guide the keel hangers... it just didn't work well. It got the hangers up in there, but coming down they bound up really bad and I was lucky nothing got stuck or threads galled. Anyway, it took a lot of fiddling but I got my system worked out.

So everything fits and I ultimately had to shave a bit of material off the sides of each hanger. Right now I have it very close but I need to maybe take just a 1/16th more off the port hanger. I will probably end up using some stainless washers if I can get some not too thick. I also used some plastic shims to help knock everything center. At the end of the day I need to not have the keel hangers grinding off the paint every time you operate the swing keel. I can also now make a new set of keel spacers which I will make myself from the left over fiberglass from the bottom job.

Keel swing test not full swing.jpg
 
Last edited: