Thru-hull replacement and hull thickness

Jun 25, 2004
475
Hunter 306 Pasadena MD
Hi folks. I'm trying to refit our 2005 Hunter 306 after it's been sitting on land for 3 1/2 years. I just cleaned up quite a few gallons of grungy bilge water, and I noticed that 2 or 3 thru-hulls which were wet for that long have plywood backing disks which are not in good shape. They were probably only in 1/2" of water, so the valve bodies seem fine, but the plywood disks are spongy, delaminated and shot. Also the sealant between the hull and the plywood is totally unstuck: whatever these were bedded in, it's not doing much good now, as it's more like a loose rubbery washer. I'll note that Hunter paid to have all the thru-hulls replaced a few years after we bought the boat, perhaps in 2007? I don't recall why (maybe someone else does).

So the first question is: should I replace both thru-hull and valves? I think the answer is yes, given that it's probably almost as much trouble as unscrewing everything, cleaning, and rebedding with a fiberglass backing plate.

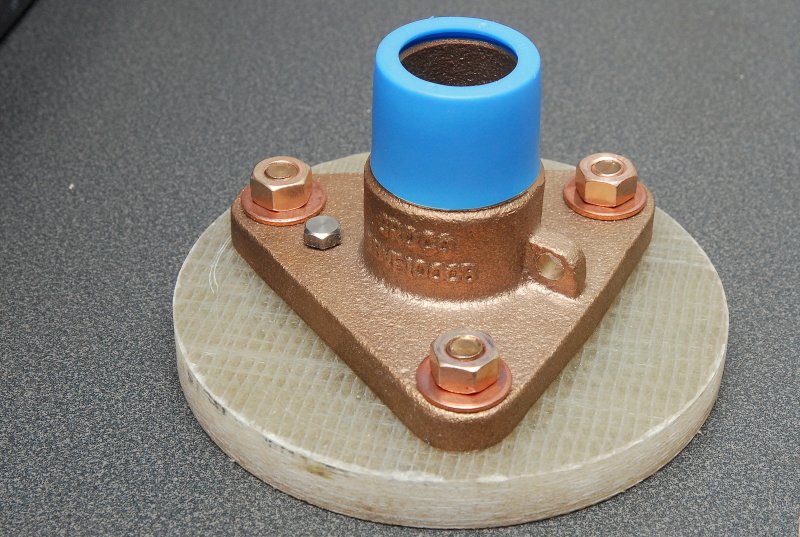
The second question: if I replace everything, should I use a proper seacock with a flange, or something similar to what is currently installed? There are only 2 reasons why I might not want to use a flanged seacock:

1) if I don't have clearance for the flange where the seacock is located (mainly worried about the head raw water intake, which is jammed right next to the stuffing box in a very tight location)

2) In Mainsail's article Replacing Thru-Hulls and Seacocks - Marine How To , he says "IMPORTANT: If your vessel lacks the skin-thickness for through-bolting and countersinking the heads do not through bolt! Some boats do not have thick enough hulls for this!" So how do I know if my Hunter has enough hull thickness? It's a very lightweight boat, really for inshore/coastal sailing. I guess I can measure the hull after I remove one or more of the existing thru-hulls. Maybe I could just use a round-head brass bolt and not countersink? After all, the thru-hull already protrudes, and the 306 is no racing boat.

Thanks for your comments,
Jay
 
Jun 4, 2004
834
Hunter 340 Forked River, NJ
For what it's worth, several years ago I asked Hunter about the thickness of the hull of my 2000 H340 in the area of the engine water intake, aft and to the side of the prop shaft tube. Thay said that the hull around the engine raw water intake is approximately 5/8" thick. Mine had plywood backing plates as you described.
 
Jan 11, 2014
11,321
Sabre 362 113 Fair Haven, NY
To the extent possible you should use flanged through hulls and marine ball valves. In order to replace the backing plate it will be necessary to remove the mushroom and seacock. Doing it correctly will not entail a significant amount of extra work, money? That's another story.

Instead of replacing the backing blocks with plywood, consider PVC backing blocks from Groco. They won't rot.

 
  • Helpful
Likes: DrJudyB
Apr 8, 2010
1,942
Ericson Yachts Olson 34 28400 Portland OR
Not sure about the hull part below the your waterline, but Hunter has used, for a long time, a foam coring material. I got a good look at an H-30 built in the 90's, in a boat yard. That boat had T-boned another sailboat. There was a "shark bite" over a foot into the bow, luckily well above the waterline. :yikes:
I could see and feel the "crumbly" core -like dried cottage cheese in consistency - and the really thin layers of laminate on both sides. While it was certainly strong enough for light use, it was alarming to see such major damage in what is the strongest part of the structure on any vessel, i.e. the angle of the bow where all of the glass fiber comes together.
Thru-hulls, OTOH, are pretty easy to do right, and Maine Sail's fine site shows us all how it's done. Nowadays, you can just install a circle of 3/8" G10 and set it into thickened epoxy. Strong and 'forever'.... :)

Good luck!
 
Last edited:
Jun 25, 2004
475
Hunter 306 Pasadena MD
To the extent possible you should use flanged through hulls and marine ball valves. In order to replace the backing plate it will be necessary to remove the mushroom and seacock. Doing it correctly will not entail a significant amount of extra work, money? That's another story.

Instead of replacing the backing blocks with plywood, consider PVC backing blocks from Groco. They won't rot.
I had seen these Groco backing plates, but I didn't understand that you can apparently use them to avoid drilling the 3 bolt holes through the hull! It looks like you glass the backing plate to the hull, and then fasten the flanged thru-hull to the threaded inserts which come with the backing plate. I think the main point of this (the backing plate) is to spread out the load and just to keep the flanged thru-hull from rotating. I had also missed the other article on this:


It doesn't really address using the pre-made Groco backing plates, but other than that, gives full instructions.

My main question then would be: will epoxy stick to the "environmentally-friendly PVC foam" that the Groco plates are made from? If not, I guess they wouldn't be much use. Also: does anyone know why you'd use epoxy to attach the backing plate, as opposed to some other marine adhesive like 4200?

Thanks for the replies,

Jay
 
Jan 11, 2014
11,321
Sabre 362 113 Fair Haven, NY
4200 is a caulk with adhesive properties. It will bond the backing plate to the hull, however because it is a caulk it will allow some movement. Using expoxy and fiberglass to mount the backing plate effectively makes it part of the hull rather than something attached to the hull. It will be stronger and less likely to fail.

As for attaching the Groco backing plate with epoxy, I'd suggest calling Groco and asking. They have good tech support.
 
Jun 25, 2004
475
Hunter 306 Pasadena MD
4200 is a caulk with adhesive properties. It will bond the backing plate to the hull, however because it is a caulk it will allow some movement. Using expoxy and fiberglass to mount the backing plate effectively makes it part of the hull rather than something attached to the hull. It will be stronger and less likely to fail.

As for attaching the Groco backing plate with epoxy, I'd suggest calling Groco and asking. They have good tech support.
So I forwarded this question to Groco:

"I am replacing thru-hulls and seacocks on my sailboat, and I have a question about your backing blocks BB-1. I would like to use them to avoid having to drill the 3 holes through the hull when I mount one of your flanged seacocks, and it is my understanding that this can be done by epoxying a backing block to the fiberglass hull first, and then just screwing the flanged seacock to the backing block with 3 bolts. Presumably, the majority of the strength of the fitting would come from the actual thru-hull which screws into the seacock, and the 3 bolts are just to prevent the seacock from rotating."

and got the following response:

"Im not sure about west system although i think that it would be fine. Normally people use 4200. As far as the inserts go, the bolts are not supposed to go thru the hull. As you have said it serves as for anti-rotational purposes."

Sounds like I have a choice to make. I got the interior part of two thru-hulls off today. Here's what the plywood spacers looked like:
thruhull1.jpegH306_stuffing_box2.jpeg
(I could almost pull them apart with my hands) and as you can see in the next picture, the fiberglass hull seems to have been built up into a little "hill" around the thru-hull. So I'm a little concerned that the Groco backing block won't sit flat without epoxy. I.e., I'm not sure I can get it to sit flat just using 4200. But the 4200 sure would be easier than 2-part epoxy.

Happy to hear your advice.

Thanks,
Jay
 
Jan 11, 2014
11,321
Sabre 362 113 Fair Haven, NY
In the second photo, the hill looks like a fiberglass laid up over a backing plate.

Here's a photo of one on my boat.

IMG_1691.jpeg
 

RoyS

.
Jun 3, 2012
1,739
Hunter 33 Steamboat Wharf, Hull, MA
I would go with the 4200. Using epoxy IMHO requires great care to produce a backing surface that ends up, after the epoxy cures, exactly parallel to the outside hull surface. If the two surfaces are not perfectly parallel and/or the hole is not exactly perpendicular you will end up with a thru-hull flange that is cocked and not flat against the hull. On the other hand, assembling the seacock, backing plate and thru-hull with caulking simultaneously will result in any miss-alignment being taken up with caulking between the backing plate and the inside hull.
 
  • Like
Likes: BigEasy
Apr 8, 2010
1,942
Ericson Yachts Olson 34 28400 Portland OR
Unintended, and understandable, 'over thinking'... you always bed the G10 backing plate in thickened epoxy. There is no gap at the curved hull surface. The backing plate and hull "become one"... sort of a Zen thing... :)
(You could use epoxy-sealed plywood for a backer, but in the long run the G10 is more of a permanent solution.)
 
Jun 25, 2004
475
Hunter 306 Pasadena MD
In the second photo, the hill looks like a fiberglass laid up over a backing plate.

Here's a photo of one on my boat.

View attachment 177541
It's hard to see in my photo, but it looks to me like the builders just added some extra thickness in that area. It's nowhere near being 1/2" extra, though. I really need to lay a straightedge over it to quantify how far it is from being flat, and how far away from the thru-hull the drop-off is.

Good to see one installed. Looks like yours is through bolted. Also, the built-up area around your fitting is _much_ higher than what I have. Is that original, or did you do it? Also, you got one of the fancy, bronze handled fittings. Those look to be around $100 more than the similar Groco fitting with the stainless handles: it's unclear to me why so much more. I'm thinking I'll go with the SS handles on 1-piece Groco FBV thru-hulls where I have enough clearance (i.e., where the handle has room to swing), and with the IVBF flanged adapter with a ball valve on top if it's in a place where I really need to handle to sit exactly a certain way.
 
Jun 25, 2004
475
Hunter 306 Pasadena MD
I would go with the 4200. Using epoxy IMHO requires great care to produce a backing surface that ends up, after the epoxy cures, exactly parallel to the outside hull surface. If the two surfaces are not perfectly parallel and/or the hole is not exactly perpendicular you will end up with a thru-hull flange that is cocked and not flat against the hull. On the other hand, assembling the seacock, backing plate and thru-hull with caulking simultaneously will result in any miss-alignment being taken up with caulking between the backing plate and the inside hull.
I'm still on the fence about this. One thought I had: The original thru-hulls (sans locking nut, ball valve, etc.) are still firmly attached. So if I decide to epoxy a backing plate there, I might be able to put the backing plate over the old thru-hull, and then loosely tighten down the old locking nut as a way of keeping the backing plate perpendicular to the thru-hull. Then after it's all set up, I'll remove the old thru-hulls and install the new ones with the seacocks and so forth. But I might do this with either 4200 or epoxy: either way, it should keep the plate perp to the thru-hull.
 
Jun 25, 2004
475
Hunter 306 Pasadena MD
Unintended, and understandable, 'over thinking'... you always bed the G10 backing plate in thickened epoxy. There is no gap at the curved hull surface. The backing plate and hull "become one"... sort of a Zen thing... :)
(You could use epoxy-sealed plywood for a backer, but in the long run the G10 is more of a permanent solution.)
Yeah: making my own G10 backing plates is another way to go, and it wouldn't have the worry of "will epoxy stick to the Groco plates?". The down side is that it's much more work (although probably cheaper): on Mainsail's website, it seems to be challenging to cut them with a hole saw, and then cut off the bolts and thread the fiberglass for the bolt studs.
 
Nov 3, 2018
82
Cape Dory, Albin 300ms Motorsailer, Vega Baltimore
Try using a Dremel tool with a cutoff wheel to cut out your home made backing plate. I just did this with backing plates I made out of epoxy ( didn’t have any laminating resin available). I rough cut the backing plate with the dremel and then sanded smooth with a belt sander.
 

RoyS

.
Jun 3, 2012
1,739
Hunter 33 Steamboat Wharf, Hull, MA
G10 is extremely difficult to drill with a hole saw. Your plan to temporarily fasten backing plate with old thru-hull fitting until epoxy sets should work. Tape the bare threads that are in the epoxy to keep them from bonding. Consider that old backing plates made from cheap plywood lasted many years with some kind of caulking. I have used plywood, G10, groco plates, caulking and epoxy at various times and I prefer caulking and the groco plate. Anything but plywood.
 
Jun 8, 2004
10,024
-na -NA Anywhere USA
The placement of thru hull fittings is important to which style as some are flat hull areas and much easier to install versus curved hull areas. On curvatures, generally you are going to use conical shaped fittings vs. the flat head style on smooth surfaces. With curved areas you have to be careful on drilling and the inward curved head. Thus you will see more backing plates used with curved surfaces than on flat. On flat, I use to sand the hull area smooth with no gel coat without a backing plate. Using conical shaped thru hull fittings, I had to use a backing plate to make sure shooting straight thru the hole in the hull.. Either way, the preferred sealant was 5200 below the water line. I use to put allot in and let it sqeeze out cleaning the excess immediately and then let it dry for 7 days. Use of teak was standard and worked well

I was advised by the owner of a conical style head thru hull. I think he said water came from topsides.
Use of 4200 below the water line is not recommended by me.
As a dealer, I did sell the 306 and in fact introduced it but with age, I cannot remember much anymore.
 
Apr 8, 2010
1,942
Ericson Yachts Olson 34 28400 Portland OR
FWIW, about two decades ago we changed out all of the original RC Marine (later acquired by Forespar), to the newer Forespar 93 Series sea cocks.
In our case the valve part was threaded into the thru hull with thickened epoxy around it. The epoxy oozed out on the outside along with the "proud" head of the thru hull. Inside the valve body is on an frp backing plate. Hull curvature irrelevant. the outer 'lip' and any external hardened epoxy was ground off flush. Note this series of valve is rebuildable from inside. This leaves a round opening outside with no discernible edge.
The fiber-reinforced thru hull and the glass reinforced hull are joined in nautical matrimony. :)
 
Jun 25, 2004
475
Hunter 306 Pasadena MD
Just got the Groco FBV 1-piece "flanged ball valve" seacocks, the backing blocks, and the thru-hulls. I think using Evercoat Kitty Hair (as in Mainsail's article) to fiberglass the Groco backing block to the (fairly uneven) hull is going to work well. Since the old thru-hulls haven't been removed yet, I was able to put the backing plate on loosely, and then screw the new seacock on to the old thru-hull. I used different sizes of hex allen keys to prop up the backing plate until it was completely level wrt the seacock flange. Turns out that for this location, I need 3/16" at 2 different points to bring the backing plate up to level, matching a "lump" in the hull floor on the other side:

engine_thru_hull.jpeg


So the plan would be to use a couple of temporary 3/16" spacers (or bolts? maybe taped securely to the hull) when I do the fiberglass, and then remove the spacers as it sets up. I would screw down the old thru-hull nut, rather than the new seacock, to hold the backing plate down while it cures. And of course, use tape or a bolt to keep the fiberglass out of the 3 holes with their threaded bronze inserts (not shown).

I was a bit worried that the "PVC foam" backing plates would be either too flimsy, or that the fiberglass resin wouldn't stick to it. But they are very hard (although they probably do have some slight give when compressed by the thru-hull being torqued down), and I read somewhere that the resin should stick to PVC just fine.

My only slight concern now is that with the extra 1/2" backing plate, the 2 1/4" long thru-hulls only have 3/4" left to screw into the flanged seacocks (I guess the hull is built up to 1" think here). This amounts to 7 complete rotations (threads) though, so I'm thinking that 7 fully engaged threads is plenty for strength. I won't be using another 3/4" that it could be turned in if things were otherwise.

Jay
 
Jun 25, 2004
475
Hunter 306 Pasadena MD
Bronze....
Yep: that was just a typo. I did manage to source bronze mounting bolts, and I see plenty of elbows, pipe nipples, etc. are available in bronze. But I can't find bronze threaded pipe anywhere to replicate the way the thru-hulls were originally set up. For example, my engine raw-water strainer was attached to an elbow and a vertical length of pipe coming up from the old thru-hull:

strainer.jpeg


I guess the pipe may be made of brass. The correct way to mount this would probably be to use a mounting bracket, and then have seacock-to-hose-to-strainer-to-hose-to-engine. The old setup was really convenient and worked well though, except perhaps that having a long lever arm (the pipe) bearing on a thru-hull is a poor idea for obvious reasons. Perhaps I could screw some plywood to the side of the fiberglass engine pan (LHSj of the picture) and use that to mount the strainer bracket (which they do make for the Sherwood strainer).

Jay