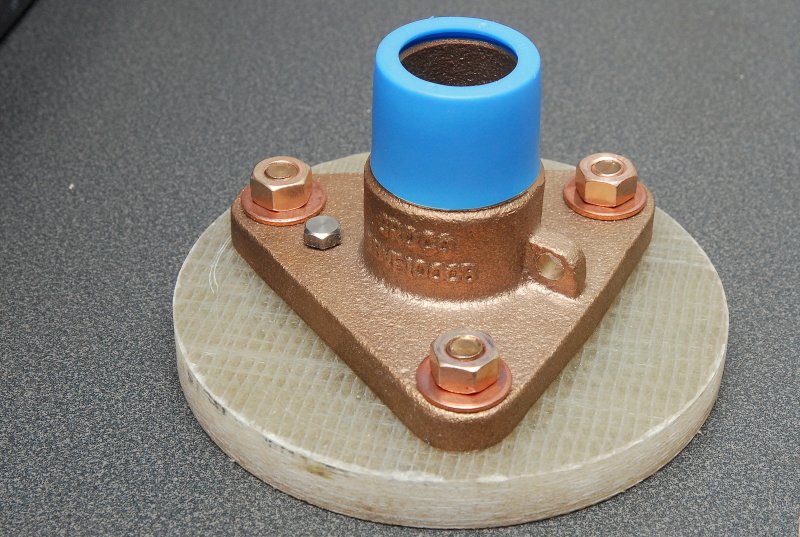
Seacock Quality... Replace?—Currently on the hard.

Jun 11, 2004
1,806
Oday 31 Redondo Beach
Have you read this article?

 
  • Like
Likes: BigEasy
Jun 21, 2004
2,954
Beneteau 343 Slidell, LA
I would install exactly as described in @Maine Sail’s “Marine How To” Article. It may seem laborious at first glance; however, it provides for an easy method for removing the thru hull fitting or seacock in the future. My previous attempt to articulate provisions for removal is nowhere near as descriptive as Mainsail’s. As usual, his methodology is spot on!
 
Jun 14, 2025
187
Hunter 1981 30 Chesapeake
Have you read this article?

The idea of epoxy captured nuts is interesting! I could epoxy in some nuts on my backing plate and screw into those.
 
Apr 8, 2010
2,143
Ericson Yachts Olson 34 28400 Portland OR
Another vote for Rod's excellent article with such good pix.
(If you have not clicked on the $ support button on his site, do so. There is nothing quite like it on the 'net.)

As an alternative, one might consider the way the yard installed all of our new Forespar composite seacocks in the 90's. (The OEM ones were all the weaker "valve on a thru hull" version, by RC Marine, from the 80's.)
Also, proper new backing plates were needed.

The head, recessed or proud, of the thru hull part was of no interest to them. They installed the new valve body thru the backer and screwed the outer part in tight.... with thickened epoxy instead of "sealant". Next the squeeze-out was faired all around, inside. Post cure, the outside "lip" was ground flush. They still work fine decades later and Forespar still produces the same "93" series.
Since the Marelon material is a reinforced plastic, just like our hulls, having it become "one" with hull seemed logical. As for the valve itself, I have had one easily replaced from inside, because the body is screwed to the base.

(The only thing that Forespar has never (IMO) completely addressed in all these years is a hydroscopic tendency of the ball material, and they can bind to some extent.)

Anyhoo.... There seems to be more than one 'right' way to do this. :)
 
Jun 21, 2004
2,954
Beneteau 343 Slidell, LA
Yes, if, as he says, your backing plates are thick enough.
With 1/4" G10 backing plates, would be better to epoxy two together to make up a 1/2' backer. Tapping into 1/2' would be more secure for studs.
 
Jun 11, 2004
1,806
Oday 31 Redondo Beach
With 1/4" G10 backing plates, would be better to epoxy two together to make up a 1/2' backer. Tapping into 1/2' would be more secure for studs.
For myself, not being particularly schooled with a tap, I'd probably drill the first 1/4" plate of G10, epoxy nuts into that, drill smaller diameter holes for the studs in the top plate then epoxy them together. So no tapping required. But maybe the OP is good at tapping.
 
Jun 14, 2025
187
Hunter 1981 30 Chesapeake
Yes, if, as he says, your backing plates are thick enough.
Luckily, I went a bit overboard and ordered 10mm G10 plates—and I’m glad I did. After machining the nut flush into the back of the plate, the strength is frankly overkill in the best way. I’ll be using a dropper to apply a bead of thickened epoxy around the scuffed nut, just to give it a little extra hold—not that it needs it.

The only concern now is getting the thru-hull perfectly flush against the outside of the hull. I’m considering a dry fit with Teflon tape on the threads to keep any stray epoxy off the hardware. Should do the trick.
 
  • Like
Likes: Richard19068
Jun 14, 2025
187
Hunter 1981 30 Chesapeake
For myself, not being particularly schooled with a tap, I'd probably drill the first 1/4" plate of G10, epoxy nuts into that, drill smaller diameter holes for the studs in the top plate then epoxy them together. So no tapping required. But maybe the OP is good at tapping.
Please correct me if I’m off base here—but if I’m securing the seacock with a bronze nut on the backside of the backing plate, then no studs should be necessary, right? It’s still a true mechanical fasten-through to the hull. The nuts will be bedded in epoxy—both underneath and around them—so they’ll be bonded directly to the hull structure. Solid, sealed, and secured.
 
  • Like
Likes: BigEasy
Jun 11, 2004
1,806
Oday 31 Redondo Beach
Please correct me if I’m off base here—but if I’m securing the seacock with a bronze nut on the backside of the backing plate, then no studs should be necessary, right? It’s still a true mechanical fasten-through to the hull. The nuts will be bedded in epoxy—both underneath and around them—so they’ll be bonded directly to the hull structure. Solid, sealed, and secured.
Well, I may be off base, don't take me for an expert, but I thought the idea was to screw a stud into the backing plate instead of having a captive bolt in the backing plate. That allows you to remove the studs from the backing plate should you need to in the future.

Here is a quote from the Rod Collins / Marine How To article:

"IMPORTANT: The reasons for using studs or even epoxy captured nuts, if the backer is thick enough, is for future removal. During removal the studs or bolts into epoxy inset nuts can be removed fully and the seacock can be peeled off with a guitar string or pried at an angle without the studs interfering. With fully captured non-removable bolts, it makes future removal and nightmare project.

Picture yourself trying to remove a seacock in the future with three captive bolts and you can’t get under it with a guitar string or to even rock it back and forth due to the studs being permanently in place. You can also accidentally mar, gall or damage the threads and then the bolt snaps or strips out and begins spinning in the substrate with no way to fix it other than MAJOR surgery. The reasons for drilling and tapping for a stud or burying a bronze nut in the plate, are more about the future and less about the now."

Edit: I guess your idea is using a bolt into the nut captured in the backing plate. I guess that might be okay but then you don't have that much control over how many threads you are getting into that nut. Either too few so not enough strength or too many where you might run the bolt through the backing plate / nut into the hull.
 
Last edited:
Jun 14, 2025
187
Hunter 1981 30 Chesapeake
Thank you for the excerpt, and I did read that. My idea was that when he mentioned epoxy captured nuts, he was referring to a system where you would epoxy in the nuts and then be able to screw in the bolts from the other side. This would allow for you to unscrew the bolts later and remove the Seacock.
 
  • Like
Likes: BigEasy
Jun 11, 2004
1,806
Oday 31 Redondo Beach
Thank you for the excerpt, and I did read that. My idea was that when he mentioned epoxy captured nuts, he was referring to a system where you would epoxy in the nuts and then be able to screw in the bolts from the other side. This would allow for you to unscrew the bolts later and remove the Seacock.
I posted this above as you were writing:

Edit: I guess your idea is using a bolt into the nut captured in the backing plate. I guess that might be okay but then you don't have that much control over how many threads you are getting into that nut. Either too few so not enough strength or too many where you might run the bolt through the backing plate / nut into the hull.
 
Jun 14, 2025
187
Hunter 1981 30 Chesapeake
I posted this above as you were writing:

Edit: I guess your idea is using a bolt into the nut captured in the backing plate. I guess that might be okay but then you don't have that much control over how many threads you are getting into that nut. Either too few so not enough strength or too many where you might run the bolt through the backing plate / nut into the hull.
Thanks for that—it’s a solid point, and I’m glad you brought it up. Thread engagement is definitely a concern if you're not precise about depth. Here's how I’m planning to handle it:

I’ll recess the nuts into the G10, insert the bolts with washers during dry-fit, then grind the bolt ends flush to the nut from the back. That way, once everything's glassed in, I’ll know exactly how far the bolt needs to thread to be fully seated—no guesswork, no risk of too little bite or punching through the backing plate.

The idea is to end up with a system that’s both removable and mechanically trustworthy, without relying on captured threads alone or using studs that might spin or seize over time. It’s a hybrid method, but I think it gives me better control and future serviceability.

Appreciate the back-and-forth—this is the kind of detailed pushback that sharpens the plan.
 
Jun 14, 2025
187
Hunter 1981 30 Chesapeake
Thanks again—your point got me thinking more critically about the install sequence, which actually helped refine my plan.

During installation, I can keep the bolts threaded into the nuts while bedding the backing plate. That way, I’m not relying on blind epoxy capture—I’ll be able to visually confirm full thread engagement before anything’s permanent. Once everything’s dry-fit and seated, I’ll grind the bolt ends flush with the nuts, ensuring that when the bolts are fully tightened later, they’ve got proper bite without over-penetrating the backing or hull.

I won’t need to remove the bolts until much later—if ever—for seacock service. So I’m aiming for a clean install now, and future access without surprises.

Really appreciate your input—it’s helping tighten up both the theory and the method.
 
  • Like
Likes: Richard19068
Jun 11, 2004
1,806
Oday 31 Redondo Beach
I’ll recess the nuts into the G10, insert the bolts with washers during dry-fit, then grind the bolt ends flush to the nut from the back. That way, once everything's glassed in, I’ll know exactly how far the bolt needs to thread to be fully seated—no guesswork, no risk of too little bite or punching through the backing plate.

The idea is to end up with a system that’s both removable and mechanically trustworthy, without relying on captured threads alone or using studs that might spin or seize over time. It’s a hybrid method, but I think it gives me better control and future serviceability.
I like that. But as I said, I am not an expert at this. One caveat is to remember to use the same thickness washers if those bolts ever have to come out. But as you said that will hopefully be never.