O'Day 222: Centerboard

Status
Not open for further replies.

estopa

.
Feb 27, 2008
182
Oday 222 Milford, CT
Well Centerboard project to begin. As mentioned in various posts I have a very loose centerboard. Meaning it sways side to side considerably. After putting the boat in a easier to work with Trailer for full keels I am now able to work on the centerboard without worry.

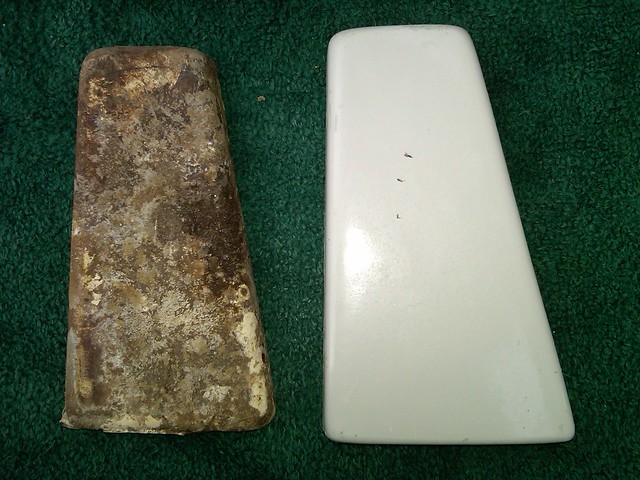
Here are some pictures. You can see some chunks are missing from the board and the pendant is just knotted on. Yikes.


From what I can tell right now, I need to do the following:
1) Remove the centerboard by removing the plates and wedges.
2) Repair the missing chunks of centerboard (with fiberglass?) prep and paint the centerboard with SSB bottom paint.
3) Clean up the centerboard housing and paint with SSB bottom paint.
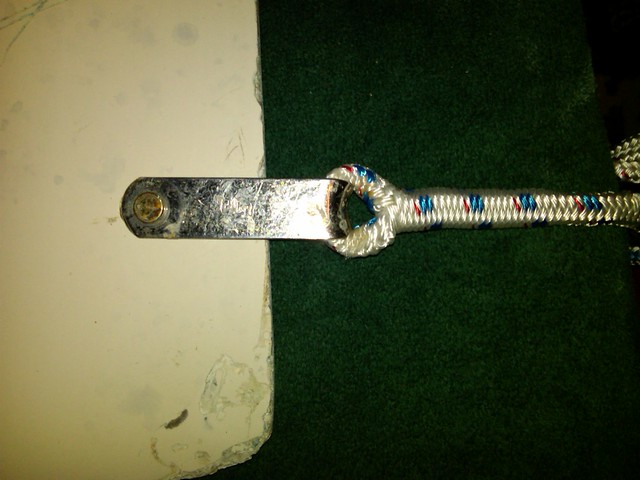
4) Replace the pendant.
5) Put back the pin and wedges (with 3M 4200 or 5200?) and the plates to hold it all in.

Anything I may be missing? I'd like some insight to repairing the missing centerboard chunks. And until I get the centerboard out I can't tell how bad the pin and wedges are.

I got a new pin and wedges ordered from Rudy coming as well as a pendant.

UPDATE: 11/10 -

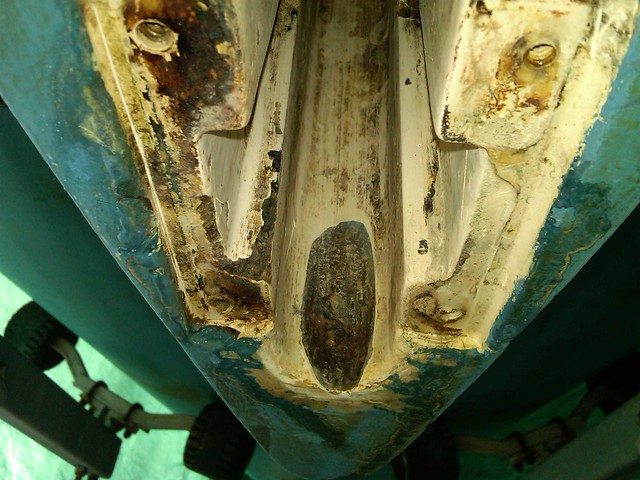
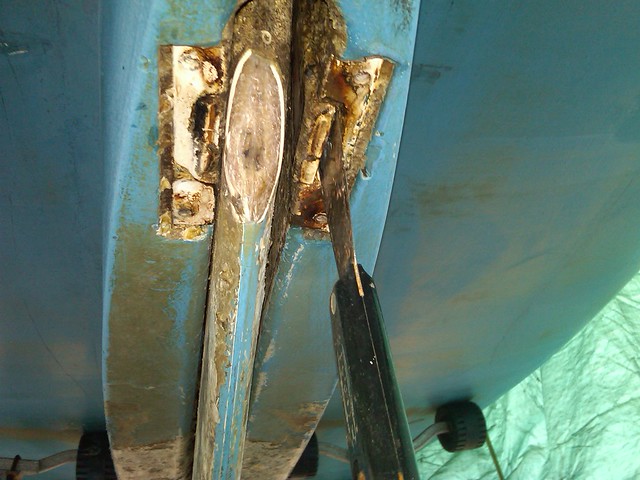
You can see the front of the centerboard and trunk here. Note how there is more of a gap on the Port side vs. the Starboard. Also the screw that holds the Port side wedge was missing. A big piece of gelcoat is missing in the front of the centerboard probably from getting hit. More to come on that below.


Using a impact screwdriver from local autoparts that normally I use for removing brake rotors made the job easy. Screws came off very easy with a few light whacks with a hammer. One thing to note is that I had a little water come out when I removed the two rear bolts from the plates.


The wedges came out very easy with a 1" putty knife. The Port side came off easy since it didn't have the screw securing it. This allowed the wedge to separate a bit, more on top of the wedge than on the bottom of it. Also had less caulking holding it then the Starboard side.


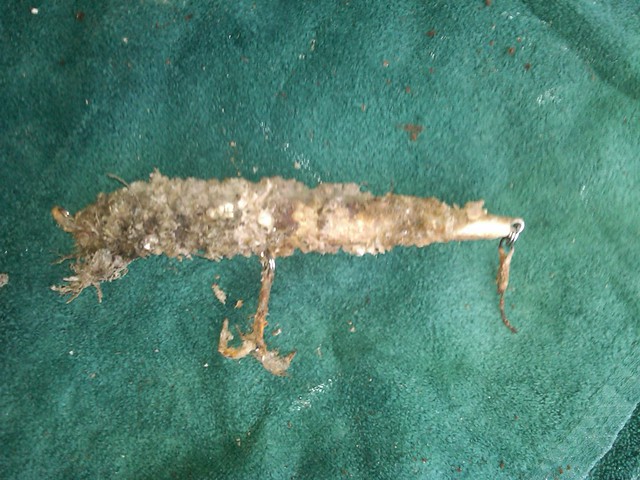
When I removed the centerboard I found a likely culprit that most likely didn't allow me to raise the centerboard all the way up. Its a large lure with tremble hooks at the end :snooty:.


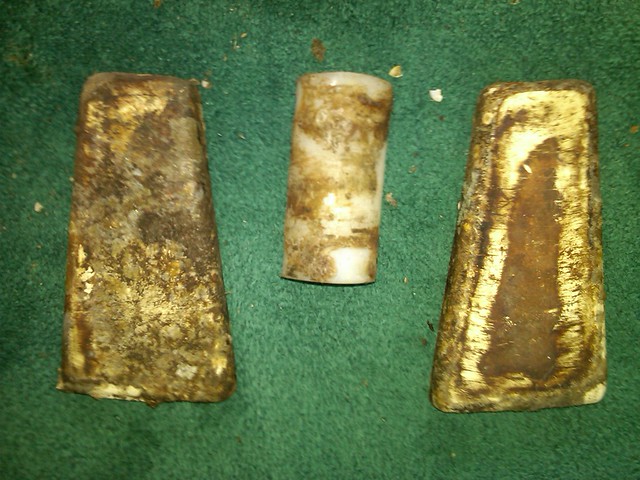
Here is the view of the parts taken off from the centerboard and trunk. For reference I plan on going to Home Depot or Lowes and match up the screw sizing. This will help me document for any issues down the road.


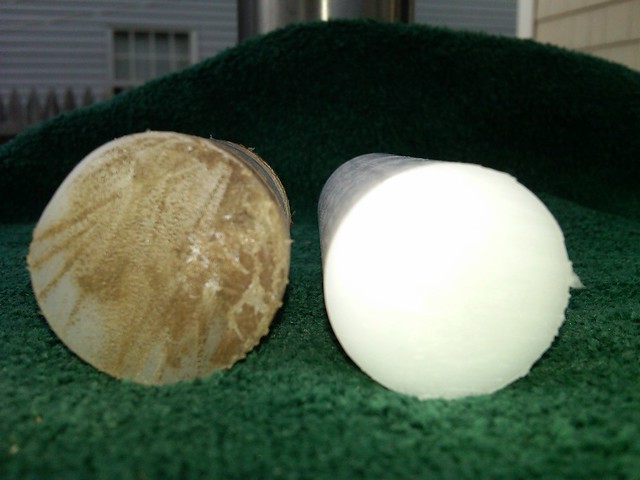
Over all the pin and wedges were not in very bad shape but I did figure out why I had the side to side play. First the pin is about 1/8" smaller diameter than the centerboard hole. Second the Port side of the pin was worn down a bit. Third the gap between the centerboard and the wedges. This translated into the overall side to side play I had with the board in general.

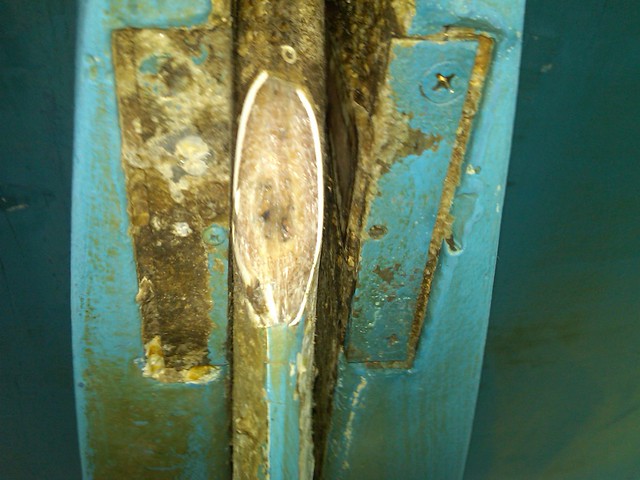
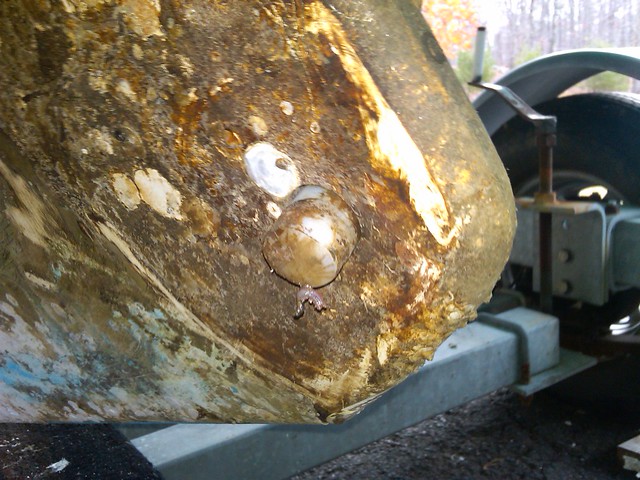
Here is the starboard side of the centerboard with the pin showing the gap in play from the pin wear. Rudy from D & R Marine indicated that these pins are made from DuPont™ Delrin® acetal resin.


Here is the Port side where the pin was more worn at the edge adding more play.


This picture below shows the 1/8 inch play I had with the Centerboard hole and pin.


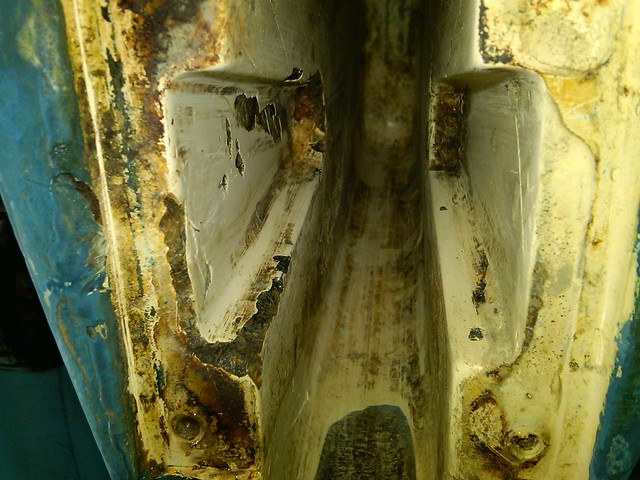
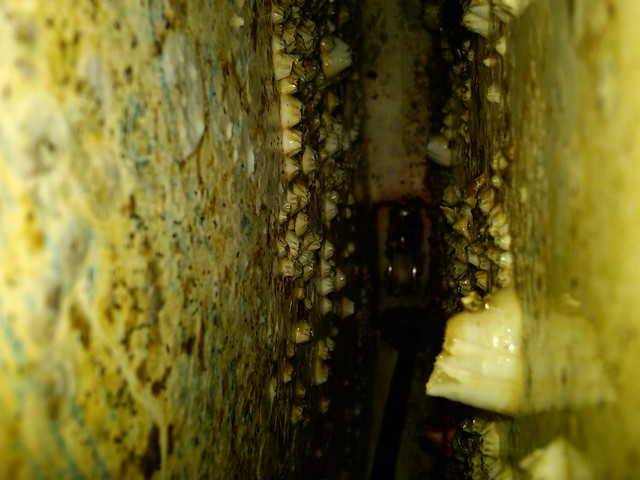
Centerboard removed showing the Trunk without the plates, wedges. Looks like some serious cleaning needs to take place here.


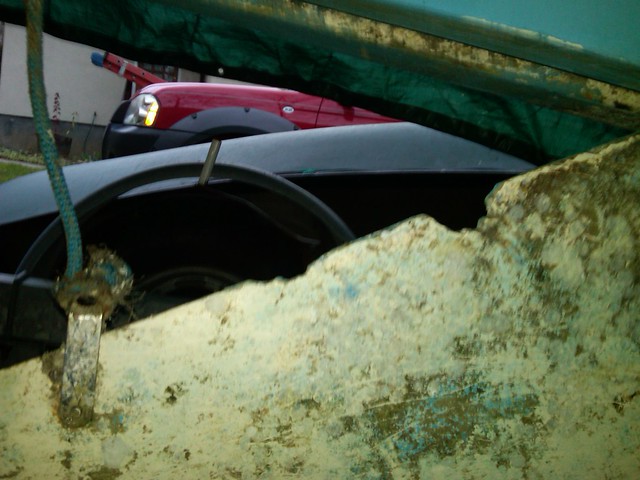
Ok so I take a look at the stern end of the trunk. WHOA?!? The rope was not wrapped around the pulley. Hmm wonder why it took some strength to get the board up.


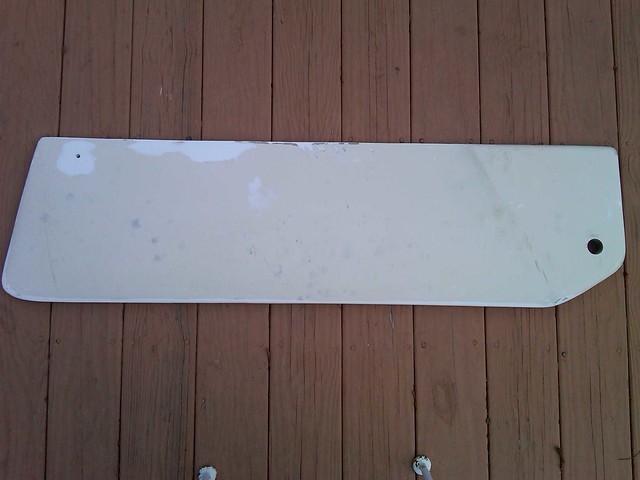
Overall view of the centerboard off the boat. Good shape except for some dings and bangs here and there. As bad as it looks I can't believe its even this good shape after 25 years.


Stay tuned.. for more...
 
Last edited:
Sep 25, 2008
992
Oday 25 Gibraltar
You've got it on a trailer that allows you drop the board? I'm jealous.

Rich
 

estopa

.
Feb 27, 2008
182
Oday 222 Milford, CT
You've got it on a trailer that allows you drop the board? I'm jealous.

Rich
The trailer was originally for a Catalina 22 fin keel that I ended up trashing because even for free it would of been a money pit. But I kept the Load Rite trailer that came with it. About the same sizing as the O'Day 222 one that I have except its bunks can be adjusted from a 1' to 4' in height.
 

estopa

.
Feb 27, 2008
182
Oday 222 Milford, CT
What should I use to fill in the missing chunks? Expoxy or maybe fiberglass filler?
 
Jan 24, 2005
4,881
Oday 222 Dighton, Ma.
What should I use to fill in the missing chunks? Expoxy or maybe fiberglass filler?
I'm no expert on fiberglass repair but I think that I would use West System Epoxy with a High Density filler where the breaks are on the thin edge of the blade. It really depends on how large these chunks are. Go down to the library and draw out Don Casey's book on sailboat repair and read up on it first. I have a lot of fillers at the house like the West System 406 and 407 and what I have done is buy the small packets of WS epoxy and hardener because they last indefinitely and my repairs are usually small. Epoxy is what you need because it won't soak up water like the Polyester Resin. Also, Epoxy resin will stick to Polyester, but Polyester will not stick to Epoxy.
 
Oct 10, 2009
984
Catalina 27 Lake Monroe
I had a big chunk missing from my rudder and repaired it with West Epoxy last year. It worked very well and the repaired section, a large void on the trailing edge where the PO had knocked it with the prop, was in great shape when I hauled out. I also used epoxy where there was some delamination and so far so good.
 

estopa

.
Feb 27, 2008
182
Oday 222 Milford, CT
UPDATED the original thread to keep consistent and maybe help someone in the future.

New pendant, pin and wedges came in this afternoon as well as all my other stuff (Full Standing Rigging) from Rudy. Boy that was fast!!! I think I placed the order Monday afternoon.

Today I spent the morning working to take the centerboard out. I was able to remove the centerboard plates, wedges, then the centerboard.

I updated the original post with the details. ENJOY!!

Comparing original wedge to the D & R one Rudy sent. The over all size maybe an issue here.

Original Wedge Sizing for reference:
Made of fiberglass shell with filler on the inside. 1-5/16" width on top tapered to 2-1/16" width on bottom. 3-7/8" Length. 3/8" in thickness.

Front View: Original vs D&R.


Back View: Original vs D&R.


The thickness of the new wedge is considerable. Which I think maybe good with the original gap I had between the wedges and centerboard.


The new pin is a lot longer and narrower than the original. Not even sure this will work for me.

Original Pin sizing for reference:
Made of Nylon. 1-1/8" width. 2-1/4" Length.


New Pendant attached to centerboard. I am not sure I like this since it seems too short thereby pinching the line a little and the clevis pin is a much smaller diameter, notice the gap below.


I may use the old shackle and clevis pin with the new spliced line Rudy supplied.


Centerboard cleaned up and sanded down ready for repair.


This Friday I should be back to the boat. I don't store it at my house. I keep it at my parents which have 2 acres and 200ft driveway. :)

Well I don't know if what Rudy sent me will work with the centerboard. I have already been thinking about maybe going to Home Depot or Lowes to look at the plumbing section for pvc plastic that I may be able to sheave the old pin a bit to fill in the gap and maybe add a plastic washer or two.

Not sure until I get back to the boat and clean the trunk up and work out a few scenarios. Stay tuned...
 
Last edited:

estopa

.
Feb 27, 2008
182
Oday 222 Milford, CT
This is what I came up doing a little research on West Marine:

WEST SYSTEM
EPOXY - G/Flex 650, 8 oz. (One 4 oz. bottle of resin, one 4 oz. bottle of hardener)

For the Filler, What's the difference?
#407 Low Density Filler
#404 High Density Filler


Oh and to put back the wedges what should I use? 3M 4200? or 5200? or something else all together.
 
Jan 24, 2005
4,881
Oday 222 Dighton, Ma.
This is what I came up doing a little research on West Marine:

WEST SYSTEM
EPOXY - G/Flex 650, 8 oz. (One 4 oz. bottle of resin, one 4 oz. bottle of hardener)

For the Filler, What's the difference?
#407 Low Density Filler
#404 High Density Filler


Oh and to put back the wedges what should I use? 3M 4200? or 5200? or something else all together.
The 406 LDF is for areas that require strength but is a little harder to sand and the 407 is for areas like gouges and small holes and it's easier to sand. You could use 3-M 4200 or 4000. I've used both and got good results.
 
Jan 24, 2005
4,881
Oday 222 Dighton, Ma.
Is that the pendant line shackle that Rudy sent you George? It's different than mine. Does it have a cotter pin on the other side for the rigging pin?
 

estopa

.
Feb 27, 2008
182
Oday 222 Milford, CT
Yes the one Rudy sent has a cotter pin. My old one has a cotter pin as well. I may just use the old one. I'll have to give Rudy a call on Friday after I clean up the trunk a little to see how those different sized wedges will work. Even the pin is too narrow in diameter. So when I chat with him I will ask about the pendant. No biggie as I still have the old shackle which I can use.

Thanks for the heads up on the epoxy and filler.
 
Jun 14, 2010
43
oday 222 Milltown, NB
Yes the one Rudy sent has a cotter pin. My old one has a cotter pin as well. I may just use the old one. I'll have to give Rudy a call on Friday after I clean up the trunk a little to see how those different sized wedges will work. Even the pin is too narrow in diameter. So when I chat with him I will ask about the pendant. No biggie as I still have the old shackle which I can use.

Thanks for the heads up on the epoxy and filler.
Great Pics!

Would be great to have them in the albums section.

Was thinking of rebuilding the wedges from plastic. Will be interesting how you make out with the new slightly larger ones.

Got mine out last week and found the pin hole rounded at the edges which may account for the side play. I just wonder though if one were to get really tight tolerances eg adding pin liner\shims may be a bad idea. ?

On the antifouling issue..... I understood from PO that my board was antifouled. Mine was as clean as a whistle. With the amount of water flowing by it, unless it is used very little, wouldn't it be self cleaning?

tom c

any chance of comparing weights...of the board that is?
 

estopa

.
Feb 27, 2008
182
Oday 222 Milford, CT
Tom, I was thinking the same thing (sheave/shim) but to be honest I also been searching online for Nylon Round Rod stock slightly larger than the original 1-1/8" diameter. By going to 1-3/16 diameter it would be a perfect snug fit to the centerboard hole that measures 1-3/16".

Tom, can you measure your pin? And the opening of the centerboard hole? Mine is 1-1/8" diameter by 2-1/4" in Length for the pin and 1-3/16 for the centerboard hole. Maybe we can help each other out because so far I only see that you can order in minimum 1 foot lengths. We can order one rod and make 2 or 3 pins!!!.

Interesting thoughts on the anti-foul. I just ordered another gallon from SSB and was just going to paint the trunk and centerboard with it. I should be ok because the boat came out pretty clean after one season. Just minor scrub and wash.

I'll weigh my centerboard later and see what I come up with.

As for the wedges, we will see. Just recalling the size of the slots and looking at the pics and comparing new to old. I don't think the new will work. The old is still serviceable as I might just add a little epoxy to build the backing a bit and good to go.

I'll chime back on Friday when I get to the boat. I will also give Rudy a call on Friday to get his thoughts.
 

estopa

.
Feb 27, 2008
182
Oday 222 Milford, CT
Harder than I thought for the oversize pin. For the original 1-1/8" or 1.125" or 28MM we can easily get it at ebay - http://cgi.ebay.com/Nylon-6-6-Round...272?pt=LH_DefaultDomain_0&hash=item20b4bc9120 or Grainger - http://www.grainger.com/Grainger/Rod-Stock-1UTW4?Pid=search

But to go up a slightly larger 1-3/16" or 1.187" or 30mm its getting a little harder via some google searching. I still have to call Rudy and maybe call direct to some suppliers as well.

I think once I get the trunk cleaned out I will know more about oversizing the pin. I may even go up to 1-1/4" depending on what the trunk slot can take. I want to make it as snug as possible. Even if I have to tap the centerboard to 1-1/4" size. MORE TO COME...

UPDATE 11/22/2010 -
No need to get a greater size. The 1-1/8 size rod I bought at Graingers is sufficient and fits nice and snug in the centerboard.
 
Last edited:
Jun 14, 2010
43
oday 222 Milltown, NB
Tom, I was thinking the same thing (sheave/shim) but to be honest I also been searching online for Nylon Round Rod stock slightly larger than the original 1-1/8" diameter. By going to 1-3/16 diameter it would be a perfect snug fit to the centerboard hole that measures 1-3/16".

Tom, can you measure your pin? And the opening of the centerboard hole? Mine is 1-1/8" diameter by 2-1/4" in Length for the pin and 1-3/16 for the centerboard hole. Maybe we can help each other out because so far I only see that you can order in minimum 1 foot lengths. We can order one rod and make 2 or 3 pins!!!.

Interesting thoughts on the anti-foul. I just ordered another gallon from SSB and was just going to paint the trunk and centerboard with it. I should be ok because the boat came out pretty clean after one season. Just minor scrub and wash.

I'll weigh my centerboard later and see what I come up with.

As for the wedges, we will see. Just recalling the size of the slots and looking at the pics and comparing new to old. I don't think the new will work. The old is still serviceable as I might just add a little epoxy to build the backing a bit and good to go.

I'll chime back on Friday when I get to the boat. I will also give Rudy a call on Friday to get his thoughts.

Hmmm

My CB hole is 1 1/8" tight. The pin is also 1 1/8 with slight wear in CB area. The pin is 2 7/16 long.

Now that the CB is out, gonna clean the slots and dry fit old ones to see how much play the is. Ditto for the pin.

tom c
 

estopa

.
Feb 27, 2008
182
Oday 222 Milford, CT
Thanks Tom, I have nylon round rod coming from Grainger, I ordered both the 1-1/8 and 1-1/4. I may just fill in the hole a bit with epoxy as I am getting used to the stuff and its strong as hell. May just use the old 1-1/8 pin and fill in with epoxy to make a tighter hole. At the same time I may cut some pvc or get nylon washers and integrate with the epoxy to the centerboard.

I also beefed up the old wedges with the epoxy as you can see the new ones don't fit for me.


Here is my slot all cleaned up. I plan to fill in the missing gelcoat with epoxy as well. On the port side where I had the most wear you can see that there is more gelcoat missing there.


I plan on completing the clean up of the trunk within the next few days and putting some bottom paint in there. Then get the centerboard in place. I'll chime back with finished pics and comments.

I still got to give Rudy a call since the wedges and pin are not the same size.

Also a little repair needed for the front of the Keel trunk.
 
Last edited:

estopa

.
Feb 27, 2008
182
Oday 222 Milford, CT
Well little by little, day by day spend a few hours to repair the centerboard. I actually found a pint of marine tex that the previous owner had left in the boat. I opened it up and tested a few spots. Worked pretty good and tough as hell. Used 80 grit and a file to shape the stuff after setting. You can see around the laminate edges all around I added epoxy so to protect the laminate. Maybe over engineering since it lasted 25 years already. I tried to paint the keel trunk a little with left over SSB bottom paint but not much was left from the spring so I just touched up the trunk a little while I wait for a new gallon I ordered last Monday to arrive.

 
Oct 10, 2009
984
Catalina 27 Lake Monroe
The centerboard looks real nice, compared to the way it looked when you removed it.

Let us know how it goes with the wedges and pin. I just dropped mine today and would like to know how those new ones work out for you. Unfortunately, I need to get my boat up another two inches to get the centerboard completely free, so it looks like I may have to wait until Spring unless I can get someone to loan me their stands within the next few weeks.
 
Status
Not open for further replies.