O'Day 222: Centerboard

Status
Not open for further replies.

estopa

.
Feb 27, 2008
182
Oday 222 Milford, CT
I picked up the nylon 6/6 rod I will be using for the centerboard pin today. It fits nice and snug, perfect fit. I got it at Grainger's Industrial Suppy for $5.88 for about a foot. Its about the same tensile strength as the Dupot Delrin without the markup ;).


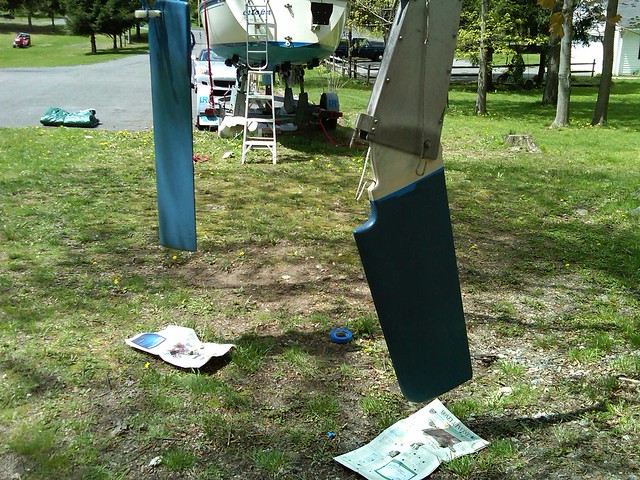
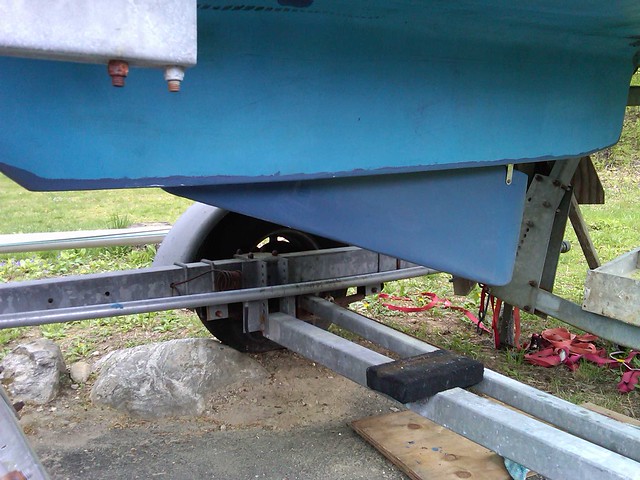
All I am waiting for is the SSB Super Ship Bottom paint to come in so I can put a few coats and assemble it all together. I ended up cleaning up the old wedges and filled in a little epoxy to make them a little more even. The old ones looked uneven as far as thickness was concerned. I guess it was maybe an afterthought of the factory at the time.

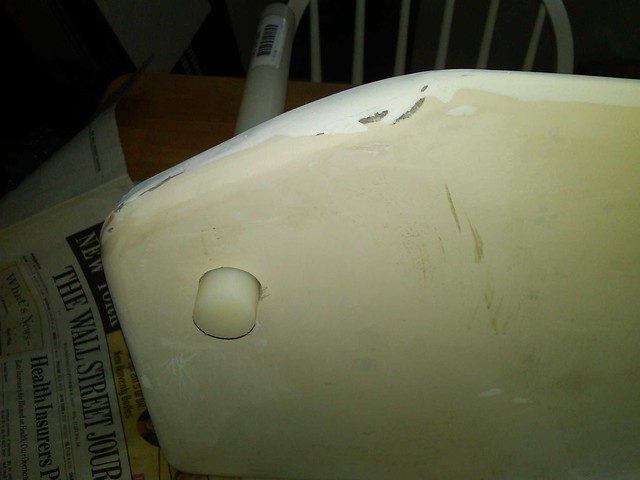
The new wedges and pin I sent back to Rudy because they didn't fit my boat. Not sure if they must of changed the sizes during production. Glad I didn't throw away my old wedges. ;)
 

estopa

.
Feb 27, 2008
182
Oday 222 Milford, CT
The centerboard looks real nice, compared to the way it looked when you removed it.

Let us know how it goes with the wedges and pin. I just dropped mine today and would like to know how those new ones work out for you. Unfortunately, I need to get my boat up another two inches to get the centerboard completely free, so it looks like I may have to wait until Spring unless I can get someone to loan me their stands within the next few weeks.
Well I sent mine back to Rudy because they were bigger than the original as you can see in previous posts. They did look a lot better made then the original ones. I would recommend you measure yours out before calling Rudy and ask him to measure his to make sure. The same goes for the centerpin unless you go grainger's route.
 
Oct 10, 2009
984
Catalina 27 Lake Monroe
Well I sent mine back to Rudy because they were bigger than the original as you can see in previous posts. They did look a lot better made then the original ones. I would recommend you measure yours out before calling Rudy and ask him to measure his to make sure. The same goes for the centerpin unless you go grainger's route.
Thanks- I'll send Rudy a tracing of it and ask them to compare. If those wedges won't work, I will make them myself.
 

estopa

.
Feb 27, 2008
182
Oday 222 Milford, CT
Well I found out why my wedges and pin are different. After talking with Rudy for a bit and sharing my HIN we determined that its a California made boat. It was built in their additional manufacturing facility in Costa Mesa, California.

I wonder what else might be different now that we know it was born on the left coast.
 

estopa

.
Feb 27, 2008
182
Oday 222 Milford, CT
UPDATE 12/22 - Still didn't get my SSB paint. I called them up yesterday and they think it was a screw-up with postal service. I will have to wait till spring now for the paint as they aren't in any hurry to make more.

I'll spend my winter building out new radio cabinet and hatch boards for the companion way.
 
Oct 20, 2008
142
Oday 222 USA
George:
Excellent post. Thank you. My 1987 O'Day 222 is also California-made (Starcraft) . I may be due for centerboard work, so appreciate the effort to post pictures and document your efforts.
 
Jun 2, 2004
1,926
Oday Day Sailer Wareham, MA
The wear on hte forward corner of the CB seems to be matched by the wear on the inside of the CB slot, I suspect that a previous owner left the CB down while moored and that caused things to wear faster than normal. The amount of fouling in the CB slot would appear to back up that theory. On my DS II I always pull the CB most of the way up while moored, that stops the board from moving as much side-to-side at rest. Joe can tell you how he leaves the board on his 222, I'd probably raise it all the way when moored, but Joe knows more about K/CB boats (especially the 222) than I do.
The pin that Rudy sent you was extra long on purpose, there was some slight variation in pin length over the production years (or to compensate for wear?) so Rudy always cuts those pins a bit long so the owner can trim it to the correct length for his particular boat.
When you re-install the wedges and plates do NOT use 5200 unless you are planning on it being PERMANENT. Better to use a good MARINE silicone or Marine sealant that is a mix of silicone and another substance like Life-Seal. Many builders use 5200 for the hull-deck joint along with screws to hold the joint together only until the 5200 cures (It's THAT strong when properly applied).
 
Jan 24, 2005
4,881
Oday 222 Dighton, Ma.
When I caulked my wedges in place I think I used 3-M Marine/Adhesive Sealant Fast Cure 4000 UV or 3-M 4200.
http://multimedia.3m.com/mws/mediawebserver?mwsId=66666UuZjcFSLXTtmXMyM8T6EVuQEcuZgVs6EVs6E666666--
It's true that plastic hardware which is set in 3-M 5200 is almost impossible to remove without breaking, but I haven't seen any type of caulking or glued hardware yet that can't be removed with a heated tool. Luthiers have been removing the necks off guitars which are attached with hyde glues, for years and the secret to this is heat. I used a blow torch to heat the blade of my fish fillet knife to get in between the caulking and the wedges when I removed them. I did the same thing when I removed my forward hatch.
I've been using this 3-M 4000 for years because it works great and it will last a lot longer if the tube is stored in a cool place. I bought a new tube of B.L. Caulking a few years ago and wound up ruining my cauking gun. The stuff had set up in the tube and was hard. It came right of the shelf of a local marine dealer in my area.
 

adanob

.
May 20, 2010
6
Oday Oday 22 Miami
Size of Shackle?

What is the size of the shackle that you have attached to the pendant?
 
Jan 24, 2005
4,881
Oday 222 Dighton, Ma.
What is the size of the shackle that you have attached to the pendant?
I bought my centerboard pendant line shackle off Rudy at D&R Marine years ago when I was in his shop. http://www.drmarine.com/ It's not the same as the stock shackle that came with the boat. It's about 3" long I think and it consists of two stainless steel plates with a spool on one end and a rigging pin with a cotter pin on the other end. Here's some pics of it. Rudy may still be selling these shackles.
 

Attachments

Oct 10, 2009
984
Catalina 27 Lake Monroe
I dropped my centerboard today and am getting everything cleaned up to put the thing back in. Any recommendations on how to hold the wedges in place while the caulk sets? I plan on supporting the board from underneath and was considering shims to hold the wedges in place.
 
Sep 25, 2008
992
Oday 25 Gibraltar
The caulking (boatlife) I used was sticky enough to hold the wedges in place while I installed the stainless pieces.

Rich
 
Jan 24, 2005
4,881
Oday 222 Dighton, Ma.
I dropped my centerboard today and am getting everything cleaned up to put the thing back in. Any recommendations on how to hold the wedges in place while the caulk sets? I plan on supporting the board from underneath and was considering shims to hold the wedges in place.
I recommend 3-M 4000 UV fast cure Adhesive Sealant Caulking, or 3-M 4200. Don't use silicone. Boat life will work but it doesn't seem to have a good shelf life as the 3-M products. All you need is a small tube of this stuff which can be bought at Lowe's or Home Depot. Wal-Mart may even carry it.
 
Oct 10, 2009
984
Catalina 27 Lake Monroe
Presently waiting on UPS to deliver a tube of 4200. Thanks for the suggestion- I was wondering whether 5200 would be wise or not.

Worked on the holes for the plates today. One of them still has the nut embedded in the keel- the others were a mess, and were filled with silicone and wood. Drilled them out and used putty/epoxy to fill.

I found a good way to clean out the trunk (probably works only for fresh water where growth is pretty easily scraped off). I stapled green scrubbing pads to a 3/4" plank and used it to reach way up in there. By wrapping the pads around the corners of the plank I was even able to get in the corners. Painted the inside with bottom paint for good measure.

Fished the new pendent through. I can't see a sheave in my trunk like you can in the pics on this thread (mine is a 23), but it does feel like there is one in there. I whipped the two lines together and they fed through with no problem.

All in all, I'm psyched at how easy this has been so far. As long as you can get to the trunk, it's not a hard job.
 
Jan 24, 2005
4,881
Oday 222 Dighton, Ma.
Presently waiting on UPS to deliver a tube of 4200. Thanks for the suggestion- I was wondering whether 5200 would be wise or not.

Worked on the holes for the plates today. One of them still has the nut embedded in the keel- the others were a mess, and were filled with silicone and wood. Drilled them out and used putty/epoxy to fill.

I found a good way to clean out the trunk (probably works only for fresh water where growth is pretty easily scraped off). I stapled green scrubbing pads to a 3/4" plank and used it to reach way up in there. By wrapping the pads around the corners of the plank I was even able to get in the corners. Painted the inside with bottom paint for good measure.

Fished the new pendent through. I can't see a sheave in my trunk like you can in the pics on this thread (mine is a 23), but it does feel like there is one in there. I whipped the two lines together and they fed through with no problem.

All in all, I'm psyched at how easy this has been so far. As long as you can get to the trunk, it's not a hard job.
I don't see why you shouldn't use 3-M 5200 for adhering the wedges. 3-M 5200 is a little stronger than 3-M 4200 but I'm sure that if you ever needed to remove the wedges you could do it by inserting the heated blade of a fillet knife into the caulking under the wedges regardless of what kind of caulking you used.
I just uncovered my boat yesterday and I found a leak that was coming in through the first screw hole in the Port cap rail near the bow. I remembered from last year that a pull over sweatshirt that I had stored in the bow was soaking wet. The hole was missing a Teak bung. I took that screw out and I was able to lift the cap rail enough to apply some 3M-5200 under it. I'm going down to Rudy's to get some 3/8" Teak bungs this morning to finish the job.
If your pendant line pipe goes straight down to the centerboard, you probably don't have the sheave up inside the centerboard well. Some of the O'Day 23s have a winch mounted on the table stanchion and the cable goes straight down.
Yesterday the temperature was in the mid 60s and I decided that it was high time to start getting my boat put together. I'm also psyched.
Joe
 
Oct 10, 2009
984
Catalina 27 Lake Monroe
OK- I am done with my O23 centerboard fixes. A couple of points to make:

  1. The pin Rudy sells is longer than the original. Bring a hacksaw with you. Luckily, I had one in my tool box from a previous project.
  2. It looks like the nuts some of us have seen on our keels were just pressed into the keel when it was laid up. Three out of four of mine are gone, which left voids as large as the nut. The holes were pretty large, too, and had been filled with all sorts of stuff by someone earlier- wood, silicone, etc. Having a dremel to clear these out would have been nice, but I just used a narrow knife blade.
  3. Fill and Drill repair- I had not worked with putty epoxy before, but it took two tries to get it right. Marine Tex is not available here, but I ended up using plumbers epoxy which is pretty similar. The first attempt (tube type) never cured, either because I failed to mix it properly, or because it was old, or because...make something up here, like maybe it needs to be applied in a few, thinner applications. If I had to do this over, I would go with regular epoxy and a syringe, either thickening it or applyng after it kicks and starts to cure. That's a product which is more familiar to me and the putty problems were very aggravating.
  4. Adhesive caulk- I used enough so that I could see it around the edges of the slots when I pressed the wedges in. I also used some on the plates for good measure.
  5. Gluing in the wedges. Adhesive may be sticky enough to hold the wedges in place if you let it set up for a bit before putting them in, but I used shims to hold them in place while I did some other things on the boat. There was about 1/8" of wiggle room between the plates and the wedges if they are pushed all the way up.
  6. Clean everything out! Most of the work on this job is prep. I scrubbed and scraped all the surfaces of the slots. I had new wedges, so that saved a little work. Having an assortment of different sized putty knives, scrub pads and little wire brushes is advisable.
  7. Eye protection- this should go without saying, but everything you knock off is going to fall on your face. Lot's of fun, that.
 

ruidh

.
Oct 1, 2007
227
Oday 23 Manhasset Bay, LI
Now that I've seen George's pictures, I understand what people are talking about when they mention centerboard wedges.

I don't have any.

The cb on my 23 is held in place by a bolt going through the keel.
 

estopa

.
Feb 27, 2008
182
Oday 222 Milford, CT
Whooohooo finally got my Super Ship Bottom paint after a nail biting waiting period.

Indy, glad to see you toughed through some issues there. Yes I had a lot of clean up myself which I did last fall. I plan on putting about 3 coats of SSB paint on the centerboard and slot in the next few weeks. I plan on launching first weekend of May if all goes right. Still have many little projects to do.

I'll post back with pictures and reviews to recap this centerboard project.
 
Oct 10, 2009
984
Catalina 27 Lake Monroe
Whooohooo finally got my Super Ship Bottom paint after a nail biting waiting period.

Indy, glad to see you toughed through some issues there. Yes I had a lot of clean up myself which I did last fall. I plan on putting about 3 coats of SSB paint on the centerboard and slot in the next few weeks. I plan on launching first weekend of May if all goes right. Still have many little projects to do.

I'll post back with pictures and reviews to recap this centerboard project.
I don't think mine was nearly as hard to clean as yours :). It's nice to have this finished even though you can't see any of the work, but at least I have a nice shiny pendent to show off.

And thanks for posting all those pics- they were very helpful.
 

estopa

.
Feb 27, 2008
182
Oday 222 Milford, CT
UPDATE - Finally got around to closing this chapter this week. It was a great learning experience and fully understand the workings of the centerboard on this boat ;)

Starting putting 1 of 3 coats of SSB bottom paint this past weekend.


Painting the centerboard slot 1 of 3 coats as well.


Found some rubber washers at Lowes to add a bit of precision on the centerboard movement.


Looking so good with that new center board pendant. BTW the specs on the pendant is 5/16ths rope with a eyelet splice at the end. About 12 ft in length.


The movement is so smooth now.


Added a healthy amount of SSB bottom paint to the brackets. I hope I don't have to touch this for another 25 years. :)


So to summarize the issues I had with my centerboard:
1) One wedge was loose and surprised it was still in place.
2) Pin was worn down a bit. Also short in length which probably added to the side to side play.
3) Pendant was not exactly spec. Just 3/8" rope knotted to the end of the centerboard shackle.
4) Pendant also came with a surprise of a 6" fishing lure. Most likely why it didn't come up all the way.
5) Lastly the pendant was not looped through the shackle in the centerboard slot.

The fixes required:
1) Clean up and repair of Centerboard and slot.
2) New Pendant from Rudy, D & R Marine.
3) New rod for centerboard from Granger.
4) Super Ship Bottom Paint on all surfaces.

Hope this helps any one else that was clueless to their centerboard issues. Also a big help was the access to a full keel trailer that allows me to work on the centerboard.
 
Status
Not open for further replies.