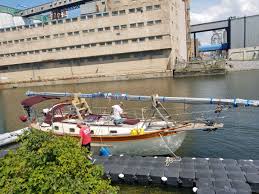
Hello everyone. My dad gave me a Kells 23 that has been fully gutted on the inside. It appears Kells 23 info is limited on the internet. I have never owned a sailboat nor been sailing but am an avid DIY'er. I have some gelcoat cracks, missing the front hatch, and the companionway hatch has had a piece of plywood screwed to the top. The winch for the keel looks in rough shape. I have cleaned all the mold out of the inside. I would really like to get it water ready asap if possible but have the winter to work on it if not possible. I really am not sure where to start. What should I do first. I have a mainsail and jib. I would appreciate all the advice I can get

New Kells 23 owner to perform restoration
- Thread starter FireDiven
- Start date
Welcome to the forum!
First, get it rainwater tight.. (ports, hatches, deck hardware bedding) Next, structure inside (replace rotted and delaminated stuff.. add stuff if missing).. then it is time to get the mast and rigging looked at and if OK, take her out !.. next is cosmetics. Good luck
First, get it rainwater tight.. (ports, hatches, deck hardware bedding) Next, structure inside (replace rotted and delaminated stuff.. add stuff if missing).. then it is time to get the mast and rigging looked at and if OK, take her out !.. next is cosmetics. Good luck
i just got my pearson into the water after rebuilding it and i didn't have as much questionable wood. i dunno - looks like a long term project. Trailered? looks trailered. What condition is the mast and rigging in? is there an outboard? any electrical system? i saw some stuff through the cabin top there.
I agree though, make it water tight, get it covered so it doesn't get more wet, make sure the keel ain't gonna snap off, the rudder isn't going to vanish into the deep and that the mast wont collapse the first time you pull on the halyard") past that, yeah. get to it when you get to it.
past that, yeah. get to it when you get to it.
Take a lot, and i mean, a lot, of pictures. not for us. for you. so you remember how it goes back together. *sage first hand knowledge for you* lol
I agree though, make it water tight, get it covered so it doesn't get more wet, make sure the keel ain't gonna snap off, the rudder isn't going to vanish into the deep and that the mast wont collapse the first time you pull on the halyard
past that, yeah. get to it when you get to it. Take a lot, and i mean, a lot, of pictures. not for us. for you. so you remember how it goes back together. *sage first hand knowledge for you* lol
http://sailboatdata.com/viewrecord.asp?class_id=63 and this can't find parts for the thing though... gotta find out who manufactured the mast if you want to rebuild it... or you're stuck fabricating your own parts. sailrite has sail info tho https://www.sailrite.com/Kells-23-Mast-Head-Rig-Sail-Data but ... seems lacking. https://forums.sailboatowners.com/index.php?threads/wood-block-under-mast.173280/ other kells owner on this thread but almost 4 years ago. http://www.cruisersforum.com/forums/f116/my-kells-23-in-need-of-help-16965.html another but even older.
https://www.dwyermast.com/items.asp?cat1ID=20&cat1Name=&familyID=41&familyName=DM-450+Mast i kept hitting dwyer trying to find the mast manufacturer. ... no promises though. might not hurt to contact and see if thats actually who did your mast.
If it were me, i'd probably go over the top engineering it all out. But at the end of the day if the mast will mount solidly and the compression to keel is good and the keel retracts and deploys and same with rudder and rudder moves free... you can always get a tow back in. haha. i'd personally try to find a outboard, 6 or 8 would be plenty of hp, so you can save yourself, as well as get away from the shore before pulling up the sails first time. anyways. fun project. i'm glad mine is sailing but i'm kinda jealous.
can't find parts for the thing though... gotta find out who manufactured the mast if you want to rebuild it... or you're stuck fabricating your own parts. sailrite has sail info tho https://www.sailrite.com/Kells-23-Mast-Head-Rig-Sail-Data but ... seems lacking. https://forums.sailboatowners.com/index.php?threads/wood-block-under-mast.173280/ other kells owner on this thread but almost 4 years ago. http://www.cruisersforum.com/forums/f116/my-kells-23-in-need-of-help-16965.html another but even older.https://www.dwyermast.com/items.asp?cat1ID=20&cat1Name=&familyID=41&familyName=DM-450+Mast i kept hitting dwyer trying to find the mast manufacturer. ... no promises though. might not hurt to contact and see if thats actually who did your mast.
If it were me, i'd probably go over the top engineering it all out. But at the end of the day if the mast will mount solidly and the compression to keel is good and the keel retracts and deploys and same with rudder and rudder moves free... you can always get a tow back in. haha. i'd personally try to find a outboard, 6 or 8 would be plenty of hp, so you can save yourself, as well as get away from the shore before pulling up the sails first time. anyways. fun project. i'm glad mine is sailing but i'm kinda jealous.
I can't wait to look through all this. Moved my 18 yr old off to college today so kinda in the middle of that. The mast itself looks to be in good shape. I haven't went over it yet except for raising it. I do have a 8 hp Johnson outboard for it though I haven't even looked at it either. I guess I need to get it to the water to make sure it doesn't leak and to test the keel. Does anyone have any photos as to what it is actually supposed to look like on the inside? I'll probably mull over the links y'all sent and get back to ya with a ton more questions. I definitely need a replacement front hatch and need to rebuild the cabin doors.
thats the brochure pic for you...
something a owner did to his... for sale on one of the many broker sites
http://www.shnool.com/images/_Capri1989/Kells_23 Full brochure.pdf found a copy of the original brochure!
some of the pics might be recgonizable.http://all-boat.com/sale/sailing_yacht/kells_23_701_1977-2773 here ya go. thats a good lookin kells.
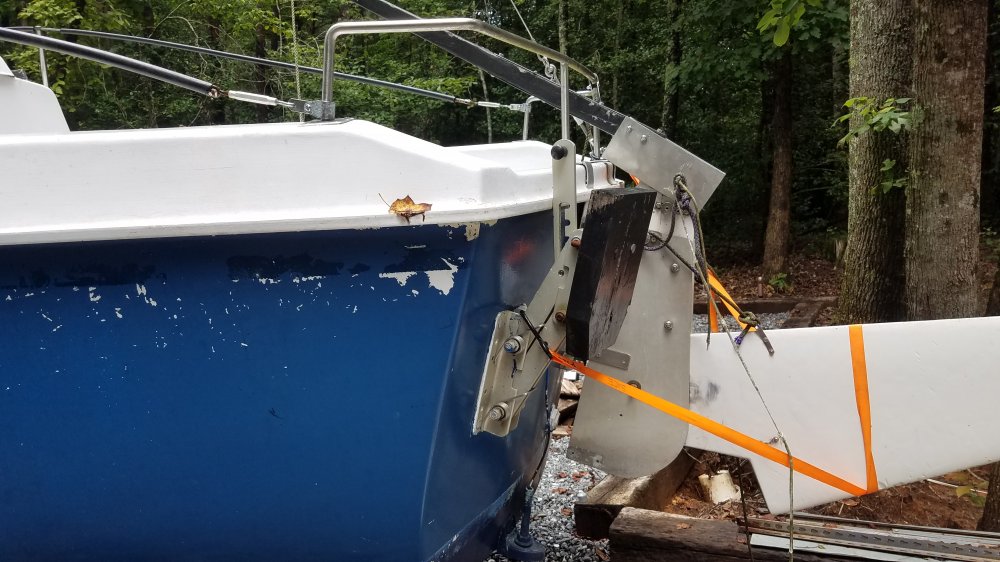
Thanks for the info. Can anyone tell me how to actually transport the boat with mast? Does it just lay across the bow and cabin or were there poles or something that supported it during travel. Also, anyone who has any ideas on how to secure the keel winch that would help. Refer to the previous pics. Also, does anyone have any pics of the electronics or switch bank that was in the boat. Mine is completely gone.
Most states 13 and a half feet tall 8 feet wide and I believe it's under 9000 pounds (you shouldn't be close to gross weight limits with that thing)
will the boat that size I'm guessing you'll need a two-axle trailer and mast can lay across the top strap down of course. if the boom sticks outbehind the trailer, or the transom for that matter, you may need to hang a high visibility red flag on it - so people don't spear themselves on it.
more than likely the original wiring was not marine-grade do you want to upgrade it anyways and when you do so for the modern switch panel in it
About that size will be about four switches total
Navigation
Steaming
Deck
Cabin light
Get a six or eight panel in order to grow (radio, etc)
Make sure you have a DC Master shut off switch...
Logically:
battery + -> dc master -> fuse block -> switches -> appliance -> ground rail -> battery -
battery, dc master, fuses and switches should all be in close proximity to each other. each appliance has its own ground.
also, if wiring missing make sure that the ac ground and lightning ground network is intact. mast is a giant lightning rod. if its not grounded to the water a lightning strike will punch its way there instead... usually making a bazillion little holes.
older boats put the ac ground, lightning ground and dc ground all together. i think thats silly, based on what i know of electronics (i throw lightning around for fun at the geek group, no really, i play with tesla coils for fun). A galvanic isolator maybe if you wanted it all tied together. older boats didn't see all the crazy eddy currents in marinas though so i guess they weren't worried about it. now if you swim in a marina you get tingly cause all the electricity. lol.
you gotta have an anchor light anyways - so get one that does all the things for you and save on wiring and bow lights and such:
https://store.marinebeam.com/smart-led-tri-color-anchor-light-and-strobe-n3-tri-cmb/
super happy with mine. 2 wires. flip the switch on and off and on again to change modes.
Last edited:
OH! sorry, yes. there's the idea you can crib the mast so its supported during transport. my p26 bow and stern and cabin are all on the same plane so i didn't have to:

observe near stern. wooden rigging to support the mast from bounce/flex during moving
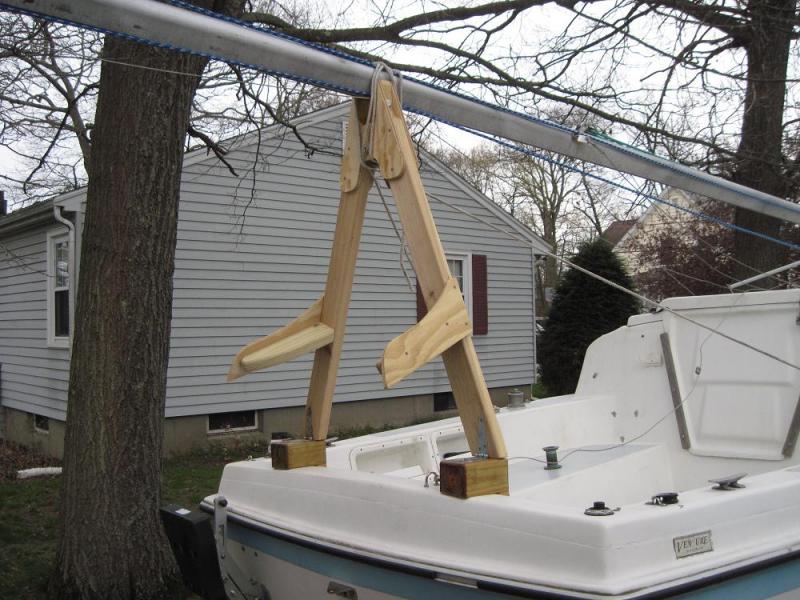
another example. don't ask me why he has the winglets on there... lol.

one that mounts to where the mast does. i wager its very stable.
was trying to find better pic but regular sawhorses work - this guy is probably going down a river with bridges and had to motor the whole way - but he's on the water not a bouncy road thats why the mast step is a great option, all the bounce transfers to the keel which then should be supported itself to prevent wear during transport.
observe near stern. wooden rigging to support the mast from bounce/flex during moving
another example. don't ask me why he has the winglets on there... lol.
one that mounts to where the mast does. i wager its very stable.
was trying to find better pic but regular sawhorses work - this guy is probably going down a river with bridges and had to motor the whole way - but he's on the water not a bouncy road
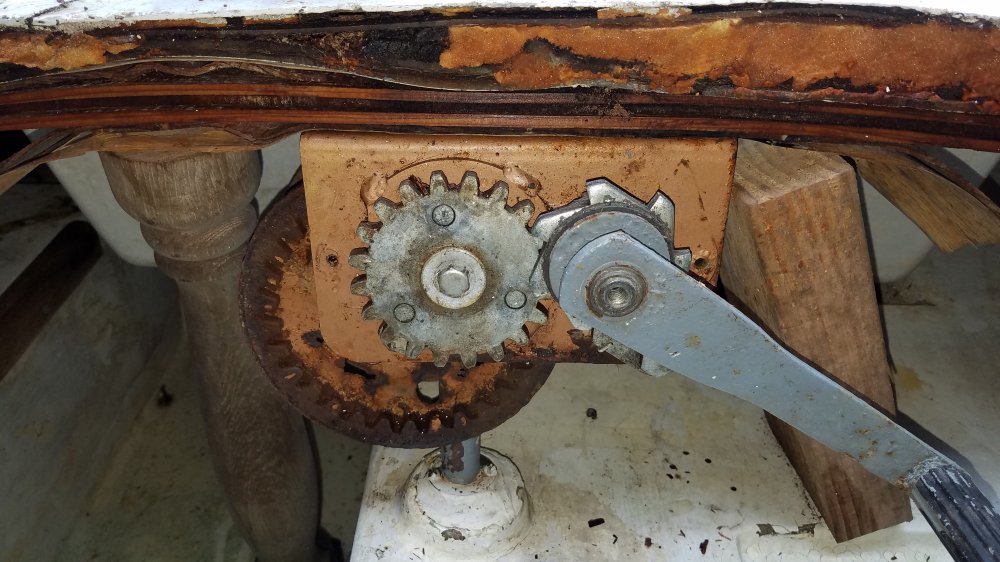
thats why the mast step is a great option, all the bounce transfers to the keel which then should be supported itself to prevent wear during transport.Thank you TipsyRaven for all the information. I think I should be able to get something rigged up for transporting the mast. I have finally managed to get it in the water for the sole purpose of making sure she didn't take on water. Everything appears fine with the exception that I have water leaking in around the Keel through bolt on both sides. It appears that someone prior to me has lathered both sides of the bolt in Silicone but some of it has flaked off. Is there a proper way to seat this bolt on both sides? I am also going to have to replace the keel winch. It is rusted through and the wire is pulling into the winch itself when under load. Thanks for your patience.
Some Updates. I have been working on the boat here and there and watching TONS of YouTube videos (especially from Boatworks Today) about gelcoat repair, fiberglassing, etc. These are two things that I know nothing about really but as I said before, I am an avid DIY'er so I think it is something that I can tackle. I have totally removed everything from inside the boat. There is currently no wiring, nothing remains but the sink and the winch (which is currently disconnected from where it was mounted below the companionway. I have been sanding inside the boat mostly with 80 grit sandpaper on a orbital sander because an owner prior to me painted the inside with latex house paint.
This first pic is my pop top (if that is the correct name) It had a piece of plywood screwed to it, assuming for strength, so there are all kinds of screw holes in in that leak. I plan to grind it and reglass the entire hatch. There appears to be something missing from the from that from what I can tell, maybe hooked into the track on the mast to hold the top open. I have seen something from StingySailor to assist in opening this top with gas struts as it is heavy, but haven't seen anything about the missing piece. Can anyone tell me about it? Also, where the hatch lays against the boat ( the actual opening, it appears that all the wood around the edge of the opening is all rotted or at least separated. I am hoping to be able to glass that shut....maybe??

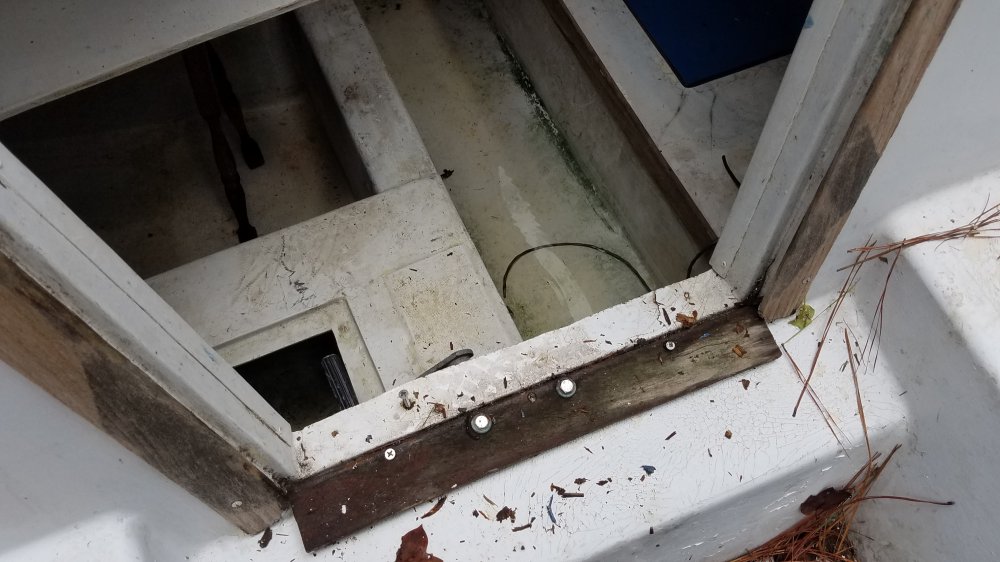
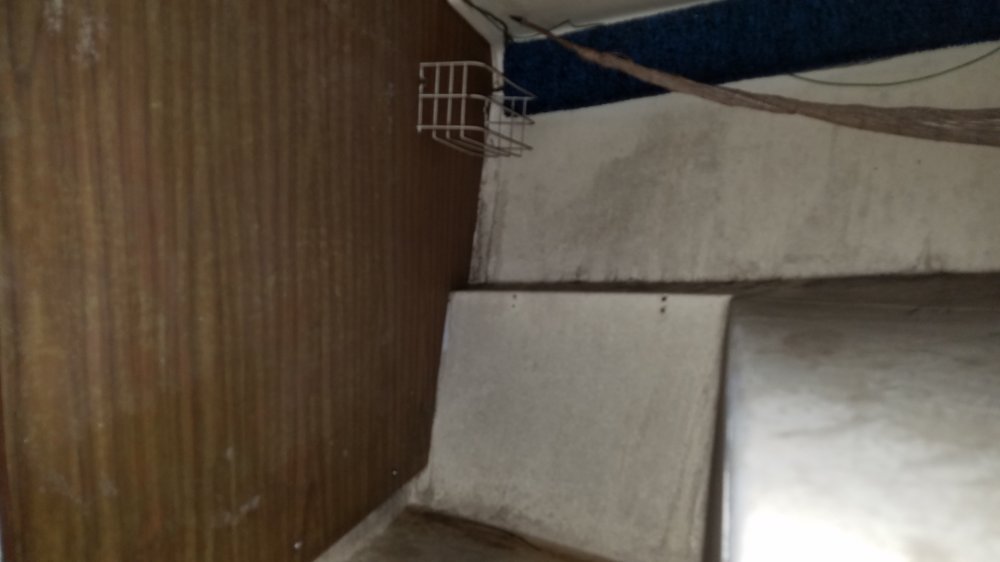
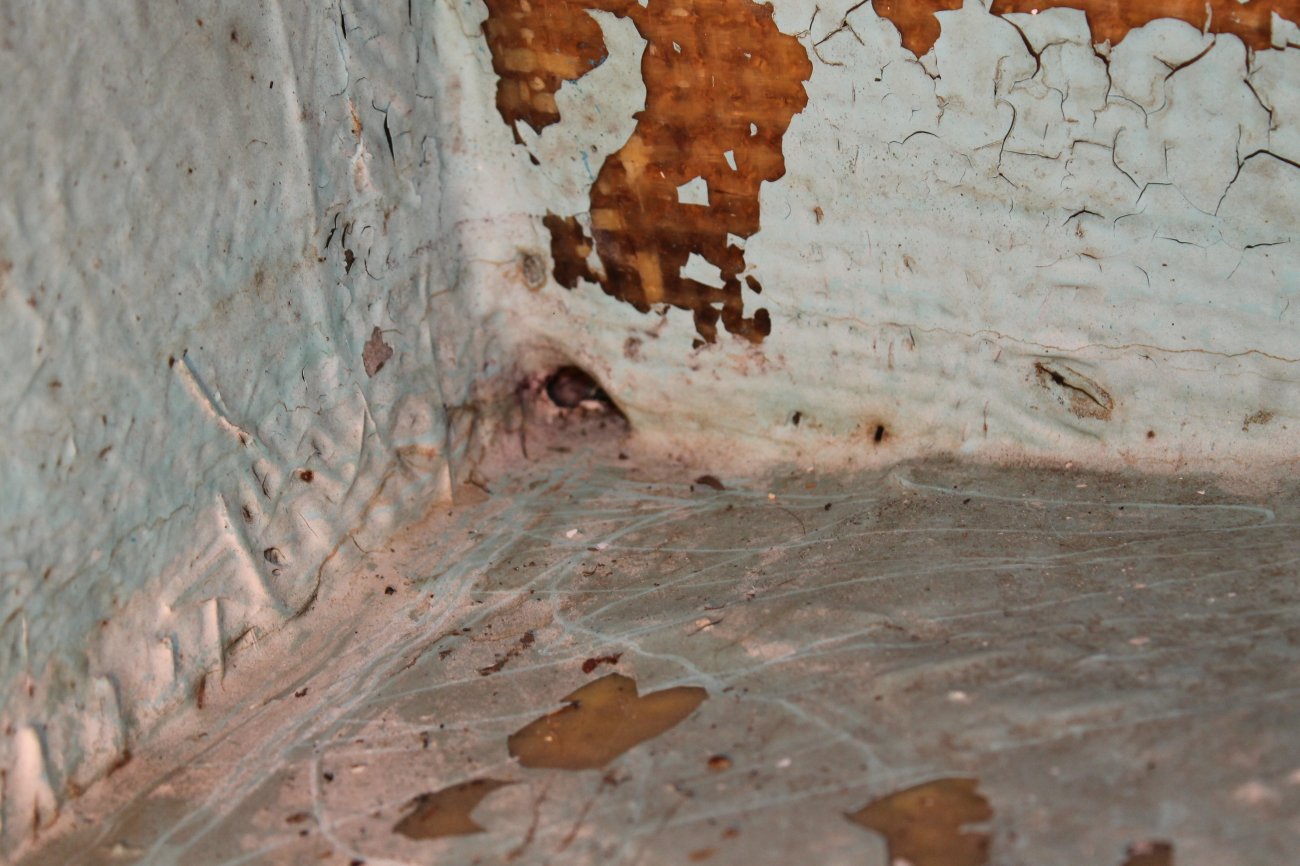
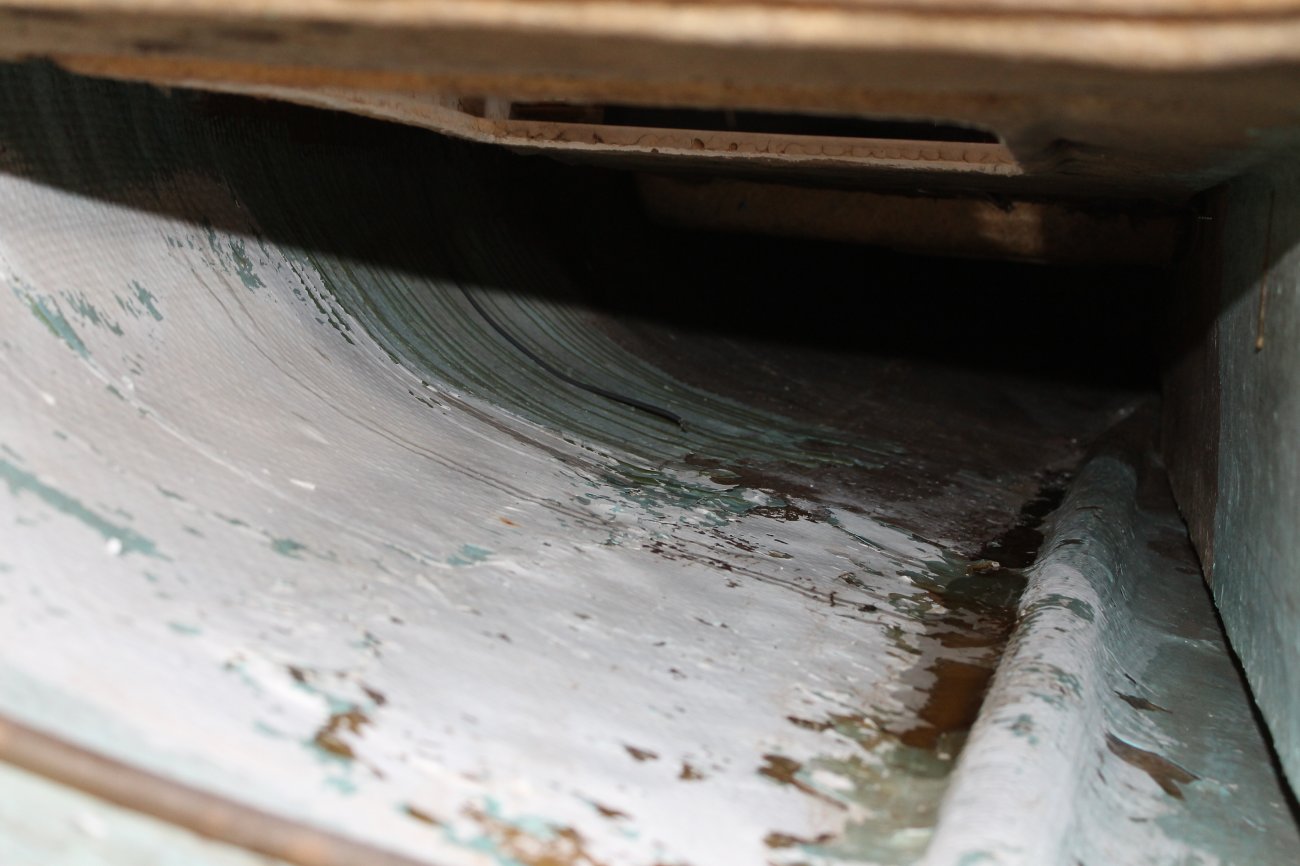
This next few pics are inside the storage compartment under the dinette and underneath the starboard storage. This is what most of the underneath storage looks like. Most of it is down to the original fiberglass hull. Do I grind/sand all this out and paint it or were there coverings or carpet or something that went in those areas?
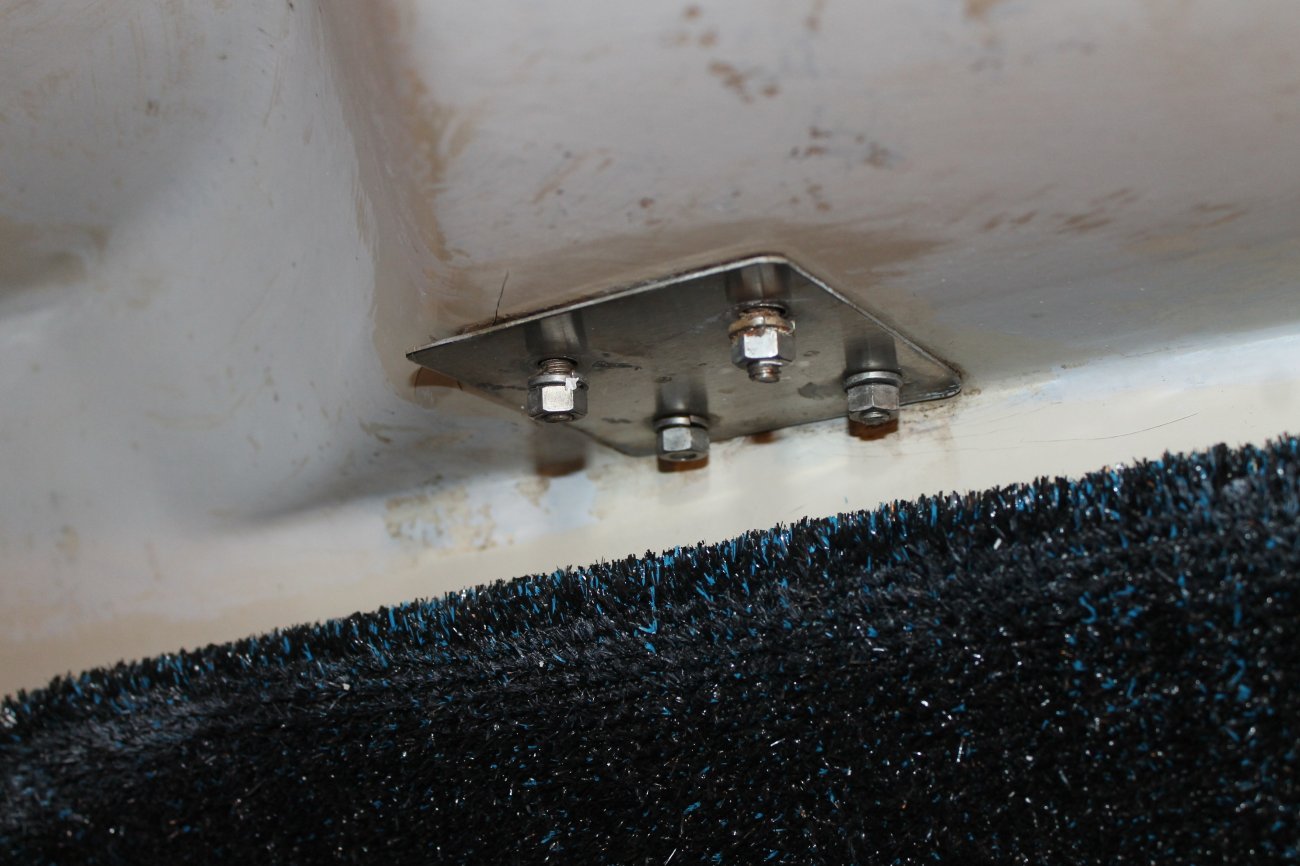
I pulled all the silicone from around the keel bolt inside the cabin, which looks to me like someone has just stuck a large nut and bolt in there. I am certain it's gonna leak. I will upload some photos of this as soon as possible.
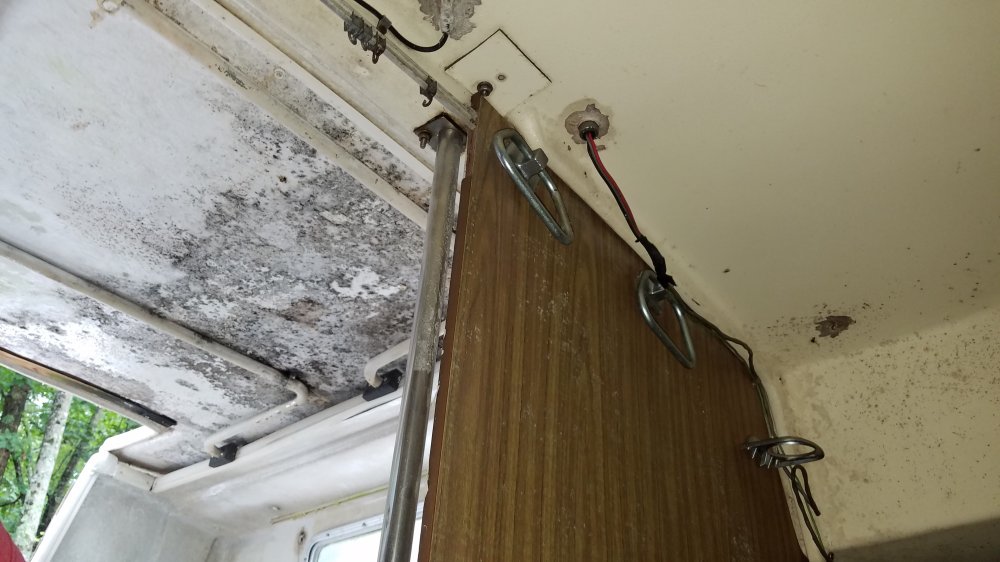
The hull/deck joint looks real bad on the inside. It used to be hidden by some wood that was covered in marine carpet. It does appear that water might have gotten in there in places also. I have watched a few videos on separating the deck joint from the outside and putting sealant inside it, resining the bolt holes, and clamping it and then redrilling new screw holes. It sounds like a rather daunting task but I don't think I can actually hurt it anymore than it is.
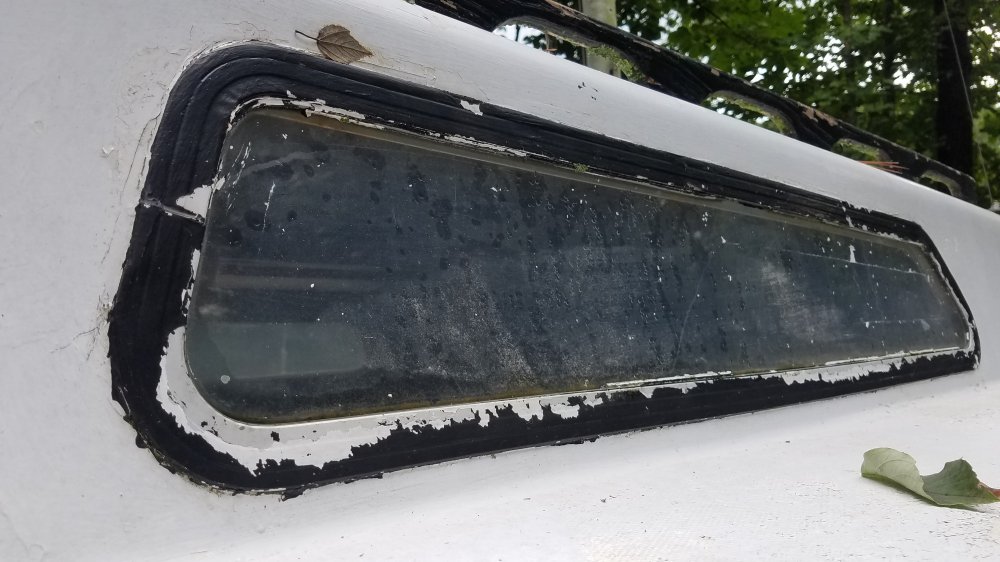
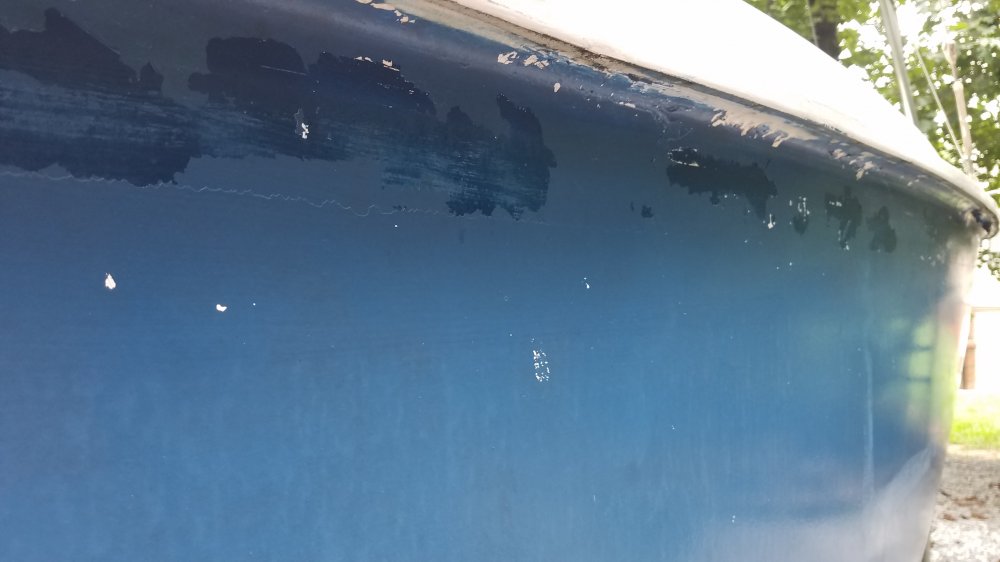
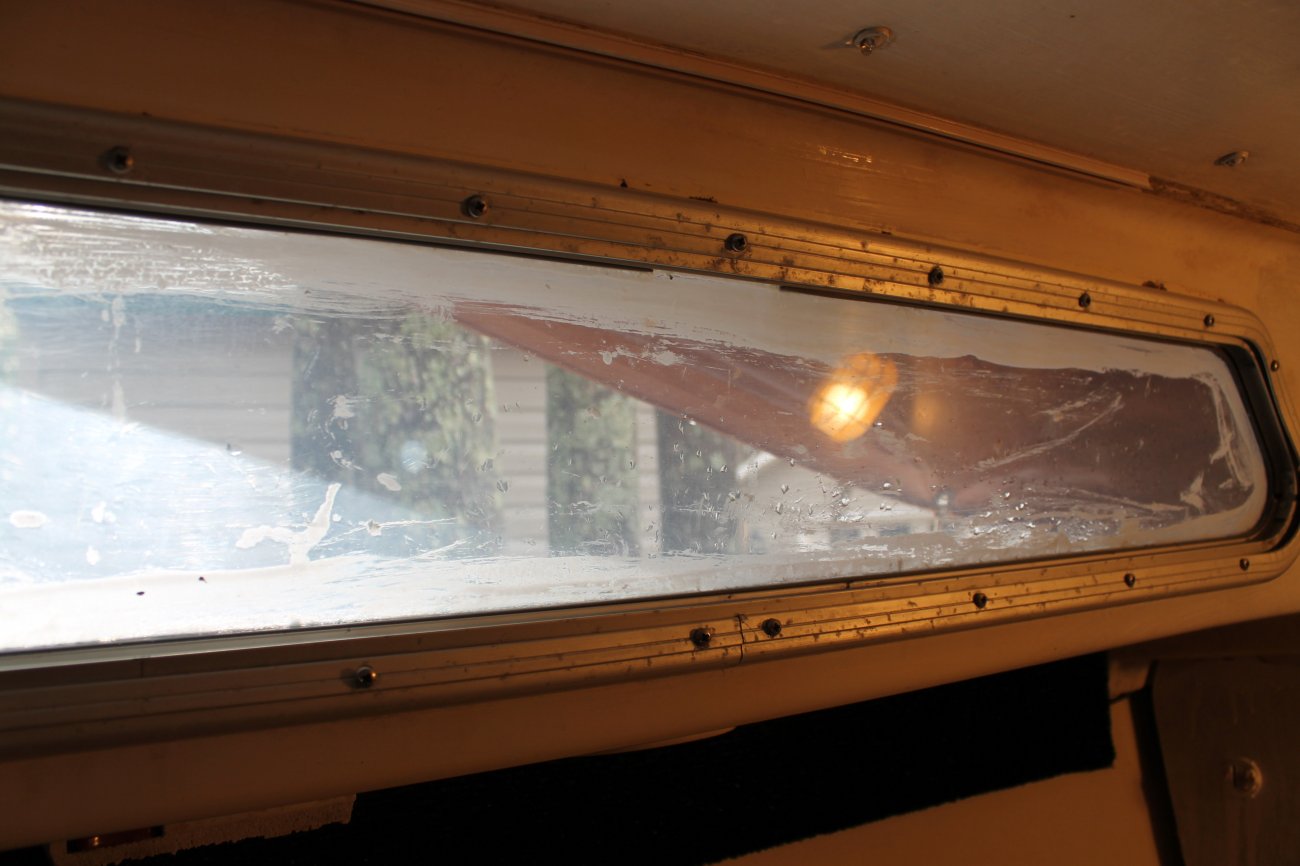
I know the portlights leak. I have taken them out but only sat them back inside without sealing them because the PVC lens needs to be replaced and I don't think all that needs to be done until I actually paint the outside.
I am pretty sure all the deck hardware needs to be removed and resealed also.
I need to get the boat up on some stands of some sort so I can drop the keel hopefully to inspect it and see if I can access the area up where the pin is.
That is all for now. I have plenty of work to keep me busy but I could use all the suggestions that you can throw out to me.
This first pic is my pop top (if that is the correct name) It had a piece of plywood screwed to it, assuming for strength, so there are all kinds of screw holes in in that leak. I plan to grind it and reglass the entire hatch. There appears to be something missing from the from that from what I can tell, maybe hooked into the track on the mast to hold the top open. I have seen something from StingySailor to assist in opening this top with gas struts as it is heavy, but haven't seen anything about the missing piece. Can anyone tell me about it? Also, where the hatch lays against the boat ( the actual opening, it appears that all the wood around the edge of the opening is all rotted or at least separated. I am hoping to be able to glass that shut....maybe??
This next few pics are inside the storage compartment under the dinette and underneath the starboard storage. This is what most of the underneath storage looks like. Most of it is down to the original fiberglass hull. Do I grind/sand all this out and paint it or were there coverings or carpet or something that went in those areas?
I pulled all the silicone from around the keel bolt inside the cabin, which looks to me like someone has just stuck a large nut and bolt in there. I am certain it's gonna leak. I will upload some photos of this as soon as possible.
The hull/deck joint looks real bad on the inside. It used to be hidden by some wood that was covered in marine carpet. It does appear that water might have gotten in there in places also. I have watched a few videos on separating the deck joint from the outside and putting sealant inside it, resining the bolt holes, and clamping it and then redrilling new screw holes. It sounds like a rather daunting task but I don't think I can actually hurt it anymore than it is.
I know the portlights leak. I have taken them out but only sat them back inside without sealing them because the PVC lens needs to be replaced and I don't think all that needs to be done until I actually paint the outside.
I am pretty sure all the deck hardware needs to be removed and resealed also.
I need to get the boat up on some stands of some sort so I can drop the keel hopefully to inspect it and see if I can access the area up where the pin is.
That is all for now. I have plenty of work to keep me busy but I could use all the suggestions that you can throw out to me.
Hello FireDiven and welcome to SBO,
Your project is surely a challenge. Being DIY driven will serve you quite well.
You might consider building a framework over the boat and trailer and then cover the framework with 4 or 6 Mil. construction plastic so you can work throughout the winter regardless of precipitation or temperature. A small block heater will warm the area inside the boat and under the constructed cover enough to dry out the moisture that might accumulate. However, do not run even that small heater 24/7. Just use it when you plan to be working.
It sounds like you have "jumped right into" the project. That way there are few options...….just keep working steadily is probably the best option. One of the Fein Multitools or a cheaper vibrating tool will be useful if you do not already have one. Lowering the centerboard/swing keel can be done by putting the boat onto bales of straw or onto a frame you construct to support the boat off of the trailer. There are discussions on this site for lifting/sliding/moving the hull to get it off the trailer. The pin through the centerboard/swing keel should probably have a grommet or rubber plug of some sort (on each side of the CB trunk) that the keel bolt goes through. They deteriorate over time, so that may be why a PO used silicone at the pin and washers. You might not find original equipment, but you can find a reasonable hardware store or automotive store replacement.
Along with pictures, label the parts you remove and mark fore, aft, starbd, port as needed to show its original orientation. It will save you much head scratching in the future! Wear dust mask protection when grinding or sanding. Buy a good one, not just those cheap paper models. Wear a Tyvek painter's suit. Wear chemical resistant gloves when using epoxy and gel coat. In that case even the cheaper, clear Wells Lamont gloves are useful. Epoxy will make the gloves unusable when it hardens. Have a box of rags handy and use mineral spirits to remove wet epoxy that drips where you do not want it.
If you knew all this already......good on you! Enjoy your project! I am in the middle of my own project too, but yours makes mine seem like child's play. Best Wishes.
Update to my post: I forgot to mention West System epoxy or similar 2 part liquid epoxy by some other company: Use that type of liquid epoxy to thoroughly soak any fiberglass cloth you use to rebuild, repair, or tab parts together. Use West System six - ten epoxy adhesive or some other similar jelly-like epoxy to reinforce parts or hold them together. The nozzle that comes with the six - ten epoxy is a waste of that expensive material because you can't get all the material out of the nozzle. I use the end of the tube as it is after pulling out the double sided plug. Squeeze out the amount you need, mix it on a nonabsorbent surface and then apply with a paint stir stick or a plastic putty knife of the appropriate width. The six - ten does not require a special "gun" to dispense it, but the tube contains a deceptively small amount of material since the tube isn't full to the end like caulk would be.
If you use any liquid epoxy (like West System) you can get thickening powder that can be mixed in the liquid epoxy resin + hardener. You add as much as you want to make it as thick as you need - say, like peanut butter consistency to help fill gaps. You have a lot of glass work to do, I assume. If you go with West System spend the money to buy the metering pump set. I have never bought the already thickened versions like Six10.
Thanks Andrew. Yea I have been watching Andy on Boatworks since the day I got the boat. He is awesome. I'm gonna check out your stuff too thanks. I can use all the help I can get. I think once I make my first glass or gelcoat repair, I will be over the "nervous-am I gonna ruin it" hump. Just got to get the weather to cooperate. Sleeting and Freezing rain as we speak.
Do all your demo and non-epoxy repairs in cold weather. Wait til temps are above 70 for good epoxy behavior. Epoxy needs warmth to “kick” and harden properly. Fabricate your cabinets indoors. Get all your warm weather projects ready for Spring. Even so, expect your project to take 3 seasons.