My 1980 Hunter 30 rennovation

Jun 25, 2013
143
Hunter 30 Montreal
Hi ggrizzard,

I refinished all the teak veneer plywood panels in the boat. They were first finished with oil and previous owner put a layer of varnish, so the varnish did'nt stay on.

I used different kind of tools and products:

1- Remover with woodworking scrapers to do not damage the thin layer of veneer. Here is a picture of what kind of scrapers I used:


2- Same kind of scrapers have been used for the tricky parts and angles. I got convexe and concave curved scrapers for the round surfaces.

3- Then, I used 220 and 320 sandpaper with orbit sander machine. A little bit od hand sanding was done for parts who cannot be done by my sander.

3- I used my Shop Vac to clean the dust.

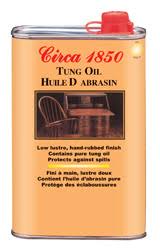
5- I finally washed with acetone all the surfaces and applyed 3 or 4 layers of tung oil depending of the wood absorption.


Last edited:
Apr 2, 2014
33
Hunter 29.5 Long Beach, MS
Fuligule,
You have done an excellent job through out the boat. No one can actually appreciate what you have done until they have done some of the work also. I am doing some work on my boat and have a question about you v-berth. I have tongue and groove boards for the v-berth and the rest of the boat but I read in a couple of sites that there should be a space between each board to prevent squeaks. I don't like the look with the spaces between boards. Your v-berth looks to be tongue and groove. Does yours have any squeaks?
 
Jun 25, 2013
143
Hunter 30 Montreal
Your v-berth looks to be tongue and groove. Does yours have any squeaks?
Hi Billybee41,

First, thanks for your comments.

My V-berth is not tongue and groove, but I would say that you can do it. It is important that your joints can move, so you should not tongue and groove too tightly. You could wait for the moment of the year and a day when the humidity will be the highest, so the wood could not expand more. I would consider to fix boards vertically by only one screw in the center of each ones. You could fix them several times horizontally. The secret, even if it is tongue and groove, is to let the wood moves with humidity and avoid cracking. More the width of the boards is small, easier it is.

I hope it will help you!

Sebastien
 
Apr 2, 2014
33
Hunter 29.5 Long Beach, MS
Woodworking is my hobby and I understand wood movement. I installed tongue and groove on another boat that was on the hard but I sold it before it was put back in the water. I didn't notice any problems while on the hard but after reading some other sites, I was worried what it would do when in the water and under flexing stresses of sailing. Thanks for your reply.
Billy
 

HMT2

.
Mar 20, 2014
899
Hunter 31 828 Shoreacres, TX
I thought about putting not tongue and groove but horizontal slats on stringers in my v berth, but did not based on some opinions that the hull needed to flex. I then ran a distance race in the Gulf of Mexico in my H 31 in about 20 knots of wind and 4-6 ft waves almost on the nose. In sort of "sleeping" in the v berth propped up against the hull, I was stunned at the amount of flex in the side of the hull, a few time as I was laying with my back against the side of the full as we moved through the sea way I felt as if I was getting kicked in the back. Also I could feel the waves as they flexed the hull on down the side of the boat. It was surreal. I am glad I did not put up wood in the v berth. Now I would not even think of it. For what it's worth.
 
Jun 25, 2013
143
Hunter 30 Montreal
I didn't notice any problems while on the hard but after reading some other sites, I was worried what it would do when in the water and under flexing stresses of sailing. Thanks for your reply.
Billy
I think that people just fixe the wood directly on the hull. That could be a problem when sailing and with hot tempetures because the hull can get very hot. Wood will not expand as the fiberglass willl. My wood "panels" are "floating panels" and they are not directly fixed on the fiberglass. I fixed them togheter by vertically wood pieces, but they stay in place by the vertical moldings on each side of the V-berth, so you can move a little bit the entire panel of boards. Upsoltry make a little bit more pression on panels and they don't move when we are sailing. I was expecting some vibrations, but They don't vibrate. It is enough tight.

To fix my boards on vertical wood pieces, I fixed them temporary on the hull with little "hot glue" just to let me screw my boards in place. By the time I finished screwing, the glue was already gone.

As you are a woodworker and you understand well the wood movement, I can tell I used quatersawn boards to get the more stable wood.

I saw people gluing a isolated material before installing wood on fiberglass. I will probably add one next summer to keep the V-birth sides more fresh, although I really don't expenct big changes...

With these infos, I think you can go on!
 
Jun 25, 2013
143
Hunter 30 Montreal
Here are the moldings I am talking about (sorry for the quality, these are the only pict I found in mmy computer):

These moldings maintain the "boards panel" in place with the shelf and the bottom of the bed.


Jun 4, 2004
834
Hunter 340 Forked River, NJ
Nav station

We had a 1980 H30 and enjoyed it for many years. I only made a few interior modifications including adding a small microwave to the starboard shelf just forward of the stove. My best improvement, however, was to take about six inches off the Nav station top. The nav station was never used for "Nav" anyway and the wide top just got in the way whenever we tried to put the children to bed in the quarter berth or just to crawl in to work on the engine.
 
Feb 1, 2010
210
Hunter 33.5 El Dorado Lake, Kansas
We had a 1980 H30 and enjoyed it for many years. I only made a few interior modifications including adding a small microwave to the starboard shelf just forward of the stove. My best improvement, however, was to take about six inches off the Nav station top. The nav station was never used for "Nav" anyway and the wide top just got in the way whenever we tried to put the children to bed in the quarter berth or just to crawl in to work on the engine.
I also didn't like the navigation table like it was so we turned it into a microwave table.
 

Attachments

Apr 2, 2014
33
Hunter 29.5 Long Beach, MS
On my previous boat I epoxied 1"X1"X3" blocks to the vertically to the hull (after removing vinyl and glue) then epoxied a 1/4"X1" strip to the blocks so it would follow the curve of the hull. Then applied two more of the strips to the first which gave me 3/4" to screw the boards to. I also installed insulation to fill the 1" space behind the boards. I also did this in the salon and in the rear berth.
 
Jun 25, 2013
143
Hunter 30 Montreal
Hi,

During last weeks, I worked a little bit on my davits for my new dinghy ans on the installation of the solar panels.


I got a small solar regulator, so I decided to use it with my small solar panel (35W) connected to the start batery bank. A bigger regulator for the other panels will be used for the house batery bank.


Wires will be pretected.


To be continued...
 
Jun 25, 2013
143
Hunter 30 Montreal
Here it is, I finished the installation and modification of my dinghy davits. Looks great and very powerful!


Jun 25, 2013
143
Hunter 30 Montreal
Hello,

Few more pictures! Sorry, I really don't have the knowledge to translate what I want to explain in english... I hope the pictures will be enough to understand the process!


Très tôt ce printemps, avant que ce ne soit possible d'aller bricoler à bord, je m'étais lancé dans la réalisation d'une nouvelle barre à roue, légèrement plus grande. Évidemment, je la voulais en acajou...

J'avais laissé le tout de côté et puis cet après-midi, n'étant pas au bateau, je m'y suis remis.

Voici donc où en est le projet.


Les pièces choisies sont coupées, puis blanchies sur les quatre côtés (dégau, refente, planeur).


Elles sont ensuite coupées et rainurées. Le bois plus clair est de l'érable. Une retaille qui traînait.


Puis le tout est collé. En fait, j'effectue le collage en 2 temps. Je colle les pièces formant une première moitié, puis une deuxième moitié. Je juxtapose les 2 demi anneaux, mais je ne colle pas leur extrémités. Les 2 demi anneaux sont collés ensemble dans un deuxième temps. Cela permet de rectifier les surfaces lors du deuxième collage et de s'assurer qu'il n'y ait pas de jour entre les joints. Dans mon cas, je n'ai pas eu de rectification à faire. C'est rare! En tournage sur bois segmenté, on utilise cette technique régulièrement.


Je perce les 6 ouvertures qui accueilleront la tige en acier inoxydable.


Pour la technique que je prévoie utiliser, je dois me fabriquer un gabarit. Voilà des années que je me dis que je devrais m'en faire un! Voilà, c'est le temps, je n'ai plus le choix!


Voilà donc le gabarit pour la toupie. J'ai pris mon temps pour m'assurer du centre afin d'arriver aux dimensions projetées de la roue. Des cales tiennent bien en place le collage, tandis qu'un pivot sur le gabarit permet au bras de pivoter librement. La pièce carrée sous la roue est du MDF acheté simplement dans le but d'avoir une belle surface plane pour travailler. Je déteste travailler ce type de matériel, mais c'est peu onéreux et ça fait de belle pièce sacrifice (pièce destinée à une utilisation unique)...


À raison d'un quart de pouce voir 3/8 à la fois, j'effectue des rotations complètes en augmentant la profondeur de coupe progressivement. Je commence par l'extérieur, jusqu'à l'atteinte de la feuille de MDF.


Bonjour les copeaux!


J'ajuste mon guide et je commence à profiler l'intérieur. Malheureusement, les cales finissent par me gêner...


Je dois donc mettre des cales supplémentaires à l'extérieur avant de défoncer les cales intérieures. Un p'tit coup de Shop Vac s'avère nécessaire pour y voir clair!


Une fois le cercle réalisé, je procède de la même manière, mais avec un fer en doucine afin de créer un rebord arrondi.


Un petit coup de sablage vite vite pour me faire plaisir.


Et hop! Le plus long reste à venir... la finition!

Je suis tout de même très content du résultat de la finition des joints. Ce sera très joli une fois vernis!


À suivre...
 
Last edited:
Sep 15, 2009
6,243
S2 9.2a Fairhope Al
nice wood working what is that going to be when completed a wheel of some sort
 
Sep 3, 2012
195
Hunter 285 Grand Rivers Ky
nice wood working what is that going to be when completed a wheel of some sort
Yes, he said this spring before sailing season started, he realized he wanted a new and larger steering wheel and threw all of his efforts into building one from mahogany... My French is not that good but I believe it is what he said.
 
Sep 15, 2009
6,243
S2 9.2a Fairhope Al
thank you........ this is sorta funny for me because i used to be a rep for a french canadian woodworking machine company but they always spoke good english
 
Jun 25, 2013
143
Hunter 30 Montreal
Yes, he said this spring before sailing season started, he realized he wanted a new and larger steering wheel and threw all of his efforts into building one from mahogany... My French is not that good but I believe it is what he said.
Yes it is exact!

I began to work the wheel when it was still too cold to work on the boat at the end of march. The wheel was leaved in my small shop and I did'nt take the time to complete it yet.

I used a lot of mahogany to restore the boat, so I wanted to use the same wood for the wheel. I tried a new technique for the first time with my router and the circular jig you can see on the pictures. It took some time to make it, but it worked very well.

The actual wheel is 26 inches in diameter. The new one is 30 inches. Just a little bit larger so I should be in a perfect confortable position when driving standing behind the wheel. I have to lean myself with the actual 26 inches wheel.

This is a projet I have tought to do since a long time, but I had too much other necessary things to do on the boat as you can see with all the pages of this post. For now, I begin to work on things that are just funny to do, just for the plaisir! That's great!


Any questions I will try to answer the better I can!
 
Sep 15, 2009
6,243
S2 9.2a Fairhope Al
you are doing just fine just keep posting as you can ...i enjoy this sort of thing