Cockpit floor replacement '84....?

May 23, 2016
1,024
Catalina 22 #12502 BSC
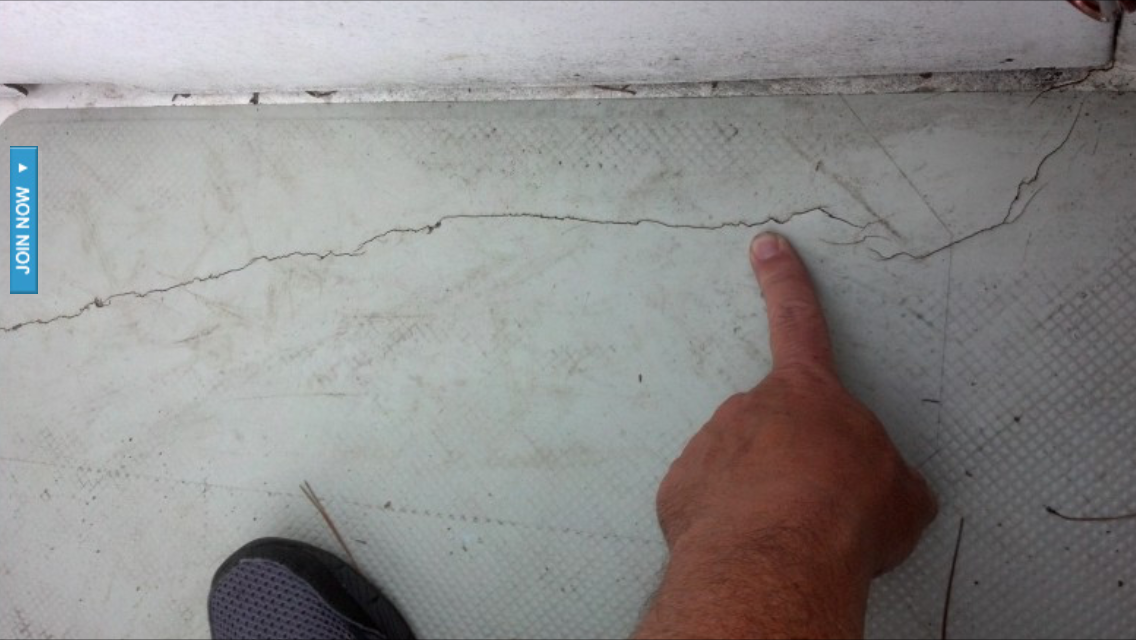
Back when acquired, our '84 had small but noticeable cracks in the cockpit floor, all forward about 12-18" aft of the companionway. Soothsayer Gene cautioned at that time that floor replacement may be in order. Fast forward 4 years, when stepped on I hear some "crackling" under foot, not terribly soft but the core is obviously been compromised. So what to do?

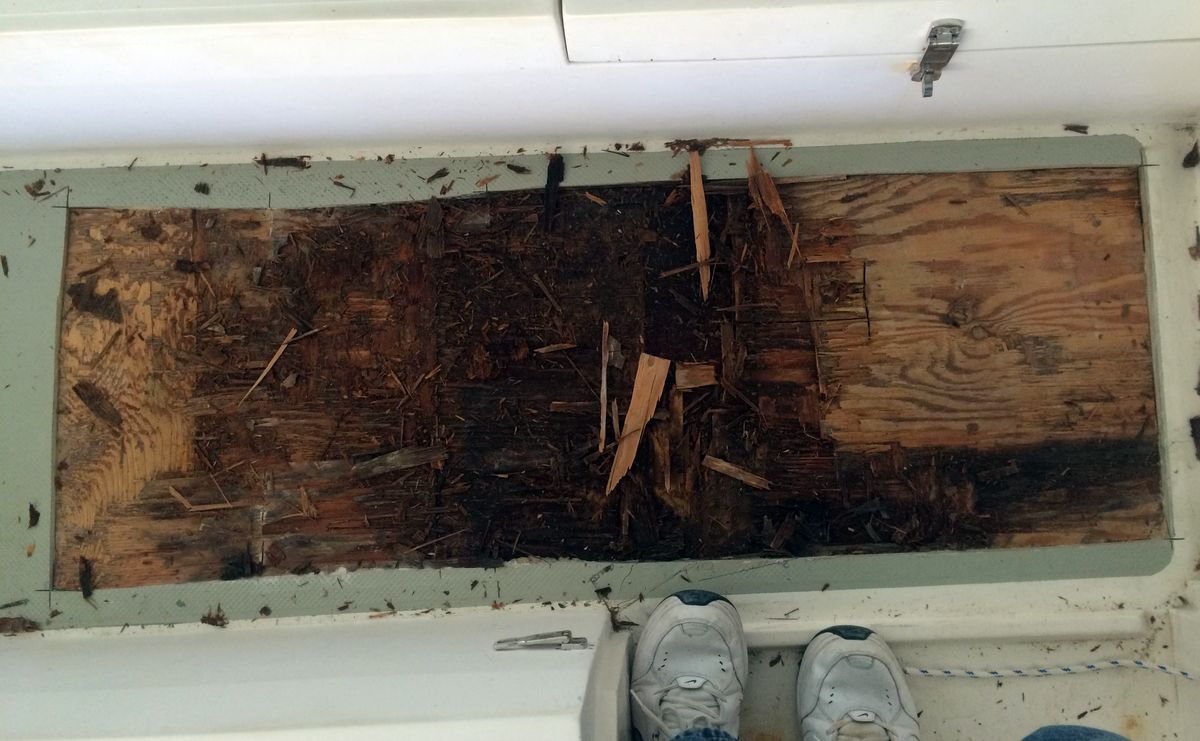
As many are aware <86 models had the stupid design where the floor slopes forward with PITA drains (and related plumbing below) right at the companionway. Thinking the extreme/ultimate solution is to cut out the entire floor from top, replace the core, glass over and in the process change the slope to aft (where I've already added scuppers in the transom to do the draining), and eliminate the troublesome forward scuppers and plumbing altogether in the process.

So, how to do this? Anyone done this? Cut out he floor & core, glass in longitudinal tapered stringers to alter the slope to aft & cover with marine plywood (or Coosa), then glass over, finish with antiskid paint?

What would you do, and how would you go about it?

(of course, the quick eze way out is to grind out the cracks, epoxy/paint and live with it for now, which would stop the bleeding)....

Thoughts?
 
Last edited:
Feb 21, 2013
4,638
Hunter 46 Point Richmond, CA
Sounds like you are not the only Catalina 22 with cockpit cracks as discussed in the threads below (including a Hunter) with recommended repair approaches.

 
May 23, 2016
1,024
Catalina 22 #12502 BSC
Gene....think so,.....those boat "rebuilders" would have done such a proper fix.....still debating here....and not a must do quite yet, thinkin' ahead though, and my preferred fix....hate those forward drains, wtf were they thinkin'?
 
Sep 30, 2013
3,538
1988 Catalina 22 North Florida
Well, I salute you if you choose to do it! I don't think I ever would. The truth is, I really kinda hate working on boats.

If I had to rip the floor open, though, I'd at least look for a way to enlarge those drains. And maybe add some "just in case" scuppers at the transom. When I re-did my own transom scuppers, I missed the opportunity to enlarge them while I was at it. I wish I had done that now.

You may have seen these already ...

2015-02-18 15.28.31


2015-02-19 11.21.46


2015-02-22 09.52.11


2015-02-26 17.54.33
 
  • Like
Likes: Grotto
May 23, 2016
1,024
Catalina 22 #12502 BSC
Gene, thx for posting those, yea, I seem to recall those.....are they from YOUR current C22 or the earlier one? or someone else's? Appears to be >85 model from the port laz, lack of fwd drains and looks like your scuppers IIRC.....yikes for sure....
 
Sep 30, 2013
3,538
1988 Catalina 22 North Florida
Gene, thx for posting those, yea, I seem to recall those.....are they from YOUR current C22 or the earlier one? or someone else's? Appears to be >85 model from the port laz, lack of fwd drains and looks like your scuppers IIRC.....yikes for sure....
Yeah, that's our '88. While tearing the floor out, I discovered that there had been a sizable void in the layup from the factory. All it took was someone stepping on the floor in just the right spot to get the crack going.
 
May 23, 2016
1,024
Catalina 22 #12502 BSC
Gene, thx for all this, the pics are very helpful (and intimidating LOL)....tell me about the process and materials used plz....and how many man-hours approx....
 
Jul 13, 2015
893
Catalina 22 #2552 2252 Kennewick, WA
Did mine a few seasons back-- complete replace:

Today it gets real:

Didn't attempt to modify direction of slope-- but one thing I did that I'm very happy with thus far-- opened both scuppers up to a full 2" drain and will ultimately mate up with a 2" thru hull. Used these scuppers and have had zero challenges with clogging:
 

Attachments

Sep 30, 2013
3,538
1988 Catalina 22 North Florida
Gene, thx for all this, the pics are very helpful (and intimidating LOL)....tell me about the process and materials used plz....and how many man-hours approx....
Things are a little foggy, it was five years ago.

I used ordinary plywood (I think? but I like your Coosa idea), biax cloth, and I went with polyester resin instead of epoxy - although I don't know if I'd do that again. The weather was cold, it took forever for the poly to cure ... I just like epoxy better. I can't give a good reason, I just have better luck with it. I get all my supplies from US Composites. Their website is primitive but they are a great company. They have called me on at least two occasions because something in my order gave them concern ("This isn't the resin you usually get, is this really what you want?" ... that sort of thing).

It wasn't really that complicated. Cut off the skin, cut out/chisel out/grind out all wet/rotten wood, set new wood in with thickened resin, smooth it all over, glass it all over, sand it, paint it. Working with fiberglass isn't rocket science, it's just plastic after all. Lots of sweat and skinned knuckles and dust dust dust. Lots of sandpaper, acetone, mixing bowls, stir sticks, masking tape, paint brushes, rubber gloves, rags ... A roller to squeeze excess resin out of the cloth.

I'm gonna say it took me three days, not counting Kiwi Grip? I tried pretty hard to screw it up, and it still came out fine. :thumbup:
 
May 23, 2016
1,024
Catalina 22 #12502 BSC
how'd you cut off the skin perimeter so neatly (circular saw?), and were top and bottom skins "adhered" to the plywood?
 
  • Like
Likes: dmhendrix
Jul 13, 2015
893
Catalina 22 #2552 2252 Kennewick, WA
@Gene Neill obviously used more precise tools-- but you can get away with a grinder on edge. Not a pretty cut per se-- but when you blend in the new floor all that rough radius edge will blend:
 

Attachments

  • Like
Likes: Gene Neill
Sep 30, 2013
3,538
1988 Catalina 22 North Florida
how'd you cut off the skin perimeter so neatly (circular saw?), and were top and bottom skins "adhered" to the plywood?
I wouldn't call that butchery "neat", but yeah, circular saw. The skin was very freakin' firmly adhered, where there was still good wood. Rotten wood, not adhered at all. You see how my floor looks like it was removed in two pieces? It was actually removed as one piece, but part of it was still perfectly good. So I cut that end off and stuck it back in, skin still intact. The rest of the skin got thrown away.