Faucet replacement HELP

Oct 26, 2010
1,993
Hunter 40.5 Beaufort, SC
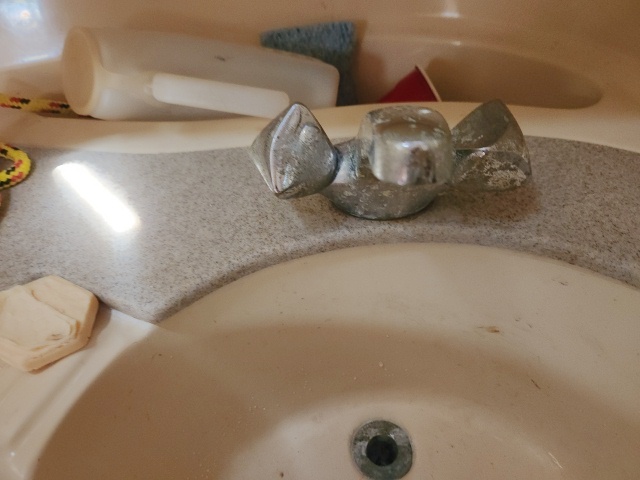
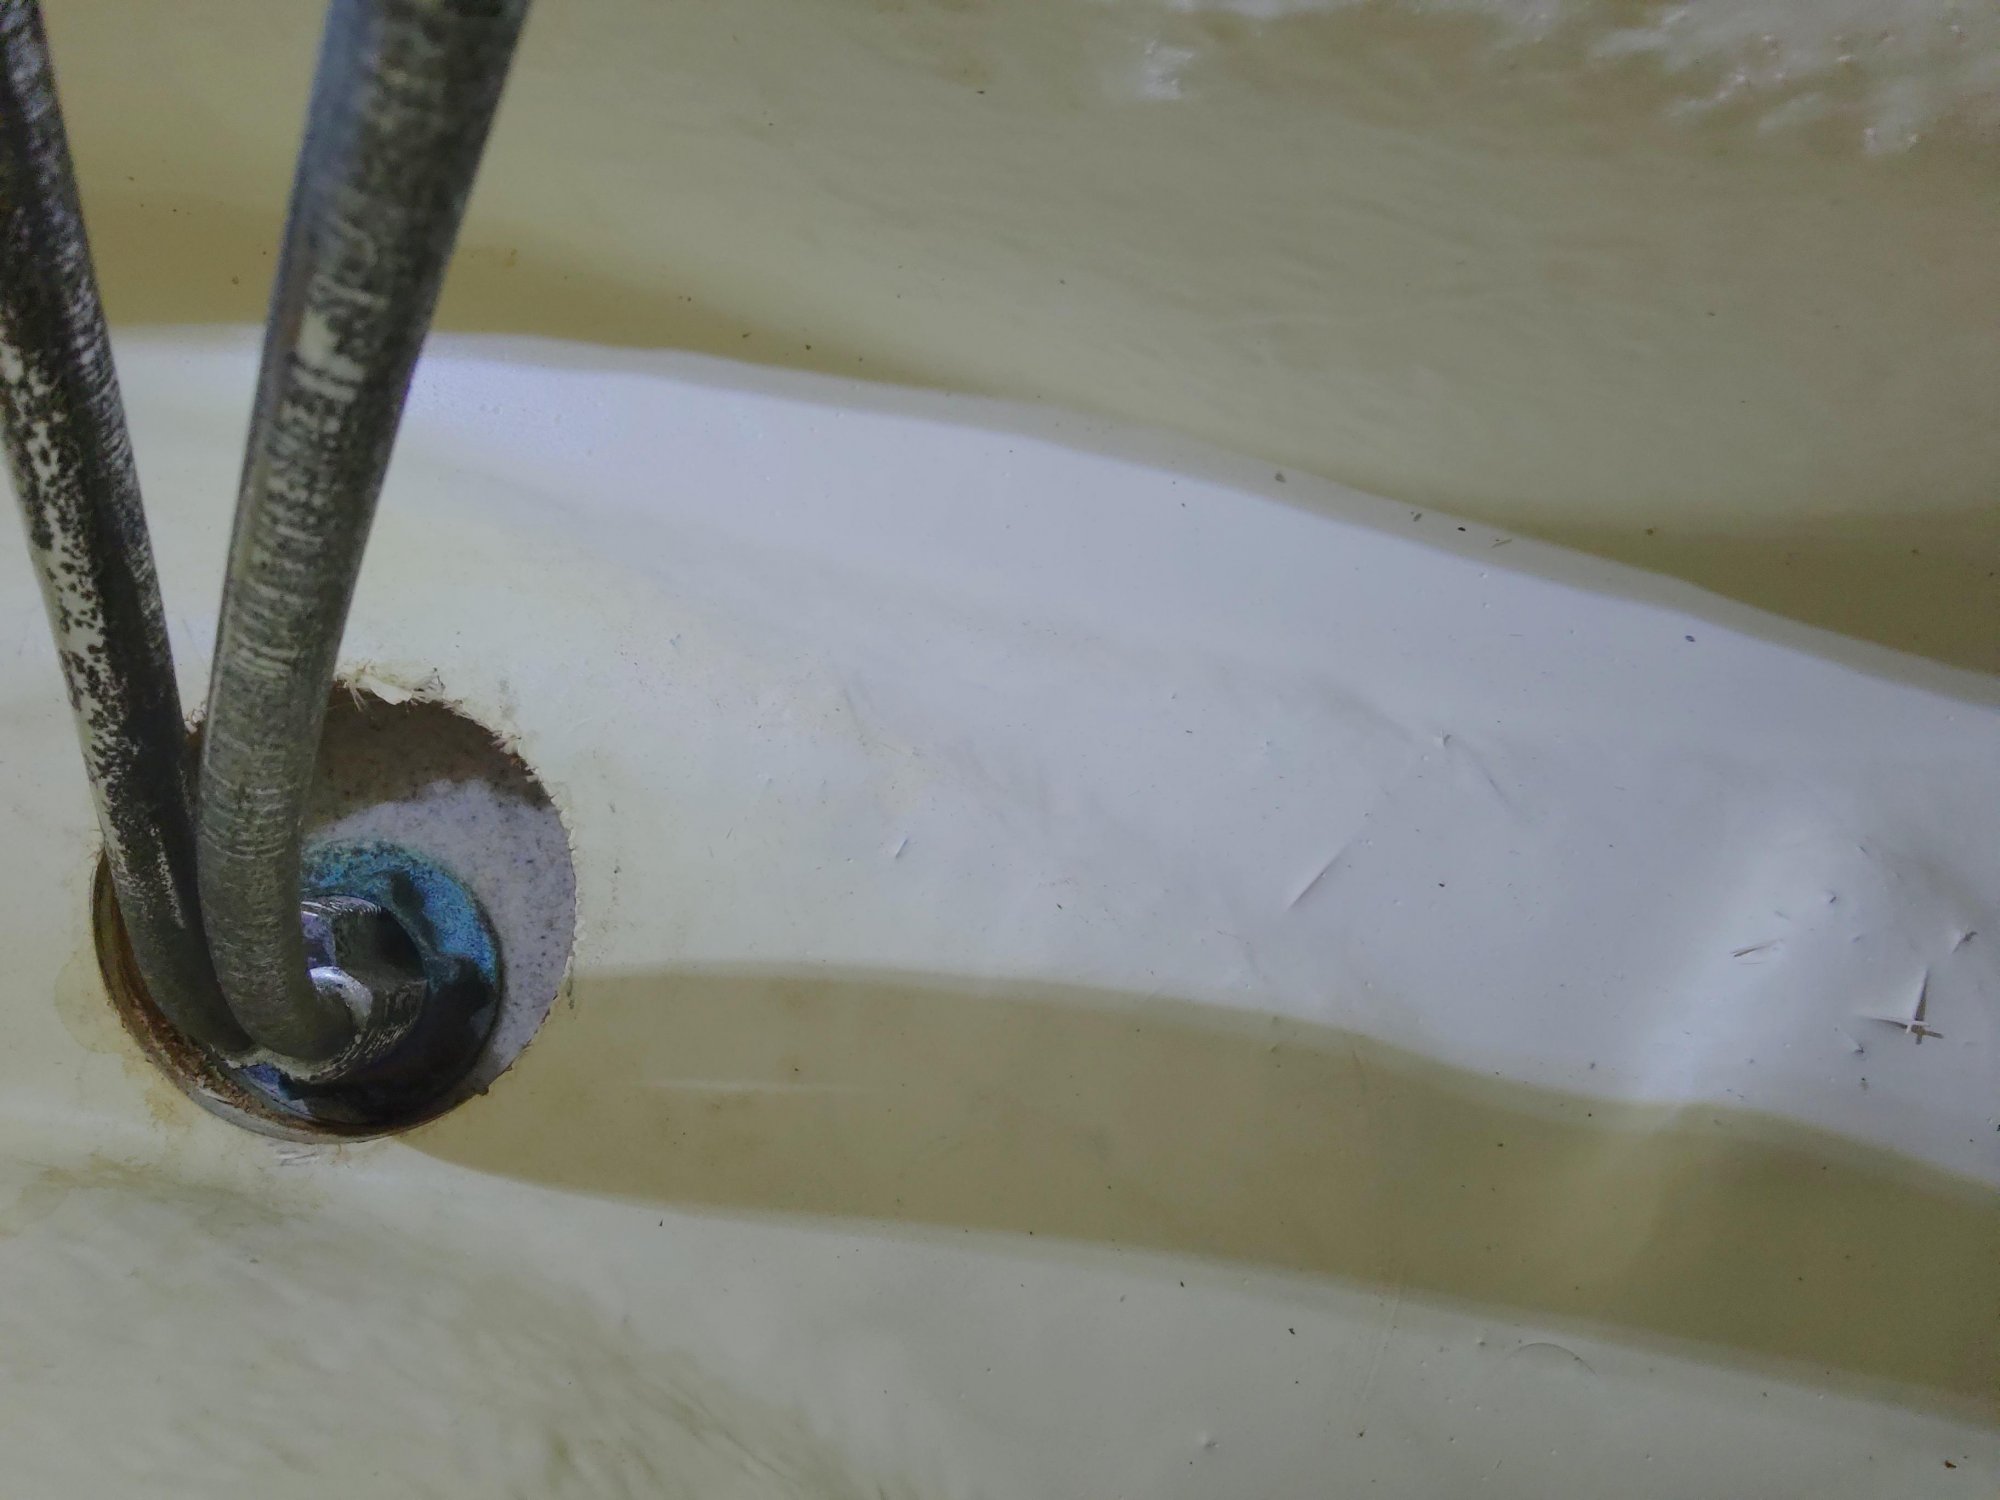
Attached is a picture of the faucet in my aft head and a picture from underneath. It is very difficult to reach underneath and I've tried every faucet removal tool I can find but I can't get it to grab onto the nut on the bottom and the clearance on one side of the opening is too small to allow any tool to fit far enough up into it to engage the ears on the nut.

Does anyone have any tricks or suggestions for how to remove the faucet? This is a 1994 Hunter 40.5. Does anyone know how the sink vanity is attached and how to remove it? Any help would be appreciated.
IMG_20240816_130436_HDR.jpg
IMG_20240522_111735_HDR.jpg
 
Nov 12, 2009
257
J/ 32 NCYC, Western Lake Erie
Any chance you can stick an old screw driver, dull cold chisel, or drift into the hole to engage the nut and then use a hammer to loosen the nut? (Just remember to hit CCW so you're not actually tightening the nut.) Also, might it be possible to enlarge the hole under the counter top a bit to get more access? It looks like it might just be a thin layer of something.
 
Oct 26, 2010
1,993
Hunter 40.5 Beaufort, SC
Any chance you can stick an old screw driver, dull cold chisel, or drift into the hole to engage the nut and then use a hammer to loosen the nut? (Just remember to hit CCW so you're not actually tightening the nut.) Also, might it be possible to enlarge the hole under the counter top a bit to get more access? It looks like it might just be a thin layer of something.
Tried that. There is not enough room to get a "swing" on the hammer. I'll keep trying though.
 
Mar 6, 2008
1,204
Catalina 1999 C36 MKII #1787 Coyote Point Marina, CA.
I do not have a sink like this, BUT, it appears that the faucet was first mounted on what appears to be marble top then attached to the counter top with some type of caulking. If so use dental floss to cut through the caulking and lift the top piece.
 
Jun 8, 2004
27
Catalina 36mkII Alameda, CA
I had a stock Catalina supplied/installed faucet.
I made up a plywood piece to surround the base of the faucet and cover my sink top. I then used my sawzall with a metal blade to cut off the top of the faucet.
I cut slow and had no damage. The bottom of the faucet dropped down after that. I work with alot of tools so it was not a big deal for me personaly.
Sometimes I wonder who designs some of this stuff.
 

NYSail

.
Jan 6, 2006
3,103
Beneteau 423 Mt. Sinai, NY
Typically when you buy a new faucet they include a wrench that fits up to unscrew it…… I saved the last one just in case.
 
Oct 26, 2010
1,993
Hunter 40.5 Beaufort, SC
I had a stock Catalina supplied/installed faucet.
I made up a plywood piece to surround the base of the faucet and cover my sink top. I then used my sawzall with a metal blade to cut off the top of the faucet.
It may have to come to that. Hope not though. I'm going to give it a few more tries from the bottom. It looks like the curve of the metal pipes feeding the faucet may be causing some difficulty it getting the tool to line up and engage the tabs on the nut. I may try cutting them off to get better access. I'll have to cap off the lines so I can have water other places in the boat while I'm working on it. They put it on but probably before they attached the Corian countertop to the shell.
 
Sep 26, 2008
618
Hunter 340 0 Wickford, RI
When I replaced the faucet in my 340 I had to remove the silver plastic cover and the handles first. Just used a plier and screw driver to lift it off, not worrying about ruining it helps. This opened up the plastic inner works above the counter top.
Then I cut the works flush with a small hack saw. This allowed me to drop it down into the cabinet.
If you find yours is not plastic inside and is metal it can still be cut off flush and then pushed through the hole.
It was the only recourse I had because the faucet was installed using more caulking than I have ever seen in my life to hold it in place. There was no way I could have ever removed the nut and washers from underneath. But I did have to use a drill to break up the caulk to get it fall out.
Looking at your photo….picture the same opening only filled with some kind of super caulking.
Your new faucet may have a washer that is to large for the opening you have, but that can be modified to fit and still hold the faucet securely.
Hope this helps you out.
 
Oct 26, 2010
1,993
Hunter 40.5 Beaufort, SC
When I replaced the faucet in my 340 I had to remove the silver plastic cover and the handles first. Just used a plier and screw driver to lift it off, not worrying about ruining it helps. This opened up the plastic inner works above the counter top.
Then I cut the works flush with a small hack saw. This allowed me to drop it down into the cabinet.
If you find yours is not plastic inside and is metal it can still be cut off flush and then pushed through the hole.
It was the only recourse I had because the faucet was installed using more caulking than I have ever seen in my life to hold it in place. There was no way I could have ever removed the nut and washers from underneath. But I did have to use a drill to break up the caulk to get it fall out.
Looking at your photo….picture the same opening only filled with some kind of super caulking.
Your new faucet may have a washer that is to large for the opening you have, but that can be modified to fit and still hold the faucet securely.
Hope this helps you out.
Thanks. I may be in contact with you if I have any questions. @sailcapt340 did you happen to take any pictures?
 
Sep 26, 2008
618
Hunter 340 0 Wickford, RI
I just looked through my photos, here on this site(in hopes I did) and on my ipad as well. I normally do take a few pictures of things I do as I go along but I guess I didn’t in this case. I am sorry for that.
Post number 7 above by Straycat outlined a very good way of doing just what i described. The use of a sacrificial piece of wood fitted over the cut off faucet is a great way of not accidentally marring your countertop.
It really is the only way to remove these faucets. At least on my boat, there is absolutely no room under there to get any tool to remove it.
The silver plastic cover just pops right off, with a little persuasion, exposing the T fitting that goes to the handles.
It has no reusable uses I can see so cutting it out will make your job much easier.
And yours has no caulking to contend with as mine did. Once dropped through the hole your connections are right there at arms length.
The day the installed mine, back in 2000, there must have been a sale on caulking and they used all they had.
When you do put your new one in, just use some plumbers putty around the hole to seal it from water. It will seat the faucet neatly and evenly.
If you do have questions PM me.
 
  • Like
Likes: smokey73
Apr 22, 2011
894
Hunter 27 Pecan Grove, Oriental, NC
Curious about how you will get the replacement faucet to be secured in the tight space.
 
Jun 17, 2022
117
Hunter 380 Comox BC
Another vote for removing the countertop. Then you'll have access to the underneath of the sink.
 
Oct 26, 2010
1,993
Hunter 40.5 Beaufort, SC
Curious about how you will get the replacement faucet to be secured in the tight space.
The replacement faucet has a different fastening method that I can access without the big "eared nut." Instead it uses two smaller nuts that crew on more easily and I should have more access to reach them.
 
  • Like
Likes: heritage
Sep 26, 2008
618
Hunter 340 0 Wickford, RI
Long needle nose pliers or long reach vise grips will be able to get up and into the hole. They will give you the grip on the nut and should be able to be turned under the counter. Once the nut is snugged up you can hold the nut with the pliers and turn the faucet to adjust it straight to the sink. This will also tighten it down a bit more.
But use caution, it really only needs to be just slightly more than hand tight.
 

JRacer

.
Aug 9, 2011
1,346
Beneteau 310 Cheney KS (Wichita)
Could you use a dremmel tool to enlarge the problem side of the opening to allow the faucet removal tool to align properly?