Engine Cooling Water not Flowing

KZW

.
May 17, 2014
831
Catalina 310 #307 Bluewater Bay, FL
Need help. My boat is no longer huffing with the engine (Universal M25 XPB) running (i.e. cooling water is not being expelled). There is a distinct sound when water is flowing through the system. That sound isn't there. It sounds like the seacock is closed (it isn't). When the water exhaust port goes in the water there is a bubbling sound like air is being blown out at low velocity. I'm limiting engine runs to six minutes to get in and out of the marina. Any longer and the water temperature goes above 180.
- I cleaned the raw water strainer. Nothing much there
- I changed the water impeller (Oberdorfer N202M). The old impeller looked like new after 4 years and 125 hours
Water did drip out when I opened up the cover plate for the impeller. It wasn't much water.
- Diving on the boat to clean the hull, I checked the water entry port (seacock open) was clear and the water exhaust port was clear.

What do I check next? I'm at a loss.
 
Sep 25, 2008
7,076
Alden 50 Sarasota, Florida
How sure are you that:
1. The new impeller is good?
2. That it is installed correctly?
3. That it turns with the hub as the engine is cranking? And
4. That the seal is new and has no air leak?
 
Jan 4, 2006
6,444
Hunter 310 West Vancouver, B.C.
Not the best idea to be running without cooling water flow.

With the engine running, disconnect the hose that feeds into the exhaust flow and work backwards to each component until you find water flowing freely. Messy and sloppy but about the only way you'll find it.
 
May 24, 2004
7,129
CC 30 South Florida
Thermostat, it looks like you may have a stuck thermostat. Did it happen from one day to the next? The other alternatives involve deficient or obstructed flow. Since you have replaced the impeller with no change I would think that is not the problem. Clogged hoses, clogged "mixing elbow" or even a clogged muffler. Before you do anything else check the thermostat. All you need is to remove it, place it in a pan with water and a have a thermometer. Start heating the water and watch the thermostat when it starts opening, mark the temperature at which it opened and watch it open all the way. Allow it to cool down and watch it close. There should be a temperature engraved in the thermostat and it should match fairly close the temperature at which the thermometer indicated it started to open. If it fails to open or if the temperatures differ then replace it. Good luck.
 
Last edited:
Nov 18, 2010
2,441
Catalina 310 Hingham, MA
Thermostat, it looks like you may have a stuck thermostat. Did it happen from one day to the next? The other alternatives involve deficient or obstructed flow. Since you have replaced the impeller with no change I would think that is not the problem. Clogged hoses, clogged "mixing elbow" or even a clogged muffler. Before you do anything else check the thermostat. All you need is to remove it, place it in a pan with water and a have a thermometer. Start heating the water and watch the thermostat when it starts opening, mark the temperature at which it opened and watch it open all the way. Allow it to cool down and watch it close. There should be a temperature engraved in the thermostat and it should match fairly close the temperature at which the thermometer indicated it started to open. If it fails to open or if the temperatures differ then replace it. Good luck.
This would be for raw water cooled engines. His is fresh water cooled (i.e. has coolant and heat exchanger.
 
Nov 18, 2010
2,441
Catalina 310 Hingham, MA
How sure are you that:
1. The new impeller is good?
2. That it is installed correctly?
3. That it turns with the hub as the engine is cranking? And
4. That the seal is new and has no air leak?
This is a good list to start. Here are some more things to check.

First ensure that water is getting to the strainer. Take the lid off and slowly open the seacock and see if the water starts to over flow. If it does good. Close the seacock and put the lid back on the strainer.

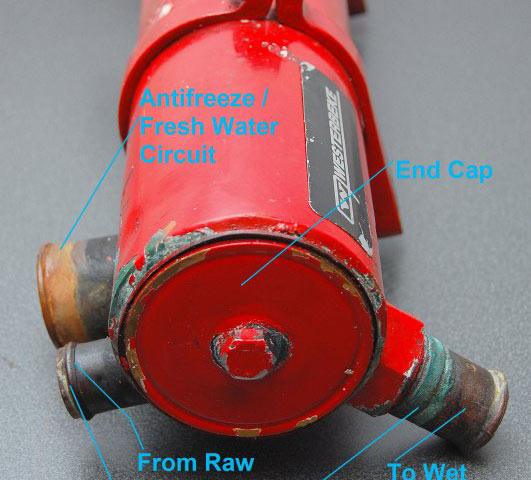
Next remove the end cap from the heat exchanger. How does the easily accessible end look. If it's not good take off the other side and put a light there. If you can't see light get a small metal rod and push it through each hole. I use a 22 rifle cleaning rod with the T handle. Change the zinc and put everything back together.

Lastly if nothing has worked yet, remove the exhaust mixing elbow and inspect it. It could be clogged with carbon build up. You might have to clean it out or even get a new one (I make my own from threaded pipe).

Really these two steps above should be done every 3-5 years for most. I do them annually but as a full-time liveaboard and cruiser it's a little different.

Good luck,

Jesse
 
  • Like
Likes: Sailm8
Feb 8, 2014
1,300
Columbia 36 Muskegon
I like the gun bore brush idea. The manual for my engine says to use a steel rod but that just doesn't sound like a good idea to me. Guess I'll be stopping by a sporting goods store.
 

ToddS

.
Sep 11, 2017
248
Beneteau 373 Cape Cod
I would second some of the suggestions others have made. Mostly though, I would troubleshoot by methodically working my way through the "path" of the water until you find where it goes from "yes it flows" to "no it doesn't". Strainer, pump, exchanger, exhaust elbow, muffler, seacocks, the hoses themselves... Each small part of the system is easy to test. Open any one of them and see if (flowing) water gets that far. This is the same method I use for troubleshooting (most but not all) electrical issues... somewhere in the flow it is going from working to not working. Keep narrowing it down until you find the culprit. Personally, while some would say start at one end, and work your way through, it is mathematically easier to start in the middle and keep eliminating 1/2 the system with each test. Your first test (maybe downstream from the pump?) will quickly tell you which 1/2 of the system the problem is in. If water gets there you can ignore impeller, pump belt slippage, strainer, seacock, etc. all at once. Keep testing the midpoint between where there is water and where there isn't water, and 2 or 3 tests will get you to the answer.
 

KZW

.
May 17, 2014
831
Catalina 310 #307 Bluewater Bay, FL
This is a good list to start. Here are some more things to check.

First ensure that water is getting to the strainer. Take the lid off and slowly open the seacock and see if the water starts to over flow. If it does good. Close the seacock and put the lid back on the strainer.

Next remove the end cap from the heat exchanger. How does the easily accessible end look. If it's not good take off the other side and put a light there. If you can't see light get a small metal rod and push it through each hole. I use a 22 rifle cleaning rod with the T handle. Change the zinc and put everything back together.

Lastly if nothing has worked yet, remove the exhaust mixing elbow and inspect it. It could be clogged with carbon build up. You might have to clean it out or even get a new one (I make my own from threaded pipe).

Really these two steps above should be done every 3-5 years for most. I do them annually but as a full-time liveaboard and cruiser it's a little different.

Good luck,

Jesse
Update:
I thank everyone for their input. I am an avid reader of this forum. I cannot be confused with a mechanic and would not be able to maintain this boat without the information available here. The marina where Amazing Grace is docked does not have a maintenance yard.

Investigation continues. This morning, before I read the replies:
- Water is getting to the strainer. Vessel is full and with the seacock open, water flows. I really don't like opening up holes in the boat below the water line. The admiral was not happy with me - there was some fumbling to get the seacock closed.
- I pulled the plate off the Oferdorfer raw water pump and bumped the engine over. The impeller turns (and it is brand new, installed yesterday)
-- With the engine running in idle, there is a drip, drip, drip of water from hose leading from heat exchanger to Oferdorfer. My thinking is this is due to back pressure

-- Next up: opening the heat exchanger. "Next remove the end cap from the heat exchanger. How does the easily accessible end look. If it's not good take off the other side and put a light there. If you can't see light get a small metal rod and push it through each hole. I use a 22 rifle cleaning rod with the T handle. Change the zinc and put everything back together." (I would not have thought of this. Excellent!!!!)
 
Oct 22, 2014
20,994
CAL 35 Cruiser #21 moored EVERETT WA
With the engine running in idle, there is a drip, drip, drip of water from hose leading from heat exchanger to Oferdorfer. My thinking is this is due to back pressure
This would not me my expectation. You should have good flow out of the hose. There should be no back pressure issues that I can rationalize.

If you took off the hose from the Heat Exchanger to the exhaust you should have "Full Flow" like that being exhausting out of the boat. It is a trickle then you have something blocking the water flow. Take off the hose into the heat exchanger and test the flow, before you go playing in the HE.

If you have good flow before the HE then I would remove the HE and have the unit serviced at a radiator shop. Have it cleaned and pressure tested. Get the proper gaskets for the HE.
 

KZW

.
May 17, 2014
831
Catalina 310 #307 Bluewater Bay, FL
You misunderstand, with everything connected, and the engine at idle, the hose drips. My guess is the heat exchanger is plugged. I will check it and report.
 
Jan 4, 2006
6,444
Hunter 310 West Vancouver, B.C.
-- With the engine running in idle, there is a drip, drip, drip of water from hose leading from heat exchanger to Oferdorfer. My thinking is this is due to back pressure

Not having the luxury of standing in front of your engine, doesn't the flow of raw water go FROM the Oberdorfer (raw water pump) TO the heat exchanger ?
 
  • Like
Likes: jssailem

Tom J

.
Sep 30, 2008
2,301
Catalina 310 Quincy, MA
You misunderstand, with everything connected, and the engine at idle, the hose drips. My guess is the heat exchanger is plugged. I will check it and report.
Very confusing. If everything is connected, where is the hose dripping?
 

KZW

.
May 17, 2014
831
Catalina 310 #307 Bluewater Bay, FL
OK, there is good news and bad news.

- Good news. The engine is huffing again - exhaust cooling water exiting the boat. No more drips from the hose that runs from the water pump to the heat exchanger (dripping at the pump end). I believe this is due to lowered head pressure.
I opened up both ends of the heat exchanger. There is no way a .22 cleaning rod is going into those holes. I put on a .22 brush and pushed it in a hole. Turns out the rod diameter is larger than the hole. The brush was not at all interested in coming out. I had to resort to a hammer on the T-handle. Dangerous as the rod, or brush could have broken off. I ran a bent coat hanger through the holes (lots and lots of holes). They appeared clear.
However, where the hose from the water pump entered the heat exchanger there was a whitish hard substance that I first took for an epoxy plug. Possibly is was calcium. It was plugging the hole through the fitting to which the hose was connected. This may be a product of corrosion. It shouldn't as I'm religious about checking the heat exchanger Zink each month, and replace it every 90 days no matter what. It took a while to dig through this stuff. It was hard, but would scrape off into a powder. I was finally able to force the bent coat hangar into the heat exchanger, through the fitting and into the hose about 4 inches. It took many repetitions to clear. I believe there remains a restriction. (The fitting is on the bottom of heat exchanger on the port side of the boat, meaning little/no access).

- The bad news. Proper cleaning would entail removing the hose from the barb fitting on the heat exchanger and cleaning it all thoroughly. I didn't do it.
-- Access is very poor and I could not get a grip on the hose. It is 15 years old and should be replaced. I think it will need to be cut off. I will look into that.
-- I was afraid to pull on the hose too hard for fear the barb fitting would break off the heat exchanger. I suspect a new heat exchanger is in my future due to this fitting and at this point in time I really don't wish to contemplate how much fun that will be.

I looked at the exhaust mixing elbow but didn't disconnect it, again for fear of breaking something. In my experience, the hoses do not like being removed. It will be cleaned when the heat exchanger is replaced.

JK: Do you have a recommendation on a heat exchanger? I have a 2005 boat, sail #307, near the end of the production run. It is 3 inches in diameter. It is my understanding early models had a 2 inch diameter heat exchanger.
Exhaust Elbow.jpg
 
  • Like
Likes: jssailem
Jun 11, 2004
1,621
Oday 31 Redondo Beach
That white stuff is most likely calcium.
You probably should pull the HX and either have it cleaned or clean it yourself (or get a new one if necessary).

It may be contraversial but I have soaked mine in dilute muratic acid to loosen / remove some of the excess buildup.
I use a wooden dowell to gently ream each tube. A coat hanger could poke through.

Here is a good article on HX's


Last edited:
  • Like
Likes: jssailem

Tom J

.
Sep 30, 2008
2,301
Catalina 310 Quincy, MA
Looks like you have found your problem. Since you have to remove the old HX anyway, you might as well take it to a radiator repair shop and get it cleaned and pressure tested. Much cheaper than a new HX. The HX should be removed and cleaned periodically , as you are aware at this point, and the same will be true for the new HX if you get one.
Sorry about the confusion earlier. I had assumed you had already disconnected a hose or two.
 

KZW

.
May 17, 2014
831
Catalina 310 #307 Bluewater Bay, FL
Anyone know why calcium builds up in the heat exchanger at the inlet from the water pump hose? If it makes a difference, the engine is usually only run 10 minutes at a time or less; just enough to get out of the marina, sail and then started for 10 minutes or less to get back into the marina. As a result, the engine never really gets up to full temperature.
 

rukidn

.
Apr 23, 2012
160
Catalina 310 258 Sandusky, OH
Agree on the radiator shop suggestion. 5 years ago I had a strap/bracket break and rub through the side of the exchanger. Radiator shop repaired, cleaned and pressure tested for $65. All I had to do was paint it + new brackets of course. Good as new. /Ed
 
  • Like
Likes: Tom J