
Pimp my C275
- Thread starter Codybear
- Start date

Thanks, but I'm still annoyed by Catalina taking a hole saw to my head. Yes, my OCD kicks in every time I give thought to it, but I've learned to try not to think about it.Great job on the boat. Wow! Love that head and installation.
Anyway, I'm hoping my documentation is appreciated by fellow sailors and fellow C275 owners. A lot of thought goes into what I do for my boat, as my wife can contest and is ready to shoot me. I have some more to come, but how much can I do to a daysailor? I'm happy with my "pimped" boat and happy to share my research.
And Alansails, thanks for the invite, but I work for beers, expensive beers and I'm slow (have to have time to enjoy the beer), so my work is not cost effective.
This mod is only for new C275 owners and is not a fun modification. For reasons I do not know, Catalina sands the bottom of the hull all the way to within about 1" (probably 0.94") of the stripe (see post #11 in "Calling ..."). This gives a lot of exposed bottom paint with very little hull color below the stripe. After studying some pictures, I figured I'd lower the bottom paint line another 3.75". In order to do this, I ran a 3" (actual 2.83") painters tape below the hull stripe and then a 2" (actual 1.88") painters tape below that one. This gave me a reasonable line to work with. Though you will have to freehand the last 5' or so of the stern. I used 1" tape for the freehand. Once the line was set, I ran additional tape below the two rows of tape to preserve the line, which also provided some protection to the sanded hull.
I removed all the tape above the protection tape and with a lot of elbow grease sanded away Catalina's orbital scratches working my way to 1500, which was the finest I could get at the local hardware store. Polishing with rubbing compound got it looking pretty good. I didn't get all of Catalina's scratches out, but it looks much better. Maybe after enough polishing over the years, I'll get the rest.
After that, I reapplied tape above the protective tape using as my guide so I could bottom paint. This is my result with 4.71" hull color below the stripe:
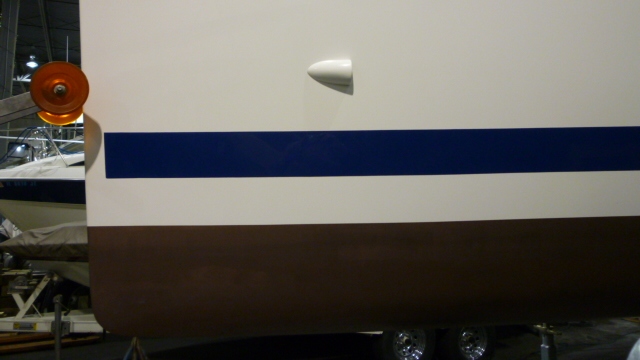
It's hard to see from post #1 in "Calling ...", but the bottom paint is about 2-2.5" above the water line. As I have the heavier wing keel and I'm in fresh water, you may get just a bit more. If you are ordering a new boat and want a lower paint line, try to save yourself some work and see if you can get Catalina to not sand so high. The only caveat is that Catalina may alter the hull stripe from hull to hull. I assume not, but I don't know how precise they are.
I removed all the tape above the protection tape and with a lot of elbow grease sanded away Catalina's orbital scratches working my way to 1500, which was the finest I could get at the local hardware store. Polishing with rubbing compound got it looking pretty good. I didn't get all of Catalina's scratches out, but it looks much better. Maybe after enough polishing over the years, I'll get the rest.
After that, I reapplied tape above the protective tape using as my guide so I could bottom paint. This is my result with 4.71" hull color below the stripe:
It's hard to see from post #1 in "Calling ...", but the bottom paint is about 2-2.5" above the water line. As I have the heavier wing keel and I'm in fresh water, you may get just a bit more. If you are ordering a new boat and want a lower paint line, try to save yourself some work and see if you can get Catalina to not sand so high. The only caveat is that Catalina may alter the hull stripe from hull to hull. I assume not, but I don't know how precise they are.
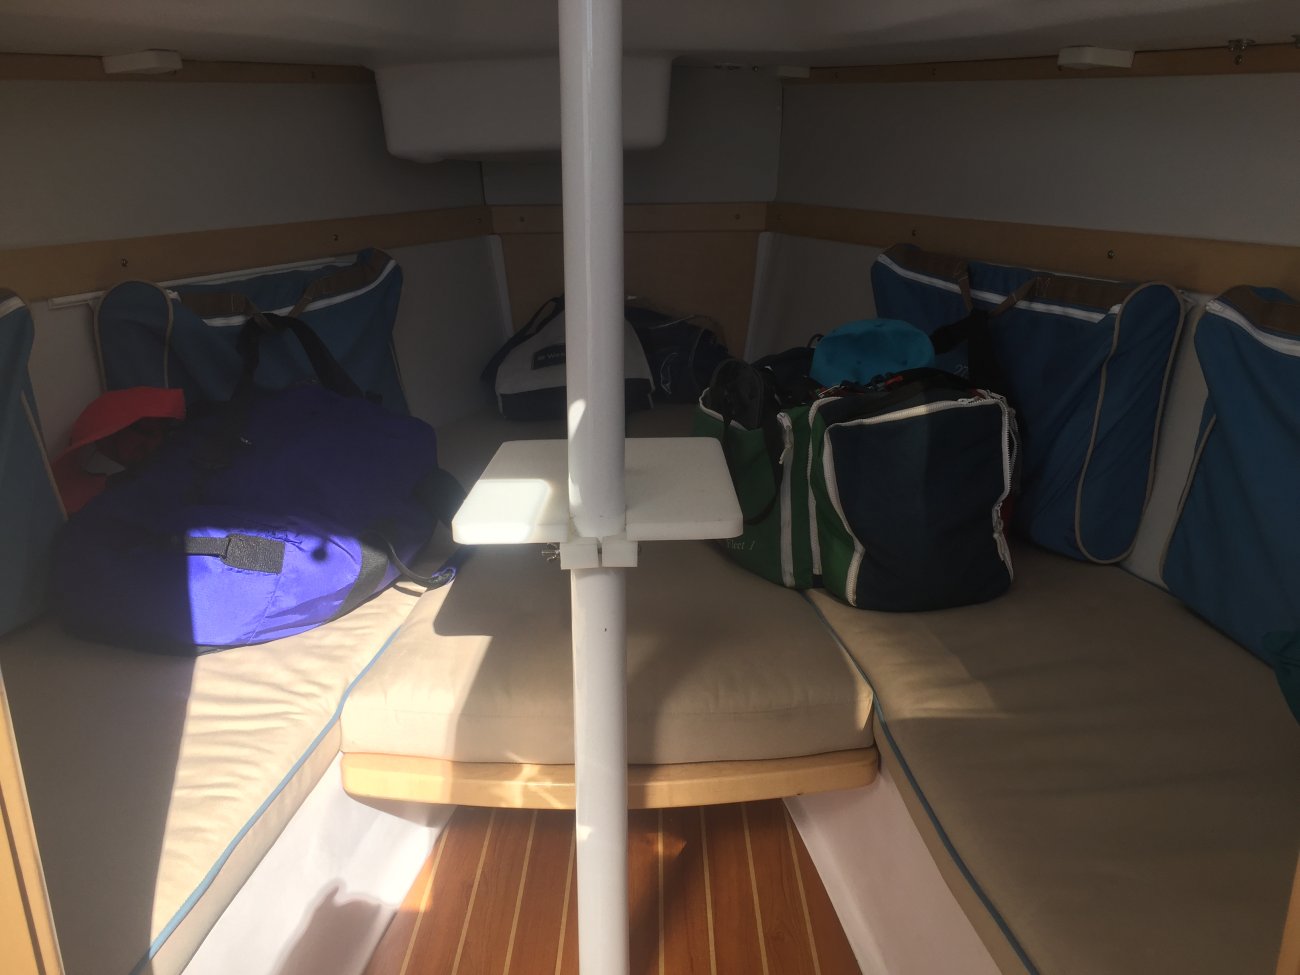
When purchasing a C275, you will have the option to buy the custom cushions. While I do like the cushions, I'm not a fan of the mounted snaps to the seats/rail. I find them annoying if you don't have the cushions mounted. It is also a $1332 (2014 price) upgrade. In my case, I was just going to go with the seat cushions (less snaps) for $1050 and maybe sew rubber padding underneath to help keep in place. In the end, I hunted down the makers of the Moorings' cushions that you find on their charter boats. The company that makes the cushions is Premier Performance Interiors. I picked a fabric from samples that was closest to the color of the C275 line bags. The invoice description has PPI Retail Moorings Cushion, Trivantage XM2 Gray 863405 Cover & Hinge. I bought 8, which is overkill, and got a volume discount, so in effect one was free. Here is what they look like:
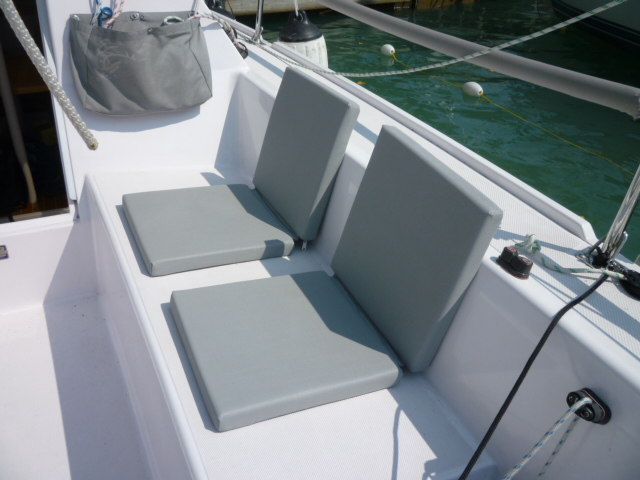
New, they can be a little slippery. The gray seams to be a nice color as it doesn't seem to get hot in the sun yet doesn't show dirt as much as white. The advantages of these over the C275 option are: easy to just put out one or two if sailing short handed, cushioning for your back, and half the price. I tied a line around the hinges of two of the cushions (one for each side), with a snap hook on the other end, to put up on the rail when steering. The line is so I don't have to do MOB drills. I get enough practice with hats, people dropping their cans with my huggies overboard and runaway beach balls.
New, they can be a little slippery. The gray seams to be a nice color as it doesn't seem to get hot in the sun yet doesn't show dirt as much as white. The advantages of these over the C275 option are: easy to just put out one or two if sailing short handed, cushioning for your back, and half the price. I tied a line around the hinges of two of the cushions (one for each side), with a snap hook on the other end, to put up on the rail when steering. The line is so I don't have to do MOB drills. I get enough practice with hats, people dropping their cans with my huggies overboard and runaway beach balls.
Every new Catalina I've had, the hull was sanded as yours. Gives good bond to the bottom paint. All 3 boats sat in the water with about 3" of exposed paint...which I like. Although I really dont like the look of boats with paint clear up to the boot stripe.
Based on my picture in "Calling", I have about 2.5" exposed paint at the bow. If I have lowered it by about 3.75", that means the normal would be 6.25" of exposed paint. IMO that is too much. I'm not aware of anyone painting the C275 transom with bottom paint which only sits above the water by about 1-1.5". So if the transom is not being sanded by Catalina and subsequently painted, why protect the rest of the hull so far above the water line? I appreciate Catalina sanding my hull for me, I just question why so high on the C275.
When you're dependent on electricity to start your boat's engine, I have always been a believer in a second battery. I held back installing a stereo until I had a second battery because of this concern.
Catalina installed my battery under the starboard saloon seat. The distance to the engine is not ideal as well as the lowering of the saloon seat after hull #1 which prevents having a battery case top installed. With my water tank located under the port saloon seat, I came up with three reasonable locations for a second battery. All have pluses and minuses, but they are: 1) starboard saloon seat, in front of existing battery; 2) under stern bunk, just aft of battery selector; and, 3) cockpit locker. I went with the second option with the intention to keep the starter battery cables as short as possible.
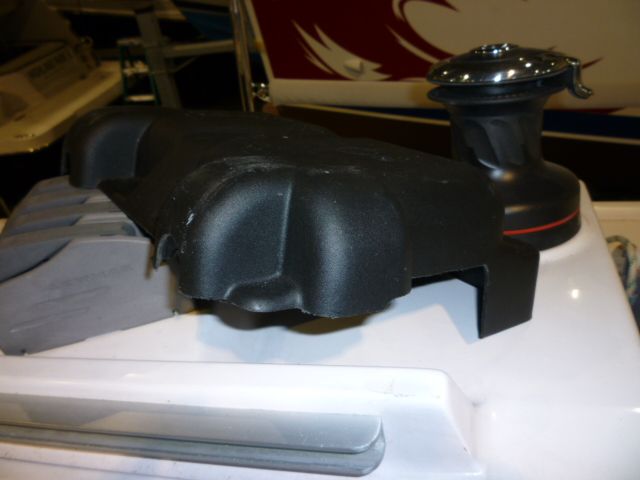
In order to simplify the install I ordered a group 24 battery tray from Catalina Direct. Took about a year for it to be made and shipped, but I wasn't in a hurry as I still was trying to figure out the stereo speakers. I also bought the matching battery box to guarantee a fit. I measured the angle of the hull under the stern bunk using an electronic level and then cut two angled strips of wood to match so the tray would sit level. Gelcoated the wood and then caulked (Sikaflex 295 (not as permanent as 5200)) the wood to the hull and the tray to the wood. This is the installed tray:
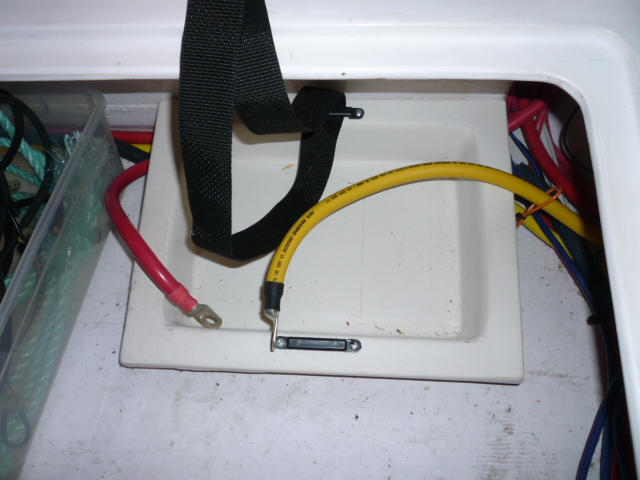
There is not a lot of height in this location, so I had to go with the shortest car battery I could find. I went with an Interstate MT-42, typically used for the old VW Beetle, and clamp-on battery cable adapters. As its only job is to start a small engine, this battery is sufficient. I also cut the battery box so the height of the battery and box matched:
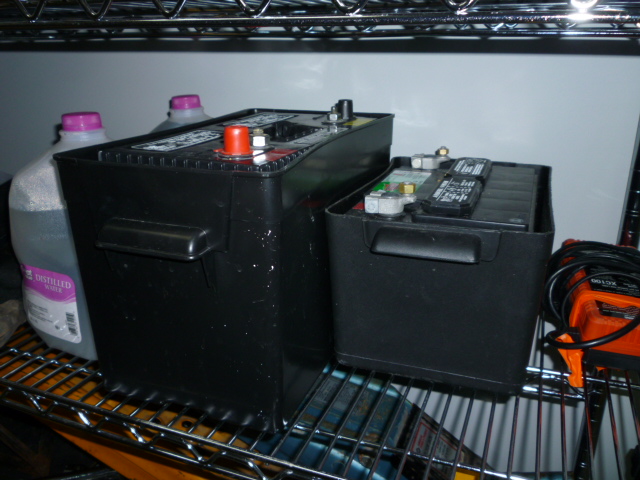
Certainly smaller than the adjacent house (G27) battery and only weighs about 25 lbs. I also went to town on the battery cover with the table saw and jigsaw to get the top to slip over the battery because of the fiberglass bunk overhang (the added cable holes help as well):
There is not much room to spare, so if installed in the same location, do not elevate the tray more than you have to. There is plenty of room without the cover, but having the cover is nice.
While my intention was to keep the battery cable as short as possible, I didn't quite follow my intentions. While I kept the positive as short as could, I decided to locate the the negative bus bar and amp shunt near the house battery instead of near the starter battery for multiple reasons.
To simplify day to day use, I added a Yandina Combiner 160 (C160):
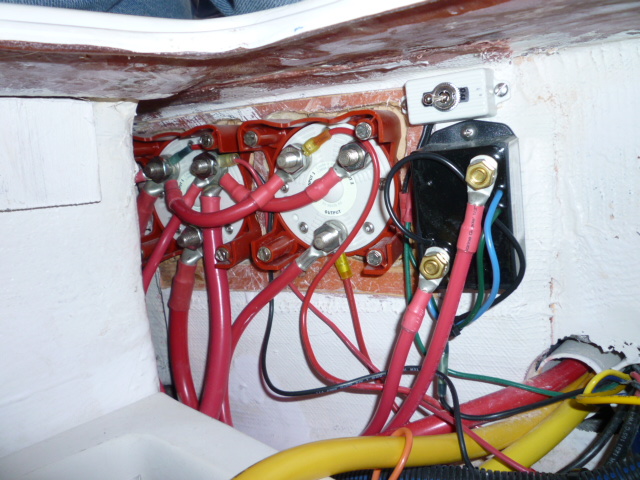
The switch above is when I remove a battery and I want to disable the combiner. The C160 doesn't use any power when the engine is not running, which is good in my situation because I opted out in regards to the solar panel on the anchor locker. Further, the C160 will also support the C275's 125A alternator. With my dual battery selectors, the panel selector is turned to the house battery (G27) and the starter/alternator selector is set to the starter battery (G42). If I want to have the house battery get the extra minute of charging before combining, I'll start off the house battery.
Anyway, I know there are multiple ways of adding a second battery to a C275, I thought I would show one option.
Catalina installed my battery under the starboard saloon seat. The distance to the engine is not ideal as well as the lowering of the saloon seat after hull #1 which prevents having a battery case top installed. With my water tank located under the port saloon seat, I came up with three reasonable locations for a second battery. All have pluses and minuses, but they are: 1) starboard saloon seat, in front of existing battery; 2) under stern bunk, just aft of battery selector; and, 3) cockpit locker. I went with the second option with the intention to keep the starter battery cables as short as possible.
In order to simplify the install I ordered a group 24 battery tray from Catalina Direct. Took about a year for it to be made and shipped, but I wasn't in a hurry as I still was trying to figure out the stereo speakers. I also bought the matching battery box to guarantee a fit. I measured the angle of the hull under the stern bunk using an electronic level and then cut two angled strips of wood to match so the tray would sit level. Gelcoated the wood and then caulked (Sikaflex 295 (not as permanent as 5200)) the wood to the hull and the tray to the wood. This is the installed tray:
There is not a lot of height in this location, so I had to go with the shortest car battery I could find. I went with an Interstate MT-42, typically used for the old VW Beetle, and clamp-on battery cable adapters. As its only job is to start a small engine, this battery is sufficient. I also cut the battery box so the height of the battery and box matched:
Certainly smaller than the adjacent house (G27) battery and only weighs about 25 lbs. I also went to town on the battery cover with the table saw and jigsaw to get the top to slip over the battery because of the fiberglass bunk overhang (the added cable holes help as well):
There is not much room to spare, so if installed in the same location, do not elevate the tray more than you have to. There is plenty of room without the cover, but having the cover is nice.
While my intention was to keep the battery cable as short as possible, I didn't quite follow my intentions. While I kept the positive as short as could, I decided to locate the the negative bus bar and amp shunt near the house battery instead of near the starter battery for multiple reasons.
To simplify day to day use, I added a Yandina Combiner 160 (C160):
The switch above is when I remove a battery and I want to disable the combiner. The C160 doesn't use any power when the engine is not running, which is good in my situation because I opted out in regards to the solar panel on the anchor locker. Further, the C160 will also support the C275's 125A alternator. With my dual battery selectors, the panel selector is turned to the house battery (G27) and the starter/alternator selector is set to the starter battery (G42). If I want to have the house battery get the extra minute of charging before combining, I'll start off the house battery.
Anyway, I know there are multiple ways of adding a second battery to a C275, I thought I would show one option.
That's a lot of work! What I did, in a C36, was to find out what tractors the Kubota D850 was used in; the D850 is the base engine for the Universal M25. I then found what battery these tractors used, which for many was an EU1L size, a pretty small lawn and garden tractor battery. I built a plywood battery box for the sealed lead acid batt, and keep it charged with a Xantrex Echo Charger. Works like a charm, and the small size of the battery opens up lots of options for location.
Remember, for a starting battery, distance can be compensated for with larger gauge wire.
Remember, for a starting battery, distance can be compensated for with larger gauge wire.
What the forum post or the install? No seriously, I see building and installing a nice looking box being more effort than buying the tray and box. I did consider a tractor battery but I got more CCA (good when the battery gets older), slightly shorter at 7" (with the add-on adapters) and fits the purchased box better. And yes, I am aware of cable gauge as I created a spreadsheet to calculate voltage loss for all the electrical loads I've added. Bigger is always better except for the wallet. Distance was only one factor in my decision.That's a lot of work!
It is good to know your smaller battery worked for your C36 and gives alternatives for others to consider when adding a battery to start a relatively small engine.
This is about as trivial as my ziptie main traveler suggestion, but it will help keep this thread alive. It is usually just a few or less people on the boat and instead of pulling out the cooler to empty it, I put a handled basket into the cooler and fill that with ice. At the end of the day, I dump the basket of water and ice over the side; wipe down any water that ended up in the cooler; close the cooler on a sailing glove to air; and, let the basket dry in the head. Keeps the mold at bay in the cooler and much easier to deal with. I also have enough room left over for a empty 12 pack for the empty cans and 4 huggies. This is my setup:
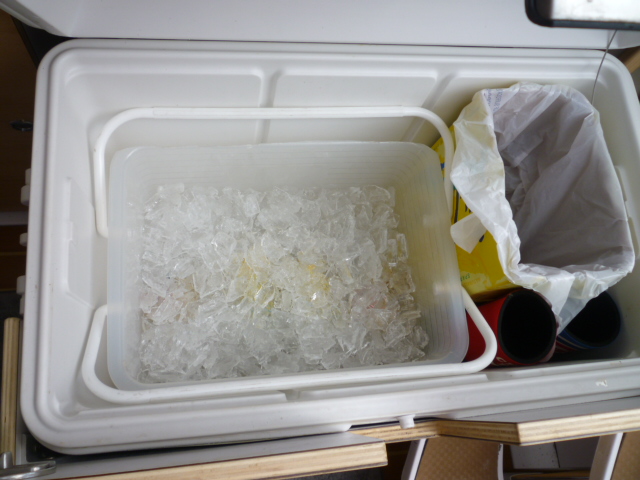
Underneath, I have another plastic bin that will hold 30+ cans upright. I just reach over the cooler and grab a can as needed to chill in the ice.
Underneath, I have another plastic bin that will hold 30+ cans upright. I just reach over the cooler and grab a can as needed to chill in the ice.
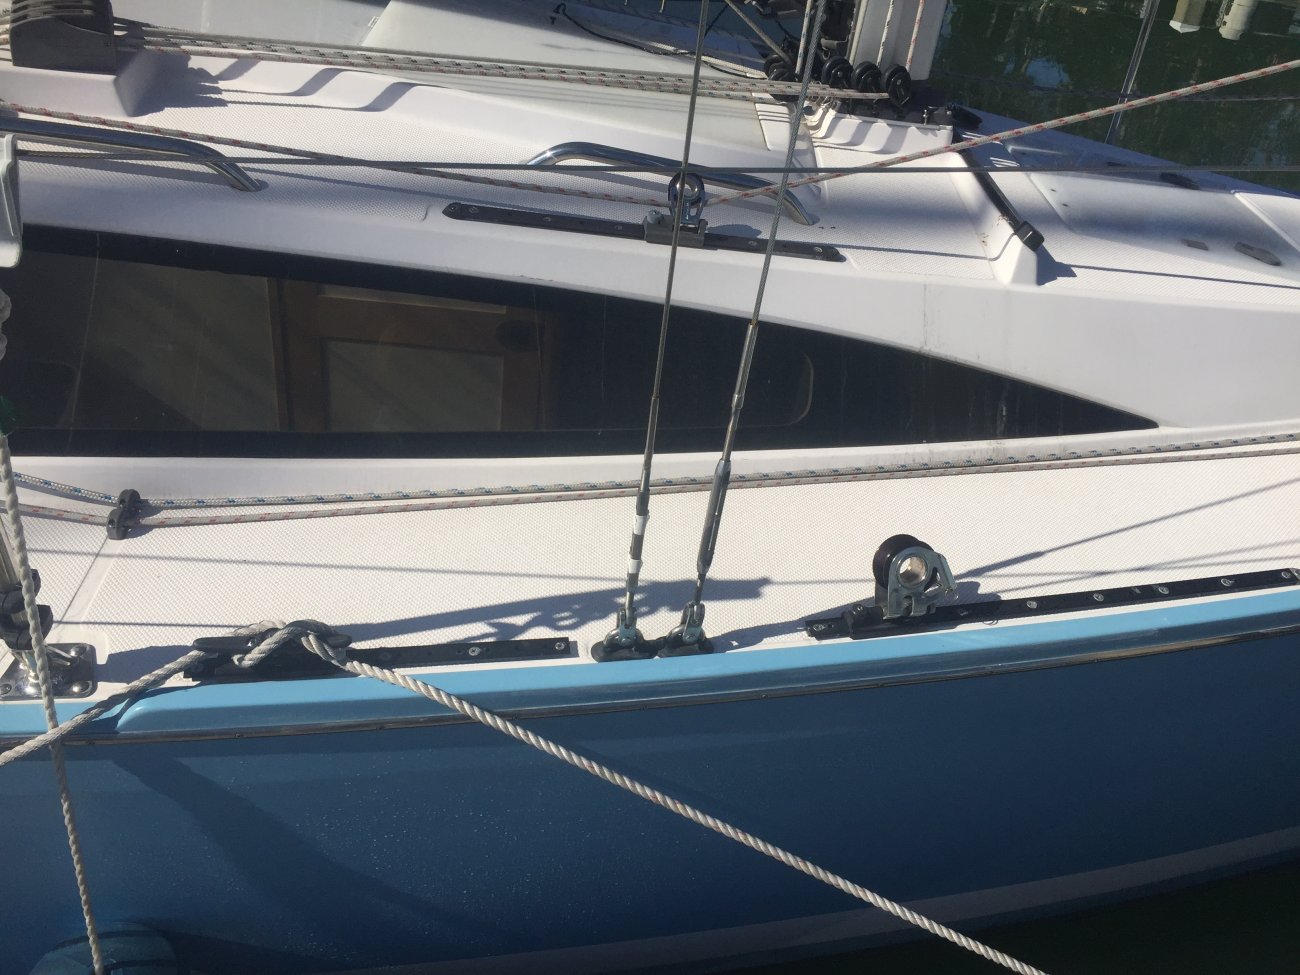
While I am a little intimidated about blogging and feel it is difficult to follow Codybear's posts, here are a few of the updates that I have made to Azure:
I added outboard sail tracks.
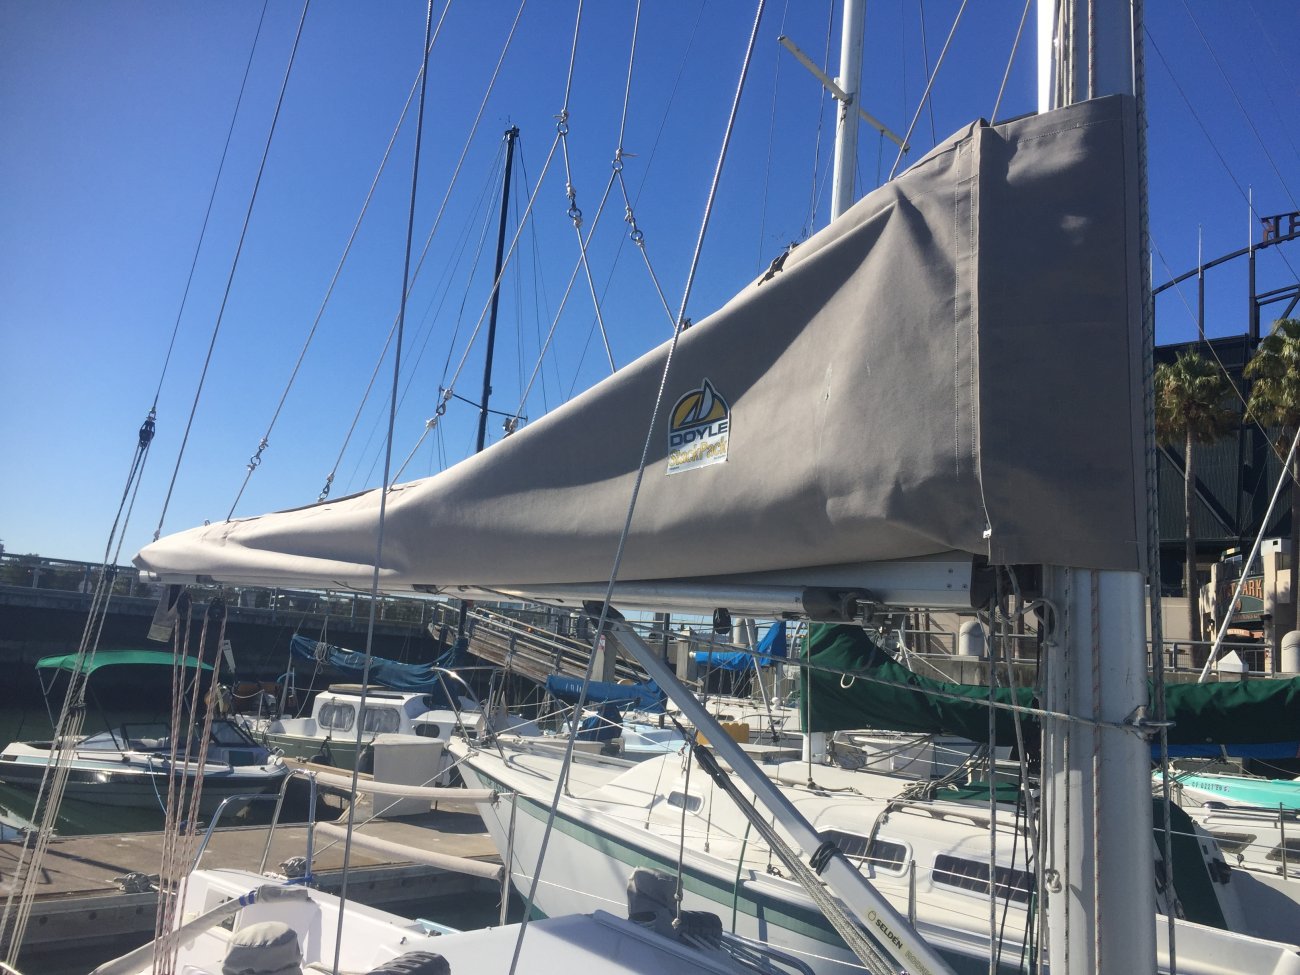
 I have added a Doyle Stackpack and Selden spinnaker pole holders
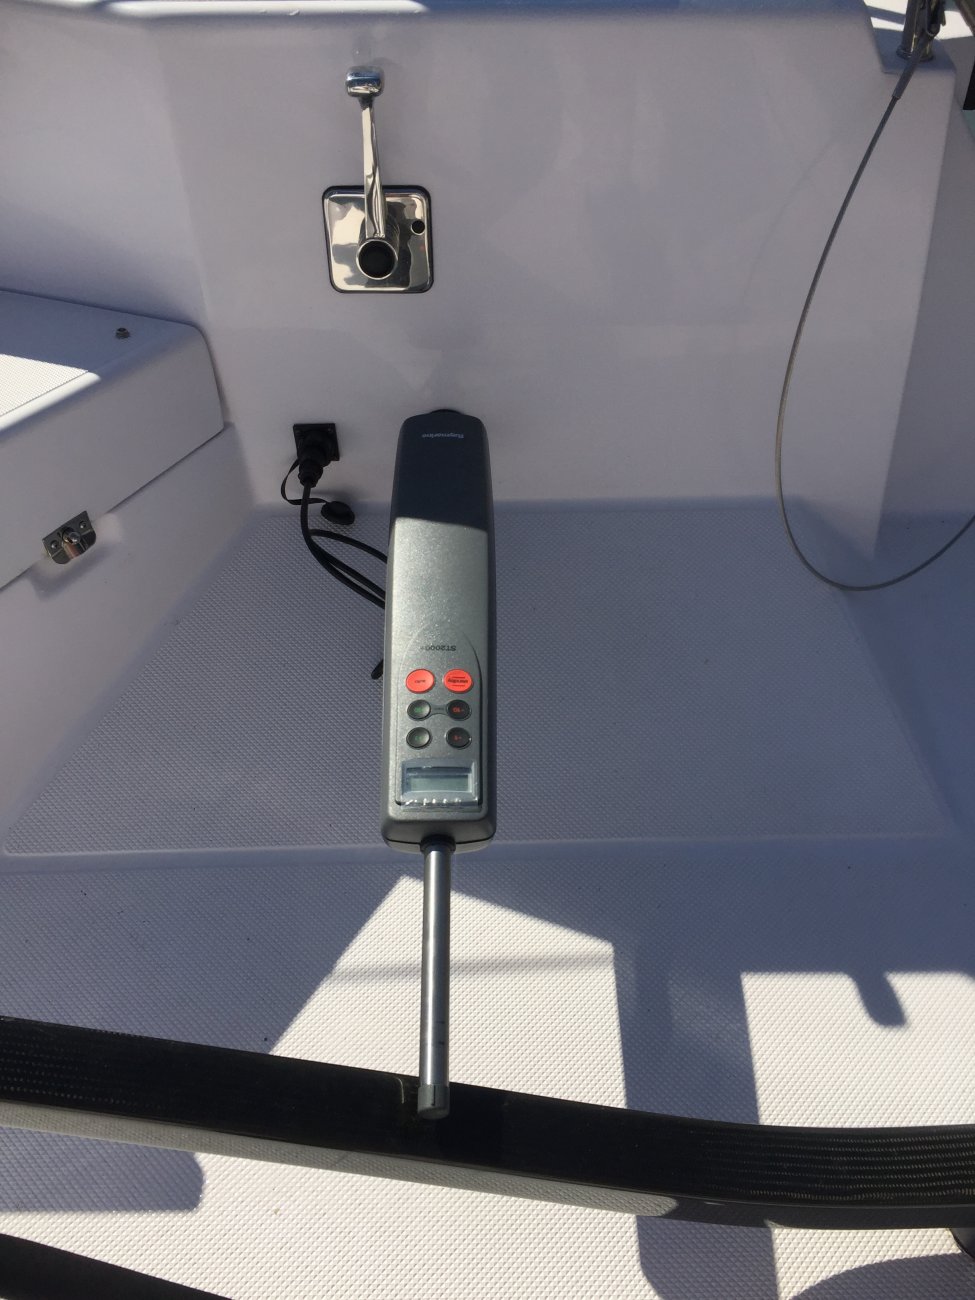
 I added a Raymarine ST 2000+ Autotiller
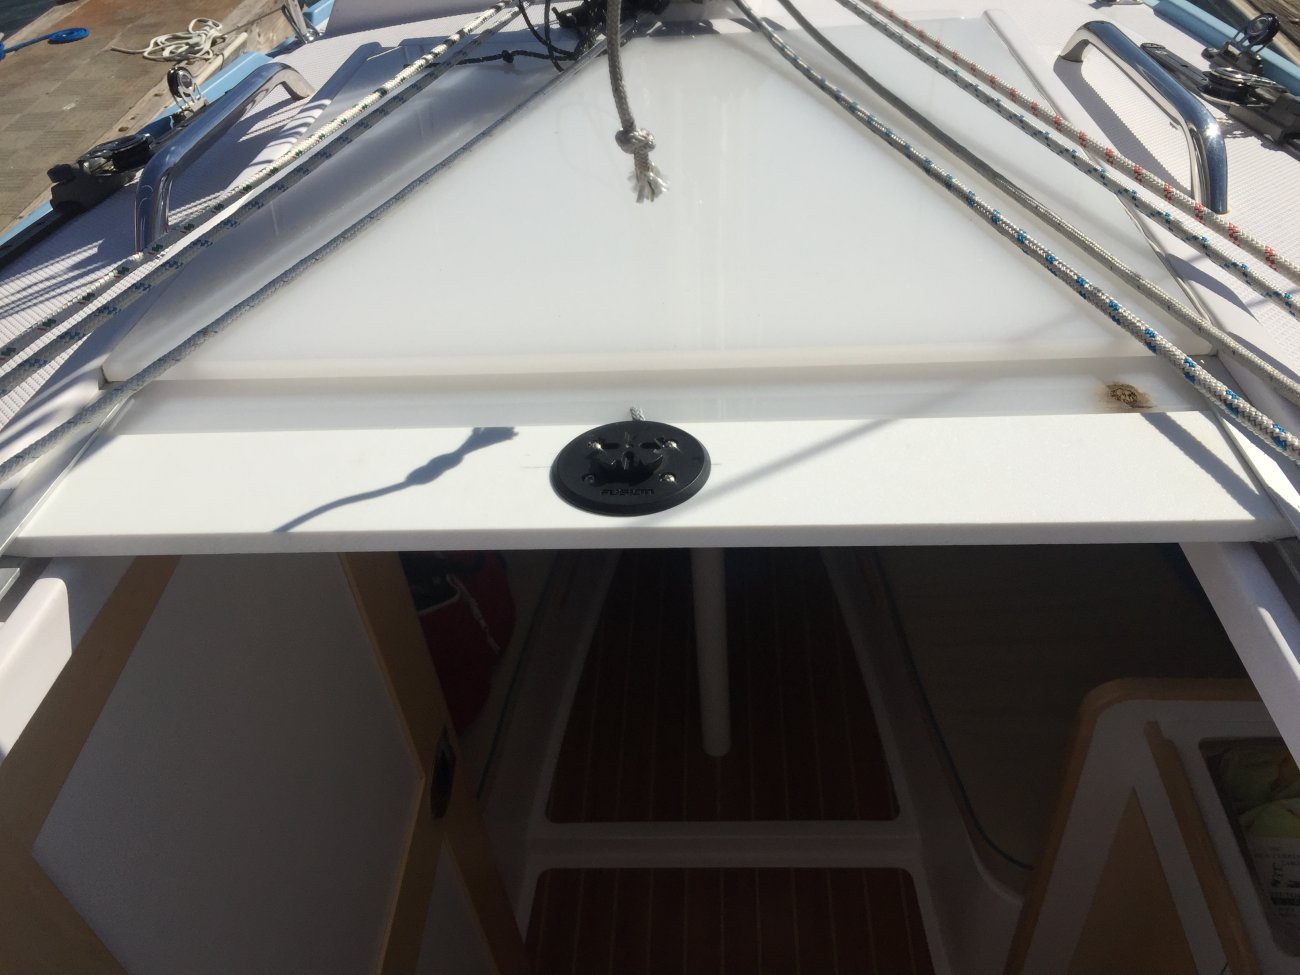
 I also added a Fusion Stereo Active Portable Watersport Stereo, which I have mounted on a piece of starboard and slide into the hatch track.

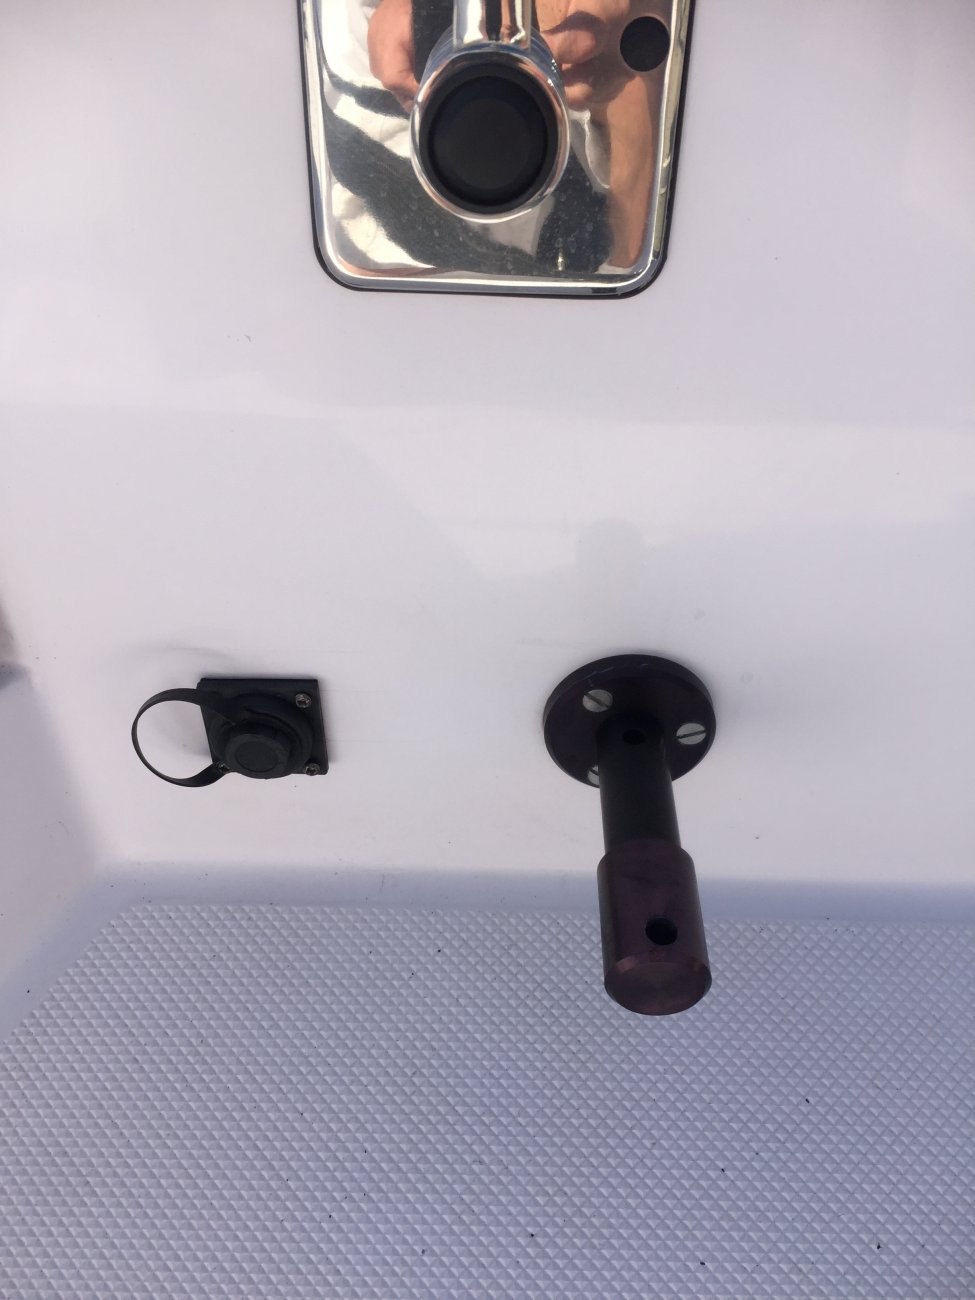
 Another addition I made out of Starboard was a small table that I attach to the mast support pole. We leave the table in the bunk position all the time. The table can be loosened an rotated aft also.
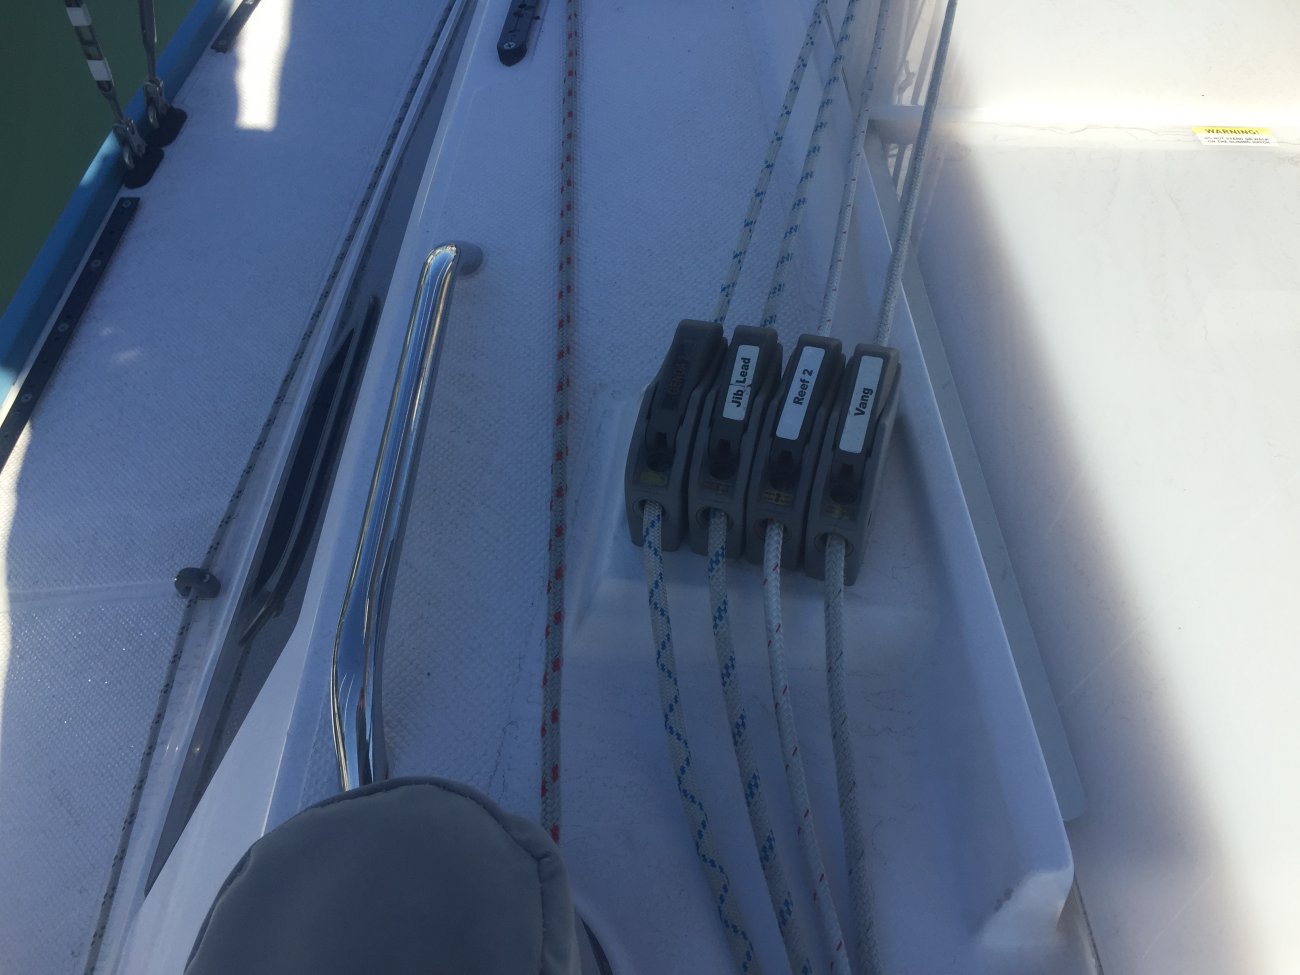
 As I stated in another post that I had a sailmaker put a second reef in my Main, added two Selden sheaves that I purchased from APSltd. Relocated my port clutches and added a fourth one for the reef line. I use the Cunningham for the forward reef point.
 I am sorry that I haven't given you a blow by blow installation presentation, but I just want to share what I have done. Codybear is a hard act to follow!
I added outboard sail tracks.
Just thought the 275 owners might like to see this Aussie Catalina 275 for sale!
https://yachthub.com/list/yachts-for-sale/used/sail-monohulls/catalina-275-sport/222051
https://yachthub.com/list/yachts-for-sale/used/sail-monohulls/catalina-275-sport/222051
Someone finally cracked and converted the collision bulkhead into a storage locker (c'mon we've all thought about it).
If it weren't for incompatible trim colours my other half would be circling like a vulture right now... waiting to make a fire sale offer on that dodger/bimini/boom-bag canvas pack.
If it weren't for incompatible trim colours my other half would be circling like a vulture right now... waiting to make a fire sale offer on that dodger/bimini/boom-bag canvas pack.
If you haven't figured it out by now, I love to tinker with little projects. Even though I have two vent lines on my holding tank, I realized I still wasn't getting enough oxygen three summers ago when someone used the head on a downwind. Not unexpectedly, the wind Gods would have to be in complete agreement for air to flow into one vent and out the other. Anyway, I figured I would help them out.
I built an inline fan for one of the vent lines. Here is a picture of the fan sitting in a 1.5" PVC connector:
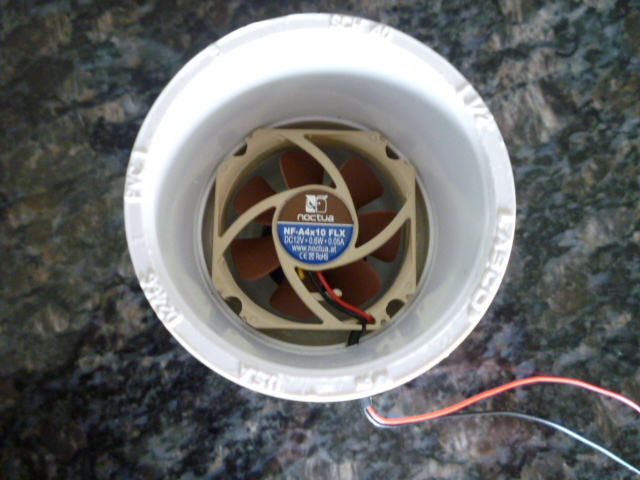
I had to cut and sand the corners of the Noctua NF-A4x10 FLX computer fan (50 mA) to fit. Complete, it looks like:

On the right is a really neat timer switch that I found on the web (http://timers.shop). It is the Timers Shop 5A multi-functional timer relay that can cycle a configurable on/off as I do not need the vent to be on 24/7, especially being off-grid on a mooring. It’s easy on the battery using 4.2 mA while on and 6.5 mA when off. It has over 30 functions and I’m using function #5 which is the repeat cycle. Another function of this timer I could see being really handy is a delay off for the instruments after the ignition has been turned off.
On the left is a SPDT relay (normally closed) which I use to turn off the timer relay when I turn on the starter selector. Initially, I added this to protect the computer fan from the voltage of the alternator, but it also has the advantage of the vent fan remaining off while I’m sitting on the boat. This relay is the Omron G5V-1 rated for 1A and consumes 13 mA when I’m on the boat and 0 mA (NC) when off the boat. I tried to get this relay function incorporated into the Timer Shop timer relay, but the demand by me, myself and I is not quite enough to cut it.
As I will be adding a solar panel and rather not burn out my nice computer fan that is glued into the PVC connector, I will be adding a 12V LDO regulator to the vent for this summer’s use. I think the Micrel MIC2920A-12WT with an output capacitor inserted between the timer relay and the fan will work well.
I’m going to be using these components with an 8 cm computer fan to add venting for the cabin (future project & post).
Well, it is certainly not sailing weather here in Chicago, but it’s nice to start thinking about next summer.
I built an inline fan for one of the vent lines. Here is a picture of the fan sitting in a 1.5" PVC connector:
I had to cut and sand the corners of the Noctua NF-A4x10 FLX computer fan (50 mA) to fit. Complete, it looks like:
On the right is a really neat timer switch that I found on the web (http://timers.shop). It is the Timers Shop 5A multi-functional timer relay that can cycle a configurable on/off as I do not need the vent to be on 24/7, especially being off-grid on a mooring. It’s easy on the battery using 4.2 mA while on and 6.5 mA when off. It has over 30 functions and I’m using function #5 which is the repeat cycle. Another function of this timer I could see being really handy is a delay off for the instruments after the ignition has been turned off.
On the left is a SPDT relay (normally closed) which I use to turn off the timer relay when I turn on the starter selector. Initially, I added this to protect the computer fan from the voltage of the alternator, but it also has the advantage of the vent fan remaining off while I’m sitting on the boat. This relay is the Omron G5V-1 rated for 1A and consumes 13 mA when I’m on the boat and 0 mA (NC) when off the boat. I tried to get this relay function incorporated into the Timer Shop timer relay, but the demand by me, myself and I is not quite enough to cut it.
As I will be adding a solar panel and rather not burn out my nice computer fan that is glued into the PVC connector, I will be adding a 12V LDO regulator to the vent for this summer’s use. I think the Micrel MIC2920A-12WT with an output capacitor inserted between the timer relay and the fan will work well.
I’m going to be using these components with an 8 cm computer fan to add venting for the cabin (future project & post).
Well, it is certainly not sailing weather here in Chicago, but it’s nice to start thinking about next summer.
Last edited:
Being on Lake Michigan and having cooler water, condensation is quite common. I wanted to add some type of ventilation to help with the humidity (I do have 3 damprids hanging in the boat at all times (be careful, they can leak)). I purchased a Marinco Nicor Solar Vent and a spare from WM and borrowed a hole saw from a friend and was ready to go, but I didn't like the idea of drilling a hole in the hatch, which would cost $600 to undo my work.
I decided to go with a computer fan that required no holes. I purchased the following items:
3" Y (W1014) and hose clamp for vacuum systems from Kingspor's Woodworking Shop.
1/4x12x12" pvc from HD.
Noctua NF-A8 FLX computer fan.
Optional:
Multi-functional Timer relay from timers.shop (cycle fan instead of always on).
Micrel LDO MIC2920A-12WT regulator and associated in/out capacitors (protect fan from 14V plus).
Board and box for 12V regulator.
First I removed the port engine vent:
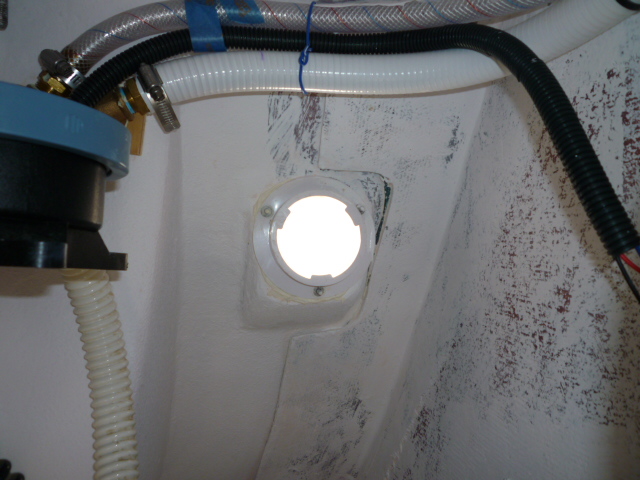
Because of vent blower direction, starboard may be better, but port locker has the least amount of natural air flow. I now want to connect the 3" Y to the existing 3 tabbed hole (unmodified & modified):
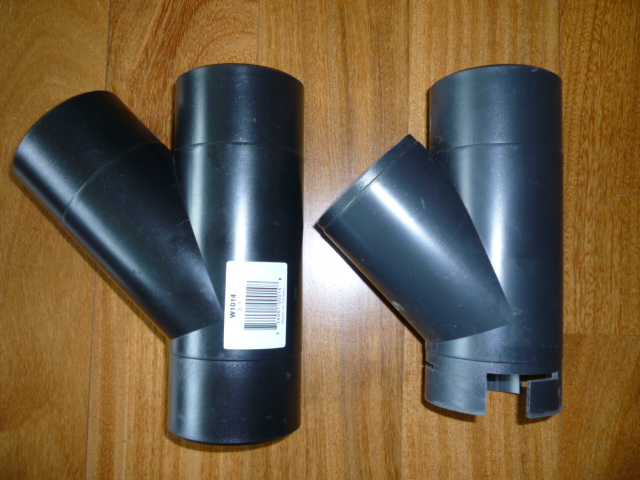
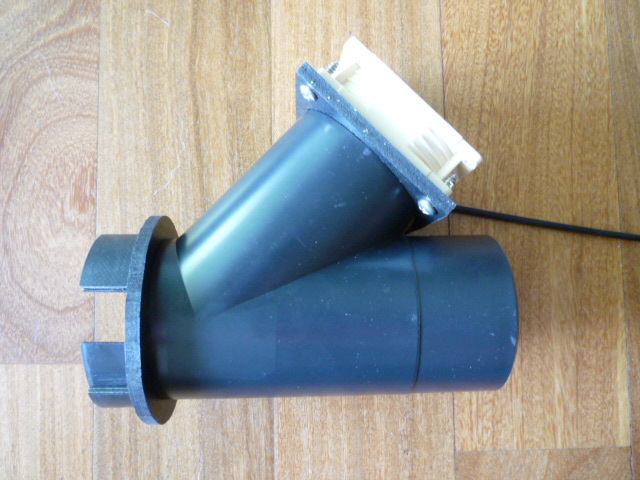
I left 1/4" on the branch for the fan. The locking cuts are for a clockwise turn with the weight of the fan securing it. I then added the 1/4" pvc, which I can't remember if I glued or made them snug to begin with. The round is for added support and the square is for the fan:
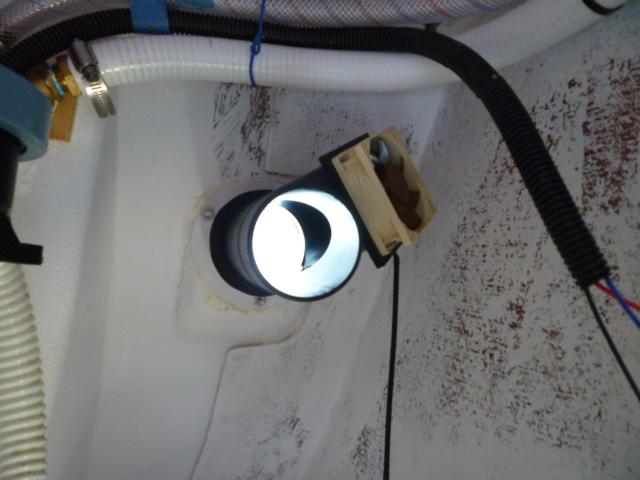
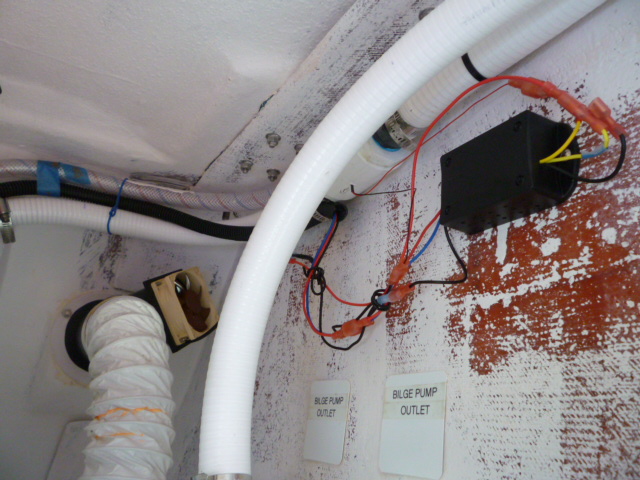
Installed:
12V regulator, capacitors, timer relays and NC relay (one timer relay and NC relay from prior post holding tank vent mod):
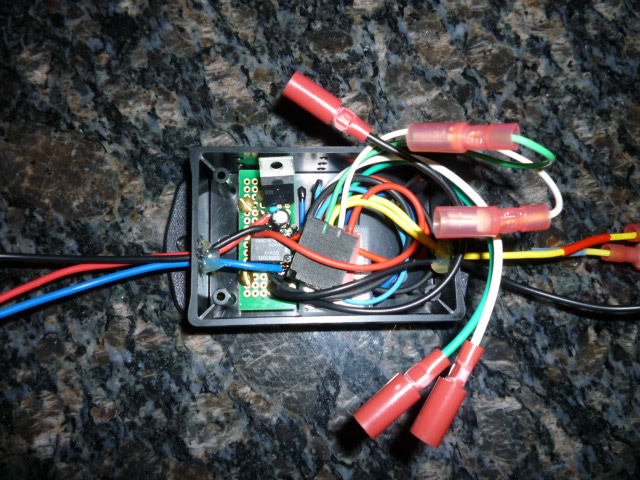
Box could have been the next size bigger, but I was having trouble finding what I wanted. And this is all installed and ready to go:
May not be as ideally situated as a hatch fan, but it is out of the way and I don't have a hatch wart to kick with my toes.
I decided to go with a computer fan that required no holes. I purchased the following items:
3" Y (W1014) and hose clamp for vacuum systems from Kingspor's Woodworking Shop.
1/4x12x12" pvc from HD.
Noctua NF-A8 FLX computer fan.
Optional:
Multi-functional Timer relay from timers.shop (cycle fan instead of always on).
Micrel LDO MIC2920A-12WT regulator and associated in/out capacitors (protect fan from 14V plus).
Board and box for 12V regulator.
First I removed the port engine vent:
Because of vent blower direction, starboard may be better, but port locker has the least amount of natural air flow. I now want to connect the 3" Y to the existing 3 tabbed hole (unmodified & modified):
I left 1/4" on the branch for the fan. The locking cuts are for a clockwise turn with the weight of the fan securing it. I then added the 1/4" pvc, which I can't remember if I glued or made them snug to begin with. The round is for added support and the square is for the fan:
Installed:
12V regulator, capacitors, timer relays and NC relay (one timer relay and NC relay from prior post holding tank vent mod):
Box could have been the next size bigger, but I was having trouble finding what I wanted. And this is all installed and ready to go:
May not be as ideally situated as a hatch fan, but it is out of the way and I don't have a hatch wart to kick with my toes.
very interested in figuring out a place to vent the Cabin ...Being on Lake Michigan and having cooler water, condensation is quite common. I wanted to add some type of ventilation to help with the humidity (I do have 3 damprids hanging in the boat at all times (be careful, they can leak)). I purchased a Marinco Nicor Solar Vent and a spare from WM and borrowed a hole saw from a friend and was ready to go, but I didn't like the idea of drilling a hole in the hatch, which would cost $600 to undo my work.
I decided to go with a computer fan that required no holes. I purchased the following items:
3" Y (W1014) and hose clamp for vacuum systems from Kingspor's Woodworking Shop.
1/4x12x12" pvc from HD.
Noctua NF-A8 FLX computer fan.
Optional:
Multi-functional Timer relay from timers.shop (cycle fan instead of always on).
Micrel LDO MIC2920A-12WT regulator and associated in/out capacitors (protect fan from 14V plus).
Board and box for 12V regulator.
First I removed the port engine vent:
View attachment 181828
Because of vent blower direction, starboard may be better, but port locker has the least amount of natural air flow. I now want to connect the 3" Y to the existing 3 tabbed hole (unmodified & modified):
View attachment 181829
I left 1/4" on the branch for the fan. The locking cuts are for a clockwise turn with the weight of the fan securing it. I then added the 1/4" pvc, which I can't remember if I glued or made them snug to begin with. The round is for added support and the square is for the fan:
View attachment 181830
Installed:
View attachment 181831
12V regulator, capacitors, timer relays and NC relay (one timer relay and NC relay from prior post holding tank vent mod):
View attachment 181833
Box could have been the next size bigger, but I was having trouble finding what I wanted. And this is all installed and ready to go:
View attachment 181832
May not be as ideally situated as a hatch fan, but it is out of the way and I don't have a hatch wart to kick with my toes.
Given you put it on the Port side, how will you vent the cabin air?
Easiest place for the air to enter the boat is from the companion way as the door does not make a tight seal to the cover (I lay my solar panel cord through the opening there). In theory the air will make its way in there and work its way past the starboard stern bunk and exhaust out the port stern through my fan. As I said, not quite as good as exhausting out the front hatch, but I didn't have to drill a hole through my hatch.