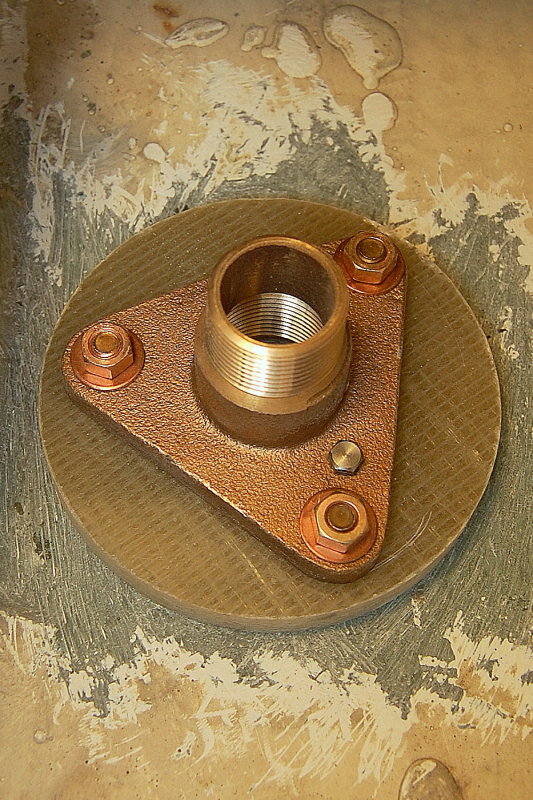
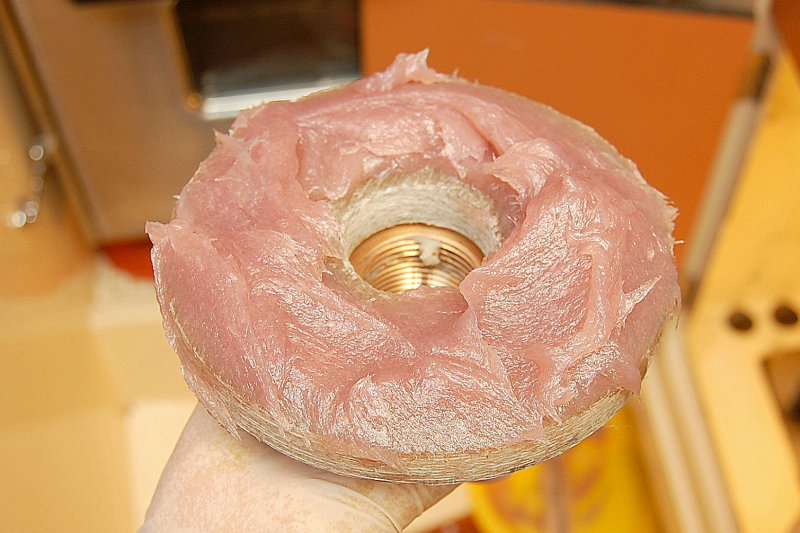
Seacock Backing Blocks, Alternate Method No Through Bolts

Feb 6, 1998
11,667
Canadian Sailcraft 36T Casco Bay, ME
Hi All,

I promised Hermit I would show how to make a backing block with tapped studs to avoid through bolting to your hull. Many don't feel comfortable drilling extra holes in the hull and this is a good way to get nearly the strength without additional holes.

1- Start: This post already assumes you're using fiberglass for the backer blocks and have already made the circle. Unlike the other method where you glass the backing plate to the hull first then drill the hole for the thru-hull with this method you drill the thru-hull hole first. To do this project a drill press is HIGHLY recommended.


2- Cut the hole: Be sure to use a hole saw as close to the OD size of the thru-hull as is humanly possible. There should be very little room between the threads and the fiberglass.


3- Make a shim:
Before you drill and tap the backer block you need to tighten the flanged adapter to the backing block using the thru-hull. Because you are missing the thickness of the hull you will need to create a spacer. I used some PVC exterior trim lumber and drilled the same diameter hole as in the backing block. Then all I did was center & tighten the flange and thru-hull together with the backing plate and spacer sandwiched in between.


4- Clamp & drill:
This is the most critical step and why you really should have a drill press. Because you are literally drilling and tapping a piece of 5/8" fiberglass, the threaded holes MUST be perfectly centered in the flange holes, and they must be 100% vertical. I made my spacer square, and wider than the head of the thru-hull, so I was able to clamp it in my drill press vice. I can not stress enough how important it is to make perfectly vertical holes that are perfectly centered in the holes of the flange or seacock. There is NO wiggle room here. Mess this up and you just wrecked a backing block..


5- Drill & tap:
Please DO NOT cut corners on the quality of your tap and always use the proper sized drill for the tap. This is an "F" drill for a 5/16" X 18 thread tap. You can also use a 17/64" drill with a 5/16" tap. Fiberglass is very susceptible to off center tapping so be very, very careful to not cut crooked or wobble your tap side to side as it will make the tapping bigger than you want. Practice in a scrap piece of fiberglass if you first if your not comfortable with this..
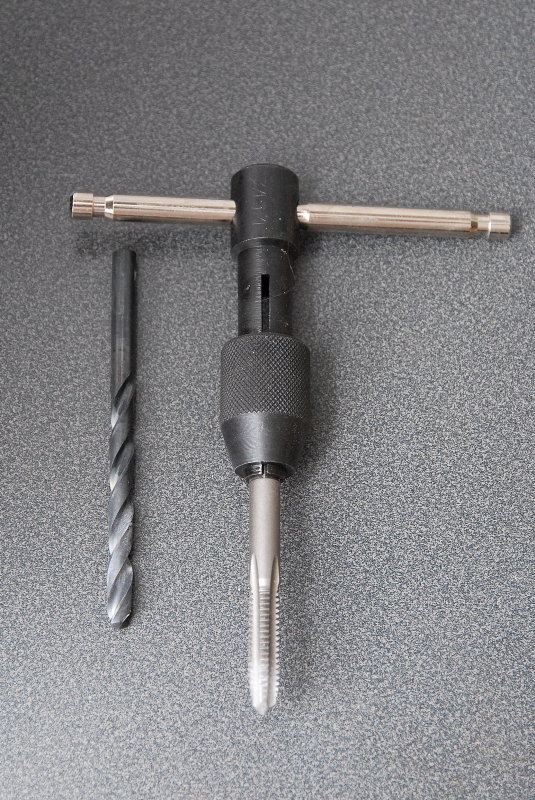

6- Tapping the backing plate:


7- Cutting the studs: Silicon bronze threaded rod is expensive but carriage bolts are cheap. Simply install two nuts onto the bolt and clamp one nut in the vice while tightening the other back onto it essentially locking the bolt into the vice.


8- Cut off wheel:
Though this 1 1/2" Dremel cut-off disc says "Plastic" it is my favorite bolt cut-off wheel and it works well on stainless or bronze.


9- Cut off the head: As you get good with the Dremel you can make some amazing bolt cuts with threads that work as good as factory. Of course you could use a hack saw too but the Dremel just works better.


10- Finish the threads: Once I cut the bolt I clean the end on my bench grinder with a brass wire wheel. This one looks almost as good as the factory end and works the same too.


11- Insert Studs: With the studs made you simply thread them into the backing block.


12- Install Flange or seacock: Once the studs are in simply drop the flange over put on the nuts and your ready for a dry test fit in the hull.


13- Side view: This photo shows a side vie of the assembly. The hull & sealant are the only pieces missing.


I should be installing this in the next few days and will hopefully remember to photograph the rest of the steps for installation and post it as a follow up..
 
Sep 25, 2008
2,288
C30 Event Horizon Port Aransas
Re: Backing Plates / Alternate Method / Not Through Bolts

I would trust this method just as well as the other. I was a little leary about 15 extra holes drilled through my hull. I actually ended up putting a few layers of fiberglass over them just to feel better about it.
Any reason you didn't countersink the underside of the backing plates and use the tapered head bolts?
One thing I wondered about when I did this job was, how effectively I removed the wax from the backing plates. I scrubbed them with acetone and then hit them with the sander and then acetoned them again. Does acetone remove the wax that is in the backing plate from using wax paper?
I'm sure you probably used epoxy for those backing plates but for someone like me who used polyester, could you cover that with the install? Thanks.
 
Oct 22, 2008
3,502
- Telstar 28 Buzzards Bay
Re: Backing Plates / Alternate Method / Not Through Bolts

Another possible way to do that is to drill the holes and install t-nuts into them on the underside of the backing plate. However, the t-nuts are not available in bronze and more likely to corrode than the way Maine Sail has done it.
 
Feb 6, 1998
11,667
Canadian Sailcraft 36T Casco Bay, ME
Any reason you didn't countersink the underside of the backing plates and use the tapered head bolts?
Because once the backing plates are installed they are permanent. Bolts could break or need replacement if over torqued. When drilled through the hull you can always replace a bolt but if the head is captured between the backing plate & hull it's permanent. Studs are replaceable.

One thing I wondered about when I did this job was, how effectively I removed the wax from the backing plates. I scrubbed them with acetone and then hit them with the sander and then acetoned them again. Does acetone remove the wax that is in the backing plate from using wax paper?
It's not just the wax paper. Polyester finishing resin, the type that does not dry tacky, has paraffin added to it to make it cure. I don't generally like Acetone as a dewaxer, not that it won't work, it just does not work as well. I much prefer, and have had better results with Interlux 202 or Pettit #95.


I'm sure you probably used epoxy for those backing plates but for someone like me who used polyester, could you cover that with the install? Thanks.
No I actually use polyester or vinylester for these. Kitty hair works great. If your hull has a lot of curvature and you bevel the backing plate to match it, (read PITA), then epoxy is a great choice. Unfortunately epoxy does not like thick sandwiched installations, it can literally smoke and will sometimes never cure properly in a situation like a backing block on a curved hull where you have a thickness that could cause excess heat. The trick I use is to scuff both the hull and the backing block with a drill and a brass brush. This creates nice deep scratches/scars in the surfaces for more potential bonding surface area..
 

BobM

.
Jun 10, 2004
3,269
S2 9.2A Winthrop, MA
Re: Backing Plates / Alternate Method / Not Through Bolts

I don't know how I feel about trusting holes tapped in fiberglass. It just doesn't seem like it would be strong enough. MS, could you provide your rationale for why you feel this is acceptable? Isn't there some time of load test thru hulls are supposed to pass?

Thanks,

Bob
 
Oct 22, 2008
3,502
- Telstar 28 Buzzards Bay
There isn't much of a load on those threaded studs. They're mainly there to prevent the flange from rotating. The main bulk of the tension is taken up by the threads on the through-hull itself, which is pretty beefy and screws into the flanged through-hull adapter. :)

I don't know how I feel about trusting holes tapped in fiberglass. It just doesn't seem like it would be strong enough. MS, could you provide your rationale for why you feel this is acceptable? Isn't there some time of load test thru hulls are supposed to pass?

Thanks,

Bob
 

Bob S

.
Sep 27, 2007
1,771
Beneteau 393 New Bedford, MA
What would be to pro's and con's to using a SST Helcoil in the fiberglass? It would make the threads a lot stronger.
 
Feb 6, 1998
11,667
Canadian Sailcraft 36T Casco Bay, ME
I don't know how I feel about trusting holes tapped in fiberglass. It just doesn't seem like it would be strong enough. MS, could you provide your rationale for why you feel this is acceptable? Isn't there some time of load test thru hulls are supposed to pass?

Thanks,

Bob
Bob,

A bronze valve on just a thru-hull with pass the ABYC 500 pound static test. The flange adds strength and distributes the force over a wider surface area and is stronger than just a thru-hull anyway even without the bolts. As Dog said the bolts are to prevent spinning when threading stuff onto it. Tapping into 5/8" thick glass is actually quite strong but again the any side load is absorbed by the flange and the thru-hull holding the flange down. Catalina for example taps stanchions into 1/4" aluminum. At 24" tall vs. about 6" tall there is significantly more leverage on a stanchion than a seacock and the boltts just do not pull out of the soft aluminum. 5/8" of fiberglass is significantly more thread contact surface area than 1/4" of aluminum and with less avaialble leverage and a thru-hull also holding it.

I personally prefer through bolting but see no reason to worry about a drilled/tapped flange. I posted this for those who don't fell comfortable drilling through the hull for through bolting. If you don't feeel comfortable then you could use the other method..
 
Feb 6, 1998
11,667
Canadian Sailcraft 36T Casco Bay, ME
Backing Block - Part 2

I got to the yard today and managed to snap a few photos. Not enough as I'd like but enough not to get resin on my wife's Nikon DSLR..

Here's the rest:

14- Dewax:
First you need to de-wax the backing plate. Polyester finishing resin has added paraffin to aid in the cure process this wax, and the wax coating from what you laid it up on, must be removed prior to installation or nothing will adhere well. Over the years I have found the dedicated, but overly priced, cocktails of chemicals sold by Pettit or Interlux as de-waxers definitely work. I only wish I could figure out what the chemical mix is because I know I could mix it up for less than what they sell it for.;)


15- Aggressively Sand: For good adhesion you really need a clean surface with nice deep scars and surface irregularities. For this I used my Fein Multi-Master and the Carbide Triangular Rasp attachment. This is a hard, alloy tipped sanding attachment. It produces about 5 times the sanding performance of 40-grit paper, but won't load up with residue. It also LASTS for a long time because it is carbide. If you don't have a Fein don't worry as about any wire wheel brush on a drill will do a similar job or 36 grit discs on an angle grinder..


16- Sand the hull: Before you begin sanding the hull you should remove any wax. Gelcoat is also an air inhibited cure so any gelcoat on the interior of a hull has a waxy surface. In order for proper adhesion any interior gelcoat needs to be removed.


17- Dry Fit: In order for you backing block and through hull to fit properly you must do a test fit. It took me four tries to get the through hull to sit flush on the exterior of the hull due to some irregularities on the interior that needed to be sanded out.


18- Installation: Once your dry fit is confirmed parallel, and all sides of the mushroom head sit flush on the hulls exterior you will need to do one more round of de-waxing of both hull and backing block. After that is done you need to wax both the flange and the thru-hull with copious amounts of mold release wax, butchers wax or even Collinite. The wax should be a paste type carnuba. After you have waxed it cut a scrap board to length and wedge the thru-hull into place. If you are on gravel or dirt lay a board on the ground to wedge the upright board against.


19- View From Inside:
Here is the thru-hull ready for the backing block and flange.


20- Mix Your Resin: For this step I chose to make my own formula. I did not use epoxy because n a sandwiched situation, with sufficient thickness it can literally smoke. My mix consisted of chopped strand fibers, cabosil (coloidal silica) and polyester resin. I like doing this because it gives me more control over consistency and how it fillets. Kitty hair is another product I use but it will not fillet as well as your own custom mix. For catylist I used some red dyed MEK-P. I like dyed MEK-P so you know you have it thoroughly mixed. Once mixed I had to work fast as I had a short pot life at 70 degrees. Wear rubber gloves and apply a thin coat of the mix to both the hull and backing block, then slather a large amount onto the backing block and thread it onto the thru-hull about three threads. I then used vise grips to grip the flange to prevent it from spinning and went out side the boat and used my step wrench to tighten down the thru-hull and seat the backing block.


21- Installed: Here is the backing block installed and curing. Tomorrow morning I will go remove the thru-hull and the flange then clean them of the wax. I'll need to wait for the yard finish fairing and barrier coating my hull before I finish installing this with marine sealant and gelcoating the interior.
 

Ross

.
Jun 15, 2004
14,693
Islander/Wayfairer 30 sail number 25 Perryville,Md.
Re: Backing Block - Part 2

Paint brush cleaner is as good a dewaxer as I have found. That soup of alcohol, methyl chloride, toluol, xylene, mineral spirits etc. Nasty stuff but it works
 
Oct 26, 2008
6,076
Catalina 320 Barnegat, NJ
Re: Backing Plates / Alternate Method / Not Through Bolts

Very nice description on how to do this ... I guess I'm not familiar with a step wrench and how it grips the thru hole from the outside. Could you show a picture of this? I can see why it is necessary to tighten it from the outside to snug in the backing plate. Are you careful not to draw it too tight or is that not an issue? I assume you had to find a way to wedge the vice grip to keep it from spinning.
 
Dec 2, 2003
1,637
Hunter 376 Warsash, England --
The Next Owner?

Nice job but will the next owner realise the three studs are only tapped into the fiberglass and he might swing on them and strip them.
Also if, or perhaps when, the outer flange dezincifies then the only thing keeping the fitting on the hull is the epoxy between pad and hull so make sure it really does bond.

On balance I would prefer bolts right through the hull - though I know first hand that dreadful feeling when drilling right through one's hull.:eek:
 
Oct 22, 2008
3,502
- Telstar 28 Buzzards Bay
Re: Backing Plates / Alternate Method / Not Through Bolts

Maine Sail—

Thanks for the photos... and you're a wise man... screw up her camera and you're toast.

I got to the yard today and managed to snap a few photos. Not enough as I'd like but enough not to get resin on my wife's Nikon DSLR..
 
G

Guest

Backing plates

Nice job on the thread. Why is your drill press so rusty?

Hunter used round 1/2 inch marine grade teak plywood through hull backing plates on our 1991 P42 and all remain in good condition with no leaks. None are through bolted or glassed in, but appear to have used a sealant to bond it to the hull material. A local circumnavigator used SS plate on all her through hulls. Lots of alternatives to choose from.

Terry Cox
 
Oct 22, 2008
3,502
- Telstar 28 Buzzards Bay
Nice job but will the next owner realise the three studs are only tapped into the fiberglass and he might swing on them and strip them.
Also if, or perhaps when, the outer flange dezincifies then the only thing keeping the fitting on the hull is the epoxy between pad and hull so make sure it really does bond.
If the next owner swings on them and strips them... it isn't your problem then... :) If you don't inspect the through-hull often enough and it dezincifies to that point, you've got other problems.

On balance I would prefer bolts right through the hull - though I know first hand that dreadful feeling when drilling right through one's hull.:eek:
Of course, having three less holes that might leak is not a bad thing, and the through-bolts might dezincify and then you're in much the same position as if you used the threaded studs with the addition of three leaking holes..... :D
 
Feb 6, 1998
11,667
Canadian Sailcraft 36T Casco Bay, ME
The whole

Nice job but will the next owner realise the three studs are only tapped into the fiberglass and he might swing on them and strip them.
The whole idea of a flanged adapter is that when a valve goes bad you simply replace it by unthreading it from the flanged adapter and the thru-hull and flanged adapter seal does not have to be broken.


Also if, or perhaps when, the outer flange dezincifies then the only thing keeping the fitting on the hull is the epoxy between pad and hull so make sure it really does bond.
If that happens then an owner was not paying attention. Considering the very low zinc content of 80-5-5-5 bronze it is highly unlikely they will dezincify. Or what happens when the hundreds of thousands of existing valves screwed only to a thru-hull, with no flange or bolts, dezincifies?

On balance I would prefer bolts right through the hull - though I know first hand that dreadful feeling when drilling right through one's hull.:eek:
This is my ONLY seacock on board that is not through bolted. I only installed this one using this method to show an alternative. I'm not one of those who is squeamish about drilling holes for seacock flanges..;) This was for those who are..
 
Oct 22, 2008
3,502
- Telstar 28 Buzzards Bay
Scott—

Here's a step wrench:


Photo courtesy of Jamestown Distributors.

Here's one of a step wrench in a through-hull, courtesy of Maine Sail:


:D
Very nice description on how to do this ... I guess I'm not familiar with a step wrench and how it grips the thru hole from the outside. Could you show a picture of this? I can see why it is necessary to tighten it from the outside to snug in the backing plate. Are you careful not to draw it too tight or is that not an issue? I assume you had to find a way to wedge the vice grip to keep it from spinning.
 

MrBee

.
Dec 30, 2008
425
Irwin 34 Citation Middle River, Md.
Re: Backing Plates / Alternate Method / Not Through Bolts

Very informative Maine Sail, Thanks for posting.

Bee