Rebedding fixed portlight

Jan 5, 2017
143
Hunter 356 SF Bay / Delta
Continuing in my quest to rid the boat of leaks, I've been getting a good amount of water coming in through one of the fixed portlights on my 03 356. It's the starboard side portlight, aft of the bulkhead. I have water coming in from under the frame, as well as running down the liner and onto the top of the galley cabinets.
Any tips/tricks for those that have removed these before I tackle it? It looks like it's held on via a series of screws into a frame. Hoping I can get by with a roll of butyl -- but I've not had this style of portlight off before, so not sure if there is a gasket or if I'll need to resort to something like 4200.
 

Attachments

Jun 5, 2012
51
Hunter 38 Chicago, IL
we had a similar leak at the same spot and after looking more deeply and ready to pull that light it turned out the be the fixed starboard light right behind the mast on our 2005 H38. It was the 4 holes, one in each corner of the glass used to hold it in place while it sets. Turned out the caulk pulled out after multiple years of cleaning and was leaking from those running behind and over the side light you are showing. Took me 10 minutes to caulk the holes and done. No pulling. Hope you find the same. Had a similar question on Facebook Hunter owners sight. it was there issue too.
 
Jun 1, 2009
1,737
Hunter 49 toronto
Continuing in my quest to rid the boat of leaks, I've been getting a good amount of water coming in through one of the fixed portlights on my 03 356. It's the starboard side portlight, aft of the bulkhead. I have water coming in from under the frame, as well as running down the liner and onto the top of the galley cabinets.
Any tips/tricks for those that have removed these before I tackle it? It looks like it's held on via a series of screws into a frame. Hoping I can get by with a roll of butyl -- but I've not had this style of portlight off before, so not sure if there is a gasket or if I'll need to resort to something like 4200.
Getting these out is easy, and lots of articles, including mine, which gives techniques for doing this
I’m going to reccomend not using Dow 795.
Instead, use Sikafkex.
Hunter used 795 on all their windows, etc, and it’s an industrial sealant meant for glass windows. Over time it doesn’t adhere well to Fiberglas and plexi. It’s a lot cheaper than Sikafkex, which is why hunter used it.
You’ll also need to use the primer for best adhesion.
 
Apr 1, 2019
14
Hunter 376 Niantic
I just replaced 3 hatches on my 376 this weekend, previous owner thought Sikaflex would be a great choice, 8 working hours later, including some epoxy time, the hatches are in, use butyl, it works great and offers the ability to rebed as required without hours of work. I probably could have just replaced the lenses but the process of removing them destroyed their shape. Sikaflex has its place on the boat, hatches and portlights is not one of them.
 
Jan 5, 2017
143
Hunter 356 SF Bay / Delta
Did the job using butyl. Removal wasn't too bad. Some galling on the screws, but they still came out fine. There was a spot on the bottom where the sealant may have been suspect, but hard to say.
 

Attachments

Last edited:
Jan 5, 2017
143
Hunter 356 SF Bay / Delta
we had a similar leak at the same spot and after looking more deeply and ready to pull that light it turned out the be the fixed starboard light right behind the mast on our 2005 H38. It was the 4 holes, one in each corner of the glass used to hold it in place while it sets. Turned out the caulk pulled out after multiple years of cleaning and was leaking from those running behind and over the side light you are showing. Took me 10 minutes to caulk the holes and done. No pulling. Hope you find the same. Had a similar question on Facebook Hunter owners sight. it was there issue too.
I suspect you might be on to something here. I noticed the day after I rebedded that I still had some water coming in. I was hoping it was just residual water in the liner. We've got rain in the forecast this week, so I suspect I'll know soon enough for sure.
I dread doing those fixed portlights, so if it's just the screw holes that would be fantastic. Did you use 795 or something else?
 
  • Like
Likes: tfox2069
Apr 8, 2011
768
Hunter 40 Deale, MD
I've got a leaking fixed portlight in the aft cabin of a 2009 H36, starboboard side over the hanging locker. I believe its exactly the same as what you had to pull. What was the process? for example, did you pull the trim ring from the inside, then break a caulk seal on the outside? I ask because its not apparent how the outside comes off since there's no screws on the outside, just an aluminum ring. Does the whole thing just pop out onto the deck once you take the screws out and break the caulk seal behind the outside trim ring? Also, what did you do to resolve your additional leaking?
 
Jan 5, 2017
143
Hunter 356 SF Bay / Delta
I ended up having to re-bed the large fixed portlight / windshield on the cabin top. Turned out it was leaking and somehow water made it's way across the headliner and onto the fiberglass liner, then dripped down above the galley cabinets.

I don't have any suggestion for you on how to narrow it down. Re-bedding the fixed portlight on the side wasn't a big project. Undo the screws on the inside, then it mostly just pops out. Clean all the bedding compound off, put down butyl and re-attach screws. Cut off extra butyl.

Here are some pictures of re-bedding the side portlight. I have a few of the "windshield" re-bed as well if you end up doing it.

Sure looks like this is leaking, doesn't it? (Hint, it's not.)

IMG_20190325_183646.jpg

This is what you'll see after removing the screws.

IMG_20190330_121957.jpg

Remove sealant from the outside as best you can and slowly push the frame out. Make sure it doesn't fall off into the water -- I didn't have to push very hard to break the remaining sealant. You can see the inner frame in the picture below, sitting on the cushion.

IMG_20190330_131510.jpg

And here is the portlight after removing it. The longest part of the job is now cleaning all the old sealant. I used butyl when I re-bedded it.

IMG_20190330_123458.jpg

And at the end of the day it didn't solve anything. THIS was the real culprit:

IMG_20200419_142503.jpg
 
Apr 8, 2011
768
Hunter 40 Deale, MD
I ended up having to re-bed the large fixed portlight / windshield on the cabin top. Turned out it was leaking and somehow water made it's way across the headliner and onto the fiberglass liner, then dripped down above the galley cabinets.

I don't have any suggestion for you on how to narrow it down. Re-bedding the fixed portlight on the side wasn't a big project. Undo the screws on the inside, then it mostly just pops out. Clean all the bedding compound off, put down butyl and re-attach screws. Cut off extra butyl.

Here are some pictures of re-bedding the side portlight. I have a few of the "windshield" re-bed as well if you end up doing it.

Sure looks like this is leaking, doesn't it? (Hint, it's not.)
Wow, really helpful - thanks very much. My portlight is in the aft cabin, but same principle, so this really helps me understand the job now. I plan on using butyl as well - and hopefully that solves my problem! The one clue I have that it will resolve it is I temporarily applied butyl to the OUTSIDE edge of the portlight frame that I suspect is leaking as a temporary fix while the boat is winterized. We've now had some honking rainstorms and it hasn't leaked a single drop, so I'm reasonably hopeful that's the culprit. With your photos I understand the job I'm in for now and think I can tackle it with ease. I just don't know how long the leak has been going on (I'm the second owner), so I'll be examining the area for rot when I get it apart, and will try to really dry it out before resealing.

Again, greatly appreciate the assist! And if you can post the photos of the overhead portlight job, in case I have to do that one day, that would be great. Leaks suck!
 

RitSim

.
Jan 29, 2018
406
Beneteau 411 Branford
One of the key failures of sealant joints is that the sealant is compressed to a very thin thin membrane. All sealants have an elongation limit. If, for instance, the elongation (stretch) is 25% and the sealant final thickness is .010", then the allowable growth is .0025"- or just under the thickness of one sheet of paper. 3M has a special double stick tape for this purpose AND it spaces the port frame about .1" from the fiberglass". Now adding the sealant allows a growth of .025. These are simplistic numbers that illustrate why you should not squeeze all of the sealant out and using a tape "spacer" gives you control.
 
  • Like
Likes: tfox2069
Jan 5, 2017
143
Hunter 356 SF Bay / Delta
The one clue I have that it will resolve it is I temporarily applied butyl to the OUTSIDE edge of the portlight frame that I suspect is leaking as a temporary fix while the boat is winterized. We've now had some honking rainstorms and it hasn't leaked a single drop, so I'm reasonably hopeful that's the culprit.
Sounds like you've got it pretty well nailed down. Good luck!

Again, greatly appreciate the assist! And if you can post the photos of the overhead portlight job, in case I have to do that one day, that would be great. Leaks suck!
Sure thing.

Start by removing the 4 screws in the corners of the windshield.

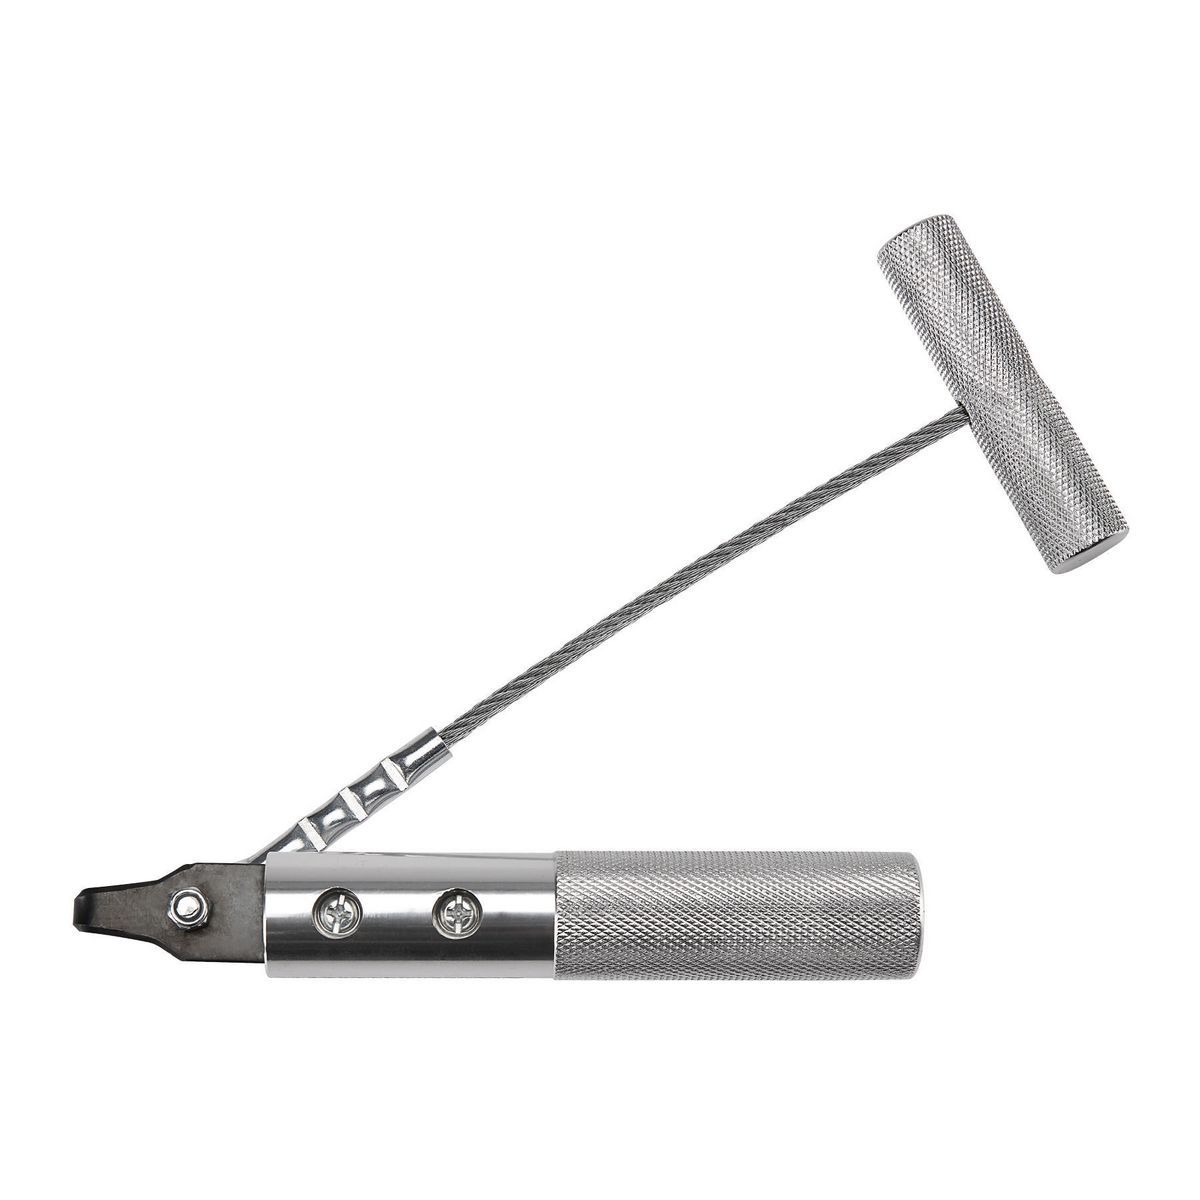
Then I used a windshield remover tool to cut out the sealant around the windshield and just under the windshield.


I then attached a suction cup lifter to the center of the windshield and attached it to the spinnaker halyard. I tightened it up, but only with just enough tension to be tight -- not enough to actually pull the windshield out.


IMG_20200418_115905.jpg

Then I had my helper slowly ratchet up tension on the halyard as I worked my way around the windshield with the removal tool. Eventually it released and popped up.

Underneath I taped a plastic sheet to capture all the detritus to come.

Then, again, came the longest part of the project -- cleaning up the old sealant. I used various plastic scrapers and Re-Mov silicon remover. I found out about this product through Practical Sailor. It's a bit pricey, but worth every penny. I've never seen anything clean up old silicone like this stuff.


After using just the scraper I had this:

IMG_20200418_140141.jpg

After the Re-Mov:

IMG_20200418_143023.jpg

Finally, re-bedded the windshield with Dow 795, which is what the original factory used. I used blue painters tape around the edges to get the cleanest bead of sealant.

IMG_20200419_142529.jpg

I didn't take any pictures of the underside, but I did end up getting some excess on the underside of the windshield. It cleans up fairly easily as long as you do it right away before it dries.

For my very first sewing project ever I made somewhat ill-fitting covers out of Sunbrella in an attempt to keep UV off the windshield and sealant.

IMG_20200621_145328.jpg

I still have ONE leak left on the boat that I just can't seem to figure out. In the aft cabin I get a slow drip from the edge of the liner at the rear bulkhead. Other folks in the forum have indicated it often comes from the wire loom going into the pedestal. I tried cleaning that up without success. One of these days I suppose I'll climb in the rear locker in a downpour with a flashlight and see if I can see anything.

IMG_20190306_174003.jpg
 
  • Helpful
Likes: tfox2069
Apr 8, 2011
768
Hunter 40 Deale, MD
This is a heroic level of detail - marked it permanently as helpful karellen. Thanks so much for sharing how you did this, and with what key materials. Good luck with the rear cabin. One possibility might be the entrance for the wire bundle coming out of the pedestal in the cockpit where it enters the boat under where the helmsman stands. On my H36 its just gunked up with a lot of hopeful silicon and wires running through that. At some point I'm fairly certain water will start working its way in there.