N28 progress

Jan 14, 2014
225
Newport Newport 28 Fair Haven, NY
Spent the weekend on the boat, and finally, FINALLY got through the whole thing! I started the weekend with a couple projects. First and foremost was to try to tackle my outboard situation. I can't remember if I mentioned in my splash thread, but the short version is this: The original A4 has long since been removed, and a kicker bracket mounted center of the transom. I have a Mercury 9.9 XL Shaft on that bracket. But the issues I had were a) the motor wouldn't steer, at all. Locked center, and try as I might, there's no simple "do this" step in the service manual. Just talks about how to hook up steering cables. And b) Even at the lowest setting, the bottom of this EXTRA LONG FREAKING SHAFT was barely in the water. How it managed to get me through those waves, God knows. Reverse was a nightmare, as the motor tried to kick upwards just enough that the prop, I swear, was skimming the surface, and all it seemed to do was just give me prop walk to port, but no real momentum.

So step 1, I found the barely noticeable set-screw that was locking the steering tube. Success, I can now steer the motor! This should certainly help with the reversing issue! I haven't tested that theory yet, but I can't imagine it would be a bad thing.

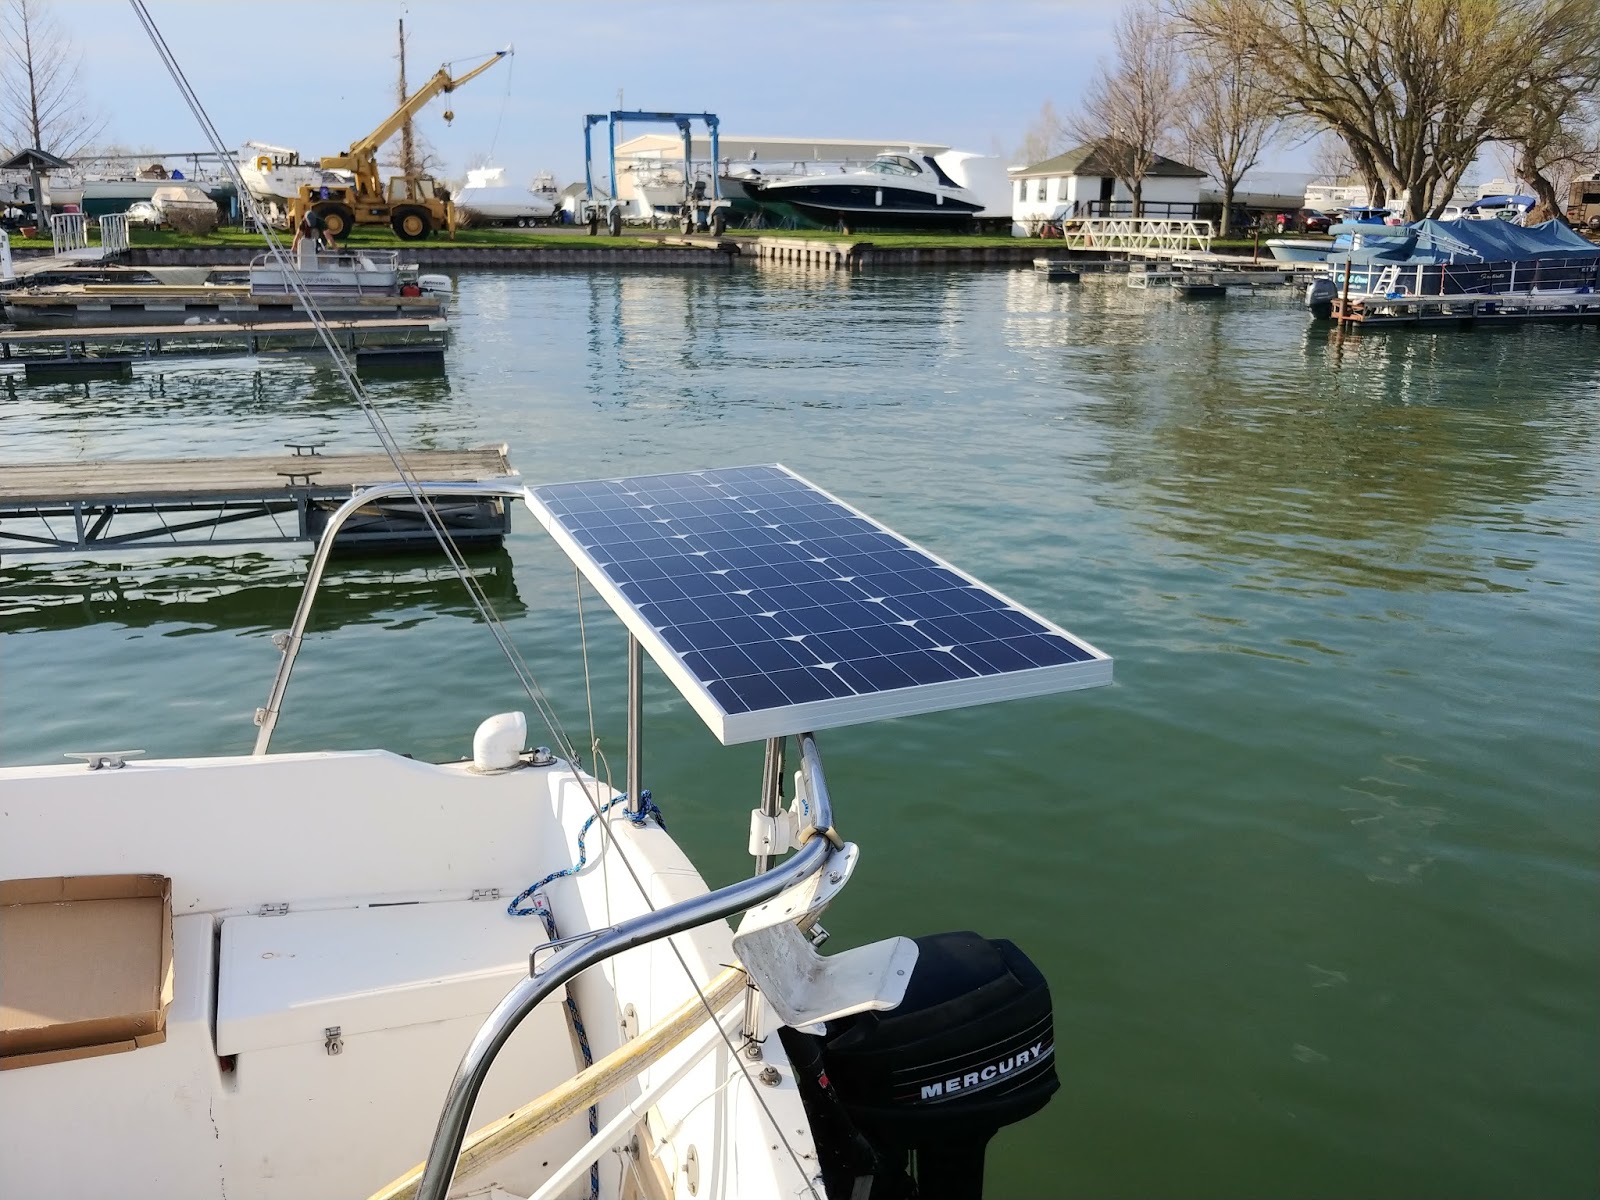
I also relocated that kicker bracket about 4 inches lower. Now, on full drop, the plate on the outboard sits properly where it should. Full raise, and I'm ALMOST out of the water (I still can't figure out how to tilt this f'n thing!) But at least with more bite under the water, I should also have a little more control and thrust, and then when I get around to swapping to a high-thrust prop after this season, that should take care of a bunch of things.

The other thing I did, was to mount my 100 watt solar panel on the stern rail. I need to get my adjustable support pole still, but even just tightened down on the clamps on the rail, it doesn't go anywhere without force being applied - even so, I used a couple lines to tie it off to keep it from dropping down.


So now... if you read this far, good on ya. Now's where more questions start for me.

First question: Is it me, or is there something amiss with my sail plan other than dirt?


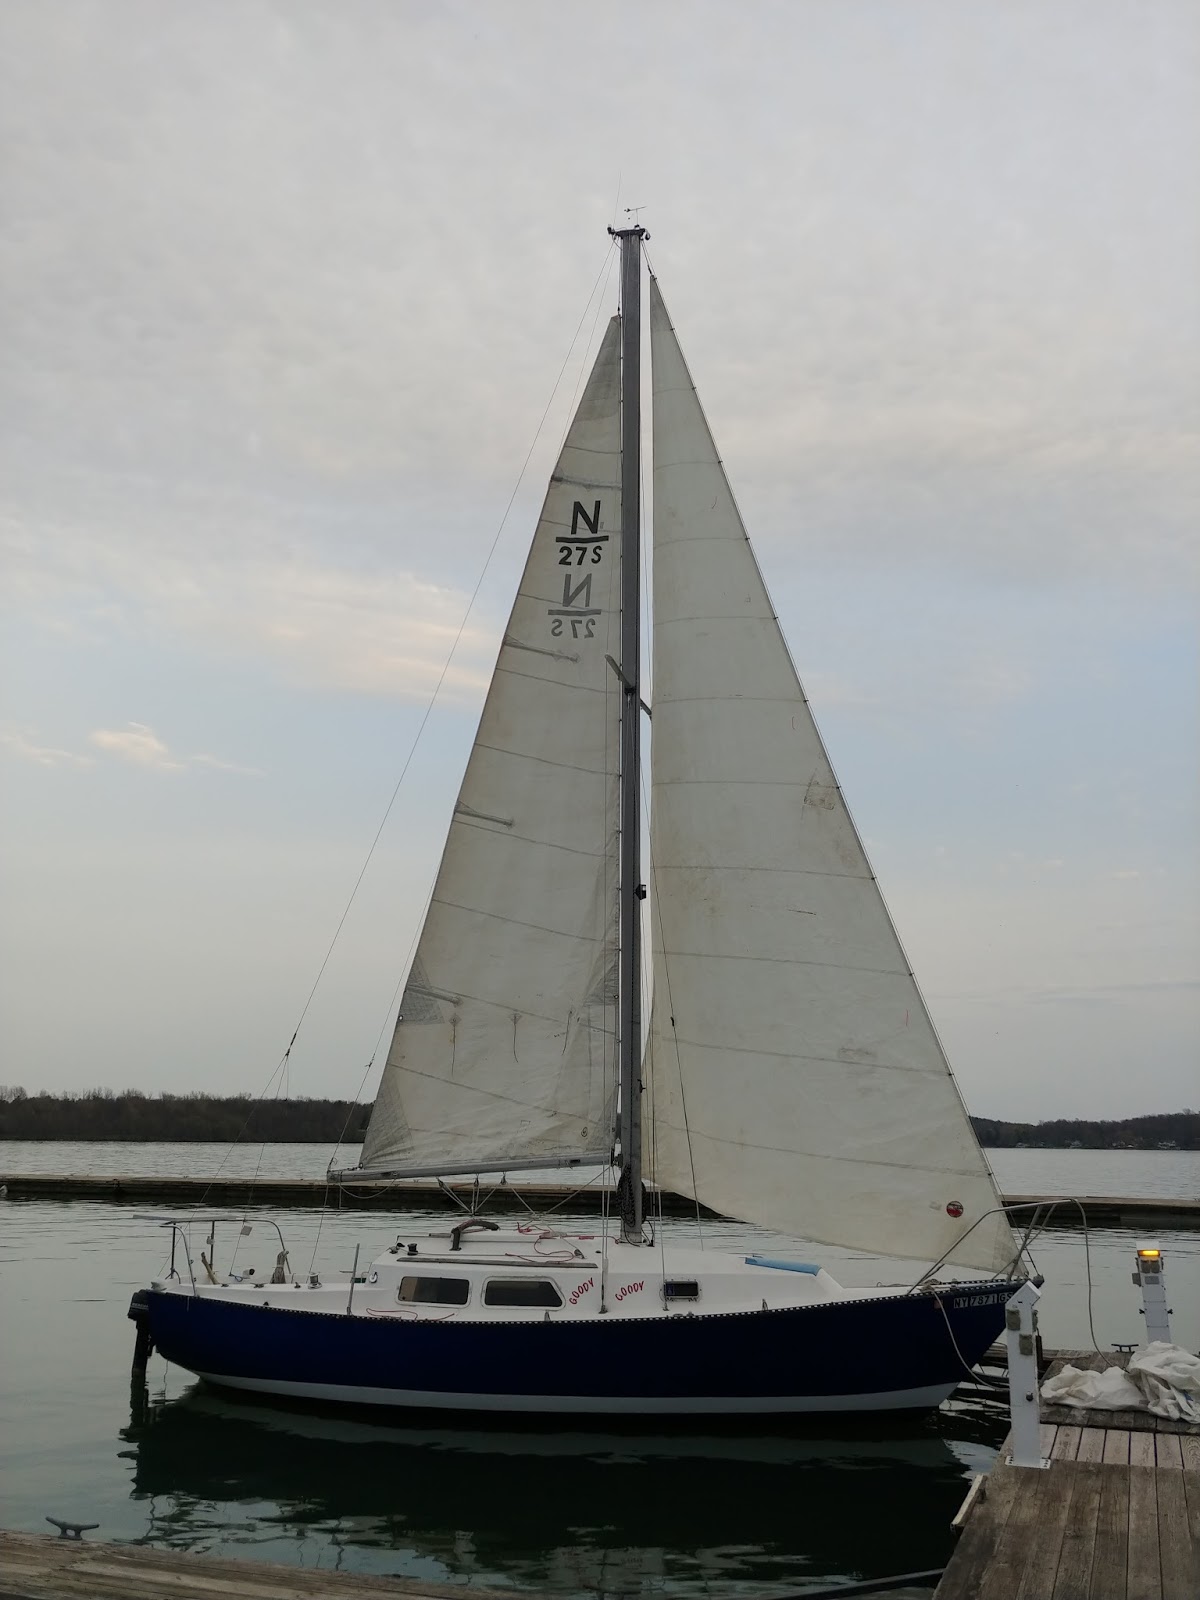
The boom seems to have quite the downward rake to it. The gooseneck on this boat is fixed to tbe mast, so it's not like I can pull that anywhere. The main sheet is tightened in just enough to hold the boom still, but it's not like I cranked it down excessively for drama. My first thought, seeing as the sail says N27S on it, is that perhaps it's a different cut than the N28 main would be. So that's definitely something I have to work out. And likewise, moving to the head sail. (I won't even mention the OTHER jib that I found, good God that thing was just a whole rolled up pile of nope). It might just be me, but it appears that he clew seems to be a bit high in the air, even for allowing for the sail to clear the cabin top coming over and back. Now this could be totally normal - my last boat, I ran a 150 genoa that had a flat cut bottom that was basically parallel with the deck, the so called Sweeper. So perhaps this is normal and I'm just not used to having such a high angle on what looks to be a standard 100, maybe a 110?

That also leads me into something else I noticed - I have no cars/tracks for my headsail. At all. None, neither side, no holes to where any would've been. Again, my last boat had chainplates further outboad, so maybe having them in where they are now, maybe tracks aren't needed? I'm going to add some soon anyway, I assume people that do have them, they follow the diagram in the manual from the capital yachts pages?

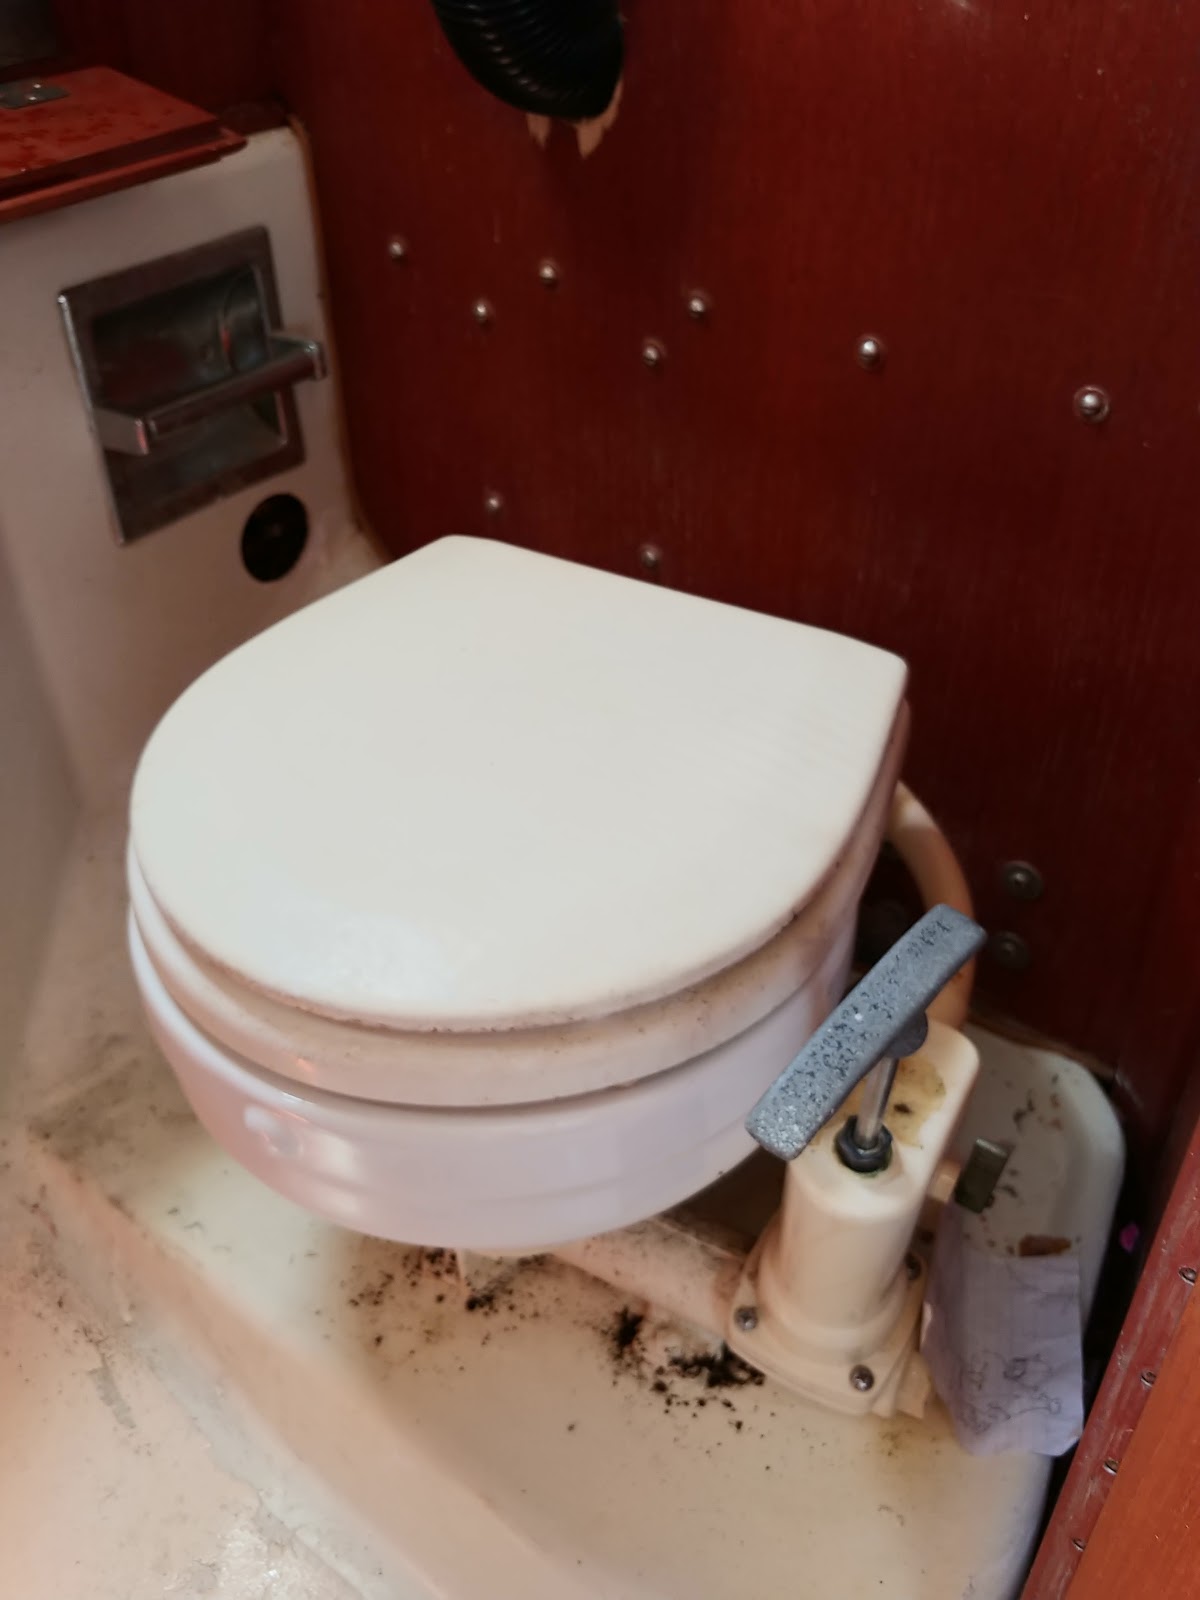
Otherwise though, I did have a good weekend aboard. Dried it out completely, cleaned it out and organized everything, and removed a lot of unnecessary things and garbage bits that were in the way. She is now ready to go out and enjoy the season, as long as no one eats Taco Bell before we go since I haven't redone the holding tank yet :)
 
Last edited:
Oct 22, 2014
20,992
CAL 35 Cruiser #21 moored EVERETT WA
@CharlzO Congrats for getting out on the water.

Your observation of the mainsail are correct. It is not the correct sail fro that boat. The sail is not to the top of the mast, It is not cut for your mast. It is too short on the boom.

The jib looks better. While you may have had a sweeper, not all boats use that cut of sail. When you can it is time to reach out an get some help from a sail loft. This is a big budget item. You can try Bacon Sails in Annapolis (they have a web site) and see if they have something that fits your boat and the pocketbook

You’ll want to check your mast/boom measurements against the “Sailboatdata.com” website to talk intelligently with a sail maker.

Oh the fun of boat ownership.

You can of course just sail the boat for a while to get a handle on the way it moves and the challenges it brings you. Then upgrade the sails and get a whole new experience when things are right.
 
  • Like
Likes: Will Gilmore
Oct 19, 2017
7,732
O'Day 19 Littleton, NH
I agree with JS. You should get a new main. My guess, not knowing a thing about it, is that main was recut badly. I don't see how the tack angle could work for any boat. You certainly can't add any rake to it. Maybe @DrJudyB would have helpful advice. Honestly, jssailem's advice seems like the only thing to say. He's also right about the headsail. Just a different cut for the jib. The higher clew means you need less track for a jib traveler, as the angle of pull needs to be farther aft. Otherwise, your foot gets too loose. That is probably why you don't see a track installed or why that particular cut was chosen.

Good job in the relocation of the motor mount and I love the solar panel. Nice looking boat.

-Will (Dragonfly)
 

MitchK

.
Sep 22, 2017
102
Capital Yachts Newport 28 Burbank, WA
charlzO, have you tried using the winch on the main sail halyard? The sail appears to be a bit loose. According to the manual, there is supposed to be a black band on the mast. That is where the head of the sail should be. According to the manual, it should be about a foot from the bottom of the mast head. The main sail is indeed the wrong one for the boat, but it should work. I would loosen the main sheet, and tighten up the halyard and see if it lifts the boom. That's what I had to do with my old sail.
 
Oct 22, 2014
20,992
CAL 35 Cruiser #21 moored EVERETT WA
When the wind fills the main sail, the boom will rise... until you pull it back down with the main sheet, or the wind dies.
Trim goal should be boom level. New sail would be cut that way. New sail would go to top of the mast, in the area as identified by the boat design.
 
Jan 14, 2014
225
Newport Newport 28 Fair Haven, NY
charlzO, have you tried using the winch on the main sail halyard?
I got it about as tight as I could where it was. I'm hoping if this weekend looks good to go out and actually put her under sail. I'll see if I can rig a block to give me better purchase on the winch. I tried curving it around the cleat and then on the winch and that was about as tight as it got, but without a true block, it might leave a few more inches in it.

When the wind fills the main sail, the boom will rise...
I'm hoping so. I know there's always a little bit to it, my Excalibur was similar, but not to quite the same extent. I think the fact that it's a N27S main is probably throwing it just that little extra bit further. It's not like once I'm under sail that the main will always be on the centerline and ready to crack me in the forehead. I'll work on a replacement main though, hopefully next month or July. Guess I should get that set before I worry about a bimini :)
 
Jun 25, 2004
1,108
Corsair F24 Mk1 003 San Francisco Bay, CA
Mitch,
You Mainsal has a shrunken bolt rope. Here’s a copy of an old post I wrote on SBO two years ago. there are a couple of other issues, but I don’t have time to address them. I’ll come back later to address them.

The bottom line is this: The biggest problem I can see is the shrunken bolt rope. If the dacron is not stretched out badly, you could release the bolt rope and re-seize it and use the sail for a while.
———————
Droopy Boom Syndrome

https://drive.google.com/open?id=0B3-G5RQ08N8BN0dKYzZJZnM4aUU

The leech of a sail usually doesn't stretch appreciably, but what DOES happen is that the bolt rope inside the luff may shrink with age. Modern, high quality mainsails don't have the shrinking bolt rope problem as much, but older ones or ones using soft dacron ropes shrink. Modern, high quality mainsails use a "hard" boltrope that neither shrinks nor stretches very much

After the bolt rope shrinks, the head of the sail cannot be hoisted up to the top of the mast. The leech is still the same length as when manufactured, so the mainsail hangs lower than it should at the back end of the boom. That's what the owner is probably seeing.

There's another thing that happens when the bolt rope shrinks: The sail gets very baggy along the luff and the draft gets very deep. The boat heels more and won't point and the sail is very hard to trim well.

There's a way to "fix" the drooping boom so the head of the sail can go up to the top of the mast. Most quality sails with a soft dacron rope have a "tail" hanging out at the bottom, which is stitched to the sail at the lower end of the luff. If you release the stitches, slide the luff down over the extra rope, and then restitch it, it may solve your droopy boom problem.

But.... and there is a but.... most of the sails with shrunken bolt ropes these days are either really old and stretched out or they are made to a low price point with OEM grade, stretchy sailcloth.Releasing the bolt rope makes the mainsail useable, but most of the time the shape is pretty baggy due to the age and condition of the sailcloth. Releasing the bolt rope in the luff might make an un-usable sail usable, but it probably won't give it a like-new shape.
~~~~~~~~~~~~~~~~~~~~~~~~~~~~~~~~

Attached Files:
 
Last edited:
  • Like
Likes: Will Gilmore
Jan 14, 2014
225
Newport Newport 28 Fair Haven, NY
I've put a few quotes in for a new main, and a 150 for kicks. Precision quoted a decent price, which would be a loose footed main that I have no problem with. There are some others I put in and am waiting answers on, but it definitely is a new sail I'm looking forward to. Minney's has a used main but in poor condition and that money is better spent towards the new one. Looks like that'll be for July this year, but at least this will be serviceable in the meantime.
 
Last edited:
Jan 14, 2014
225
Newport Newport 28 Fair Haven, NY
So this weekend's adventure has begun. I picked up a Raymarine Dragonfly 4DVS fishfinder from Defender on closeout for 89 dollars, so I mounted that. I really could care less about the fancy sonar and fishing options, I just wanted a depth meter for the time being, and as cheap as the whole unit was, why not. Mounted the transducer in wax under the starboard berth just by the bulkhead, as close to the keel line as I could get. So far, seems to work. Will test further tomorrow.

Also rid myself of the anchoring nest in the locker, and replaced with 25' of 1/4" high test chain, and tentatively 100' of 3/8" that looks like it was one of those Walmart spools in it's day. It hadn't even been unrolled fully, but until my 200' of 1/2" gets here on Monday, I rigged it to at least have that. Turns out the Danforth in the cockpit locker won't actually stow IN the anchor locker, so back it went, but with a shackle at the ready.

Found the on-demand water pump wiring, so tested that, and sure enough, it's there. Not a fan, really. But there might be a better solution ahead for it. I'll explain in a moment. I also mounted my 24" TV on the bulkhead, for those overnight Netflix needs. I intended to run it off my laptop but for some reason, this DisplayPort-HDMI adapter isn't passing sound like my other one. I gotta find that.

Also ran (temporarily) some blue Dyneema lifelines, so there's at least SOMETHING there for the time being, and then replaced my bow lights with LED fixtures I picked up cheap. That was all the progress today.

However...with productivity comes confusion. While tracing the water lines, I noticed a couple things. One, my head has NO FREAKING INTAKE. The water line feeding into the head, I sh*t you not (pun...maybe intended?), is capped off. What in the world.. And to make it better, I see no thru-hull anywhere that coincides with where it came from. Obviously I'm not sinking, so it's not something open anywhere. But I have no clue. The tangle of hoses under the V-birth, and lack of direct access to the water tank is simply maddening. I've traced out the rest of the holding tank lines, far as I can tell. And also as far as I can tell, there are multiple lines leading into the holding tank, not just the discharge from the head. It looks like there's a drain from the anchor locker going there? Which makes little sense. Why add to the holding tank with rain water and what not. I can't even find the water fill. At all. There's no access to the tank itself from any direction to find what fittings go where. I thought I found a corrugated hose that went in, but it goes up under the anchor locker and disappears. I don't anticipate using the on-board water but I'd at least like to have it sorted. And it's starting to look like a complete top-to-bottom head and tank system replacement. Hell I'd even plug the intake for the head into the water pump if I thought it wouldn't just endlessly draw - and if I knew how to fill the darn tank!

Tomorrow will be taking her out for the first actual sail though, so there's that to look forward to in the midst of the chaos.
 

MitchK

.
Sep 22, 2017
102
Capital Yachts Newport 28 Burbank, WA
Charlz,
Sounds like you are where I was at last fall. Trying to locate all the thru hulls so I could ensure they were closed and had antifreeze in them. All but three of my seacocks have been changed out to Marlon ones. The one for the holding tank pump out, and the two for the cockpit drain. My problem is, I currently have no way to get the boat out of the water to change them out. But that's my problem for another day. Got a box of wood plugs standing by.
Now hopefully our boats are plumbed basically the same. So, with that said, the seacock for the head is located in the aft most starboard compartment in the V berth. The seacock is just a little forward of the hatch opening next to the water tank. If yours is located there, be aware, that if you reconnect it, that on a starboard tack, the top of the head is below the water line. So make sure the head pump valve is turned to shut off the water supply, and the seacock is shut. I will be installing a vented loop in mine between the hand pump and the toilet inlet so I do not have to worry about taking on water through the head intake. It will also be getting a vented loop from the toilet to the tank for the same reason.

Also, just so you know, there are two head discharge lines and seacocks. Both of mine are located under the cabinet in the head. One is for direct pump out of the head via the Y valve, the other is plumbed directly to the holding tank via a hand pump. You can actually pump the tank directly over the side. I will be eliminating that feature in the near future. For now, it is wire tied so it can not be opened. Along with the Y valve and discharge seacock for the Y valve. So to recap, there are three large hoses going to the top of the holding tank. One from the Y valve, one to the suck out port in the anchor locker, and a third that goes directly to a seacock via a hand pump. A small vent hose goes to just below the toe rail on the port side of the bow.

The corrugated hose you mentioned that goes forward under the anchor locker is the cleanout line for the tank. The fitting will be found in the back port corner of the anchor locker. Mine also does not have a standard fitting, and I had to make an adapter for the pump out station hose.

The fill for the fresh water tank is located on the top of the tank. It does not have an external fill port. This cap is located under the center hatch cover in the V berth. The vent line for the tank goes forward and vents into the starboard side of the chain locker.

The actual drain for the chain locker is a small hose that goes from the lowest point in the anchor locker directly forward and out the leading edge of the bow. I think it is about 1/4" id hose just a few inches long.

If you have not found it yet, the head sink drain seacock is located under the forward portion of the port sette in the main cabin.

The hardest seacock to get to is accessed through the starboard side cockpit locker. You have to remove everything you have in the locker, then pull up a piece of plywood that forms the locker floor. You will then see the seacock. There is a cutout in the plywood floor, but it doesn't give you much access. Also located on a bulkhead in the forward end of this locker is another Y valve. This valve allows you to switch between bilge, or allow you to pump out the ice box. The manual bilge pump is in the aft end of the cockpit.

There is also a DC light fixture located in the forward portion of this locker. Hard to get to, but if you are crawling around in the locker, its nice to have a light. So there is one more fixture to convert to LED. I am converting all of my light fixtures to LED bulbs. I found some absolutely awesome bulbs for the main cabin that are rated at 1700 lumens! They are not cheap, but there is no comparison between the original incandescent bulbs and these LEDs, or other LED's I have tried. They draw approx. 850mA each, but for the amount of light they provide, its worth it. And I can use them in the original fixtures.

Anyway, I hope the info above is useful.

Mitch
 
Last edited:
Jan 14, 2014
225
Newport Newport 28 Fair Haven, NY
Looks like we have a bit of a different plumbing maze between us, but you've given me a couple good things to go looking for further.

I did more tracing this morning, and this is as far as I've made it. I'm uploading a quick video to youtube to maybe make it easier. But here's the descriptive version while I wait for it to finish:

The holding tank I have is a Jabsco Minitank 6 gallon, (38110-0000 model) with a top plate with two large opening and a small. Large corrugated from the head to one large inlet. The other large has a T fitting on it. One side snakes through another corrugated and up through the back of the starboard hanging locker and to a deck fitting (conveniently labeled gas.. which is funny, since the one back in the cockpit over the old fuel tank is labeled waste). The other side of the T goes through another hose, to a manual pump mounted in that same hatch, and then down to the direct overboard discharge thru-hull (which is closed). The smaller fitting on the tank, has a small piece of hose which then has another T fitting - one hose goes up under the v-berth and makes it's way into the anchor locker where it's just an open end dangling inside. The other hose goes over to starboard and follows the previously-mentioned corrugated. These appear to be "vents" for the holding tank, and I assume this was some attempt at cross-ventilation somehow. The starboard hose has a deck fitting that is more like a hose fitting - threaded like it would accept a garden hose. I'm rather glad I double checked, as I was half ready to shove a hose on it and hit the water to see if that was my water tank fill. That might have been messy.

Now the corrugated line that I followed up into the anchor locker, upon Mitch's advice I had looked into the bottom of the locker again (how I didn't pay attention when I put the rode in there yesterday, I have no idea), and it looks like there's a fill fitting there. When I was taking the video just now, I FINALLY found the other end when I had the camera stuck in tight places, and from what I can see, THAT is the water tank fill for this thing. Of course, there's no plug on it, so god knows how much dirt and crap has gotten shoved down that. And there's no access to the water tank under the v-berth, without cutting the top of the fiberglass off.

All of this leaves one giant question though: Where in the hell was the water intake for the head before? It's capped off, and there are no thru-hulls anywhere close to it, so it must've been cut off from somewhere. At this point, I'm debating on T-ing into the sink drain from the head sink, to act as both a sink drain, as well as a head intake. From what I've read briefly (as in, the other tab I have open), this would also allow me the option of flushing with the onboard water supply as opposed to intaking from the sea (fresh water anyway so not much of an issue there really).

Another option I have, is the entire center hatch in the V-berth is currently empty. It's a nice storage option for sure, but the odds of me needing it for storage at this point is small. I've seen people that have had V-berth holding tanks mounted, so an option might be to convert that into the holding tank. I'd rather not, since I don't see it being used much anyway but at the same time, finding a tank that matches the dimensions of this existing Jabsco are annoying. If I'm honest, I wouldn't bother replacing it, EXCEPT a previous owner hacked a hole in it, and shoved what looks like an RV vent hose into it with duct tape as a "vent". Likely they were smelling permeated hoses or a clogged vent, dirty bilge, combination... assumed it was the tank, and that was their solution. Ugh.
 
Jan 14, 2014
225
Newport Newport 28 Fair Haven, NY
Very true. We don't use the head very often, and my last boat I just used a porta-potti and even that we hardly ever used. I'd prefer to stick with a more traditional head for comfort reasons, but it's crossed my mind to yank EVERYTHING out and just do that lol. Though it's not the thru-hull capped off - I haven't found the actual thru-hull for the intake - it's just the hose that leads into the head and the hose is just plugged off on the end. I just have to find a source for it, at this point (not counting replacing all this stuff as it goes)
 
Jan 14, 2014
225
Newport Newport 28 Fair Haven, NY
The video finally uploaded for anyone that wants to follow along.

 
Oct 22, 2014
20,992
CAL 35 Cruiser #21 moored EVERETT WA
@CharlzO is it in the water? If on land I would think in a 28 foot boat that should be reasonably straight forward. Locate each of the thru hulls under the boat, climb back in the boat and locate them inside.
If in the water, a bit more of a challenge, follow the pipes. They should act like Dorothy’s yellow brick road.
 
Jan 14, 2014
225
Newport Newport 28 Fair Haven, NY
Yes, she's floating now. I've gone back over all the pictures I took when she was still on the land, and I still only came up with the three actual thru-hulls in the cabin, and the one that's closed off in the engine compartment (no more engine). I was thinking perhaps a previous owner had removed the head intake thru-hull at some point, but I haven't even been able to find where it might have been glassed over, unless they reused it for a depthsounder. There is a plugged off one on the port side underneath the settee near the sink drain so it's possibe. My hardest part is the lack of access under the v-berth. I had tought too that it could be entirely possible that it's located under where the holding tank is sitting, but I am not really inclined to remove the tank until I'm ready to replace it, for... obvious reasons. I was reading a thread over on SailNet regarding someone doing something along what I was thinking - they usually leave their sink drains closed unless they're using it. So they plan on Tee-ing off the drain and using that thruhull also as an intake. Sounds like their plan though is to basically fill from the sink, and then the toilet will draw out of the water that's being held in the drain line.

It seems logical enough. I can redo the intake plumbing after this season. I'm hoping to not need to use this thing at all this year, if I'm honest, but there's always the "oh s***" instances so I would like to at least get it functional for emergencies until then. I suppose I could just dump water in the bowl from the sink using a cup? I've never had or used a manual head so I'm still in the dark on how that works lol. And identifying this head is an interesting endeavour. No labels.


No idea what direction the lever on the side should be in to "pump to the tank", or if it even works anyway. New head is definitely on the list soon.
 
  • Like
Likes: jssailem

MitchK

.
Sep 22, 2017
102
Capital Yachts Newport 28 Burbank, WA
Charlz, good video. There are definitely some significant differences between your N28 and mine. I have watched the video a couple of times, and have a question. In the aft portion of the V berth, there appears to be a small shelf unit with a nicely finished plywood top. Is that top removable? I think your access to your fresh water tank is behind that shelf unit. Both my black water tank and fresh water tank is located in the bow where yours is. The black water tank is supposed to be 6 gallons, and the fresh water tank is supposed to be 20 gallons or so. It looks like a PO installed a fresh water fill port on the starboard deck. I would like to install an external fill for mine, and that looks like a good place to install it. Just need to find a way to add a fill port to the tank. Supposedly, there is special glues developed for the RV industry that allows you to bond additional port to tanks, then just run the new water lines. Of course, if I am running a hose to fill the tank, I could just open the forward hatch, and snake the hose to the existing fill port.
 
Jan 14, 2014
225
Newport Newport 28 Fair Haven, NY
If you're talking about the cut-out section in the center aft section, I believe it's a little wooden shelf that the previous owner had built. Unfortunately, zero access there either. I decided to go out and put the sails up before I tried to test my theories as to which is the fresh water fill. The one on the starboard side of the deck next to the pump out fitting, that has that weird hose connector, that hose leads back as best as I can tell to the holding tank, as a vent. Why someone would use that kind of fitting is beyond me. But I've learned with this boat that the previous owner(s) were quite adept at being inventive. But it really does appear that I have a sealed-for-life water tank. I'm sure I could carefully cut an access hole facing backwards, from the inside of that giant center compartment to reach hoses and such. I hadn't thought of that, but that would give me some access without having to completely mangle the topside of the fiberglass in the v-berth. I really wish they hadn't discontinued that holding tank model, or at least had a newer version of it with the same setup. I would be more than happy to replace it with a like model to get rid of this one and it's 'custom' vent, but looks like I'll have to just get a different one and put the fittings in myself.
 

JRT

.
Feb 14, 2017
2,037
Catalina 310 211 Lake Guntersville, AL
Honestly based on age and unkown condition you are better removing and replacing with a MSD that is self contained and has the pump out capability. Peggie Hall is the SME on this.

@Peggie Hall HeadMistress
 
Dec 2, 1997
8,708
- - LIttle Rock
That toilet looks like an antique PAR, which was a Jabsco model from the 70s. It's beyond help, along with all the hoses...but even if it weren't, don't even THINK of connecting any manual toilet--or any other toilet designed to use sea water--to the fresh water plumbing! If you can't find any flush water intake line to it, it's possible that you have a recirculating system...a nightmare that was popular among smaller boat builders in the '70s, as were corrugated hoses. It ALL needs to come out and be replaced. All your fresh water hoses should also be replaced, and maybe the tank too. But let's deal with the the sanitation system first:

John Tubb is right...On any boat much smaller than about 30', a self-contained system—an "MSD" portapotty-- makes a lot of sense. The "MSD" designation in the model name/number means it has fittings for a pumpout line and vent line, and is designed to be permanently installed (actually just sturdier brackets than portables, so you could still take it off the boat if you absolutely have to), which means that although it's still called a PORTApotty, you don't have to carry anything off the boat to empty it.

A 5-6 gallon model holds 50-60 flushes...you'd need at least a 30 gal tank to hold that many from a manual marine toilet. No plumbing needed except a vent line and pumpout hose--so no new holes in the boat...and -0- maintenance needed except for rinsing out the tank--which you can do with a bucket while it's being pumped out. Total cost including the pumpout hose and vent line is about $200--a fraction of what you'd spend for toilet, tank and all the related plumbing needed. And the best part is, you have all the advantages of a toilet and holding tank without giving up a single square foot of storage space.
Check out the Thetford 550P MSD and the Dometic/SeaLand 975MSD Sanipottie

The link in my signature goes to my latest book, which not only deals with odor issues, but is also a comprehensive "marine toilets and holding tanks 101" manual that will help you get it all right the FIRST time and also help you learn how to prevent 99% of problems instead of having cure 'em. And I'm always glad to answer any questions it doesn't.

Peggie
"If you can't explain it to a six year old, you don't completely understand it yourself." --Albert Einstein