The process of lap fitting your prop to the prop shaft taper makes certainj both the shaft and prop mate together on the taper well with no high or low spots. When you see the inside of a prop with rings or high and low spots it was not reamed or lap fit properly. The mating of the two surfaces is extremely simple to do.
They fit to each other through the act of rotating the prop around a locked shaft with the valve grinding compound in-between the two surfaces. The idea to to achieve a 70% contact area or better during this process. You can further check your work with Prussian Blue but it's not totally necessary.
Ideally, this should be done any time you replace a shaft or prop and are mating a new prop to an old shaft or if you are unsure whether it has ever been done. You DO NOT want to over do this though and this is usually a one time job.
Apply Compound To Shaft:
Remove the key and apply a liberal amount of compound to the shaft and slather the area where the prop will sit.
Valve Grinding Compound:
The compound you use for this task is commonly referred to as valve grinding compound. I have used Clover Compound by Loctite and also the compound by Permatex which is available at most any NAPA Auto.
For this task I do prefer the oil lubricated valve grinding compounds as opposed to the water based versions. With the water based product the prop seems to bind more and is "grabby" when rotating it around the shaft. For this pictorial I used oil based Permatex brand. Any fine valve grinding compound will work.

Slide The Prop Onto The Shaft:
Once you have the compound on the shaft slide the prop on but do not drive it on hard. Once it feels seated, and is not wobbling on the shaft, begin to rotate the prop slowly and with even pressure. It helps if you have locked the gear box. Rotate the prop about 5 times then remove it & check progress. If you still need more fitting do it again.

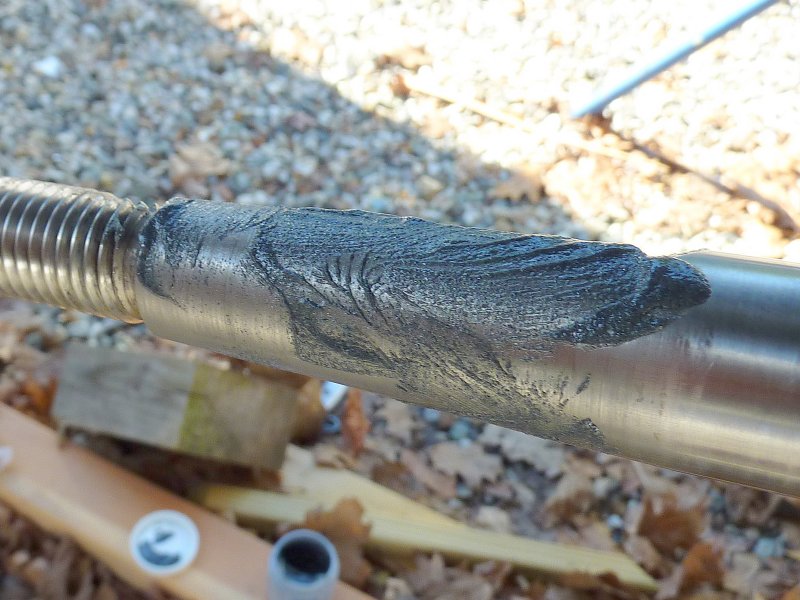
After Grinding:
Here is what it looks like after rotating and before wiping the valve grinding compound off the shaft. The picture with the compound wiped off came out all blurry so I'll need to take another one at some point.
The shaft and inside of the prop should look evenly ground with no spots that have not been honed.
The shaft and inside of the prop should look evenly ground with no high/low spots or rings that have not been honed. It should be noted that the prop is the part that will give up more material as it is significantly softer than most shafting unless you have an old bronze shaft.

High / Low Spots:
In this photo you can see a couple of either high or low spots about half way down the inside of the prop & the concentric "rings" I was talking about. This prop was worse before I started but the shots down through the bore never came out good enough to publish (note to self remember to bring flash!) This photo was only after about five rotations. I spun it a total of 22 rotations and these high/low spots were no longer visible making for a much better fit interface.

Clean The Prop & Shaft:
To clean the inside of the prop I use a terry cloth towel doused in denatured alcohol. Simply pull it through the prop a few times and you will be ready to install it.
Always check the keyway and make sure all the grinding compound is out of the it as well. If you can't get it clean with a rag you can use a q-tip to clean the keyway.

Install The Propeller:
To install the propeller you'll want to follow these simple steps:
1) Slide the prop onto the shaft, without the key, until it will not move any further. It is okay to use glycerin or a light oil, but not much to slide the prop onto the shaft as this will prevent premature binding but be sure to clean this oil or lube for the final install.
2) Mark the leading edge of the prop where it meets the shaft with a fine tip Sharpie marker. This is your insert depth mark. When installed with the key, and torqued down, you should no longer see the fine point Sharpie marking. Remove prop.
3) Install the key and slide the prop over it and up the shaft. If you can't get to your mark the key is jamming the prop and needs to be readjusted or re-fit via filing or sanding of the key.
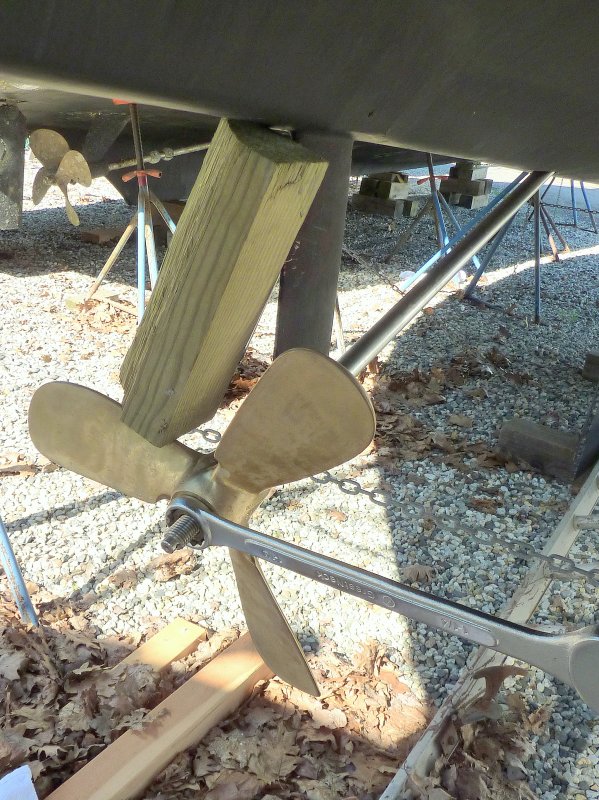
4) Thread on the big nut and insert a block of wood between the hull and prop to lock it.
5) Torque the large nut, preferably using the right sized wrench. These nuts are soft and can be rounded easily so a proper fitting wrench is a good idea. The nuts for a 1" shaft are usually, but not always, 1 1/4".
6) Once the prop has been torqued down remove the large nut and replace it with the thinner nut and torque it down.
Proper Installation of Nuts:
Yes, the small nut is supposed to go on first acting like a lock washer, with the big nut backing it up. I always torque with the big nut then flip flop them and lock them onto each other with two wrenches.
Once the nuts are on and torqued install your cotter pin. I have found that if I don't really bend over the cotter that it can hook weeds. Ideally you don't want to bend them that much, but figure out what works for your local waters.

They fit to each other through the act of rotating the prop around a locked shaft with the valve grinding compound in-between the two surfaces. The idea to to achieve a 70% contact area or better during this process. You can further check your work with Prussian Blue but it's not totally necessary.
Ideally, this should be done any time you replace a shaft or prop and are mating a new prop to an old shaft or if you are unsure whether it has ever been done. You DO NOT want to over do this though and this is usually a one time job.
Apply Compound To Shaft:
Remove the key and apply a liberal amount of compound to the shaft and slather the area where the prop will sit.
Valve Grinding Compound:
The compound you use for this task is commonly referred to as valve grinding compound. I have used Clover Compound by Loctite and also the compound by Permatex which is available at most any NAPA Auto.
For this task I do prefer the oil lubricated valve grinding compounds as opposed to the water based versions. With the water based product the prop seems to bind more and is "grabby" when rotating it around the shaft. For this pictorial I used oil based Permatex brand. Any fine valve grinding compound will work.
Slide The Prop Onto The Shaft:
Once you have the compound on the shaft slide the prop on but do not drive it on hard. Once it feels seated, and is not wobbling on the shaft, begin to rotate the prop slowly and with even pressure. It helps if you have locked the gear box. Rotate the prop about 5 times then remove it & check progress. If you still need more fitting do it again.
After Grinding:
Here is what it looks like after rotating and before wiping the valve grinding compound off the shaft. The picture with the compound wiped off came out all blurry so I'll need to take another one at some point.
The shaft and inside of the prop should look evenly ground with no spots that have not been honed.
The shaft and inside of the prop should look evenly ground with no high/low spots or rings that have not been honed. It should be noted that the prop is the part that will give up more material as it is significantly softer than most shafting unless you have an old bronze shaft.
High / Low Spots:
In this photo you can see a couple of either high or low spots about half way down the inside of the prop & the concentric "rings" I was talking about. This prop was worse before I started but the shots down through the bore never came out good enough to publish (note to self remember to bring flash!) This photo was only after about five rotations. I spun it a total of 22 rotations and these high/low spots were no longer visible making for a much better fit interface.
Clean The Prop & Shaft:
To clean the inside of the prop I use a terry cloth towel doused in denatured alcohol. Simply pull it through the prop a few times and you will be ready to install it.
Always check the keyway and make sure all the grinding compound is out of the it as well. If you can't get it clean with a rag you can use a q-tip to clean the keyway.
Install The Propeller:
To install the propeller you'll want to follow these simple steps:
1) Slide the prop onto the shaft, without the key, until it will not move any further. It is okay to use glycerin or a light oil, but not much to slide the prop onto the shaft as this will prevent premature binding but be sure to clean this oil or lube for the final install.
2) Mark the leading edge of the prop where it meets the shaft with a fine tip Sharpie marker. This is your insert depth mark. When installed with the key, and torqued down, you should no longer see the fine point Sharpie marking. Remove prop.
3) Install the key and slide the prop over it and up the shaft. If you can't get to your mark the key is jamming the prop and needs to be readjusted or re-fit via filing or sanding of the key.
4) Thread on the big nut and insert a block of wood between the hull and prop to lock it.
5) Torque the large nut, preferably using the right sized wrench. These nuts are soft and can be rounded easily so a proper fitting wrench is a good idea. The nuts for a 1" shaft are usually, but not always, 1 1/4".
6) Once the prop has been torqued down remove the large nut and replace it with the thinner nut and torque it down.
Proper Installation of Nuts:
Yes, the small nut is supposed to go on first acting like a lock washer, with the big nut backing it up. I always torque with the big nut then flip flop them and lock them onto each other with two wrenches.
Once the nuts are on and torqued install your cotter pin. I have found that if I don't really bend over the cotter that it can hook weeds. Ideally you don't want to bend them that much, but figure out what works for your local waters.
")