Just brought a 1986 Hunter 23 home - The rebuild!
- Thread starter Roughsawn
- Start date
@isaksp00 is correct about cover for the cockpit drain as you need it to prevent junk getting into it. I am cautious about the 90 degree bends. See if the forum store has one so you do not have to drill new holes. They also should have the build list of parts for your boat.
I suggest pulling the forward panel off in the V Berth which is triangle in shape and look at anchor locker hose area for any leaks.
Topside leaks. Well there is a way to detect. Close off forward hatch and tape it. Put a large single piece of plastic over company taped to the deck. Slit it so a leaf blower tube can be inserted and tape over. Have another person standing by with a bucket of soapy water. Turn on and start brushing everything topsides. Any bubbling you will find topside leaked.
Your mast and boom are either Kenyon Isomat or Z Spar. Parts for Kenyon Isomat go to Rig Rite. Z Spar go to either Forum store or U S Spars in Gainesville Florida for parts.
What engine do you have? Take a photo of motor bracket and also inside locker wall so I can see what is going on there to see if attachment of motor bracket is stout. You have what is called a reverse transom
Where the shroud chain plates go thru the deck, see if any water stains on the interior bulkhead.
Welcome to the forum
Crazy Dave
I've been thinking about getting my sails reconditioned. The LaMauney Process for cleaning and re-resining that Sail Care offers might be worth trying. From what I can tell for my H26 main, it would cost somewhere around $150 about 10% the cost of a new sail.Thanks! I think the sails will suffice for a bit. They certainly look original - main and jib. Kinda stiff feeling, yet slick. Did not find any rips or bad areas. Some staining, but expected. Stitching still looked good! Spread them out in the warehouse at work recently. They looked huge!
https://sailcare.com/site/sail-cleaning-pricing/
I'd also check the bulkheads that the chain plates bolt to. On mine, the plywood had degraded due to a bad seal under the chain plate cover on the deck. It cracked under load, I'm lucky I didn't dismast.@isaksp00 is correct about cover for the cockpit drain as you need it to prevent junk getting into it. I am cautious about the 90 degree bends. See if the forum store has one so you do not have to drill new holes. They also should have the build list of parts for your boat.
I suggest pulling the forward panel off in the V Berth which is triangle in shape and look at anchor locker hose area for any leaks.
Topside leaks. Well there is a way to detect. Close off forward hatch and tape it. Put a large single piece of plastic over company taped to the deck. Slit it so a leaf blower tube can be inserted and tape over. Have another person standing by with a bucket of soapy water. Turn on and start brushing everything topsides. Any bubbling you will find topside leaked.
Your mast and boom are either Kenyon Isomat or Z Spar. Parts for Kenyon Isomat go to Rig Rite. Z Spar go to either Forum store or U S Spars in Gainesville Florida for parts.
What engine do you have? Take a photo of motor bracket and also inside locker wall so I can see what is going on there to see if attachment of motor bracket is stout. You have what is called a reverse transom
Where the shroud chain plates go thru the deck, see if any water stains on the interior bulkhead.
Welcome to the forum
Crazy Dave
@isaksp00 is correct about cover for the cockpit drain as you need it to prevent junk getting into it. I am cautious about the 90 degree bends. See if the forum store has one so you do not have to drill new holes. They also should have the build list of parts for your boat.
I suggest pulling the forward panel off in the V Berth which is triangle in shape and look at anchor locker hose area for any leaks.
Done did! The original anchor locker hose came complete with a rusty pair of Vice Grips crimping it off. After cleaning 2 yards of rotten leaves and other stuff out of the locker, I discovered a nice anchor with chain and about 100' of rope! Then replaced the hose. I'm not completely happy with it yet, but it's not leaking anymore.
Topside leaks. Well there is a way to detect. Close off forward hatch and tape it. Put a large single piece of plastic over company taped to the deck. Slit it so a leaf blower tube can be inserted and tape over. Have another person standing by with a bucket of soapy water. Turn on and start brushing everything topsides. Any bubbling you will find topside leaked.
Thanks Dave, this is on my short list of things to check.
Your mast and boom are either Kenyon Isomat or Z Spar. Parts for Kenyon Isomat go to Rig Rite. Z Spar go to either Forum store or U S Spars in Gainesville Florida for parts.
It's a Kenyon. One HEAVY SOB!
What engine do you have? Take a photo of motor bracket and also inside locker wall so I can see what is going on there to see if attachment of motor bracket is stout. You have what is called a reverse transom
Just ordered a Tohatsu 6 hp Sail Pro this morning from onlineoutboards.com as they were FINALLY back in stock. The boat still has the original motor mount, but I ordered this one to replace it with: https://www.amazon.com/Panther-55-0407AL-Aluminum-Lightweight-4-Stroke/dp/B00CKFUF12
I also brought home a 2'x2' piece of 1/4" aluminum plate (an old sign)to use as a backer for the motor mount and rudder gudgeons.
Where the shroud chain plates go thru the deck, see if any water stains on the interior bulkhead.
They appear to be good! The leaks, so far, are old cracked companionway slider and anchor locker hose. Anchor locker hose replaced and thru hulls have been rebedded. Brought a piece of Acrylic home from work today to replace the companionway slider. (I work at a sign shop, so sheet plastics abound, and the piece of 1/4" aluminum was an old sign destined for the dumpster) for free!
I did notice the port light is also leaking a lil bit. Will be pulling both port and starboard lights off for a good cleaning and rebedding soon.
Welcome to the forum
Thanks! I've read so so many threads on here where you have shared your wisdom on Hunter 23's. I can't tell you how grateful I am for that. Your wisdom here definitely was a large part of choosing this particular boat. Again, many thanks sir!
Crazy Dave
Last edited:
Thanks for the tip! I think they are OK... 3/4" plywood does not looked stained and still seem tabbed in pretty solid. I will remove the cover plates and rebed soon though...I'd also check the bulkheads that the chain plates bolt to. On mine, the plywood had degraded due to a bad seal under the chain plate cover on the deck. It cracked under load, I'm lucky I didn't dismast.
If there is any rot it would be in the grain at the top edge. The tabbing on mine was fine right before it failed. Make sure the bolts that attach the chain plate to the plywood are tight.
Got it! The veneer that covered the end grain on the plywood ogee is missing on one and peeling on the other. I will look into those further before stepping the mast.If there is any rot it would be in the grain at the top edge. The tabbing on mine was fine right before it failed. Make sure the bolts that attach the chain plate to the plywood are tight.
And I need to extend a hearty "Thank You Sir!" to you as well. It seems when ever I have a question about this ole gal and search forums here, you had the correct answer posted years ago!
Much appreciated. I think I'll run what I have this summer, but it certainly wouldn't hurt to send the sails to them over next winter to have them checked out. And their pricing is pretty reasonable!I've been thinking about getting my sails reconditioned. The LaMauney Process for cleaning and re-resining that Sail Care offers might be worth trying. From what I can tell for my H26 main, it would cost somewhere around $150 about 10% the cost of a new sail.
https://sailcare.com/site/sail-cleaning-pricing/
Hi. I grew up sailing on Lake Erie -- well, Maumee Bay, really. The furthest east we ever got was West Sister Island. I would like to get a boat and back into sailing, but have very little idea how to evaluate a used boat, and especially a fiberglass hull. I'm looking at a 1989 Hunter 23 in Chicago. Any suggestions as to what in particular to take a close look at?
Sure! With one HUGE caveat. My knowledge of this boat is barely a mere drop in the ocean compared to the knowledge available on this forum. So with that in mind...Hi. I grew up sailing on Lake Erie -- well, Maumee Bay, really. The furthest east we ever got was West Sister Island. I would like to get a boat and back into sailing, but have very little idea how to evaluate a used boat, and especially a fiberglass hull. I'm looking at a 1989 Hunter 23 in Chicago. Any suggestions as to what in particular to take a close look at?
I looked at 2 1986 Hunter 23's being offered for sale at Strictly Sail in Cincinnati. Read many, many posts on here about this particular boat dating back to 1999 before buying it, so I didn't go in totally blind. Plus, being a licensed home inspector I have a bit of a talent for looking at things with a discerning eye.
Anyway, I sure someone with an infinite amount of wisdom concerning this boat will chime in soon (Dave? Peter? you guys have your ears on?!) But I will share my experience.
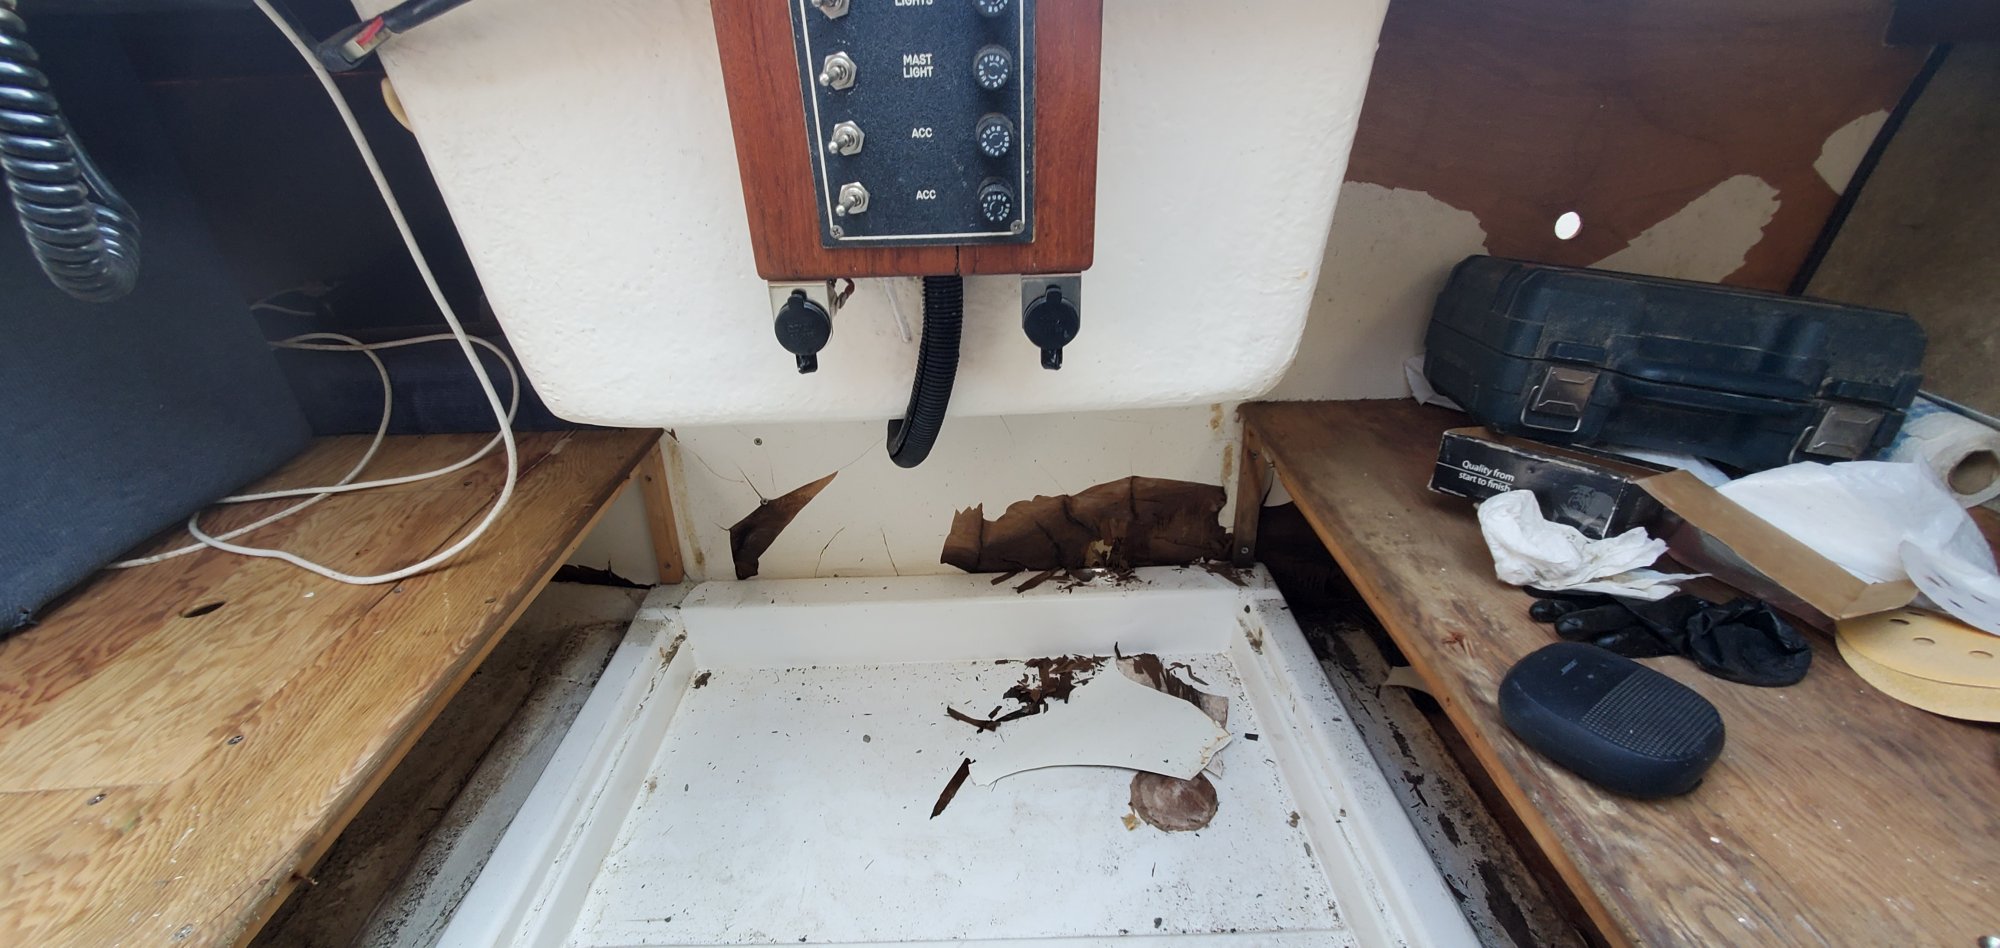
As I mentioned, I looked at both 23' Hunters at the lot. Both had very similar deficiencies in that they had taken on rainwater and had been left neglected. That rainwater built up and caused some rotting of the bulkheads. My next project, and likely the major project with this boat so far, is to cut out the rot in the rear bulkhead (just under companionway) and replace it.
I did notice that this problem existed on both boats I looked at, and definitely was a factor in the offer I made for the boat.
Both boats also had some rot in the front bulkhead at the v berth (I posted on this earlier in this thread.)
Although I don't believe I'll need to replace the front bulkhead, as the rot was minimal, it will need tabbed back in now that the area is dry.
I'd definitely suggest bringing a flashlight with you and looking in any nook and cranny on the boat for water damage. And the bonus is you can look inside the hull to see if there were any repairs from a past crash or some such.
The exterior hull on mine had been neglected so long and was chalky to touch...
Fortunately a friend has taken that project and is running with it. He's been at it 2 Saturdays now, wet sanding and whatnot... He's done great! The boat is starting to take a shine and all it's cost me is some beers!
There are some cracks in the gel coat on the topsides that will need addressed, but I think I'll do that while docked..
")
Open the port side lazarette locker and give that area a good look. Rudder pintles, cockpit drain, battery box, etc. Again, when I chose this boat, I knew it needed some work. And it was a big factor in the offer I made. I did look over the mast pretty closely - mainly making sure it wasn't cracked or something that would have been a no go... Just a couple t bolts bent. Sails were original, and although I didn't get to go over them fully at the dealership, they appeared, and still appear, serviceable. The running rigging will be replaced very soon. The dealership was asking $4k for the boat. I offered $2500 and, not without a minor amount of haggling, they relented.
So far, the cost to get this thing up to par has been pretty minimal - (except the outboard - but I could not find a used one anywhere). And a WHOLE bunch of elbow grease, but it really is a labor of love for me.
If you are reasonably handy, and the boat needs some work, go for it! Just make sure your offer reflects that. And don't overlook the resources on this forum... There at literally thousands of posts about Hunter 23's here!
Oh, I may as well post an update of the progress on this ole gal! Mostly still in "demo" phase, but once the rear bulkhead is replaced (as mentioned in above post) I've a number of parts that have been refinished to reinstall and a good deep cleaning to do.
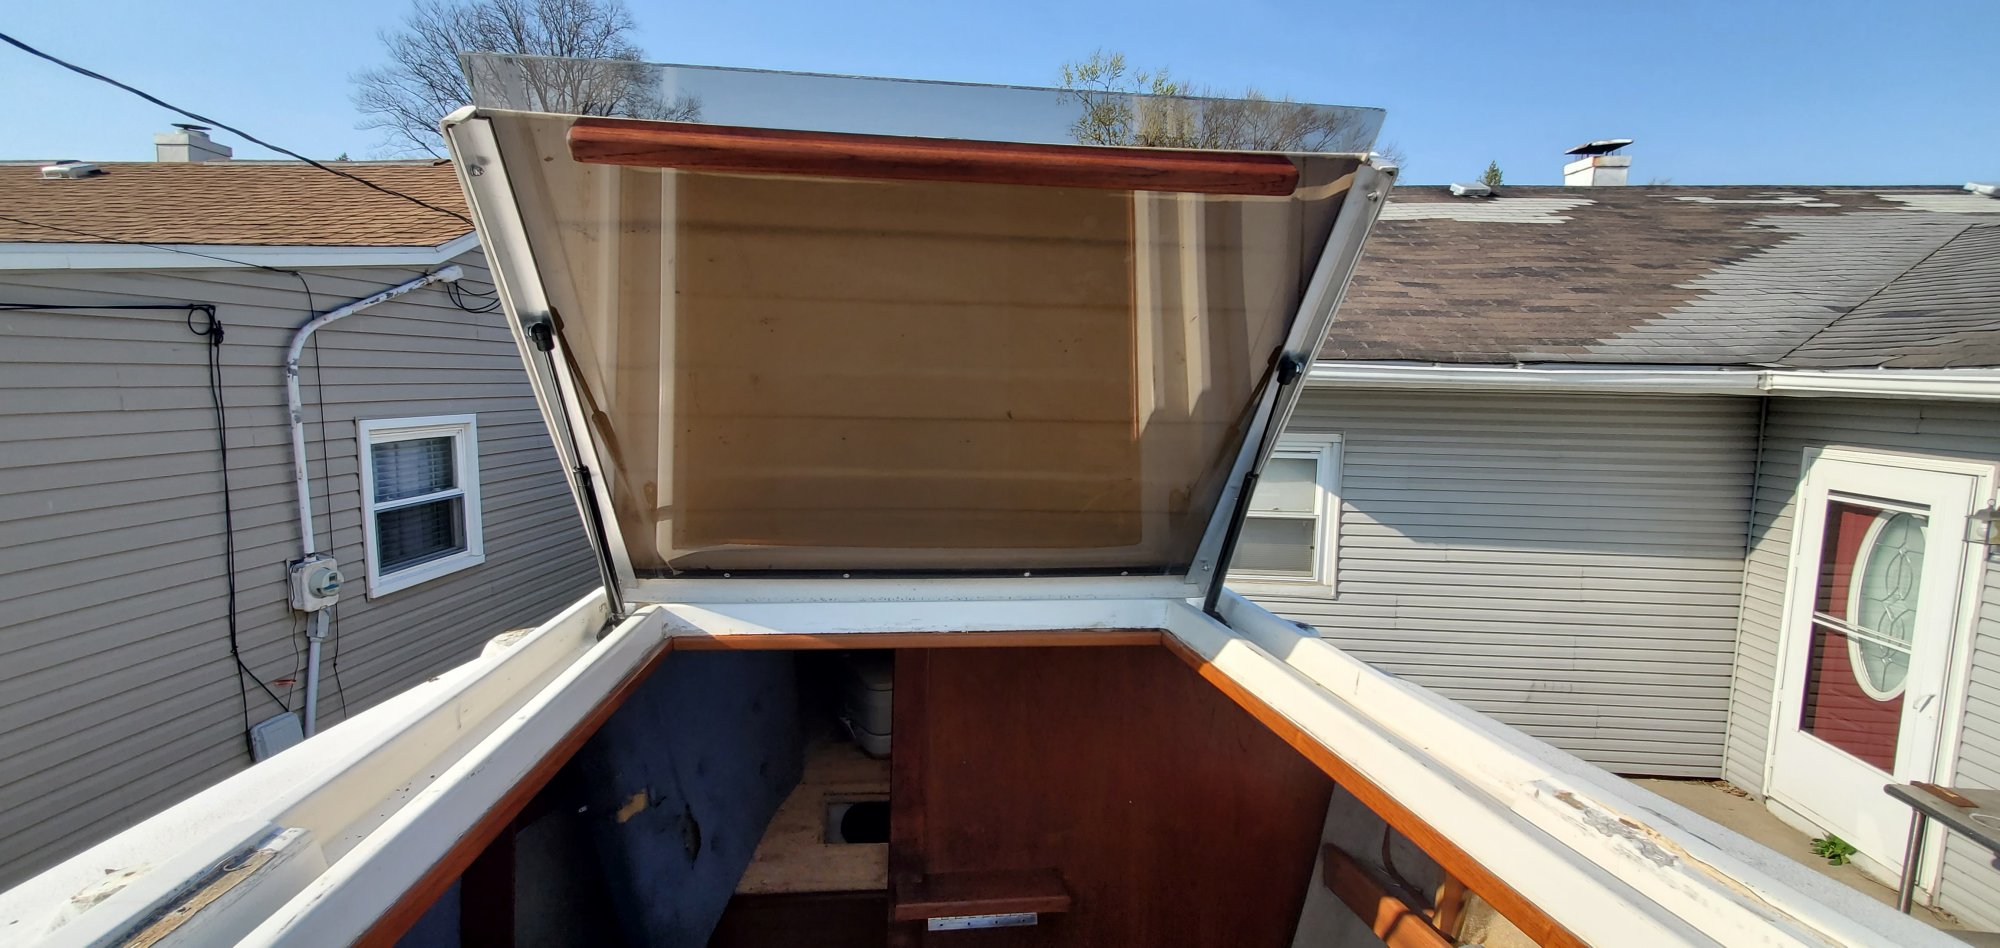
Saw a post a while back where a guy put gas struts on the hatch (Paladin?) and decided that needed to happen. Mentioned in an earlier post that I brought a new piece of acrylic home from work for the slider, and finally got that installed, but also decided to add some gas struts to the hatch. We now have a convertible!
Brought home some scrap 1" aluminum angle and set it up.
Used these https://www.amazon.com/gp/product/B08QV5XQ6W/ref=ppx_yo_dt_b_asin_title_o00_s00?ie=UTF8&psc=1
as the base mounts for the struts...
and these for mounting to the hatch..
This operation takes some engineering. The base mounts are reversed (left mount on right side) and I had to grind down the bolts thru the hatch as they were to wide to close it, but its working good now. bottom mounts are planted 6 7/8" to the aft end from the curb in front of the hatch and about 3/4" in from the outside curb.
Had to play around with exactly where to mount the angle on the hatch. It hit the strut initially and would not allow the hatch to close, but all is well now. Liking this!
Thanks for the update! I appreciate your picture of the companion way hatch - you've just added a job to my list, as ours can be a real pain to slide open sometimes and I want the gas struts! Time to make a few additions. I'm working on pics of ours for an introductory post. coming soon!
Update time again! The weather has been somewhat co-operative the last couple weeks with the exception of a lot of rain. Progress is being made! As I was blessed recently with a dock on Indian Lake here in Central OH, the race has been on to get this ole gal ready to sail!
The main project was to replace this rotted bulkhead.
So happy with the Dewalt Oscillating tool I bought a couple years ago. It allowed me to cut out that rotten mess WITHOUT cutting an inadvertent hole in the hull. Here's what I ended up with.
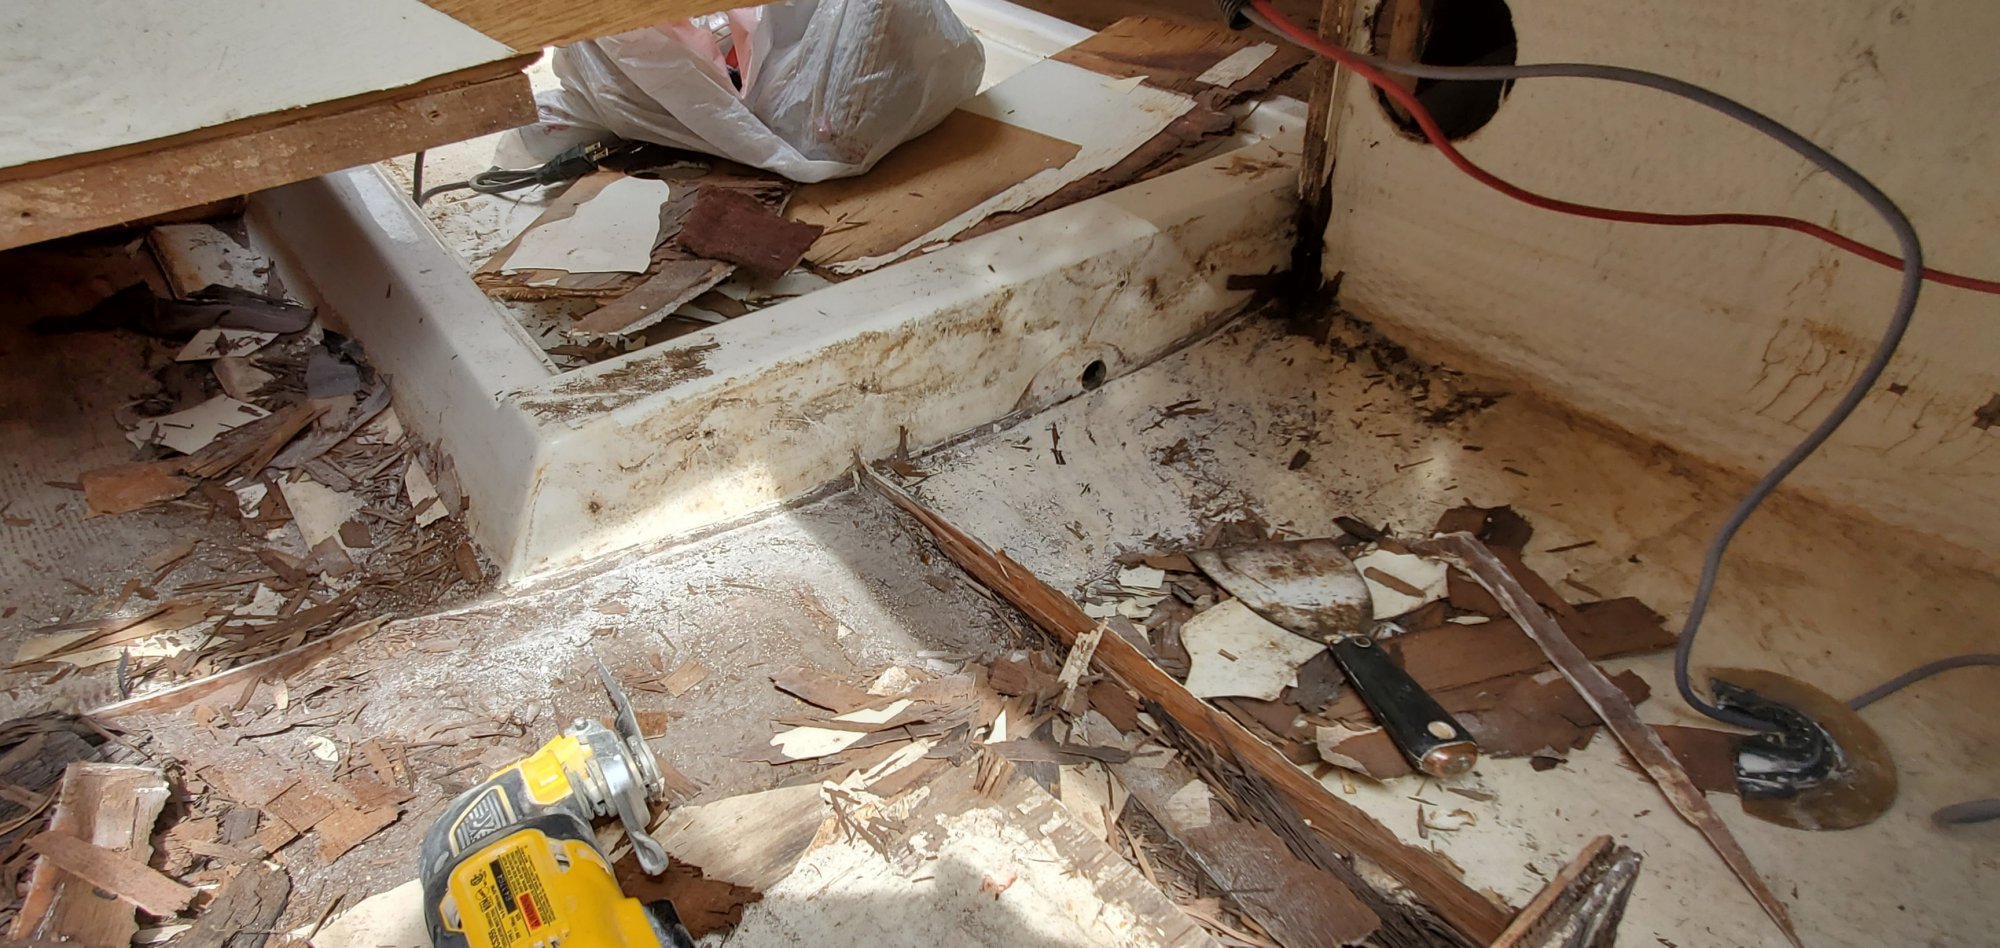
I made a pretty close 3/8" plywood patch and glassed it back in with a gusset plate across the seam for strength.
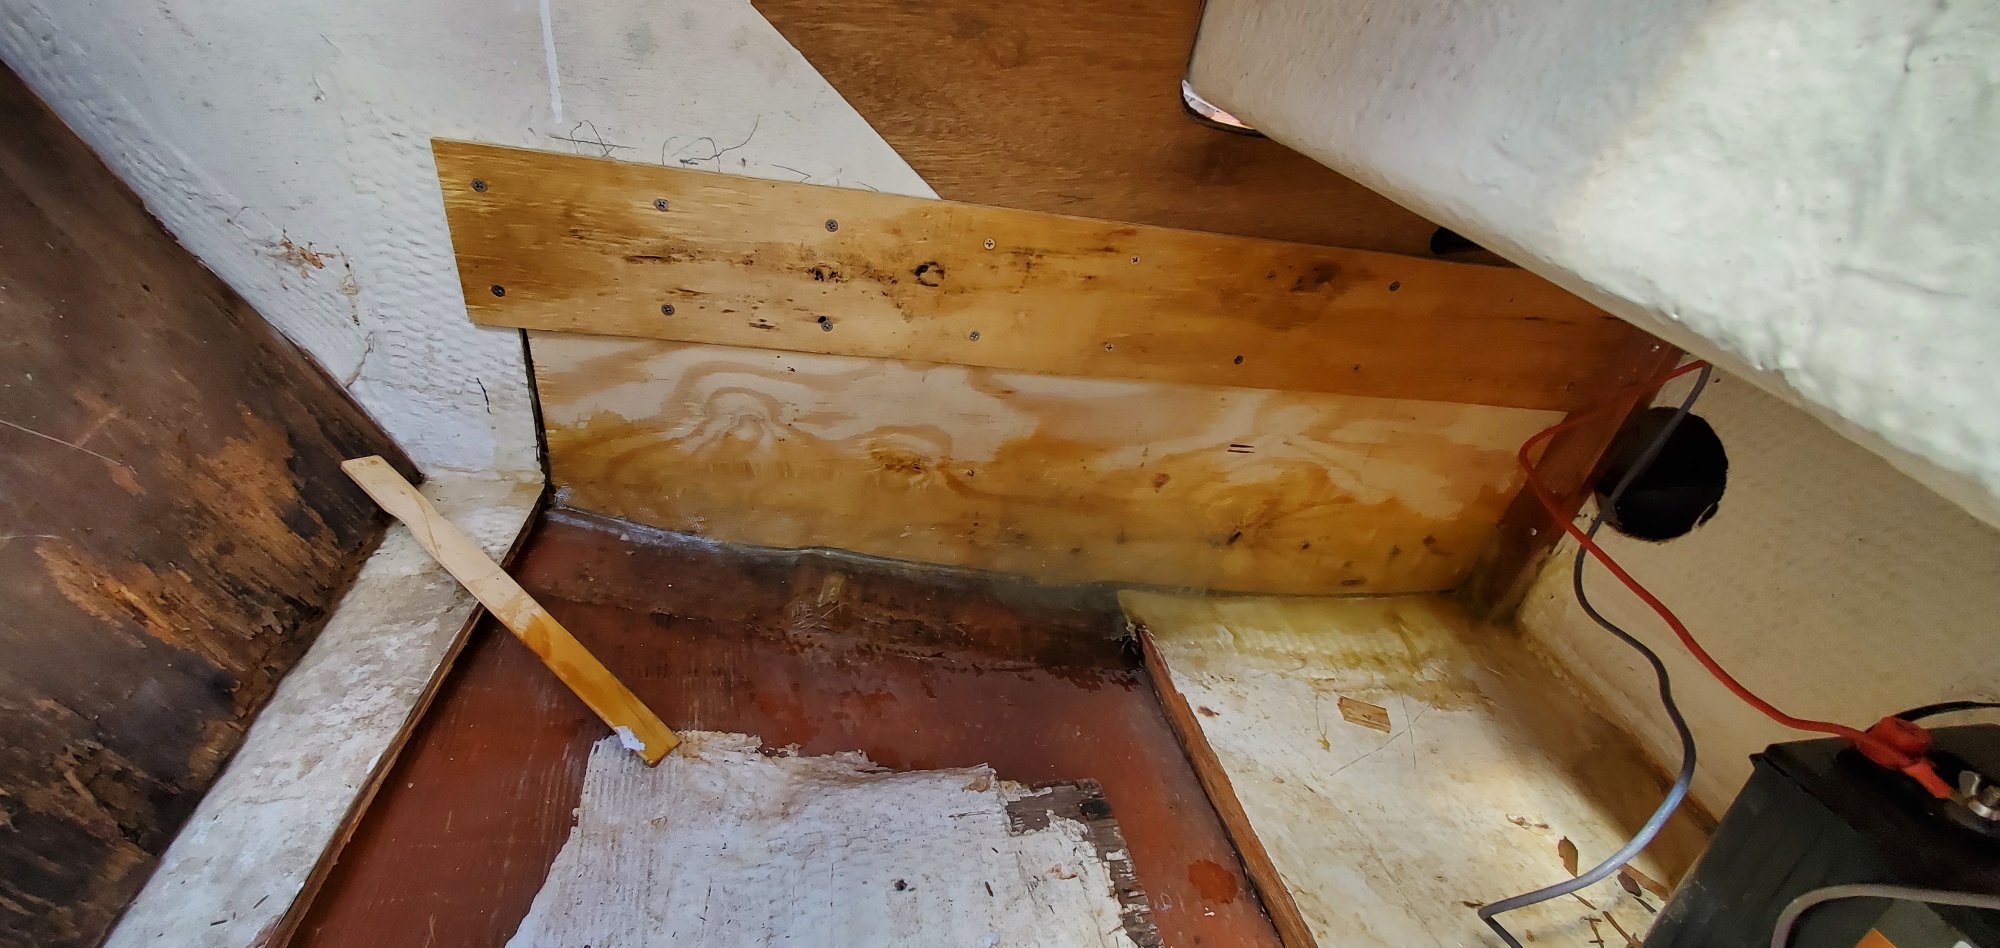
Still have to paint this thing with Epoxy and rebuild the battery box platform, but the majority of this project is complete.
From the cabin:
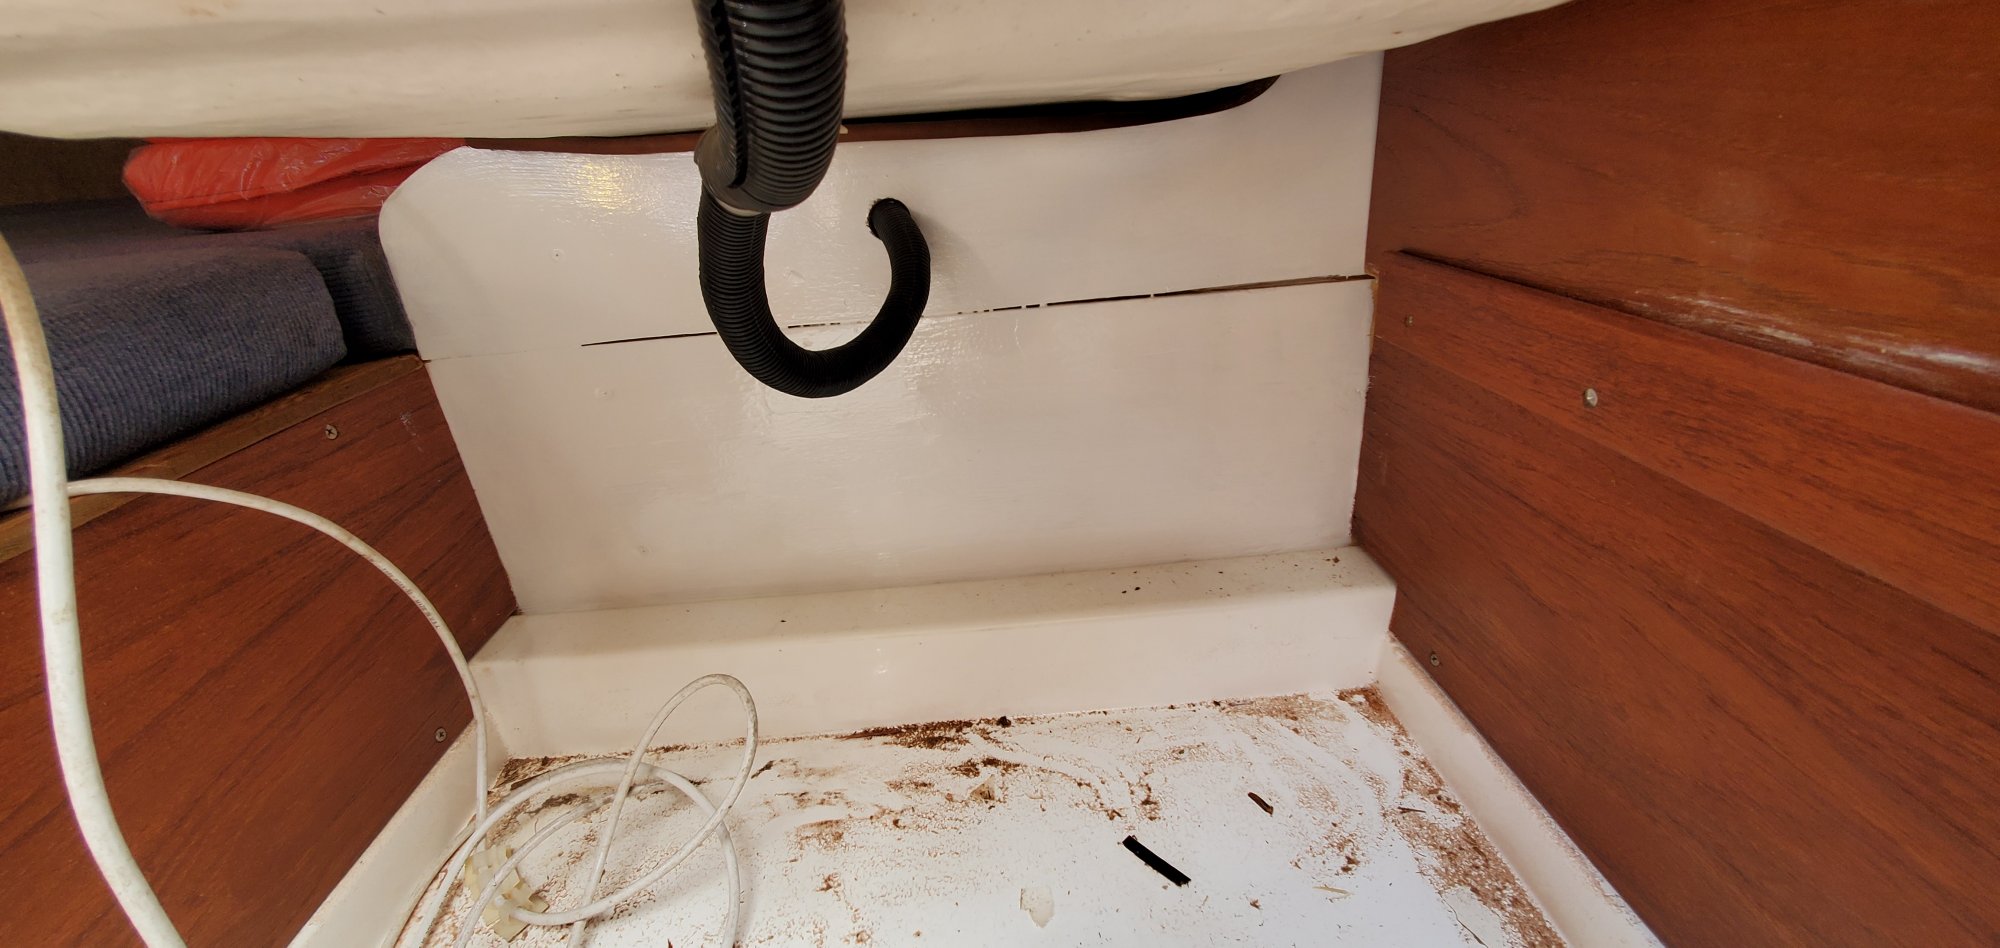
I still need to pick out a nice board out of the wood shed to cover the seam, but I have some really cool exotic hardwoods to choose from.
This week I've been focused on the rudder. It seemed to me like it was starting to separate at the seams.
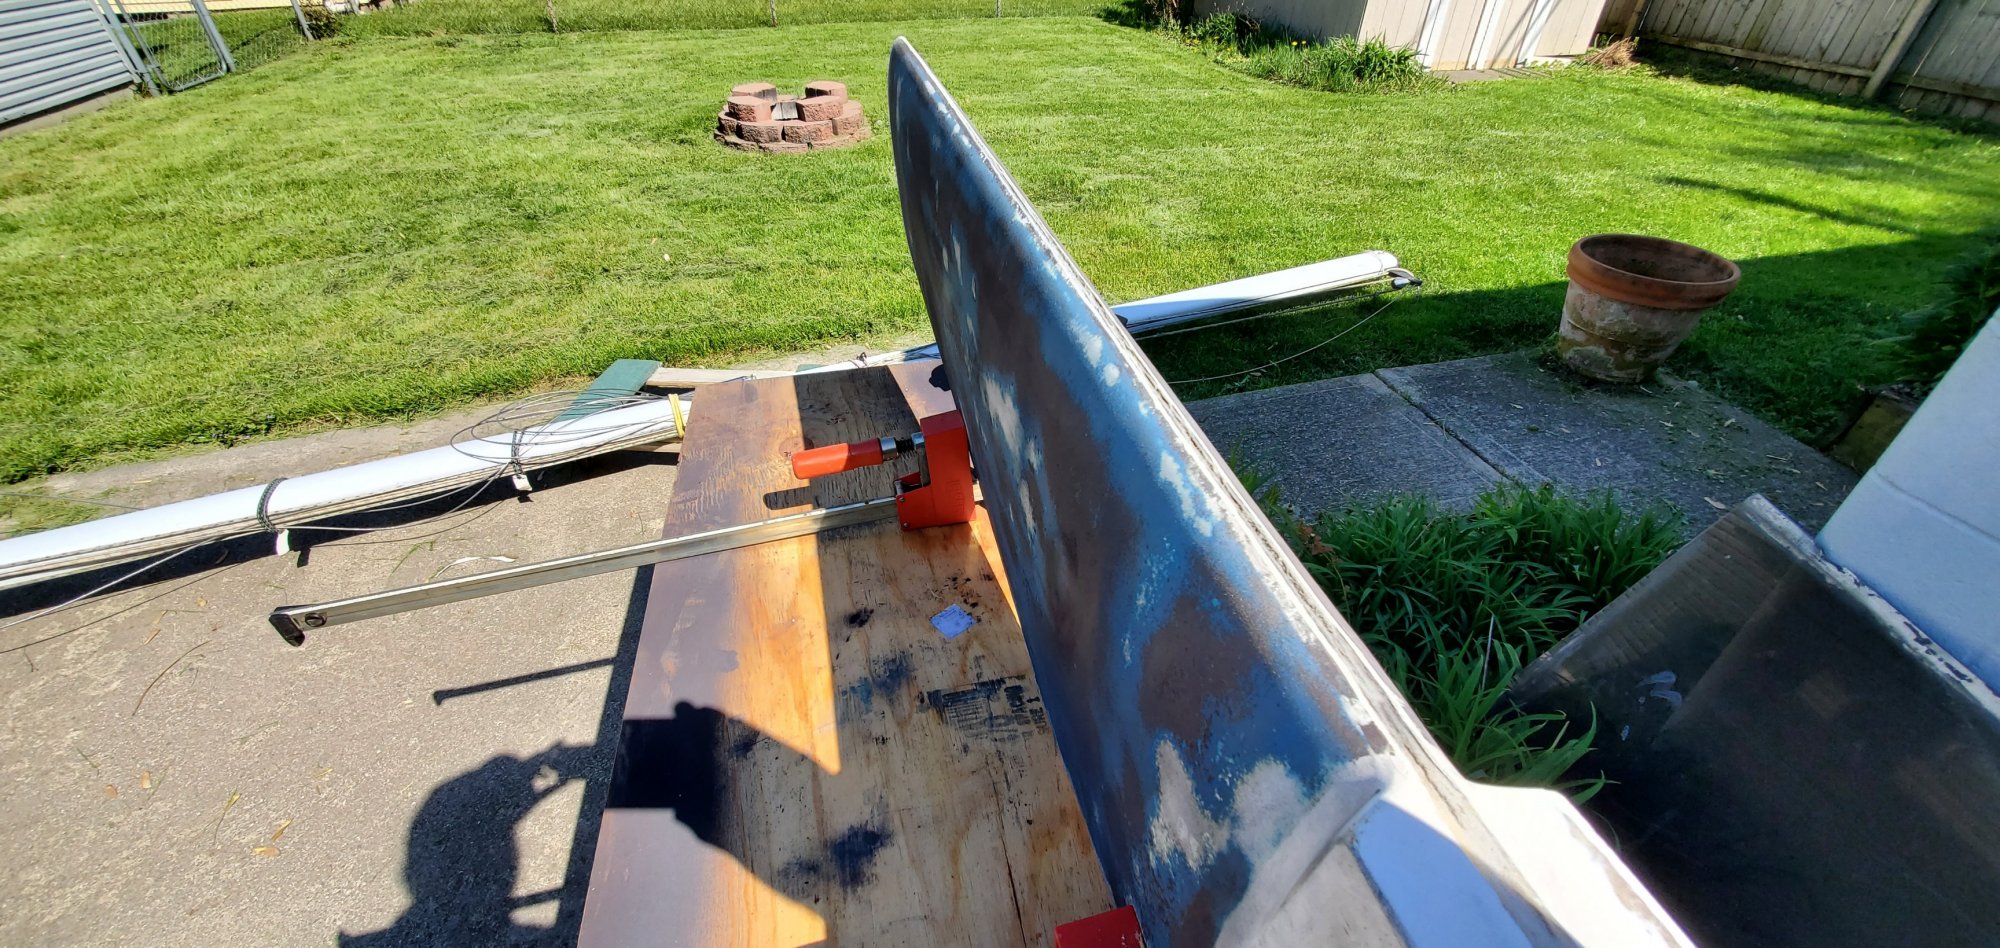
I just sanded it all down, painted it with epoxy and covered the seams with mesh. Then it got another good sanding and a couple coats of epoxy paint. Hopefully this keeps this thing together and water OUT!
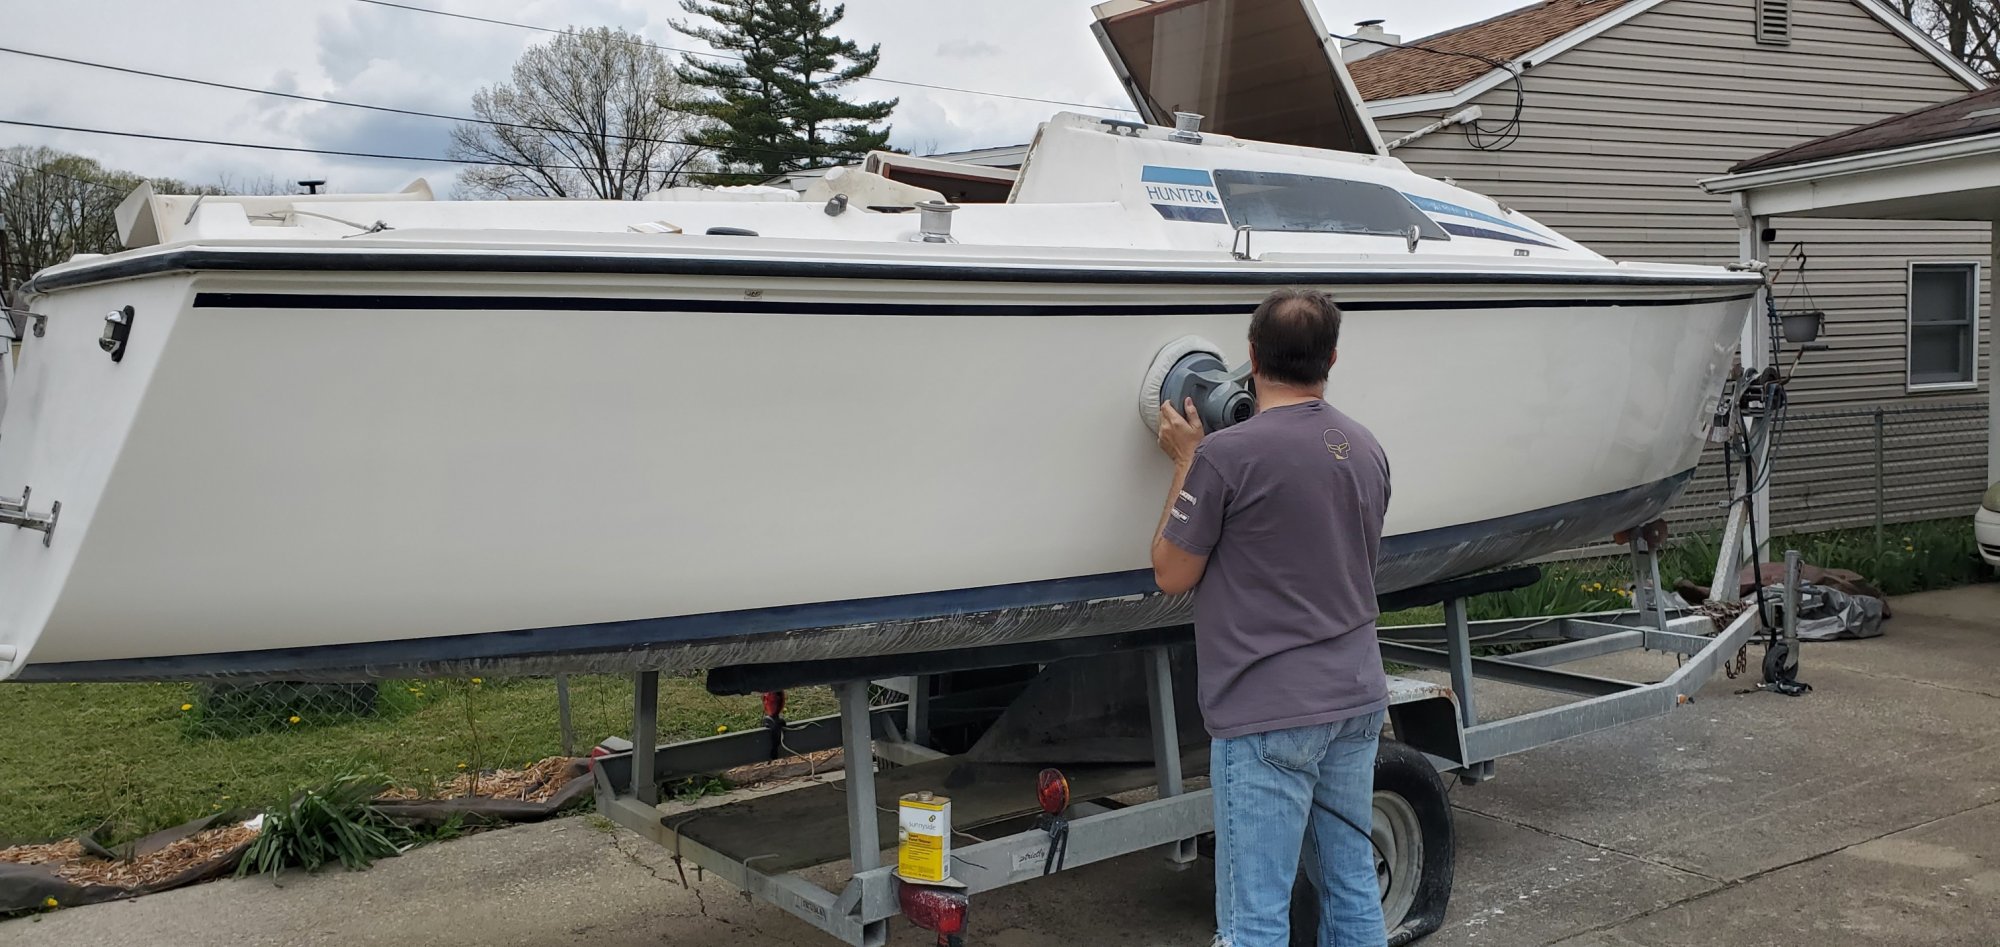
Another blessing - A buddy has been working diligently polishing the hull on Saturdays. It's not looking like new, but for a 35 year old boat, it looks pretty amazing considering all the chalkiness when he started. Just need to keep him in beer and food! It really is looking great!
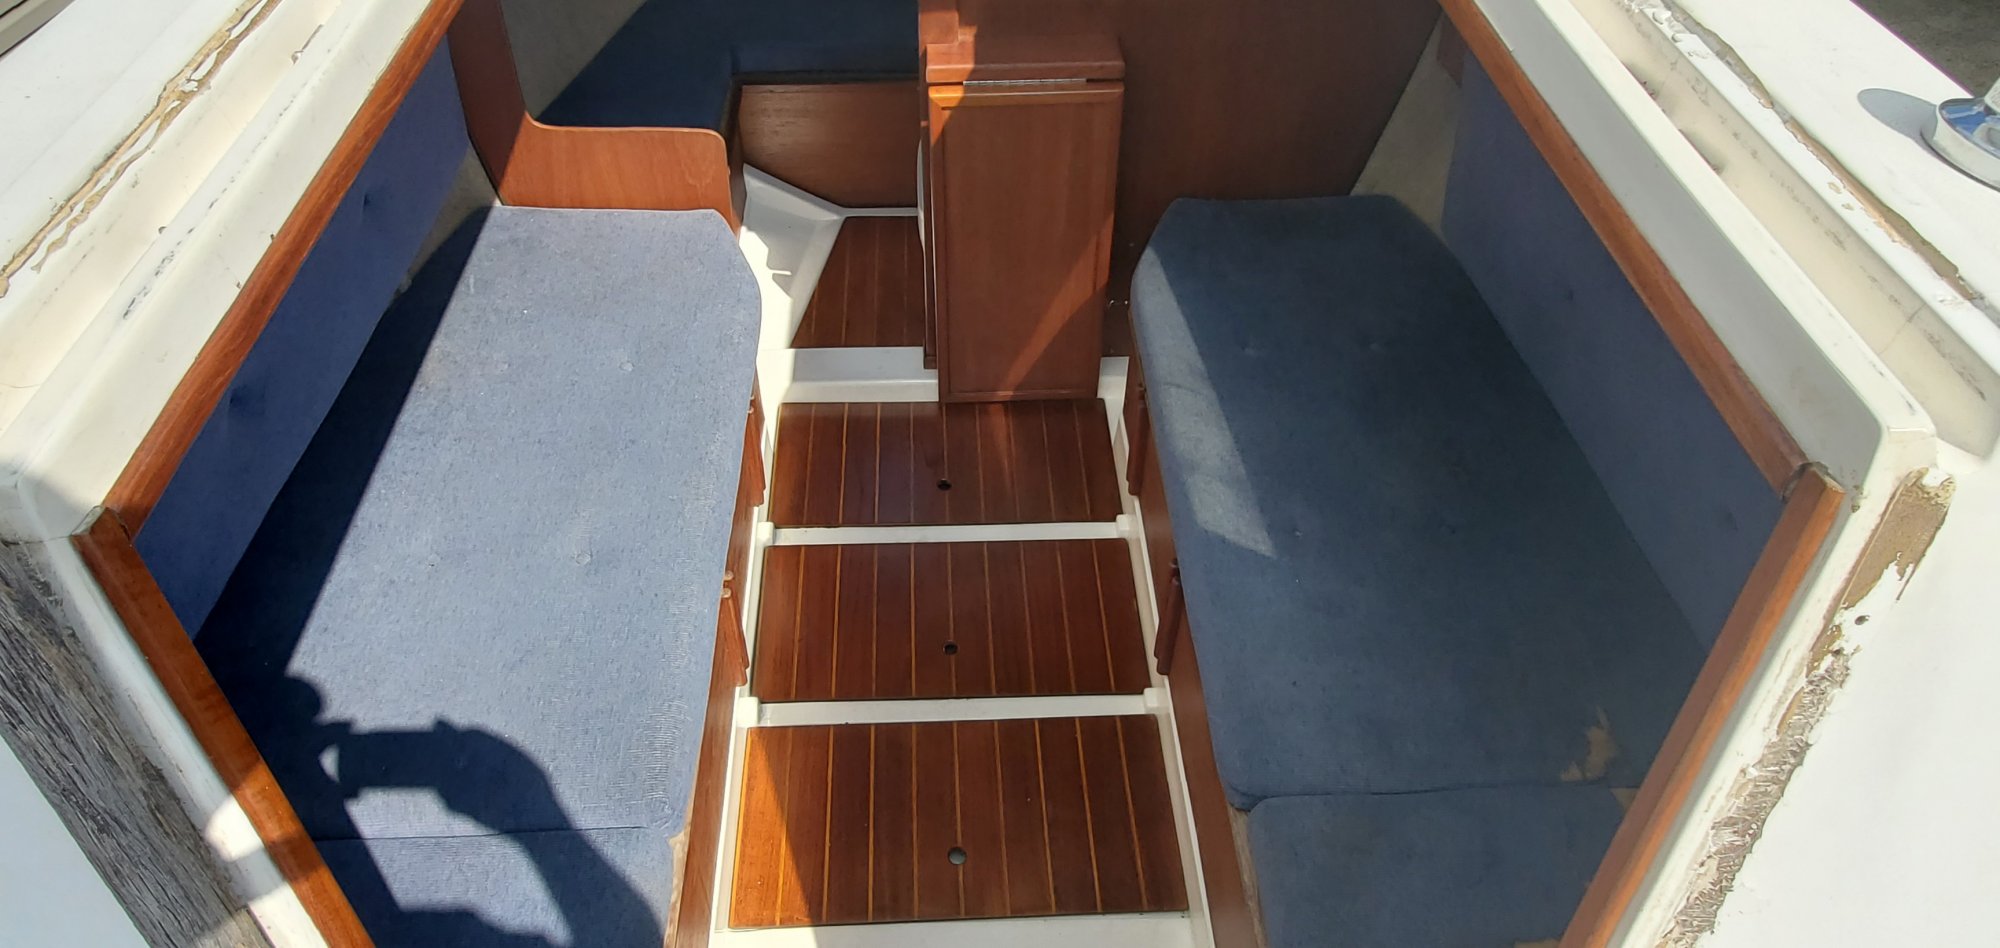
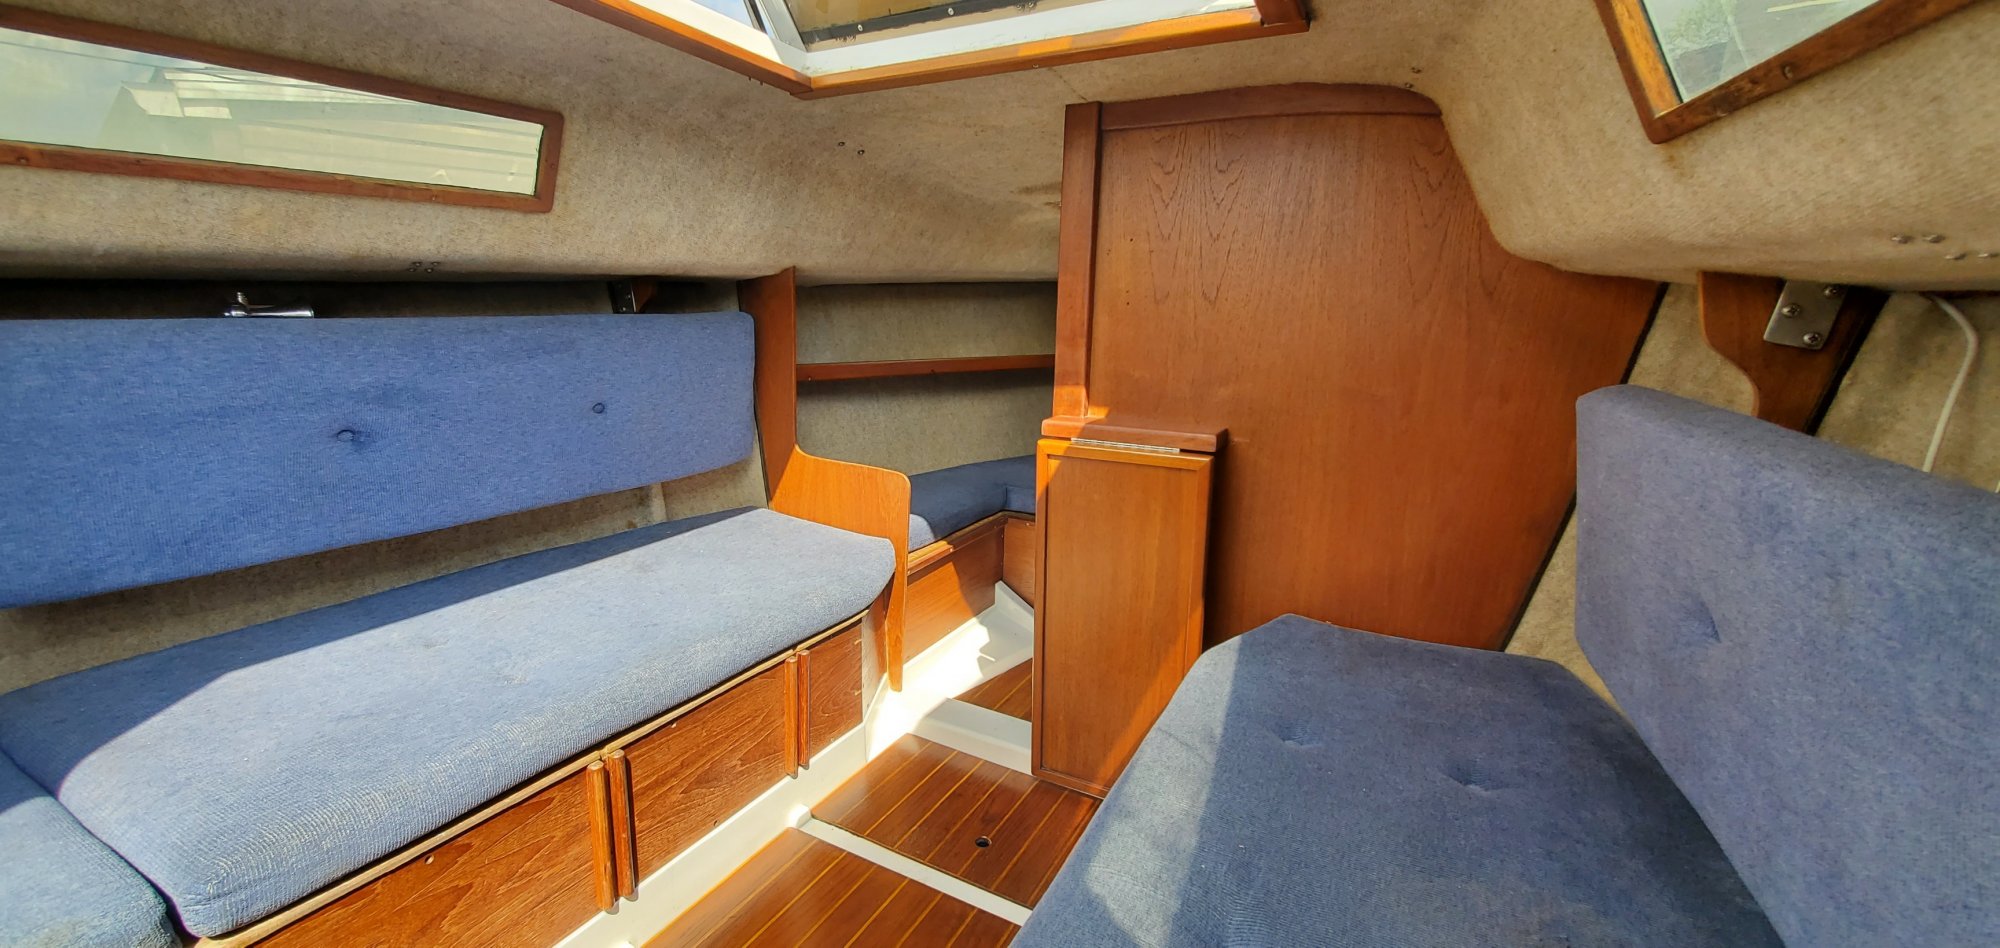
Oh, and the interior is mostly done now. Some punch out work and quite a bit of cleaning before 100%...
Next week plans are to complete the rudder/tiller, get the new outboard mount installed and the new outboard worked in. And I really need to clean the rust off the keel and repaint it. More to come!
The main project was to replace this rotted bulkhead.
So happy with the Dewalt Oscillating tool I bought a couple years ago. It allowed me to cut out that rotten mess WITHOUT cutting an inadvertent hole in the hull. Here's what I ended up with.
I made a pretty close 3/8" plywood patch and glassed it back in with a gusset plate across the seam for strength.
Still have to paint this thing with Epoxy and rebuild the battery box platform, but the majority of this project is complete.
From the cabin:
I still need to pick out a nice board out of the wood shed to cover the seam, but I have some really cool exotic hardwoods to choose from.
This week I've been focused on the rudder. It seemed to me like it was starting to separate at the seams.
I just sanded it all down, painted it with epoxy and covered the seams with mesh. Then it got another good sanding and a couple coats of epoxy paint. Hopefully this keeps this thing together and water OUT!
Another blessing - A buddy has been working diligently polishing the hull on Saturdays. It's not looking like new, but for a 35 year old boat, it looks pretty amazing considering all the chalkiness when he started. Just need to keep him in beer and food! It really is looking great!
Oh, and the interior is mostly done now. Some punch out work and quite a bit of cleaning before 100%...
Next week plans are to complete the rudder/tiller, get the new outboard mount installed and the new outboard worked in. And I really need to clean the rust off the keel and repaint it. More to come!
Last edited:

Update yet again!
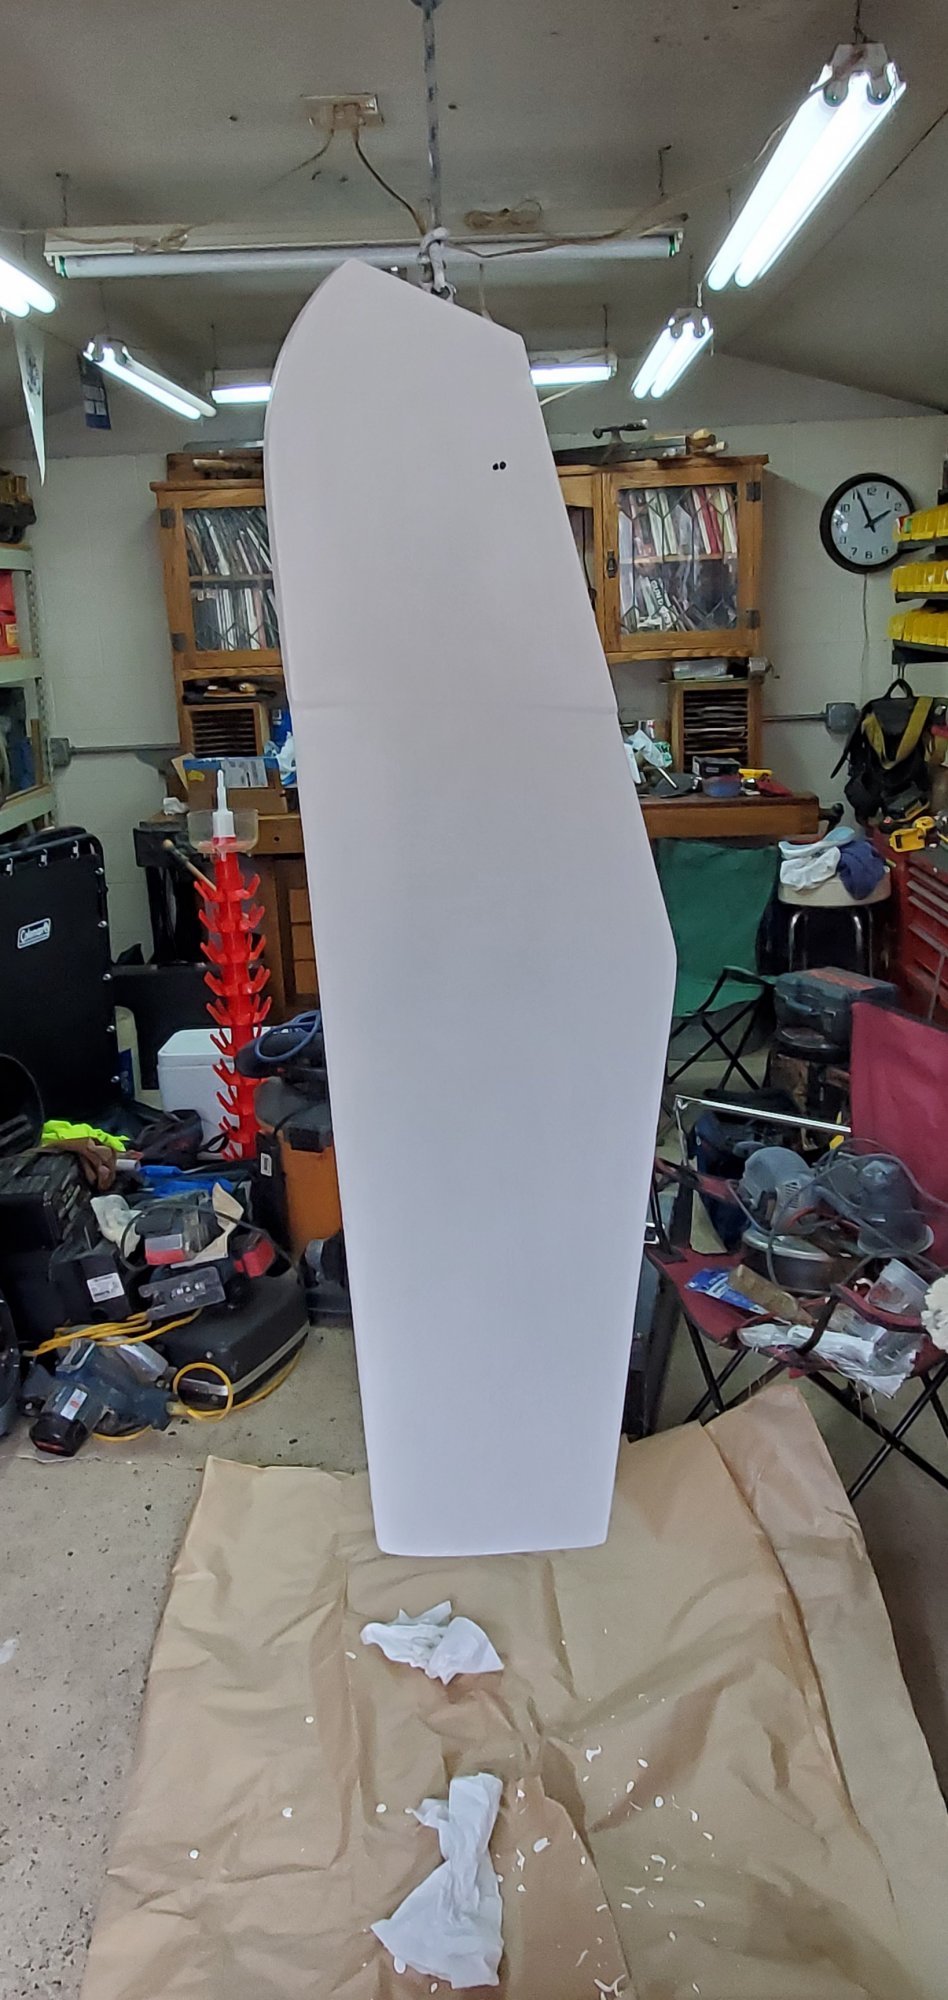
Finally got the rudder squared away and on the boat. That thing looks kinda HUGE hanging off the back of it! Still have to put the tiller on, but that'll happen right before it leaves for the lake.
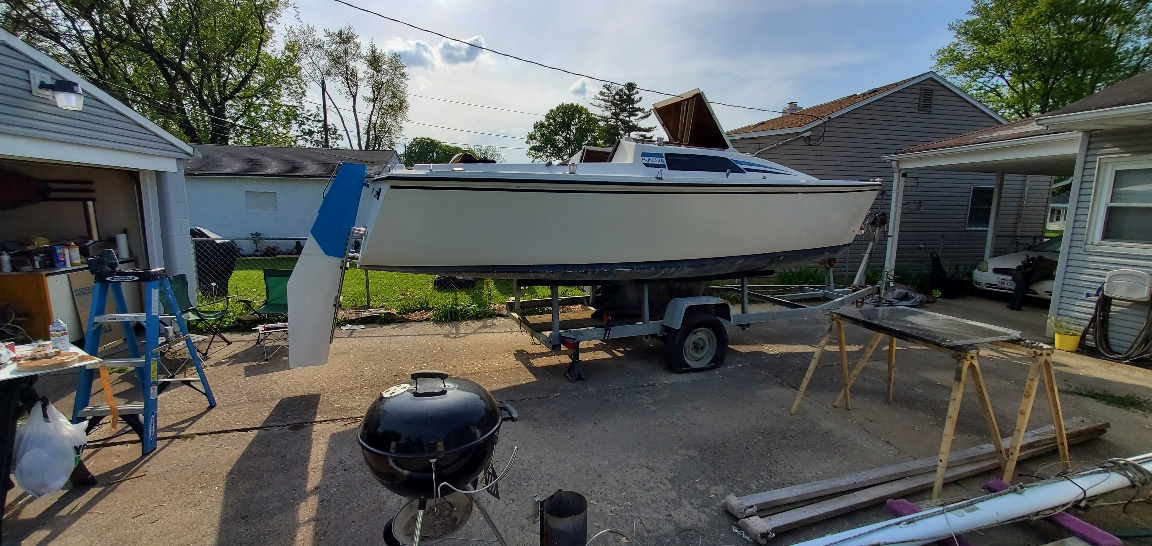
Looking at the old graphics and chalky looking port lights compared to the rest of the polished hull got to bothering me. I work at a sign shop, so I talked to one of our designers about making new graphics. I made some rubbings of the current graphics on some lightweight paper with a pencil and brought them in. He took the rubbings and also some close up photos I sent him and here's what became of that:
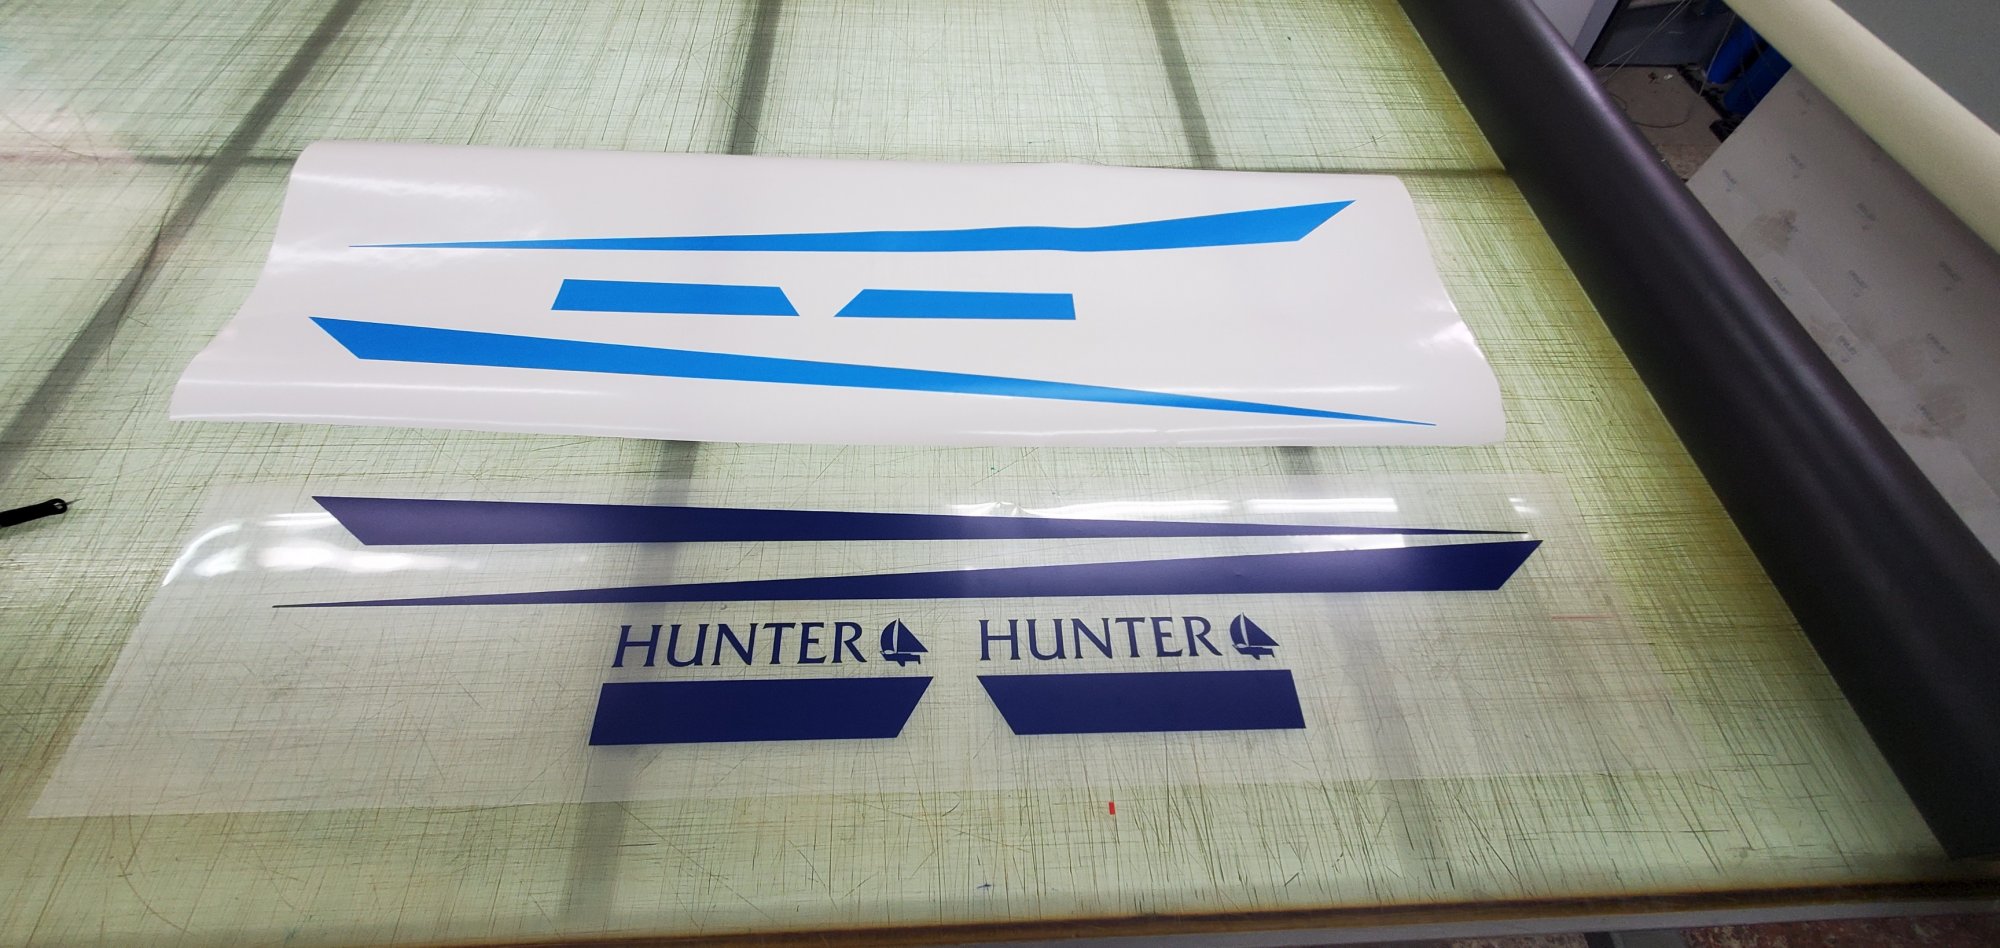
Sunday I scraped off the old decals, and installed the new! Plus, my buddy also polished the plexiglass portlights and those were reinstalled. She's looking kinda NOT 35 years old now!
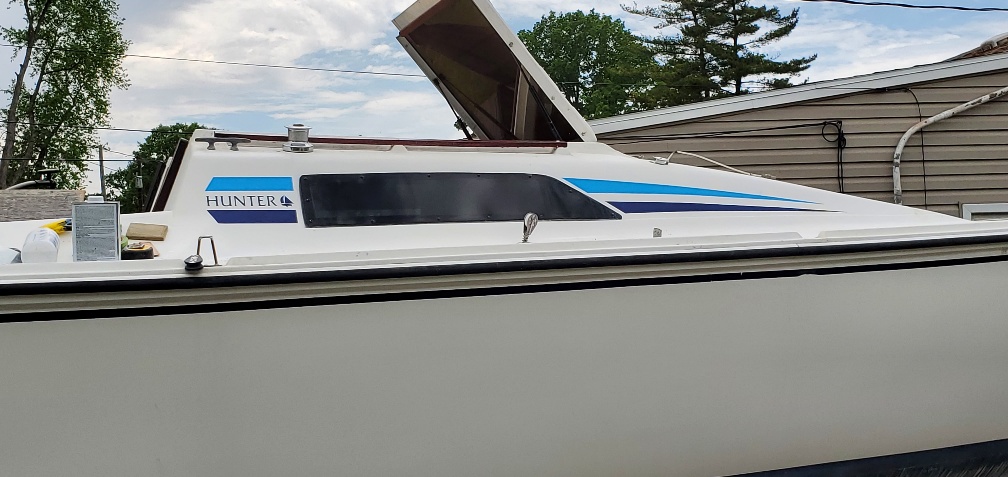
I didn't match the original vinyl colors exactly. The dark blue is close, but I opted for a lighter blue top stripe as it was the closest our vinyl shop had in stock. Very happy with this!
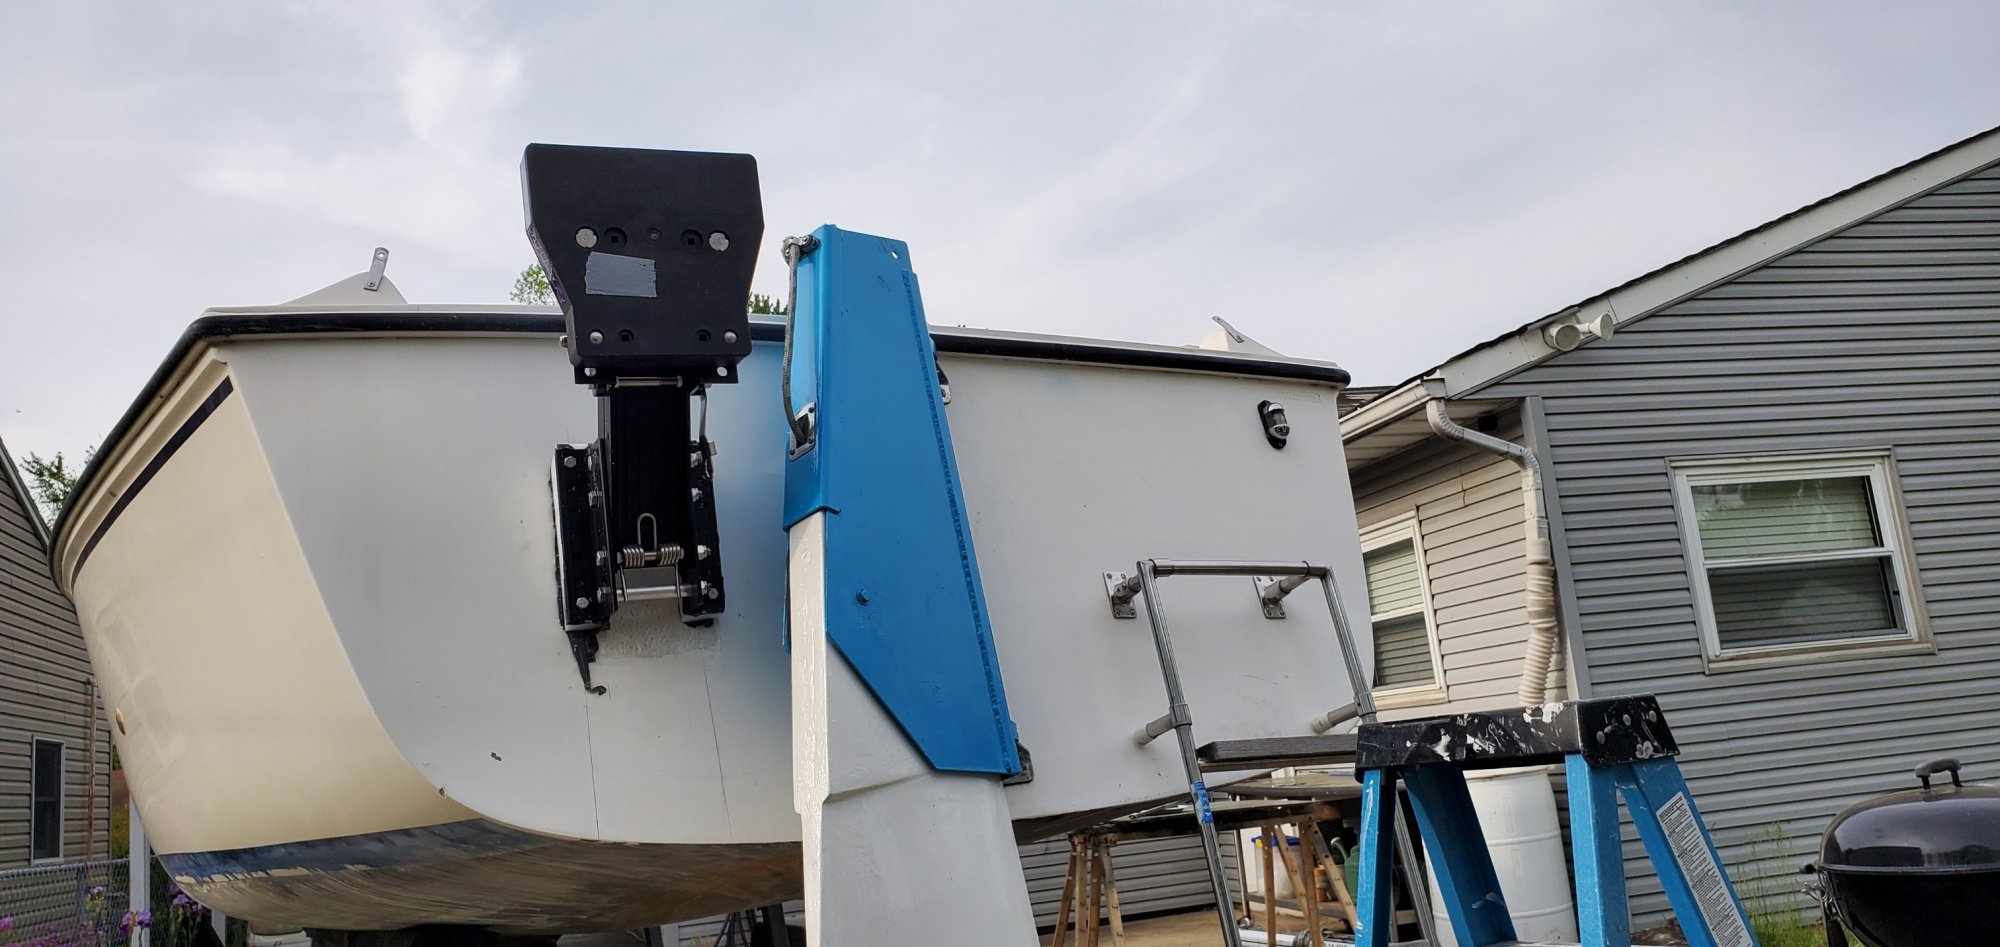
And now for the biggest PITA project as yet. Installing the motor mount. Grrrrr.......
I had ordered a new outboard mount a couple months ago as the original just didn't seem like it wanted the task of carrying a brand new 4 cycle motor around. This new mount is pretty sturdy and definitely is capable of preventing a new motor from ending up at the bottom of the lake but was not really adjustable for the reverse transom on the H23. The handle to lower the motor hit the top of the transom\rub rail.
I love the lines on the boat. Whoever designed it did a fantastic job. But the reverse transom and the fact it is also convex lends itself to some difficulties retrofitting stuff!
Ended up ordering a 12" x 12" x 2" piece of UHMW from Fastenal and making some angles with it to put the new motor mount somewhere close to plumb.
It's a beast!
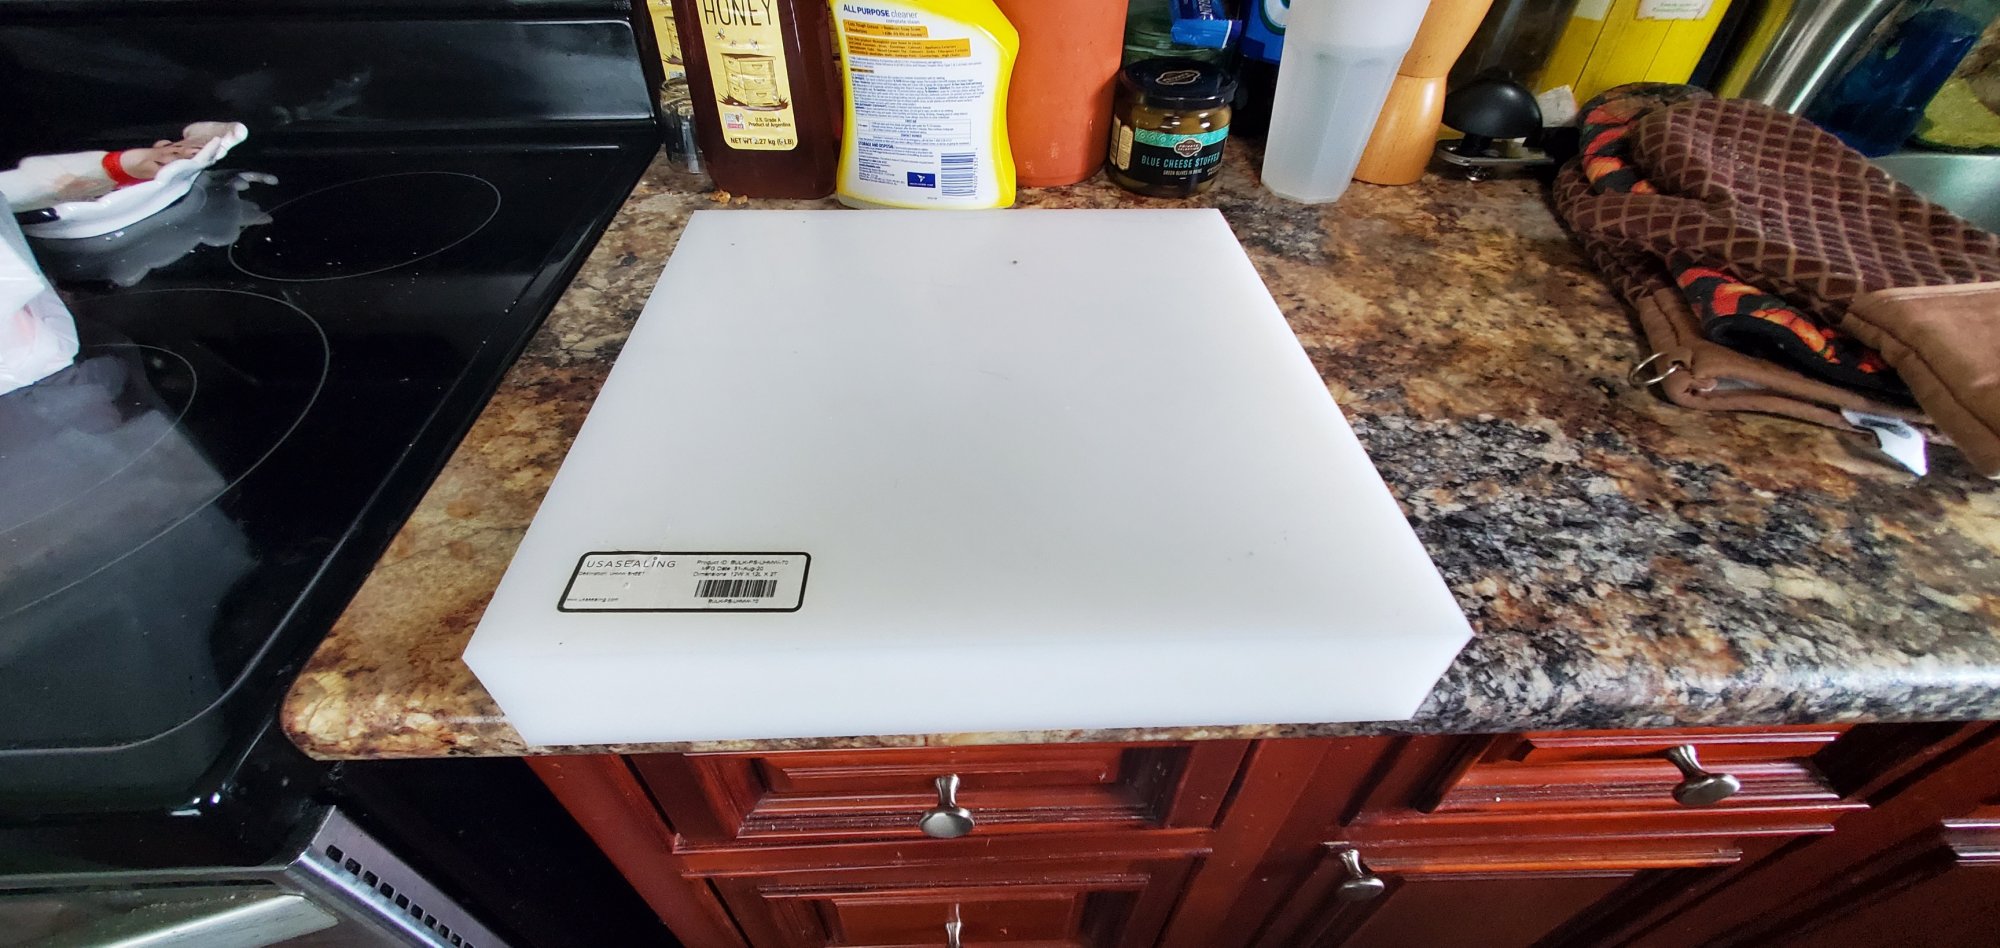
Machines easier than wood and will never rot.
I had 2 problems mounting the motor mount.
.
First, since the boat is sitting on a trailer with a flat tire and the transom is reversed AND rounded, it almost impossible to find a line of reference to align the motor mount to. I really didn't want to put the boat in the water (where it would sit level) and realize the mount is NOT level!
The best idea I could muster is laying a 2ft framing square under the rub rail and marking a line down 90degrees from that to reference mounting the motor mount. Hope my theory proves correct, as I'd hate to have to move this thing now!!
Second, Trying to hold up the motor mount with the 2 plastic wedges I cut and then drilling the holes for the bolts... Well, let's just say for a few minutes I became the textbook definition of "swearing like a sailor"
Should have called a bud for a hand, but my stubborn self just kept going....
Anyway, here's the new mount with the wedges installed. I used copious amounts of butyl tape under it and will follow up with sealer around the joints. BTW, the wedges hold the mount out about 2 1/4".
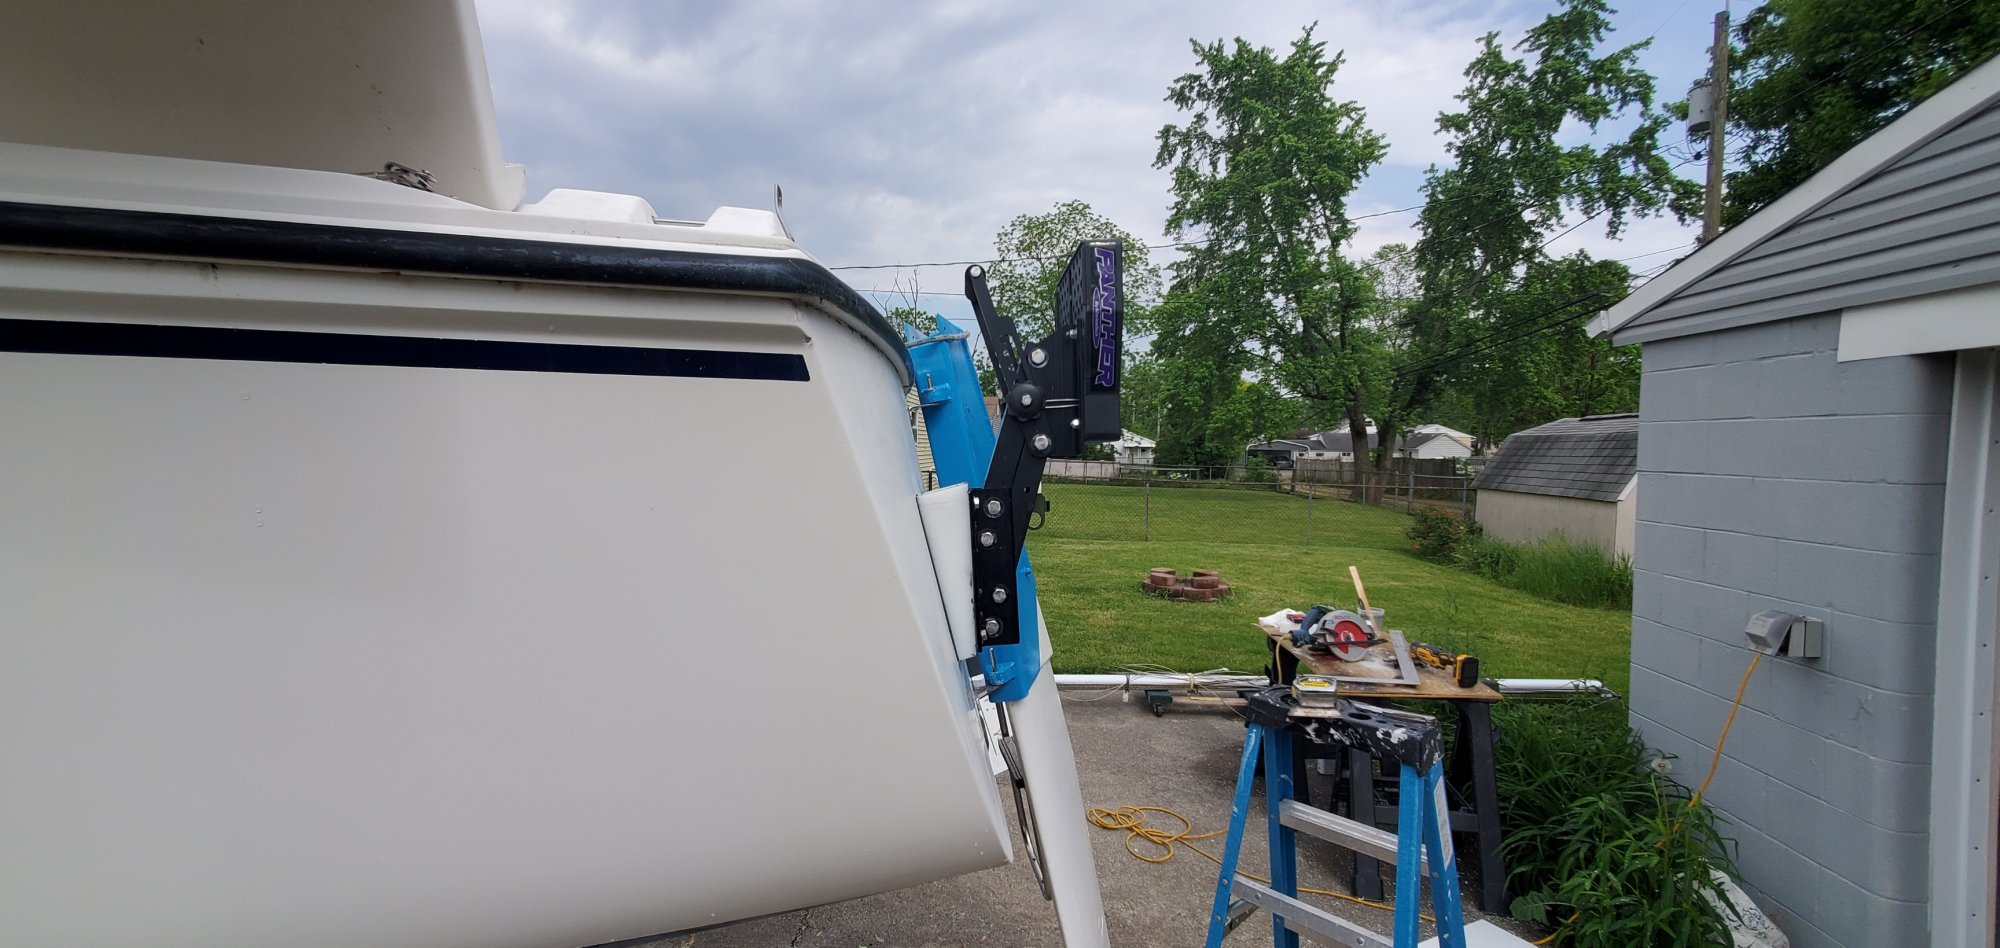
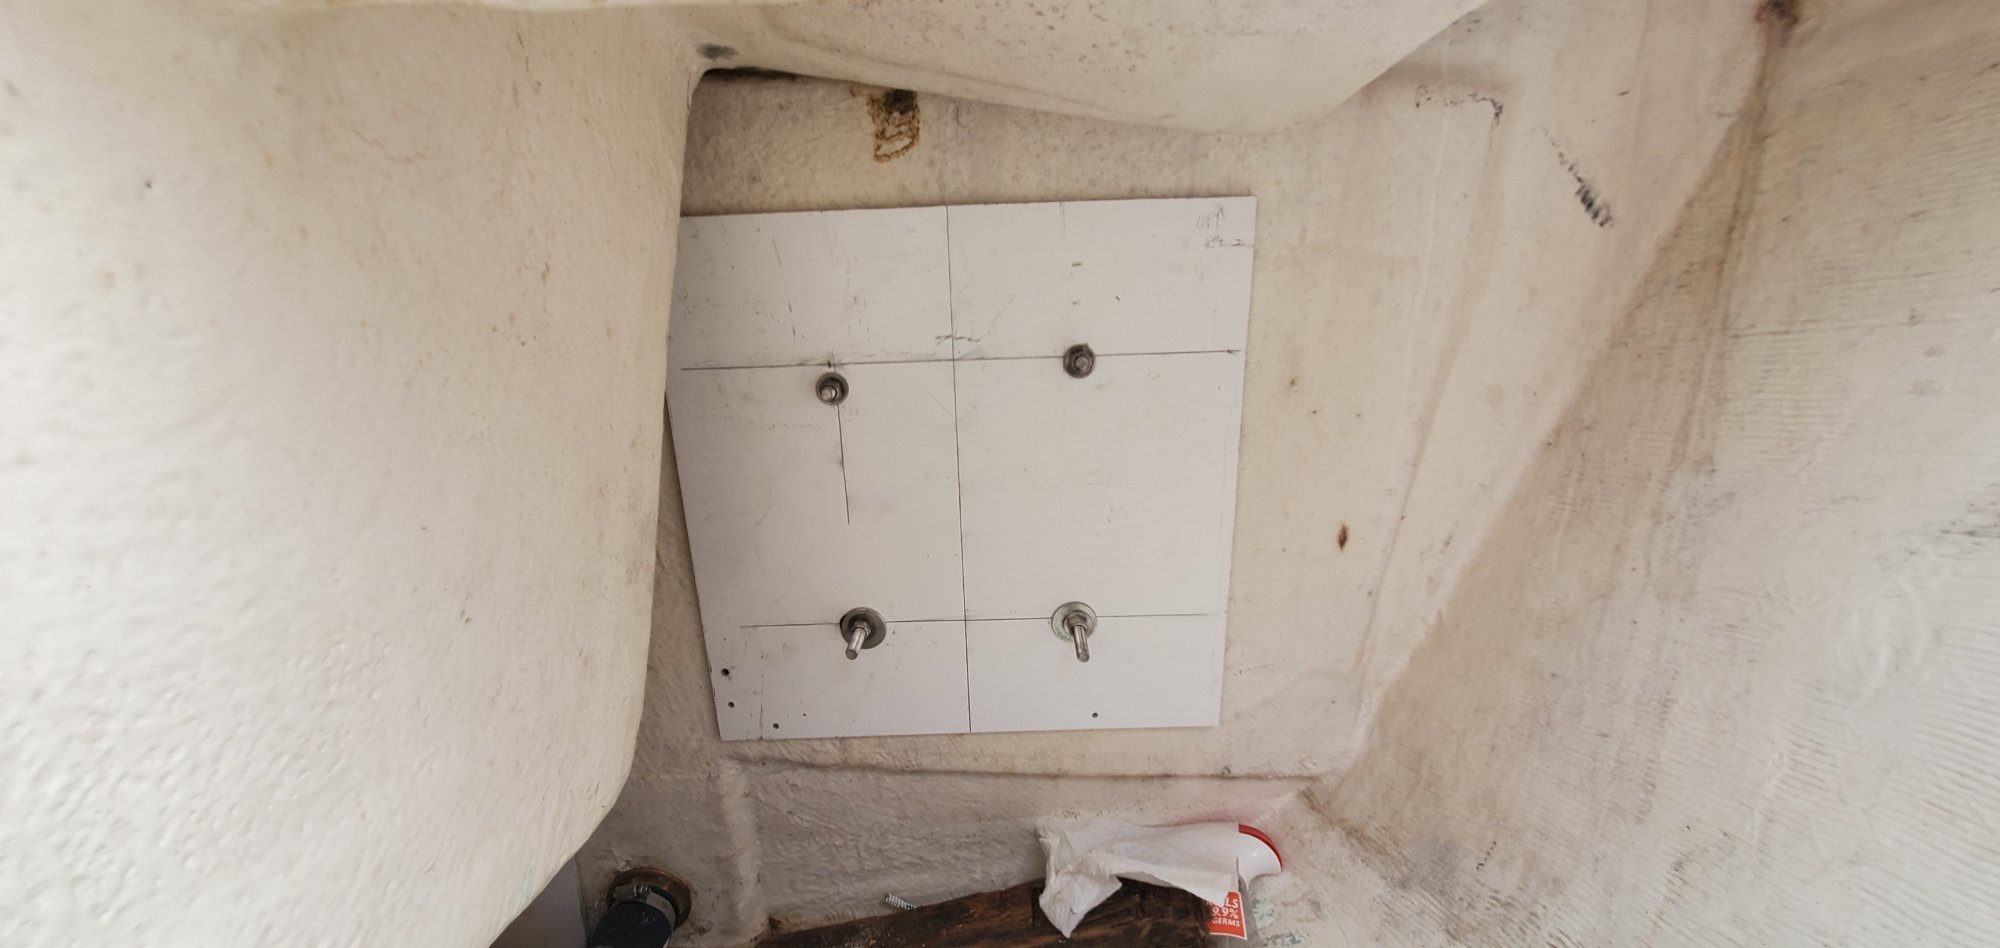
I also added a 1/4" aluminum backer plate inside the transom. Maybe overkill, but it's parts from a scrap sign I salvaged, so free!
And here's hoping the mount is level. Will know for sure once she's in the water in a few weeks!
Next project... That rusty keel!
Finally got the rudder squared away and on the boat. That thing looks kinda HUGE hanging off the back of it! Still have to put the tiller on, but that'll happen right before it leaves for the lake.
Looking at the old graphics and chalky looking port lights compared to the rest of the polished hull got to bothering me. I work at a sign shop, so I talked to one of our designers about making new graphics. I made some rubbings of the current graphics on some lightweight paper with a pencil and brought them in. He took the rubbings and also some close up photos I sent him and here's what became of that:
Sunday I scraped off the old decals, and installed the new! Plus, my buddy also polished the plexiglass portlights and those were reinstalled. She's looking kinda NOT 35 years old now!
I didn't match the original vinyl colors exactly. The dark blue is close, but I opted for a lighter blue top stripe as it was the closest our vinyl shop had in stock. Very happy with this!
And now for the biggest PITA project as yet. Installing the motor mount. Grrrrr.......
I had ordered a new outboard mount a couple months ago as the original just didn't seem like it wanted the task of carrying a brand new 4 cycle motor around. This new mount is pretty sturdy and definitely is capable of preventing a new motor from ending up at the bottom of the lake but was not really adjustable for the reverse transom on the H23. The handle to lower the motor hit the top of the transom\rub rail.
I love the lines on the boat. Whoever designed it did a fantastic job. But the reverse transom and the fact it is also convex lends itself to some difficulties retrofitting stuff!
Ended up ordering a 12" x 12" x 2" piece of UHMW from Fastenal and making some angles with it to put the new motor mount somewhere close to plumb.
It's a beast!
Machines easier than wood and will never rot.
I had 2 problems mounting the motor mount.
.
First, since the boat is sitting on a trailer with a flat tire and the transom is reversed AND rounded, it almost impossible to find a line of reference to align the motor mount to. I really didn't want to put the boat in the water (where it would sit level) and realize the mount is NOT level!
The best idea I could muster is laying a 2ft framing square under the rub rail and marking a line down 90degrees from that to reference mounting the motor mount. Hope my theory proves correct, as I'd hate to have to move this thing now!!
Second, Trying to hold up the motor mount with the 2 plastic wedges I cut and then drilling the holes for the bolts... Well, let's just say for a few minutes I became the textbook definition of "swearing like a sailor"
Should have called a bud for a hand, but my stubborn self just kept going....
Anyway, here's the new mount with the wedges installed. I used copious amounts of butyl tape under it and will follow up with sealer around the joints. BTW, the wedges hold the mount out about 2 1/4".
I also added a 1/4" aluminum backer plate inside the transom. Maybe overkill, but it's parts from a scrap sign I salvaged, so free!
And here's hoping the mount is level. Will know for sure once she's in the water in a few weeks!
Next project... That rusty keel!
Last edited: