
Fuel tank replacemnt C30 1989
- Thread starter topman
- Start date
- Status
- Not open for further replies.
R&R of the tank is on my winter todo list so I've been looking this job over. My plan is to remove the tank, then evaluate clean/repair/replace.
You'll need to remove all the hoses first. I had my engine hoses off last fall while working on a clogged pickup filter. They didn't come off easily and I had to trim the ends before re-installing. Check the condition of your hoses and determine if they need to be replaced while you're into the job. The same goes for your fill hose. I'm planning on replacing mine while I have everything apart.
Remove the fuel gauge sender and inspection plate.
My plan is to use a squeeze ball and fuel hose to siphon fuel out of the tank. Last time I tried a cheap drill mounted transfer pump but these aren't made for fuel and the diesel kills the seals. I went through three of these little pumps to empty my tank.
When you're done you'll have some fuel left in the tank. Seal the hose barbs to prevent spills when taking it out.
The tank is held in by four screws. The port rear screw can only be accessed by removing the rear galley cabinets (at least on my boat). I'd recomend a phillips attachment for a 3/8 socket to get better leverage.
Once it's unbolted the tank itself should be pretty light and there's plenty of room to lift it out.
Make sure to remove and discard the screen from the pickup tube prior to reinstalling the tank.
You'll need a couple of 5 gallon fuel jugs (depending on how much diesel is in the tank), a way to transfer the fuel to the jugs, nitrile gloves, oil absorbant pads and a cleaner to catch any spills. Dish soap and water in a spray bottle and some paper towels work pretty good to clean up minor spills.
Make sure you get any spills cleaned up same day and cap the lines to prevent diesel odors from getting into the boat while the tank is out. Once in your cushions the smell is damn near impossible to get rid of.
While the tank is out clean underneath with something like Simple Green or Greased Lightning, again to combat any lingering odors.
Jim
Just curious, why do you want to replace the tank? Is it so corroded that its leaking?
Ps. I used the cheap multi purpose pumps that Wallwort sells that only about 10 bucks, do the job, and are cheap enough that you can toss them after the fuel removal job. Cause the pump & anything that touches that diesel will forever reek!
Ps. I used the cheap multi purpose pumps that Wallwort sells that only about 10 bucks, do the job, and are cheap enough that you can toss them after the fuel removal job. Cause the pump & anything that touches that diesel will forever reek!
Most tanks last about 10 to 12 years -- mine lasted 13 years. Three of the four screws came out easy. I knew it was going to happen and with the 4th screw I wasn't so lucky and stripped the head and it was the toughest one to get to. It took me a bit of time and effort with the 4th screw. Why they use screws is beyond me. When I installed the new tank I used hex head screws.
I thought I only had only one pin hole leak but when the tank fabricator pressure tested the tank I had pin hole leaks all over the place. The Newport Beach, Ca tank fabricator duplicated the tank. I wanted the attachment pads in the same location for ease of installation. It was a piece of cake to reinstall but it took a while to get rid of the smell.
My advise is that at the first whif of smell hop on it and find the problem. My wife noticed the smell right away but I dismissed it after checking hoses etc. Eventually, the fuel ended up in the bilge and the boat stunk. I never heard the end of that deal from my wife.
My experience was pretty much the same as Don's.
The 4th screw was a bear.
Because of the potential for further leaks and weakening of the tank I decided to replace it rather than try to make repairs.
I contacted the manufacturer (whose name and part # were on the old tank) and they still had the patterns for the tank and were able to get me a new one in just a couple of weeks. The mounting screw holes were in a little different location from the original but other than that everything fit perfectly
Proper installation, overall care and a decent wall thickness on the new tank is critical to long life. If installed correctly an aluminum tank can last for 40+ years to as long as the vessel.
#1 The tank CAN NOT sit in dampness or anywhere water can rest against the tank. To alleviate this pads of G-10 (epoxy based fiberglass sheet) can be bonded to the tank bottom with 4200 or similar. What ever is to be bonded to the tank must be impervious to water absorption but not Starboard or similar because it won't stick well. I would suggest a minimum thickness of 3/8" but 1/2" would be even better. It is important to have no air bubbles trapped between the fiberglass sheet and the aluminum and the whole gap must be filled with the marine sealant. The pads will contact the hull or "tank shelf" and keep an air barrier around the tank and minimize or nearly eliminate corrosion issues. In Catalina's poor factory installation practices are what normally cause leaking issues. Tanks on these boats often rest directly on the hull or directly on wooden brackets or shelves. This is REALLY bad for an aluminum tank.
#2 A lot of factory tanks have been built from the ABYC bare minimum 0.090" aluminum. This is CHEAP & DIRTY but not a thickness I would spend my hard earned money on. Have your builder go up to 1/8" (0.125") or better yet 3/16" 0.1875") aluminum for the tank.
#3 After you get the new thank, thoroughly clean the insides with a vacuum. You'd be amazed at what dissimilar metal shavings can wind up in a new tank. These dissimilar bits of metal can cause galvanic issues and can penetrate the tank from the inside out.
#4 Keep water out of your new tank! New fill gaskets numerous times per year and a way to probe the bottom of the tank to drain off the absolute bottom contents and examine them. Draining the tank entirely for winter storage is also an excellent technique.
#5 If you plan to elevate the new tank to create a drier environment around it then you may need to subtract that pad height from the new tanks height dimension.
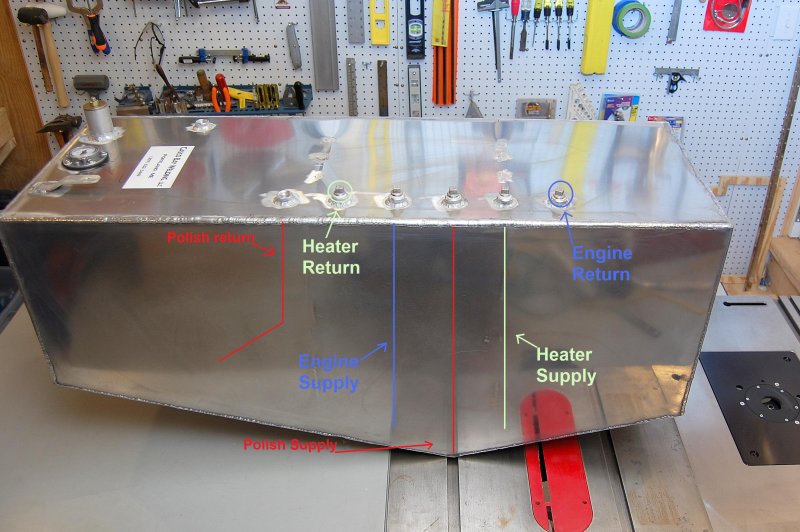
#6 Consider installing an extra supply & return tapping for a fuel polishing or recirculation system. They can be plugged initially and you can add the polishing system when funds allow. The recirculation pick up should be at the lowest point in the tank and pick up fuel from within 1/8" off the bottom. The return tapping should also have a "dip tube" to return the fuel below the fuel level to prevent or minimize foaming.
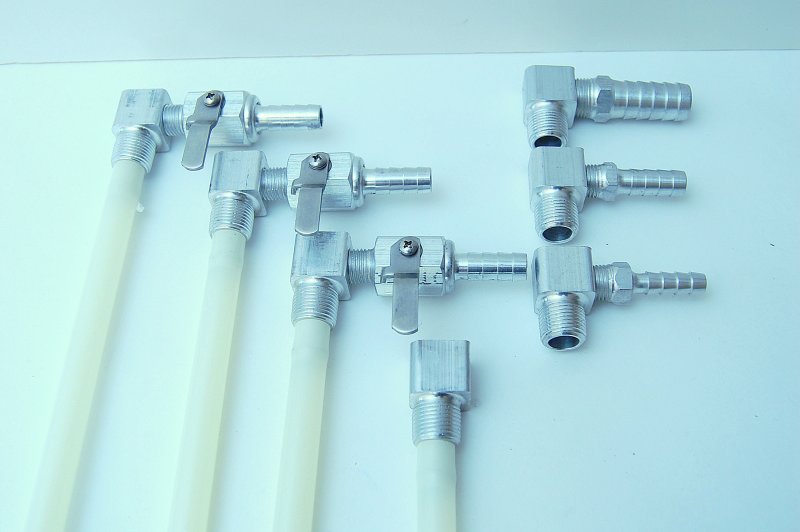
#7 Do not use copper alloy based tank fittings threaded directly into the tank. Not only is against the ABYC standards it can accelerate corrosion issues. Aluminum tank fittings are available from Luther's Welding in RI 401-253-5550 for a very, very reasonable sum.
#1 The tank CAN NOT sit in dampness or anywhere water can rest against the tank. To alleviate this pads of G-10 (epoxy based fiberglass sheet) can be bonded to the tank bottom with 4200 or similar. What ever is to be bonded to the tank must be impervious to water absorption but not Starboard or similar because it won't stick well. I would suggest a minimum thickness of 3/8" but 1/2" would be even better. It is important to have no air bubbles trapped between the fiberglass sheet and the aluminum and the whole gap must be filled with the marine sealant. The pads will contact the hull or "tank shelf" and keep an air barrier around the tank and minimize or nearly eliminate corrosion issues. In Catalina's poor factory installation practices are what normally cause leaking issues. Tanks on these boats often rest directly on the hull or directly on wooden brackets or shelves. This is REALLY bad for an aluminum tank.
#2 A lot of factory tanks have been built from the ABYC bare minimum 0.090" aluminum. This is CHEAP & DIRTY but not a thickness I would spend my hard earned money on. Have your builder go up to 1/8" (0.125") or better yet 3/16" 0.1875") aluminum for the tank.
#3 After you get the new thank, thoroughly clean the insides with a vacuum. You'd be amazed at what dissimilar metal shavings can wind up in a new tank. These dissimilar bits of metal can cause galvanic issues and can penetrate the tank from the inside out.
#4 Keep water out of your new tank! New fill gaskets numerous times per year and a way to probe the bottom of the tank to drain off the absolute bottom contents and examine them. Draining the tank entirely for winter storage is also an excellent technique.
#5 If you plan to elevate the new tank to create a drier environment around it then you may need to subtract that pad height from the new tanks height dimension.
#6 Consider installing an extra supply & return tapping for a fuel polishing or recirculation system. They can be plugged initially and you can add the polishing system when funds allow. The recirculation pick up should be at the lowest point in the tank and pick up fuel from within 1/8" off the bottom. The return tapping should also have a "dip tube" to return the fuel below the fuel level to prevent or minimize foaming.
#7 Do not use copper alloy based tank fittings threaded directly into the tank. Not only is against the ABYC standards it can accelerate corrosion issues. Aluminum tank fittings are available from Luther's Welding in RI 401-253-5550 for a very, very reasonable sum.
- Status
- Not open for further replies.