Filler Neck Replacement on Yanmar YM-series Heat Exchanger?

Dan_Y

.
Oct 13, 2008
514
Hunter 36 Hampton
Found a crack in the filler neck of our Yanmar 3YM30. I pulled the heat exchanger and pressurized it through the overflow tube per the shop manual and air bubbled out of the crack.

I have a replacement filler neck and the sealing copper ring that has to be pressed inside the neck to force the neck against the heat exchanger body (see photo). Not like the old version, which was bolted on.
Filler Neck Crack.jpg
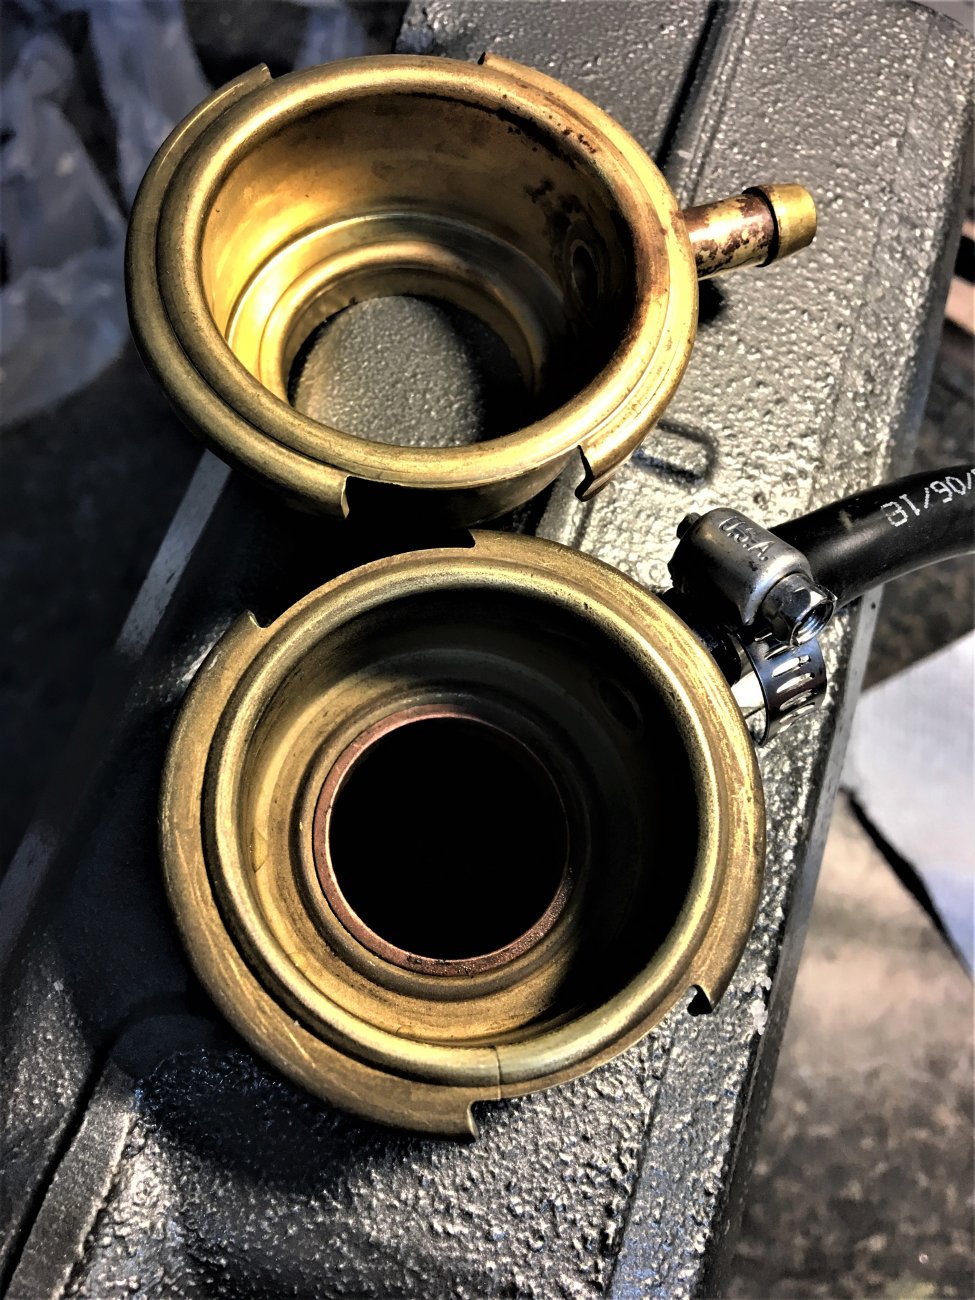
Yanmar tech bulletin GBT2010004 shows how to drive in the new neck and then press the copper sealing washer into the neck with the two special tools. The bulletin states to have the tools fabricated locally.

A Mack Boring rep at the boat show last fall said simply to epoxy the new neck in. The Yanmar procedure calls for permanent locktite and the copper sealing ring. Epoxy seems a little sketchy, considering the small area of overlap. The local Yanmar service guys here don’t seem to have experience with this, so I guess it’s a pretty rare repair.

Has anyone done this or had the tool fabricated. What epoxy would be strong enough?

Thanks

Dan
 

Attachments

Jan 30, 2012
1,123
Nor'Sea 27 "Kiwanda" Portland/ Anacortes
The instructions do not require 603. You can also use "glue or other equivalent" too. If you use 603 do not skip the activator otherwise the cure might not be reliable. If you use epoxy you don't need the activator. Devcon, 3M, Loctite all make a 200 degree F formula epoxy. Note the sealant goes between the neck and the tank not on the copper ring.

As to the tools you need two of them. You can have them made by your local machine shop - it is a simple matter to turn each tool on a metal lathe. The one that sets the copper ring probably needs a radius to form the outside flare. You can make them yourself by using wood dowels sanded to shape and bolted together right down the center. Wood works because the parts are pretty soft. Either way you need to be gentle with the hammering.

If this is not really up your street remove the heat exchanger and take the parts to the local radiator shop - they will fix it for you. If this is a combination exhaust manifold/heat exchanger you will need new gaskets.

Charles
 
Last edited:

Dan_Y

.
Oct 13, 2008
514
Hunter 36 Hampton
Thanks Charles -
I actually removed the heat exchanger and pressure tested it to find the leak. Third time removing it. First time for replacing bundle seals and second time to chase this leak. The coolant would drip off the the heat exchanger at the rear bundle seal, with no trace of the coolant actually coming from the filler neck. Got a clue when wrapping every clamp and seal with paper towels and the only leak was at the filler neck.

Good points about the adhesive. I just don't think I would trust the adhesive alone without the inner ring as suggested by a Mack Boring fellow. Although there is almost 1 sq in of bonding surface around the neck (.24" x 4 "). I need to look up the shear strength of the adhesives to see what margin is available at a pressure of 15 psi. Probably a lot.

The tool used to set (tap in) the neck has a small groove around it's circumference to accommodate the raised lower seal, visible in the photo. The 2nd tool used to press the copper ring (they call for pressing, not tapping for some reason) has to have flat bearing surfaces so that the top surface of the ring is pressed down below the lower sealing surface per the instructions. Makes me wonder if oak could be used. Use of wood is a good thought. I don't have a press nor a vice wide enough to press in the ring. Wondering if tapping it would work?
 

Attachments

Jan 30, 2012
1,123
Nor'Sea 27 "Kiwanda" Portland/ Anacortes
Yes tapping works fine. I use a 3- 5lb hand sledge very gentle - thus one really uses the mass of the hammer to shape the flares. Just enough force to seat the copper in the position you want. If you want to press then use a big C clamp.

The idea is to set the copper flare so it is ends up slightly below the raised margin of the brass neck. The reason is so the cap seals against the brass inner margin - not the copper flare. You don't need anything fancy to do this. Just a bit of care.

I favor the epoxy because it is a gap filler. Epoxy will make up for any possible misfit and is an adhesive as well. 603 is a fair adhesive - intended originally for pressed in bushing type bearings - but not a very good gap filler.

My guess is your cap (the spring loaded lower seal part) leaks slightly. Consider new 13 lb (or whatever ) cap from the auto supply - no need to pay marine pricing.
 
Last edited:
Mar 20, 2016
594
Beneteau 351 WYC Whitby
Had the same thing on a perkins ,used a socket to tap it in ,however I used JB weld epoxy as it had the highest heat rating constant temp of 500 degrees and can go to 600 degrees. I read of other people using it , anyways that was 3years ago no problems
 
Last edited:

Dan_Y

.
Oct 13, 2008
514
Hunter 36 Hampton
I ended up taking the heat exchanger tank to the dealer where I bought the boat. They pressed in the neck and copper ring with a large drill press, not running of course. I forgot to ask what adhesive they used on the filler neck, but they said they did. I’ll find out and post back here. After about two hours run time no leak.
Dan
 
Aug 15, 2019
2
Leopard 40 Detroit
Hi everyone. I just sprung a leak on my 3YM30. When I took off the cap I saw the filler neck was very slightly bent and that's apparently the cause of my leak. Everything above is real useful. Maybe you could answer a couple of quickies: Do I have to remove the heat exchanger to replace the filler neck?, and How do I get the old filler neck out?
 
Aug 15, 2019
2
Leopard 40 Detroit
Hmmm, that's a possibility. I had not thought of trying to repair it. If I run a very fine sanding block over the top I can see the low point. I stuff the opening so I'm sure I get no grit inside.
 
May 1, 2011
4,189
Pearson 37 Lusby MD
JB Weld is what my boatyard used to fill a divot that was keeping the radiator cap from sealing.
 

Dan_Y

.
Oct 13, 2008
514
Hunter 36 Hampton
Hi everyone. I just sprung a leak on my 3YM30. When I took off the cap I saw the filler neck was very slightly bent and that's apparently the cause of my leak. Everything above is real useful. Maybe you could answer a couple of quickies: Do I have to remove the heat exchanger to replace the filler neck?, and How do I get the old filler neck out?
Hey steelbeltradial - Are you positive the neck doesn't have a crack? A crack would seem to be the cause of a sudden leak versus a bent neck, unless the rubber seals on the radiator cap suddenly failed. Had you removed the cap just before it started leaking? I wrapped a paper towel tightly under the filler neck flange and saw the area where the coolant leaked out, but didn't notice the crack. Take a bright light and a magnifying glass and inspect very closely. I did not find the crack until I pressure tested the heat exchanger with the cap on, although it seems obvious in the photo above. The radiator shop I used to clean the heat exchanger last year put a plug in the filler neck and did not check the cap's internal and external sealing surfaces since they are focused on the bundle/seals.

The shop either pressed the copper ring out on the drill press with the right sized socket, or actually used a hack saw blade to cut through the copper ring first then pressed the ring out. They pressed the new filler neck in with a socket. I was told they might have to heat the heat exchanger with a torch to weaken the glue (like red Loctite) , but apparently they did not. Couldn't find what adhesive they used to seal the new filler neck. Then the copper ring was pressed in per the instructions with my original post above.

I wouldn't want to tap on the heat exchanger while it's on the engine. There are six bolts (about 5-6 inches long) that hold the heat exchanger to the engine. The area of the 6 bolts in shear is probably sufficient to take the tapping, but I don't know how hard you must tap. I would worry the gasket would leak exhaust gas. Maybe re-torqueing the bolts would fix that? Removing the heat exchanger is not difficult, just time consuming if you are not a pro mechanic (I'm not). It's an hour or two to find the right tools, remove the alternator, exhaust elbow and cooling water pipes, then 3 minutes to actually remove the 6 bolts...ha. But you can really inspect/service the wiring that goes to the starter then!

Dan
 
Sep 1, 2020
1
Beneteau 393 Rockport, MA
I've just completed the Yanmar recommended repair, per the attached Global Technical Bulletin GTB2010004 for this filler neck issues on many Yanmar Diesels.

Tools to do the repair cost me $315. ( 3 hours of labor to make them).They are beautiful and match the specs in the GTB, but I don't plan to ever use them again. Looking to see if someone would like to purchase them from me for $250.
Yanmar Filler Neck Tools.jpg
 

Attachments

Rupez1

.
Oct 6, 2021
3
Jeanneau Sun Odessey Whitehaven
I've just completed the Yanmar recommended repair, per the attached Global Technical Bulletin GTB2010004 for this filler neck issues on many Yanmar Diesels.

Tools to do the repair cost me $315. ( 3 hours of labor to make them).They are beautiful and match the specs in the GTB, but I don't plan to ever use them again. Looking to see if someone would like to purchase them from me for $250.
View attachment 184471
Contact me. Interested in buying these tools
 

Rupez1

.
Oct 6, 2021
3
Jeanneau Sun Odessey Whitehaven
As a mechanic the tools are overkill a socket and JB weld will install no issues 5 years ago I did it. When you buy a new filler neck it now comes with JB weld
Thanks very much for your reply I appreciate it. I’m keen to do the job myself but I’m deffo not a mechanic! The Yanmar solution has two parts. One copper ‘collar’ and the neck piece. I’m not sure how I would fit the copper collar with just a socket. That Penta heat exchanger body has a ‘lip’ to hold the neck. The Yanmar doesn’t. I think that makes the Yanmar fit more critical? What’s drift?? Thanks again for the support.
 

NYSail

.
Jan 6, 2006
3,048
Beneteau 423 Mt. Sinai, NY
JB Weld is what my boatyard used to fill a divot that was keeping the radiator cap from sealing.
Do you have a photo of the repair. I seem to have a similar leak from the cap….. just doesn’t feel like it sets closed.
Thanks
Greg