I know this is wrong, but I am not handy and I am cheap. I just noticed a crack developing in the glass above the compression post on my Hunter 34. Is there a quick and dirty way to fasten, say, a steel pole abutting the post on one or two sides without pulling everything apart? Any other creative cheats?
Compression post cheat?
- Thread starter danm1
- Start date
The most likely problem is moisture and rot of the wood core in the deck under the mast. Symptoms of this are loose shrouds, and deformation of the overhead on top of the compression post.
Second most likely is the structure at the base of the compression post on the bottom of the boat. Visual inspection is the way to check.
In any case, you need to figure out the problem before coming up with a solution.
Second most likely is the structure at the base of the compression post on the bottom of the boat. Visual inspection is the way to check.
In any case, you need to figure out the problem before coming up with a solution.

"Is there a quick and dirty way..." Not really IMO. I guess you could put in a metal (or wooden) post to port of the existing post but that means the load would be off center. If you put one on either side you might as well replace the post as removing the stbd forward settee is more difficult than removing the facing on the post. I replaced the floor in my cabin so I know all about tearing those settees apart. I did inspect my compression post while doing that and it was fine. And like what the guy in the link about replacing the post said the hardest part is getting the facing off. The glued the heck out of it.
Inspection does seem to be the first step, so I need to get the trim off. Which side do you pull, side facing v-berth or main cabin or sink? How is it fastened? Can it be removed without destroying? Do you need to jack up the mast first? Thanks.
I (being a cheap engineer) did mine in the cheapest way I could that I figured would get the job done without taking the mast down. The real problem is that the core in the cross beam that the post bears on is fir and a small persistent water leak will rot it. My compression post was not rotted. The fiberglass cross beam is not strong enough alone to handle the compression load. In a nutshell, I loosened the rig, marked the underside of the beam where the post was bearing. I removed that piece of the beam.. I cleaned out the goo and gunk that had been fir.. I carved a block of solid aluminum to fit inside the hole and epoxied it in, replacing the fir.. The block is a bit taller (flush with the bottom of the beam) so that the post bears on the block and not the beam bottom.
There has been a lot of discussion about the various fixes.. most have great pictures.. Search "ask a hunter owner" with "compression post" and you'll find a treasure trove of info..
https://forums.sailboatowners.com/i...ression-post-design-flaw.171280/#post-1208014
There has been a lot of discussion about the various fixes.. most have great pictures.. Search "ask a hunter owner" with "compression post" and you'll find a treasure trove of info..
https://forums.sailboatowners.com/i...ression-post-design-flaw.171280/#post-1208014
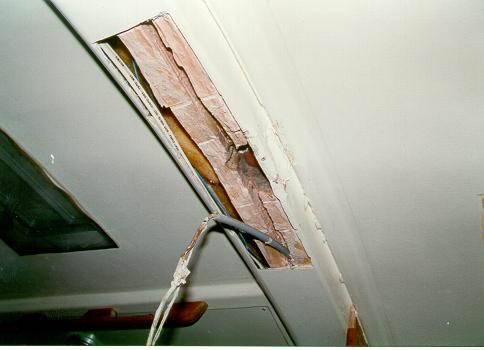
Take the head door off the jamb. That's the cover for the wire chase in the post (forward facing). Pop the plugs and remove the screws. You might be able to then peek up inside to see what is going on. In my case, the transverse piece of wood compressed due to the downward force of the mast. That caused the beam to deform and eventually crack big time. Others have had rot due to water getting in around the piece of PVC pipe that extends up from the deck into the mast a few inches. That will require pulling the mast to repair. I cut a large hole (probably too big) in the beam and installed a large aluminum plate against the bottom of the deck, then filled the rest of the distance down to the top of the post with an aluminum block drilled to allow the wires to pass through. After getting a pro to re glass everything it's still perfect after 20 years.
This link will take you to my repair.
https://hunter.sailboatowners.com/mods.php?task=article&mid=31&aid=6641&mn=34
This link will take you to my repair.
https://hunter.sailboatowners.com/mods.php?task=article&mid=31&aid=6641&mn=34
Okay, I appreciate the advice from Jack to remove the aft trim and Allan to remove the forward trim...but I have to confess that I still don't know which to do first. Is it me, or is the post set up differently in different 34s? (I am willing to accept that it's me, but I really need to be led by the hand if it might involve tools. I have a well documented tool allergy).
Rub rail for Hunter sailboatsAnd now a word from the sponsor...
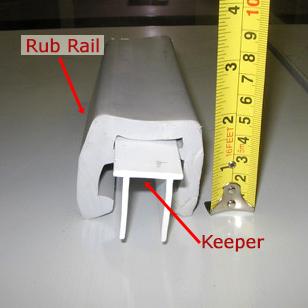
After many years of shortage, we now offer rub rails for most Hunters from the late-90s and newer. Insert and keeper/track available.
See the product
I'm pretty sure they are all set up the same way. So, it is the head door jamb you want to remove first. Here is a picture of what it looks like. Don't do what I did and take off the entire bulkhead. You will be able to look up in that slot and see if you have post rot, beam rot or beam compression. Then after you figure out what to do next based on the situation, go in small steps like Kloudie1 did.Okay, I appreciate the advice from Jack to remove the aft trim and Allan to remove the forward trim...but I have to confess that I still don't know which to do first. Is it me, or is the post set up differently in different 34s? (I am willing to accept that it's me, but I really need to be led by the hand if it might involve tools. I have a well documented tool allergy).


Not really. All H-34's have this problem eventually. Mine did and I had no wood rot. The header beam barely catches the edge of the compression post in bearing so the bearing area is way too small. Over time the wood in the header beam crushes. There are many fixes that have been posted on this website. I think mine was the cheapest. I did, however, have the mast removed first. I opened up the fiberglass to expose the wood beam. The beam has a channel cut in it for the wiring. This is part of why there is so little bearing area. I screwed a 1/4" thick x 4" x 12" long steel plate to the underside of the beam to bridge the channel and drilled a hole in the plate for the wires in the compression post to continue through to the mast. This increased the bearing area considerably. I just put the old compression post back in place. I was able to do this because all of the wood was dry and in good shape. I did not bother to repair the fiberglass. I could just cover with some teak trim.
If ya don't have a multitool ya going to need one for this job.. The best is Fein, the inventor, but there are many viable knock offs available.. I used the Harbor Freight cheapie and it did what I needed..
Buy the blades from Depot or Lowes or...? because the HF ones aren't too shiny
https://www.harborfreight.com/Oscil...iMTQuOTkiLCJwcm9kdWN0X2lk IjoiMTE1NDgifQ==
Buy the blades from Depot or Lowes or...? because the HF ones aren't too shiny
https://www.harborfreight.com/Oscil...iMTQuOTkiLCJwcm9kdWN0X2lk IjoiMTE1NDgifQ==
As Markwbird found, the cross ways wood in the beam had been hacked out on mine as well. With the mast not being directly in-line with the compression post, a lot of load transferred to a very small section of the wood. Mine crushed down enough that it completely severed the antenna cable which follows the channel. Hunter actually fed it through a piece of water hose with a pull string. The wires for the mast lights went straight down and were not damaged. I replaced all the wires except the two that are behind that beam (AC for the starboard side outlets and the 12 Volt cabin lights circut). You can see the deformation in the wood. Again, much bigger hole than necessary. Just needs enough to cut the wood in half and shove out of the way in the beam. Try and get a solid plate up in there to spread the load. Fill the rest of the distance with a block to form a solid couple down to your post and trim with teak to hide the opening.