Funny you should mention about screwing the bilge pump into the bilge without the use of any sealant. The PO had done the same. Since I have owned the boat I've had water in the bilge, not much, but enough to make it nasty and stagnant. My aim is, while the boat is out, I'm going to grind the area, seal the steel keel that's affected by the water, close it up with some fiber glass, simultaneously bedding in a clip for attaching the low profile pump to. This way there are no holes. I'll let you all know how it works.
CENTERBOARD HELP
- Thread starter twodzusfittings
- Start date

I drilled a six 1/4" drain holes at the end of the season a few years back. I found a very very small amount of water. I poured thickened epoxy over the remains of the rusted lifting hooks and the bilge pump screw hole. It was pretty easy to fill the holes back up at the beginning of the season. I've done heated storage since then
@ Project_Mayhem. So tell me if I have the correct approach to this project. As in the picture you can see where I have damage.
Here is my action plan: I’m going to remove the two bilge pumps, clear away all loose flaking fiber glass, clean down to good steel, seal the steel, then apply a layer of pure resin, over which I will glass cloth, building a good solid bilge basin as it once was, but embedding a clip to attach my low profile pump to. Once this is complete, a coat of bilge paint. Reattach the hose pickup and my low profile pump. Tell me what you think, please.
Here is my action plan: I’m going to remove the two bilge pumps, clear away all loose flaking fiber glass, clean down to good steel, seal the steel, then apply a layer of pure resin, over which I will glass cloth, building a good solid bilge basin as it once was, but embedding a clip to attach my low profile pump to. Once this is complete, a coat of bilge paint. Reattach the hose pickup and my low profile pump. Tell me what you think, please.
I'm no expert but that's pretty much how I would handle it. I've read that the shoal keels are basically solid resin with lead ingots. When I carved into the shell of mine I found crumbled material that looked like a cross between typical resin and concrete so what I read sounds totally plausible. The real expert on the O'Day boats is Rudy at D&R Marine. He was the parts manager at O'Day
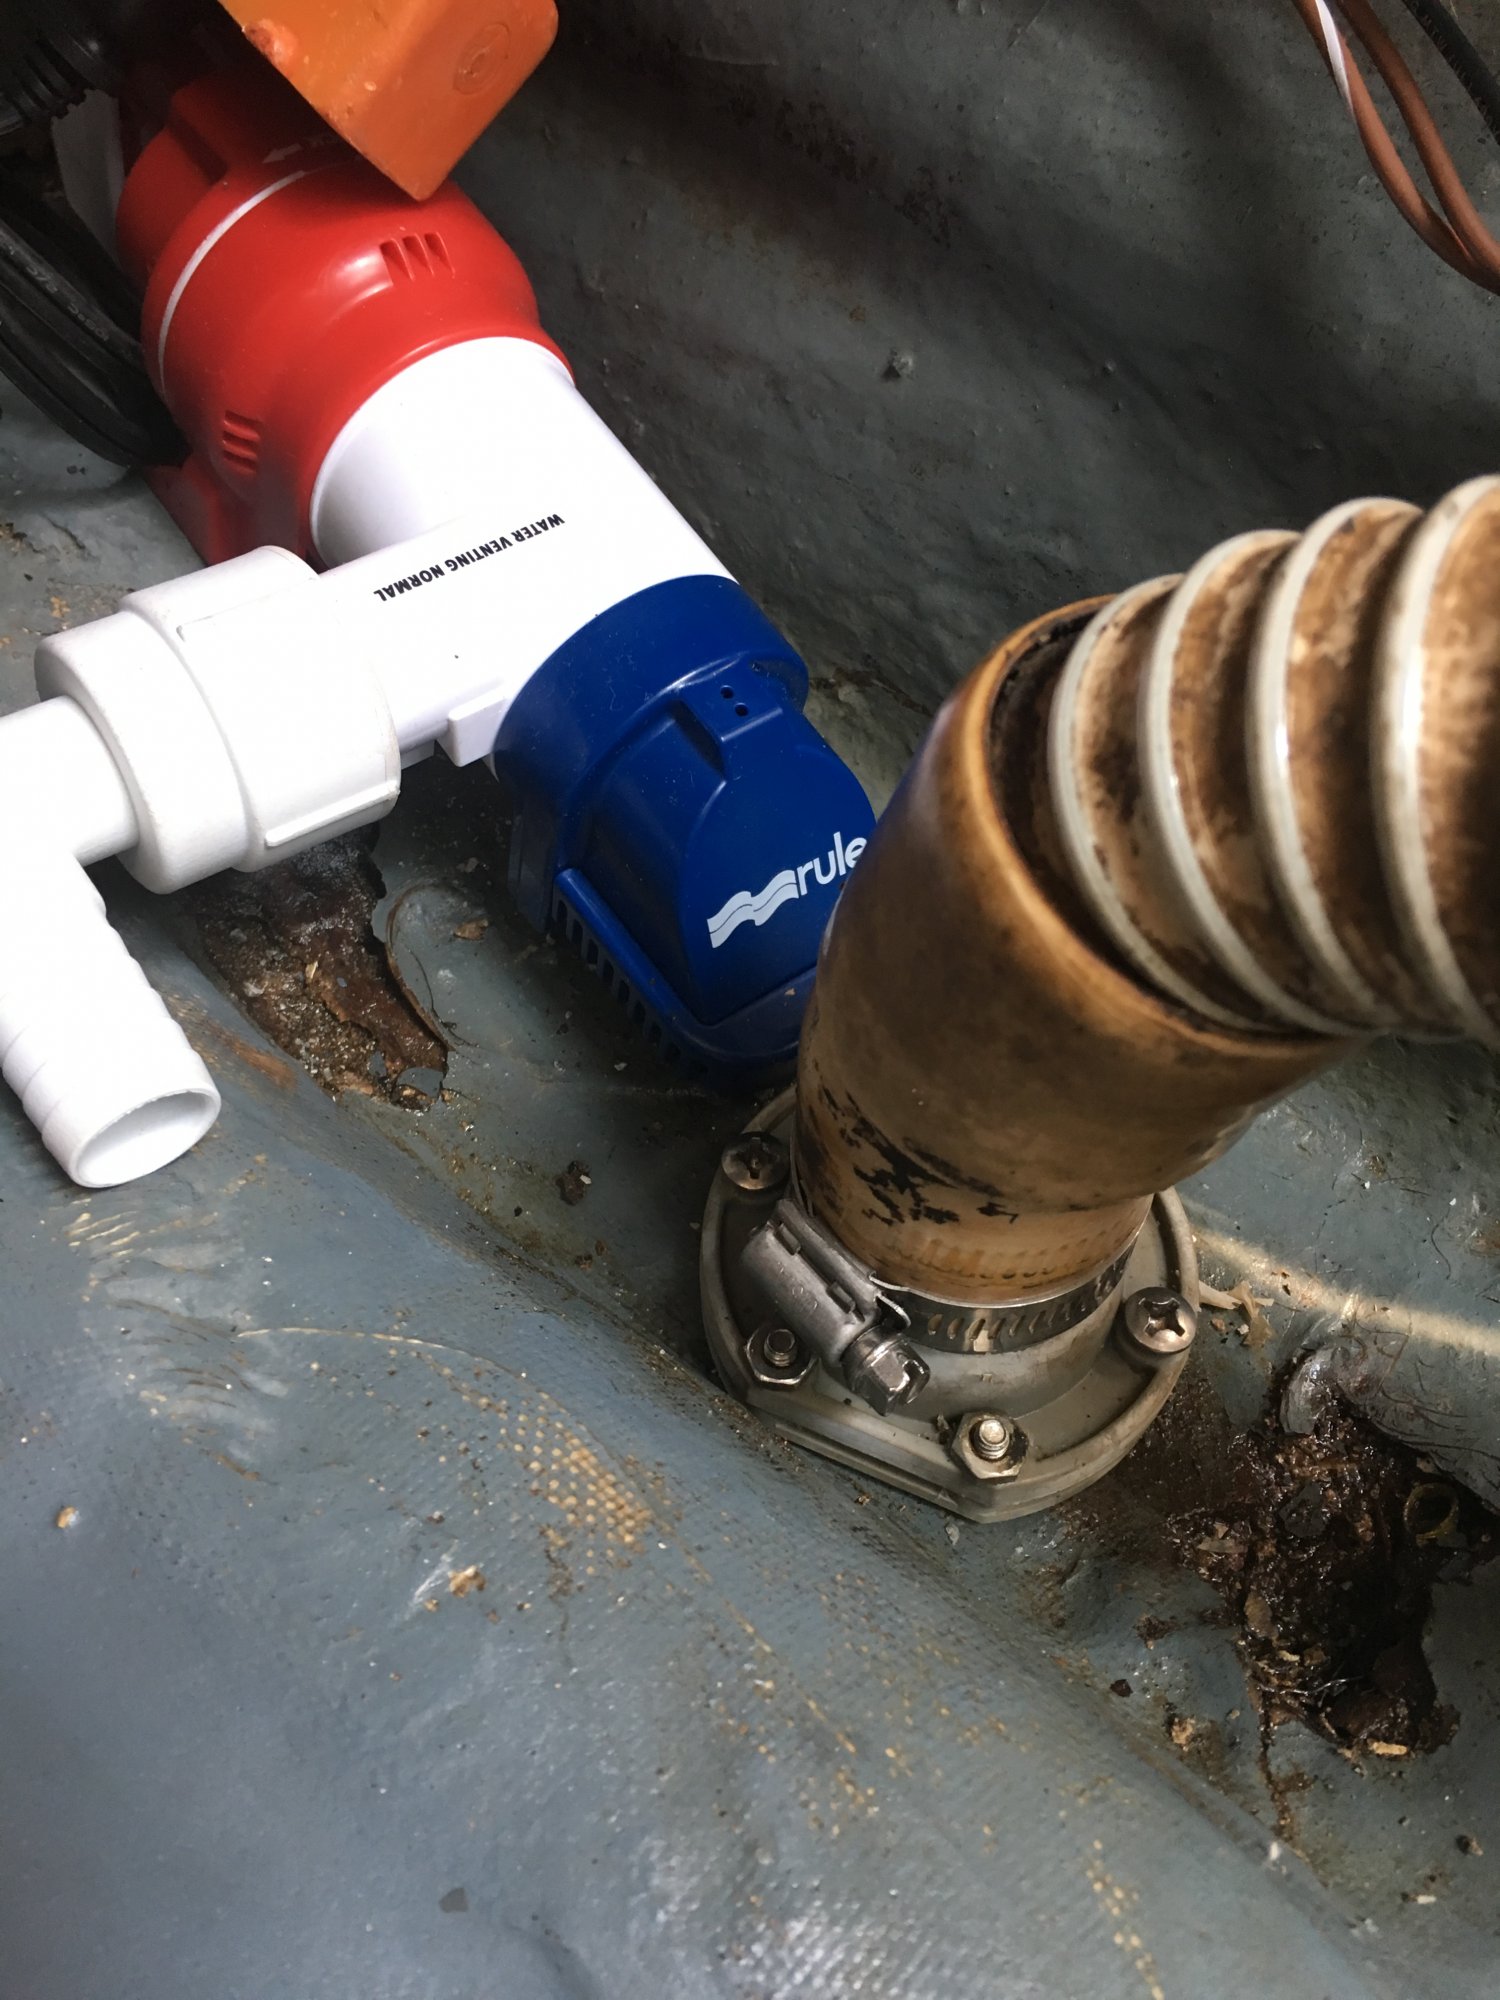
This is a picture of my bilge with the up haul tube for the centerboard, after the rule bilge pump and the manual pump pick up have been removed. It's currently all dry on the surface, leaving behind residue from the cracked areas.
A closer look shows the crew holes for the manual pick up and to the left the screw holes for the automatic. Both leak water in.
Today I visited the boat (outside it was 11degrees). Once the heaters started pumping warm air into the cabin, I took
my multi tool and started cutting away loose fiber glass. What I found was a sandy concrete mix, some of which was water logged. As in the second picture below, one can clearly see. My multi tool ran out of battery power, so I cleaned up the mess, ready for the next visit, hopefully a little warmer.
My plan is to remove the bad fire glass, grind to a clean and dry level, seal with some thickened epoxy resin and then lay some cloth down. Once this is achieved, drill fresh holes, fill with epoxy again and then drill smaller holes to hold the pump pick ups. If anyone has any sound advice on how to proceed please add to this thread.
As I make progress I will add more pictures.
That crumbled concrete like material is what I also found in my keel. I started out with the same approach as you and then realized that was one deep rabbit hole as it was all at least damp material. If you have liquid in the keel it's going to be at the bottom. Filling the cracks in the keel "concrete" will cost a lot of money and will change the weight of the keel.
After much consideration I carved out the cracks in the side of the keel caused by freezing water (we hit -30F that winter) and let it dry out for 2-3 weeks in the spring
If I was in your shoes I'd probably dump some alcohol or RV antifreeze in the bilge and then drill drain holes at the bottom of the keel in the spring. There are no reports of any wood in the O'Day keels so most unfrozen liquids shouldn't cause any harm. Rudy at D and R Marine should be able to confirm the keel material
An angle grinder might be better suited to tackle the heavy fiberglass in this part of the boat. Grinding, cutting and sanding discs all work well for fiberglass. I just tried a 7.5 amp 4.5" grinder with a 36 grit flap disc on fiberglass and it made tapering a much much easier task. I wish I had it when I was fixing my keel
Last edited:
More success today. I was able to get the centerboard out of the keel and lay it on a pair of saw horses, to make sanding easier. I had to put a chaser on the line that hold the centerboard lifting cable. I found the stainless steel braided cable to have some deterioration at one of the thimbles. Guess I have to replace that.
anyhow, I sanded the old paint off, took it to the gelcoat, found a few bare spots where the fiberglass is showing, so I need to seal. I'm thinking that I'll put a good solid barrier coat on before painting a hard bottom paint.
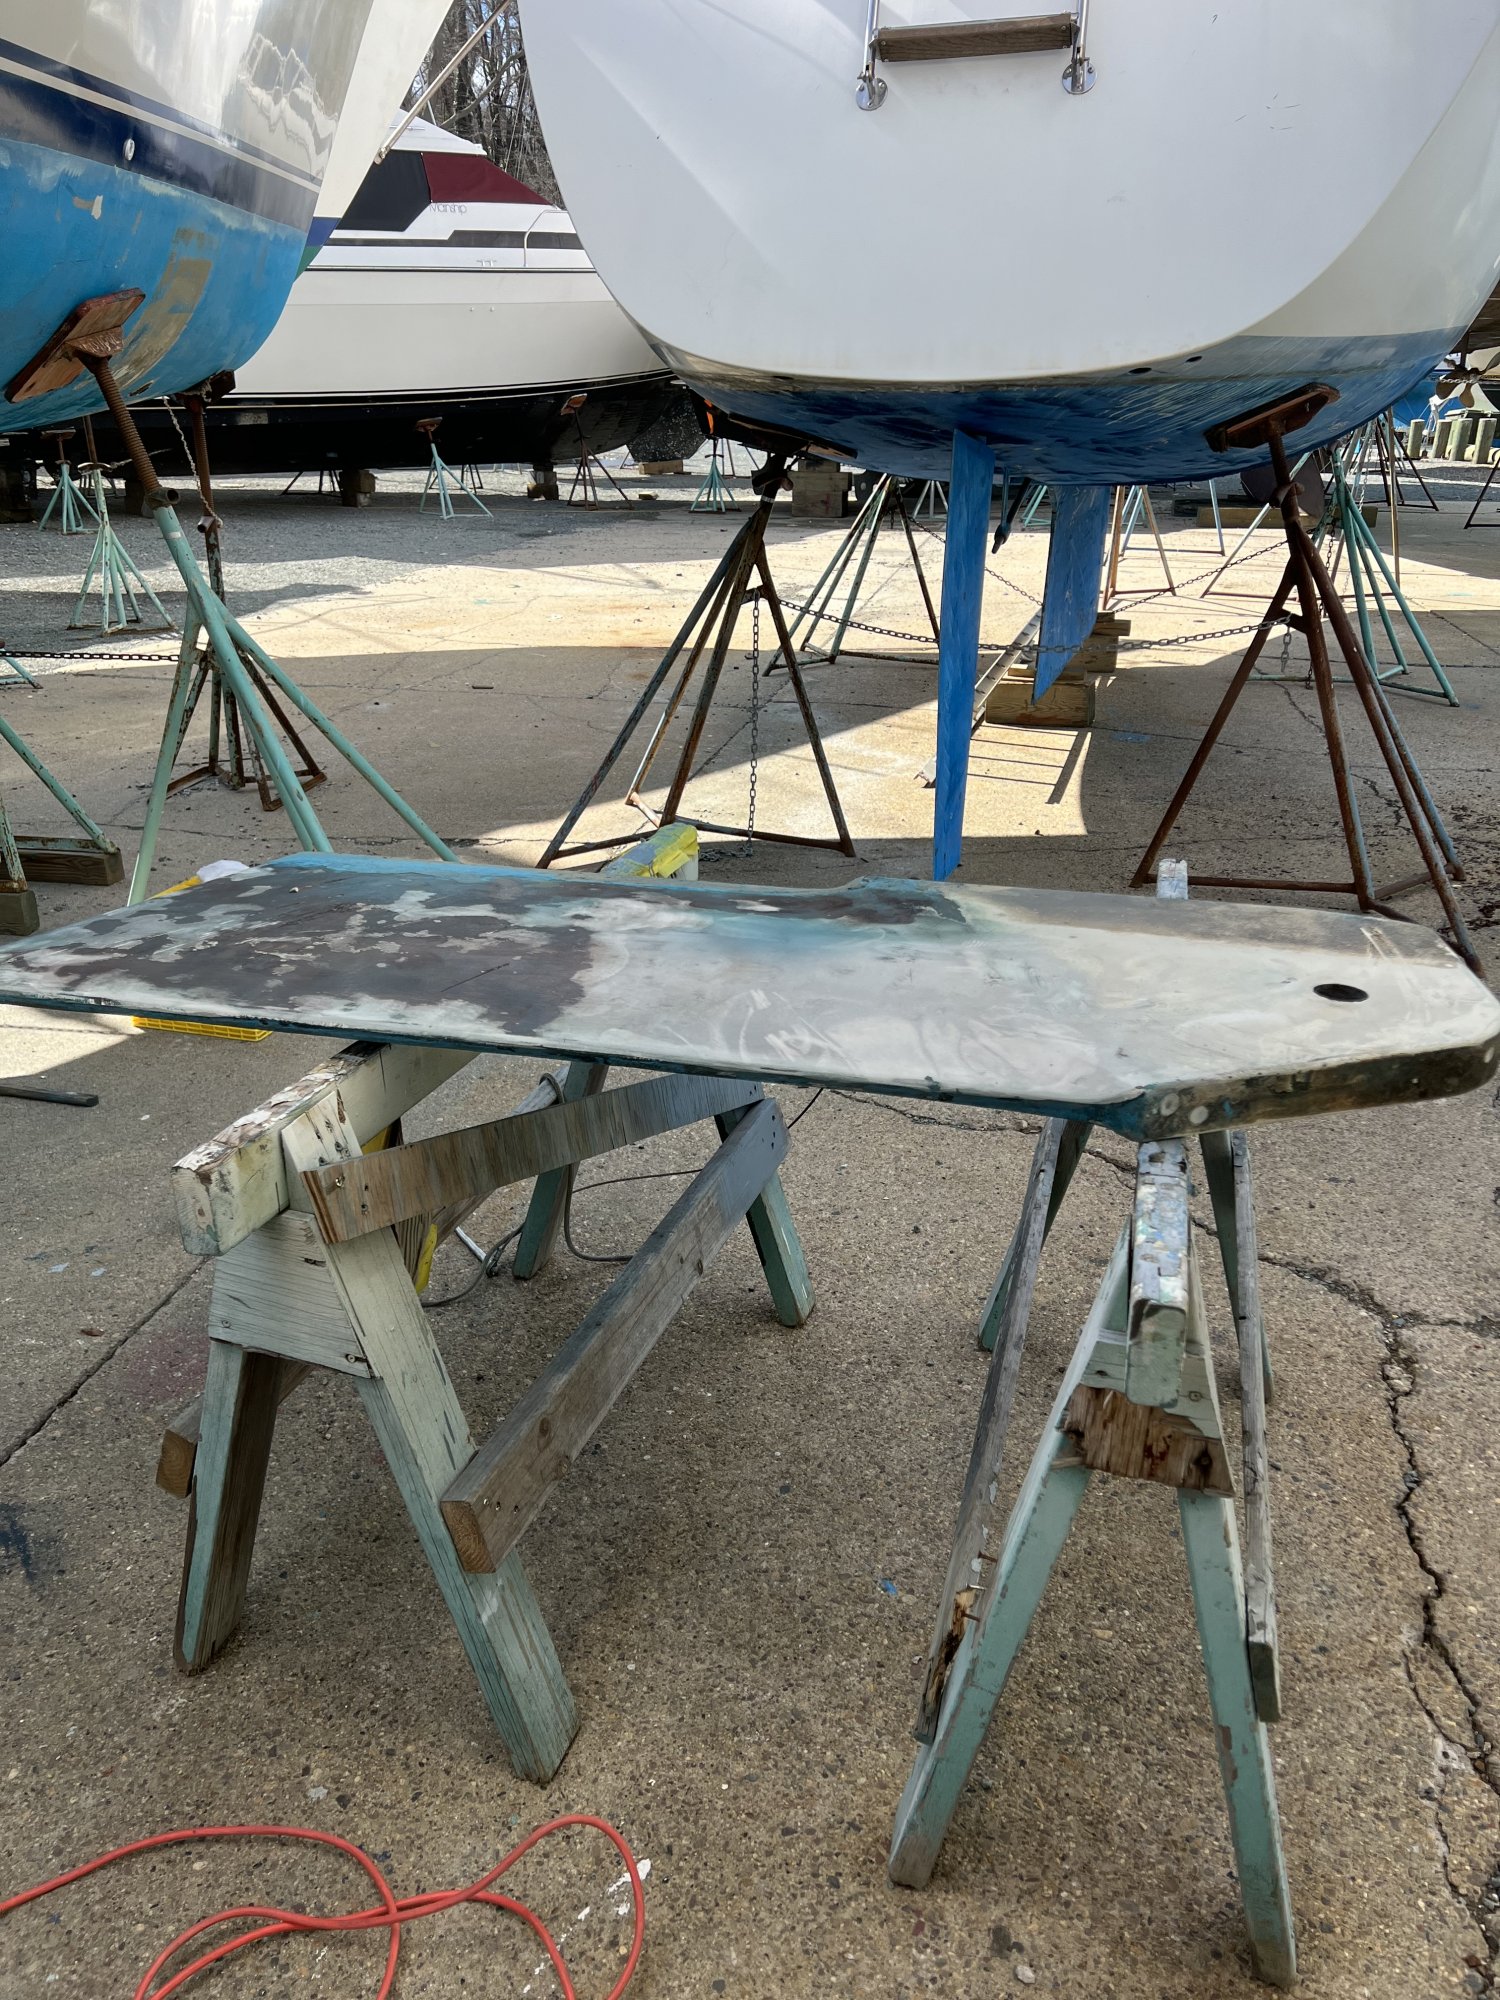
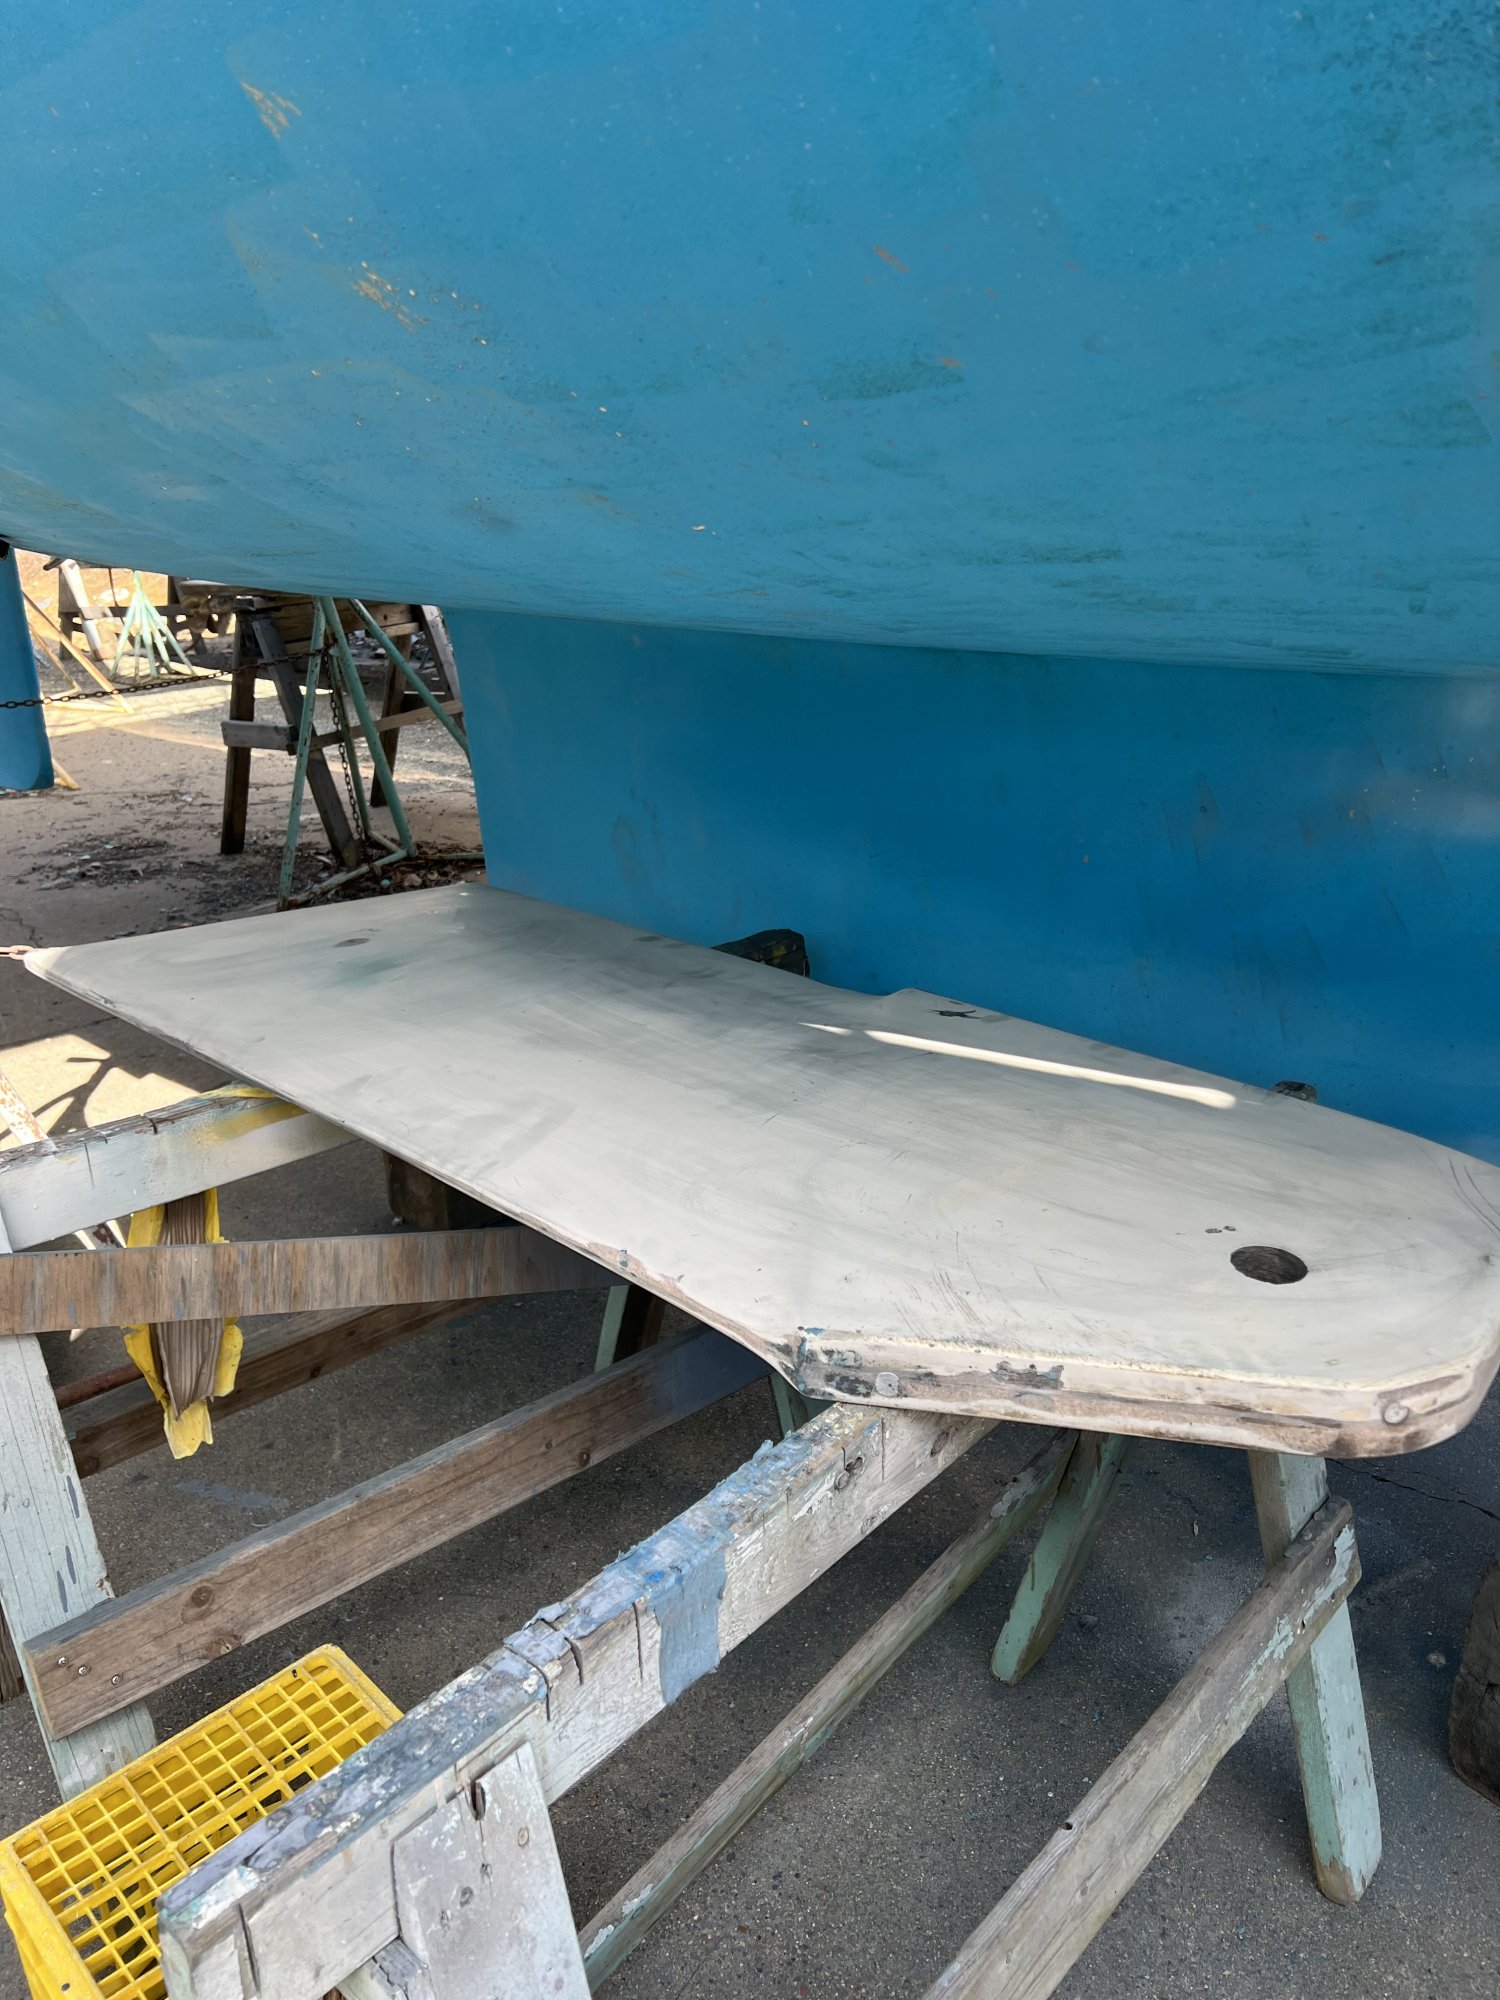
anyhow, I sanded the old paint off, took it to the gelcoat, found a few bare spots where the fiberglass is showing, so I need to seal. I'm thinking that I'll put a good solid barrier coat on before painting a hard bottom paint.
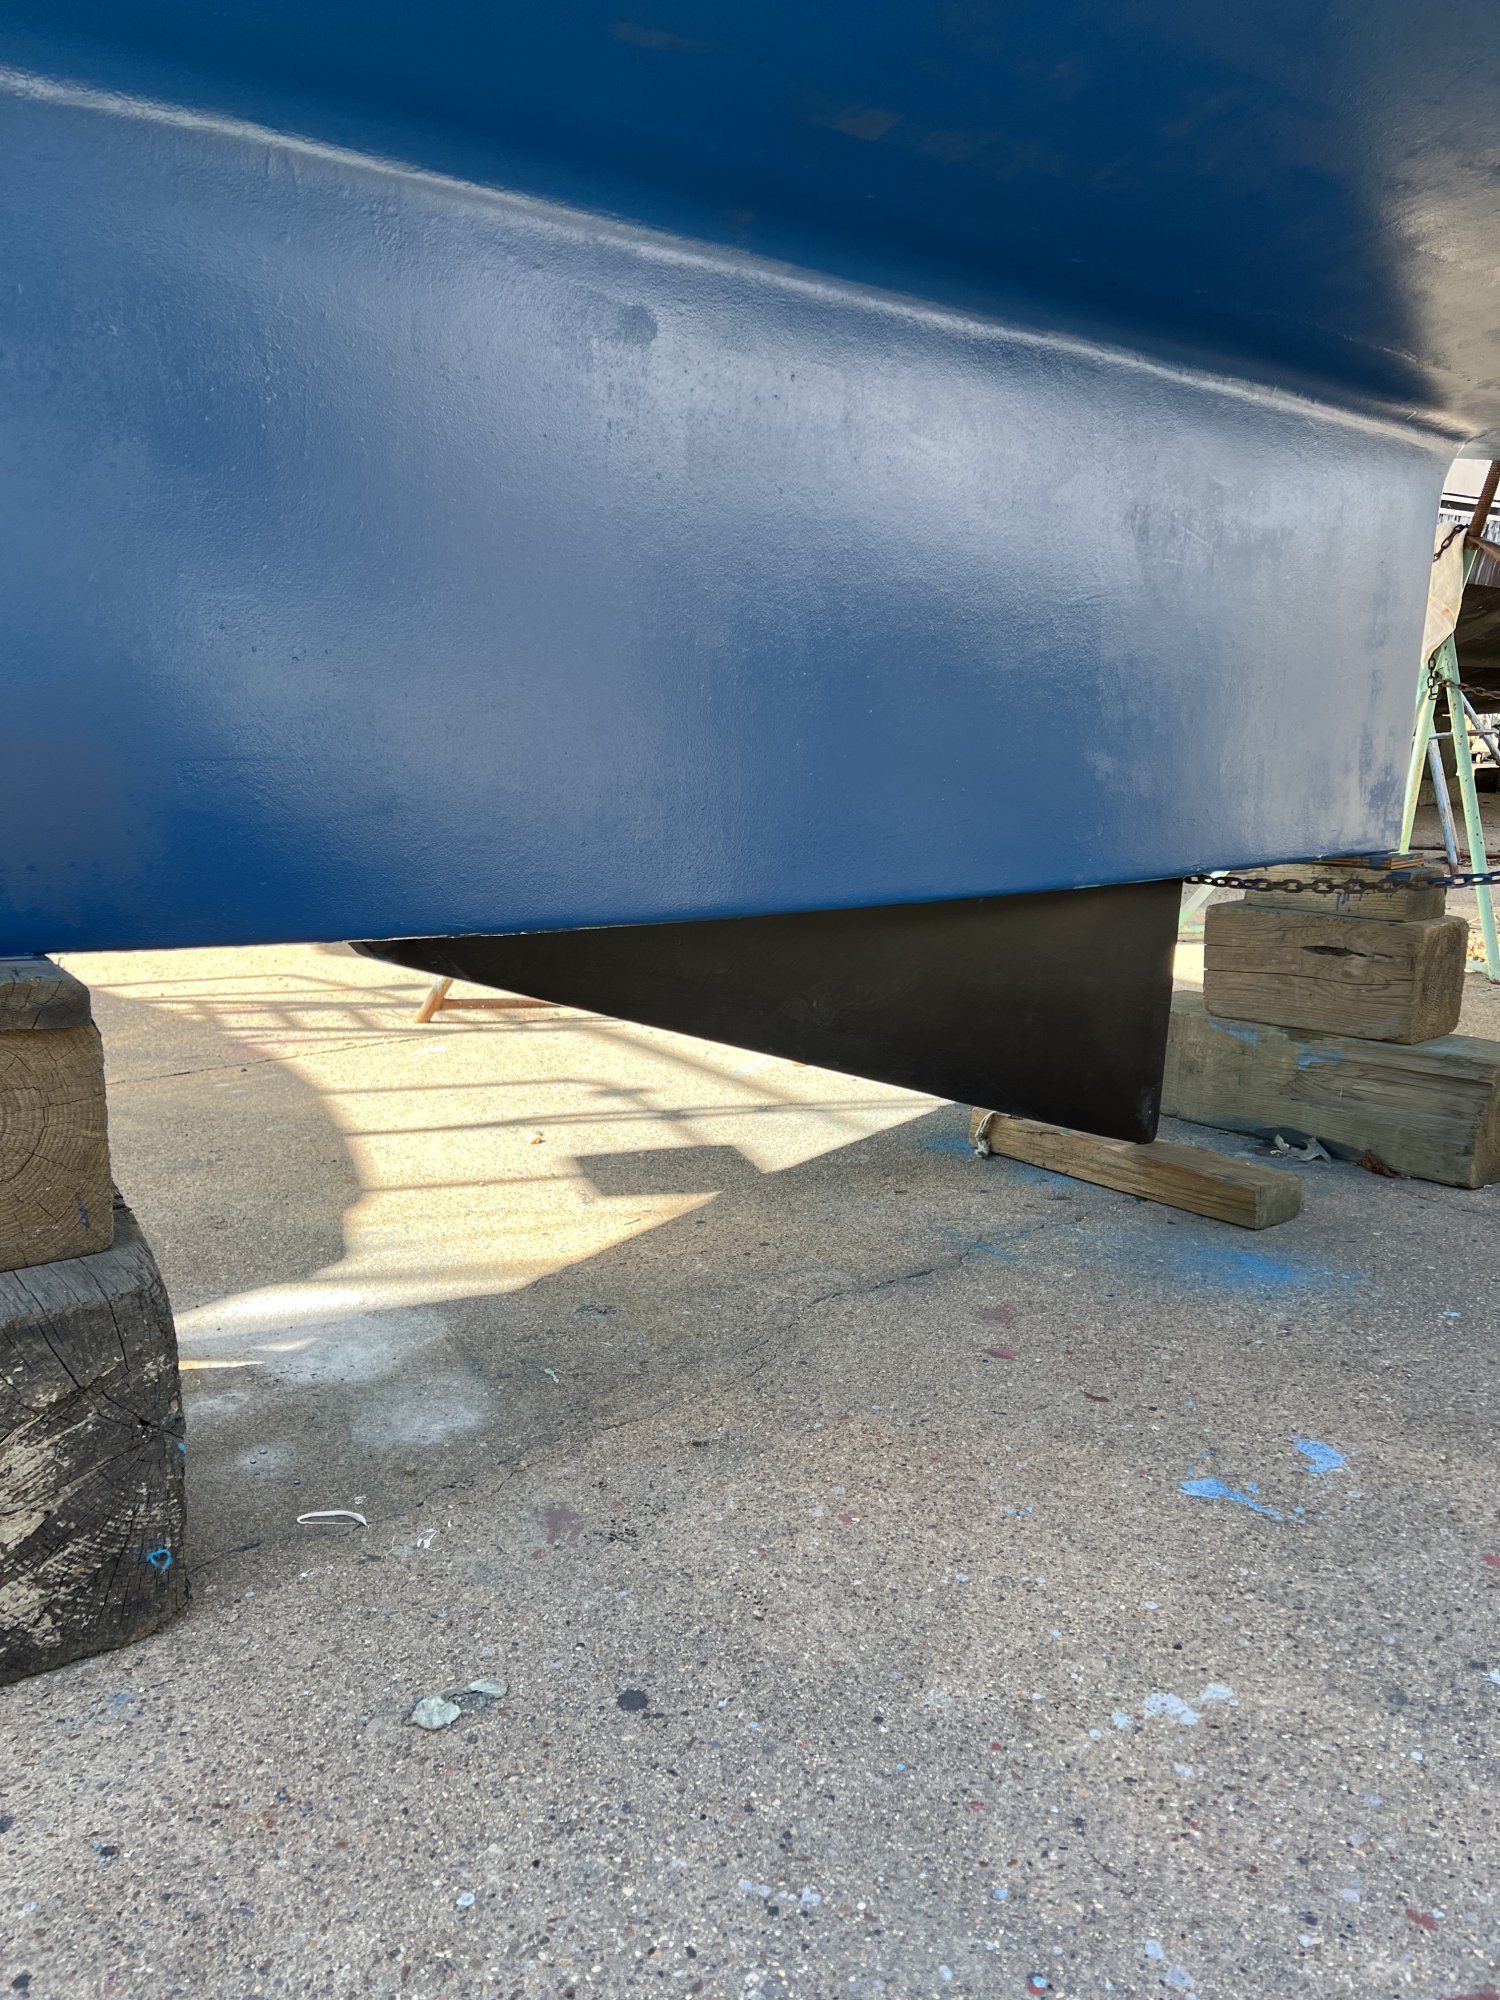
Centerboard finished. Cavity wall in the Keel repaired as needed. All ready for a new cable and then install. Woll be splashing mid April.
So we have come to the end of this challenge. All my "Angst" disappeared slowly as I asked questions and folks gave me information that helped me through this project. I thank you all. I would like to summarize the challenge and how I achieved the outcome, so it may help others with the same model boat. My guess is that many of you are working against time to get your boats ready for splashing as yes, the season is starting. And yes for some, it's happening all the time. I know and I'm jealous!
So the CB was stuck up in the cavity. When the boat was hauled I had the yard men put it as high as they could. In the beginning I was sure it was not high enough, which turned out to be correct but also it ended up being ok. I knew the centerboard cavity was full of debris, growth and stuff unknown, along with a few barnacles. So I used a power washer to slowly but surely erode the crap out of the cavity. Then with home made long handled scraper, I removed a lot of the remaining barnacles and semi loose ablative paint. On the bottom of the keel are two Stainless Steel plates held in with 5/16 flat head bolts about two inches in length. I eased them out slowly as to not damage the heads. I then pulledl the wedges out that held the pin in place. I loosened the line to let it down, but nothing moved. I tightened the line just enough to let it drop without it coming crashing down and continued to rock back and forth on the CB. To my utter surprise, it started to come down. I gave it a little more line and it finally came to rest on the ground. (See pictures in previous posts) . The cavity was damaged in some areas, which I fixed with thickened epoxy, after sanding away to clean gel coat.
A week later I started the sanding the CB, thinking that if I got the major part sanded and painted, I could finish the rest while it hung in the sling over the weekend before splashing. As I put pressure on the board with the sander it slid sideways. At this point I wondered how far could it go. Well I found that the up haul cable block was at its limit and would not allow it to move anymore. With a chaser line attached, I removed the block and let it go all the way down. The board finally came down with a few more big tugs. Success so far. Picked it up, (weighs 110 pounds) and put it on saw horses and sanded away. All the time I was wondering how I was going to get the cable out of the CB. After sanding it all down, wiping it with acetone to begin the painting with an epoxy barrier coat, I noticed where a pin must go through, there was some gray filler. To my surprise it was a rubber plug. I removed the plug and underneath was a flat head bolt. Undid the bolt and removed the cable bracket. This I packed to take home and replace with fresh stainless steal wire. My days where getting brighter. Worries started to slip away.
I completed the barrier coat and a few days later scuffed it and painted three coats of black, hard bottom paint.
With a fresh cable in hand I was ready to re install the board. I laid the board down on some cardboard, installed the cable bracket, sealed the new bolt with white life caulk, left multiple finger and thumb prints on the board, and then slid it in place. Using Egyptian style physics in engineering, I raise the board to the cavity and with the up haul I got it all back in place. With immense joy I tackled the replacement of pin, shims and plates, filling all bolt plugs with 4200 and smearing the rest of the caulk to fill any voids under the plates. I torqued down the bolts and took a well deserved break to stare at my work. Up haul blocks back in place all is working again.
I don't know if its me or if this happens to most folks, but I seem to get caulk all over the place. It's a job I hate. Four days later I'm still trying to get the caulk residue off my hands.
Thanks again, hope this wasn't too long winded!!!!!!
Last edited:
twodzusfittings...I sorry I found your post after you completed all of your work. The reason for the excessive amount of caulking around the bolts is that they leak and water gets inside of the keel trunk and works its way to the bilge of the boat. You mentioned in your list of work that you replaced the pendent with a cable. If your in salt water the lead collar you put the cable in to form a loop will not last. If it fails I recommend that you replace the line and cable pendent with an all line pendent and use a shackle to attach it to the centerboard fitting. I've attached pictures of mine. Regarding your question about how often I use the centerboard, I use it 0% of the time as I don't like hearing it banging around while I'm sailing.
Attachments
-
 67.1 KB Views: 137
 -
 64.9 KB Views: 119