C22 New Style "Stormwatch" Purchase and Refit

Mar 20, 2015
3,094
C&C 30 Mk1 Winnipeg
I've run into a couple of snags, rudder lock bolt stripped out and i lost half of the lock disk and the handle while in a pretty good blow on my last 5 day shake down and the sea cock on the drains. I can't get the thing to shut off. It seems like a small issue but it is the type thing that gives me nightmares. I also discovered a spot on the starboard cabin top that sags when I step my 200lbs up there so i think i better do some explore holes to see whats up.
I took a look at my original rudder and it has the disks and the handle. Not sure what shipping would be. Also not sure what their condition is since they are still mounted to the rudder.

I agree on the valve for the drains... I'd be concerned too. If it can't close now, it may not be far from leaking.
 
Mar 20, 2015
3,094
C&C 30 Mk1 Winnipeg
Re-fit Update:

I have spent the last few weeks of spare time, repairing a 1998 3/4 ton pickup I purchased for a tow vehicle, but I'm finally doing some more work on the boat.

The varnish on the new table was complete, so this evening I mounted the hardware, and installed a drawer for charts on the bottom.

I was at a yard sale this past weekend, and bought a monitor stand that had a nice keyboard drawer with ball bearing sliders.
I drilled out the rivets holding the drawer sliders, and purchased four, metal, 90 degree angle, brackets and some stainless screws.

I cut the bracket length down by 1/2" and bolted them to the drawer slides. I used bolts that had flat heads that didn't interfere with the slider function. In fact, I had to use a bench grinder to make them a tiny bit smaller so they wouldn't rub.
I rounded and smoothed any cut edges to prevent any chance of people's legs being cut.

I then mounted the drawer + slides + brackets, to the bottom of the table.
I made sure the drawer was set back from the edge far enough, so that it wouldn't interfere with the fiberglass lip, when the table is lowered for sleeping.


Re-purposed Keyboard Drawer Mounted on Table Bottom.


New Table in Place


Table with Keyboard/Chart Drawer Open


Trip to San Juans and The Gulf Islands anyone ?

Note: I had planned to stencil a compass rose on the table top, but I decided that I could easily do that later, and wanted to simply get the table ready for use. The fall is coming fast and no time to waste. !

Tomorrow I'll hopefully be cleaning up the radio wiring, making a mic clip, and starting to install the new amp/volt meter in the panel.

Cheers,
Roy
 
Last edited:
Dec 5, 2011
550
Catalina Catalina 22 13632 Phenix City
Beautiful job on the table and re purposing the sliding drawer. Good luck getting her splashed before the summer comes to an end.
 
Mar 20, 2015
3,094
C&C 30 Mk1 Winnipeg
Gene: I don't know about VERY nice.. There are varnish blobs on the bottom of the table which I didn't bother with for example.... but thanks for the compliment.

One of the good things about the drawer, is that it locks when extended, so I could leave it open when under sail.

Slim: Thanks.... I'm very close. I could have her and the tow vehicle ready by Sunday.

In spite of temptation, I've decided to do a shakedown sail before I take her to Lake of the Woods for a few days. Besides the fact that I have never fully rigged her, I haven't even taken the new mainsail out of the box, nevermind hoisted it to see if it's ok.
Nor do I know if the signet depth finder works correctly..

The list is getting much shorter... :)
 
Sep 30, 2013
3,538
1988 Catalina 22 North Florida
Hey, if you have to lie on your back on the cabin floor to see those blobs ... they ain't there! (Or you're drinking too much).

We think similarly: I built a tray under my table, open from either side, to store our big book of paper charts. :)
 
Mar 20, 2015
3,094
C&C 30 Mk1 Winnipeg
We think similarly: I built a tray under my table, open from either side, to store our big book of paper charts. :)
That's makes sense. Access from either side would be a good option. We sat in the boat trying to decide which side to put the drawer on. In the end we decided that close to the hatch was best, that way we could lock it open to increase workspace, while still having the forward seat available to sit while using the stove.
 
Mar 20, 2015
3,094
C&C 30 Mk1 Winnipeg
-----
"We have Launch !"... Errr maybe not.
------


Were do I start ?

Last weekend, after a lot of work getting the boat usable (but not completed), and a lot of work finding and fixing a good used 4x4 pickup, we finally towed the boat to the lake:


Stopping for Ice and Food

The previous weekend we had been up at the lake, checking the suitability of a new boat ramp.
The ramp has good parking, and the ramp itself is concrete, fairly steep/deep and WOULD probably have made for an easy launch.


Last Saturday, after a busy busy week, we made a last minute decision, and got the boat ready.
By the time we got to the lake, it was late afternoon, but we were optimistic that we could launch the boat, sail across the bay to Victoria Beach Harbour, and spend the night on the boat.

The attentive reader will notice I used the word "WOULD" in a previous sentence.

You see.. Before we attempted to launch, I walked over to a guy who was launching his small aluminium fishing boat to get some local knowledge.

The kind man saved us a lot of grief.
It seems that while the ramp was fine, the channel that led to the lake itself wasn't.

The channel leads to a lagoon/marsh, where you then have to go through a channel in a large sandbar out to the lake itself.
Thanks to the great guy with the fishing boat, we learned that the channel had silted up, and was so shallow that he had to get out and push his boat over the sandbar in the channel. To make matters worse, the wind was blowing across the channel and pontoon boats had been getting stuck.

So, scratch that launch ramp.

We headed north up the highway a short way, to see if the small marina there would work better.
When we got there, there was a chain across the ramp, with a contact number listed so we could pay a launch fee.
We called the number, got no answer, and left a message. Being the fall in cottage country, there was only an handful of people around and none of them were marina staff.
While we sat there waiting for a phone call from the marina owners, we decided to check online satellite images of the marina to see where it's access channel went.

Surprise ! it went into the same lagoon, with the same silted up channel through the sandbar.

At this point we were running out of options due to the rapidly oncoming sunset.

You would think that an area surrounded by cottages and lakes would have a listing of every public launch ramp in the area.
Well, they don't.
I don't know it's acase of "It's ours and we keep it secret" or "Everyone knows where it is. Why do we need to let people know ?" or just a lack of ??

A search on the internet came up with references to the launch ramps at the various beach communities, but none of the info told you their exact location.

We did know of one launch ramp that is in a beach community that has a "no vehicles allowed" policy for much of the area, but were weren't sure if it was open. The "no-vehicles allowed" rule applies during the summer so might we drive in and use the ramp now ?

To find out, we drove to my sister's cottage which is in the "non restricted" section and left the boat there. We then drove back to check out the ramp.

The ramp looked great, and had direct access to the lake !!

BUT.... The docks all had gates+padlocks on them so after we docked the boat, we wouldn't be able to get back on land. Being the off-season, it was very unlikely we would be able to contact someone, pay a fee, get a key, and launch the boat before the sun went down.

"Honey... why don't we just stay at the cottage and launch the boat tomorrow ?"....

<Stay tuned>
 

jmczzz

.
Mar 31, 2013
515
O'Day 26 CB New Orleans
Gee wiz I thought I had problems getting mine launched. Persevere, good luck. James
 
Mar 20, 2015
3,094
C&C 30 Mk1 Winnipeg
-----
Aborted Launch Continued.... aka "It was for the best"
-----


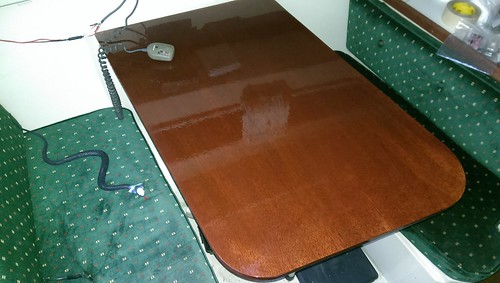
After we realized that launching that day wasn't possible, given the amount of daylight left, and the problem of getting access to the docks, we decided that we would simply sleep on the boat as planned, albeit on the trailer. Launching could wait for the next day.

We fired up the alcohol stove and made some tea, then chose the table/bunk for our first night onboard. The table/bunk area was decently comfortable, if a bit skinny in width. The alcohol stove did it's job perfectly. Using it in the reconfigured location, was hands on proof of the advantage of forum member "Watercolors" galley design, over the oem setup. :)

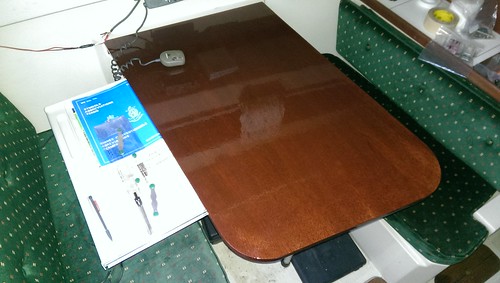
In the morning, after breakfast, we gave the boat a pre-launch once over.
At that point we had raised the mast a few times, but that was before we had received our new mainsail from Precision Sails. In addition, we had never mounted the jib on the CDI furler.
With this in mind, and because we were in a location where there was nothing to prevent us from raising the mast, we decided to quickly raise the mast and check things out.

The new custom mainsail fit perfectly, from what we could tell. Of course, a complete assessment would require actual use, with the battens installed.


New Mainsail


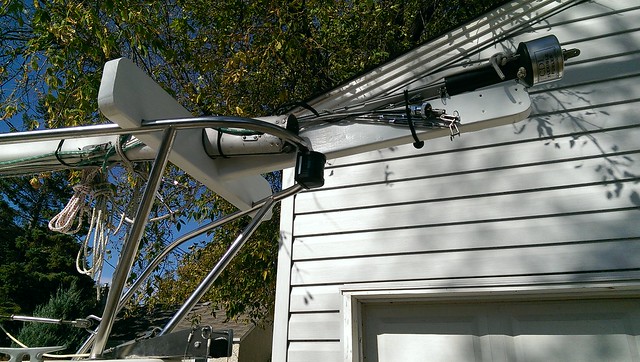
The existing jib+furler was a different story...

With all the projects I was doing over the summer, I never took time to fully investigate how the sail was hoisted on the furler.

What I saw on the boat didn't make sense, but I had only skimmed the CDI manual previously.
I assumed that it was fully functional, because the previous owners had it installed, and had used it last year. You know what they say about ass-u-ming ?

In essence....
The furler's extrusion has a slot on both sides.
The jib's luff tape slides into the rear slot, though a gate, just like mainsail on the mast.
A halyard made from 2 pieces of line, runs externally up to the top of the forestay, through a sheave/pulley, then back down to the deck inside the front of the extrusion.
Once the jib is fully hoisted, the messenger/second piece of line is removed and the remaining halyard piece is secured to the furling drum.

Bloody simple right ?

Why did the system initially not make sense to me ?
BECAUSE IT WAS ASSEMBLED WRONG BY THE PREVIOUS OWNERS' BOATYARD STAFF

The sheave at the top was on backwards, and the halyard line was fed into the wrong side of the extrusion.
Because the halyard was non-functional as assembled, the only way they could have put the jib on, was to mount it on the furler, before the the mast was raised.

We dropped the mast, disassembled+reassembled the furler as per CDI's user manual and raised the mast again.
Now that it was assembled correctly, the jib hoisted easily, and the furler worked as designed. :)

With mast still up we decided to test the pop top cover.
It worked great. It fit tightly, but not so tight that we had to struggle to do the snaps up like some C22 owners have reported.


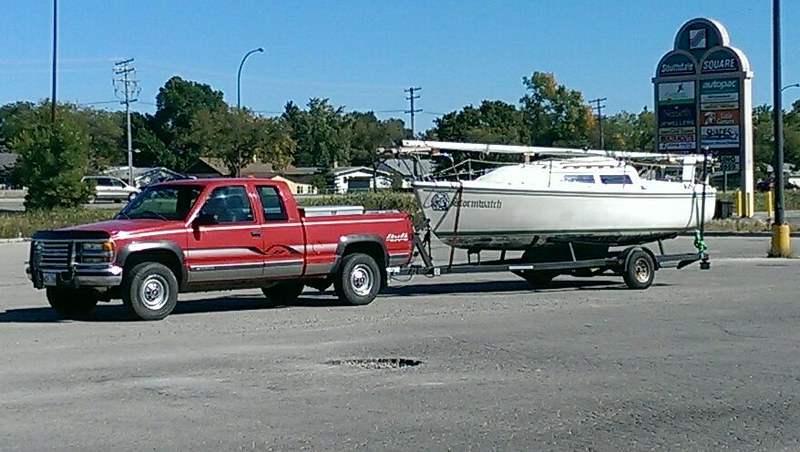
So we had tested both sails, and we were finally 100% ready to tow the boat to the launch and spend a nice warm day out on the water.....

Woah ! Not so fast there, pardner !

You see.. we were using a 6ft stepladder to get on+off+on+off+on all weekend.
We had been using the ladder all summer without a problem.
This time the trailer was sitting on uneven ground and the ladder was leaning ever so slightly away from the boat.

My wife, with one hand on the boat, and one on the ladder, as required, had the ladder go sideways. She was unable to pull the ladder back, and the ladder toppled with her jumping the last 3 feet to the ground.
Unfortunately she landed flat footed without absorbing the shock with her legs.

So.. now she was limping... had sprained her knee... and launching the boat was cancelled.


Edit: I forgot to mention the light at the end of the tunnel.
On the way back from the lake, we stopped at another tiny harbour which we were told about but had never seen.

While I was checking out the ramp, my wife was checking out the docks:
Me: "I think this ramp will work perfectly !"
Wife: "I know it will work perfectly !"
Me: "How would you know that ?"
Wife: "There a Catalina 22 over here !"

It's 1 hour away from our house, has direct access to the lake, and the launching and berthing prices are great ! :-D

In the end, the weekend was productive and not a total loss by any measure.
The only bad part of the weekend, was my wife being injured.

Hopefully someone can take a few lessons from this story.

Cheers,
Roy

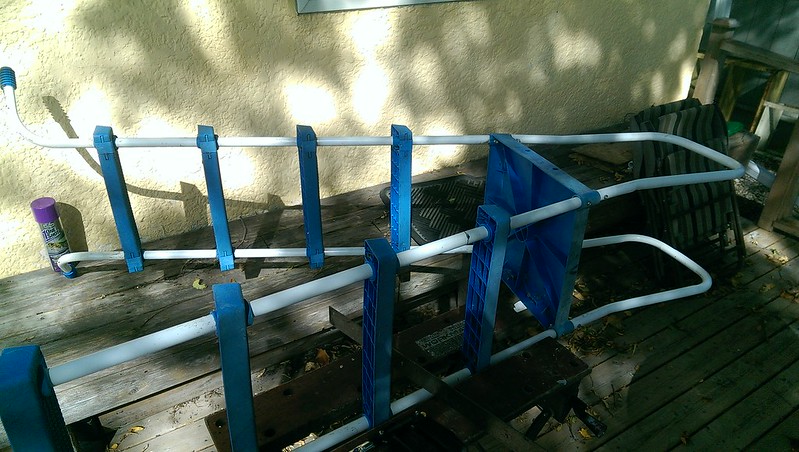
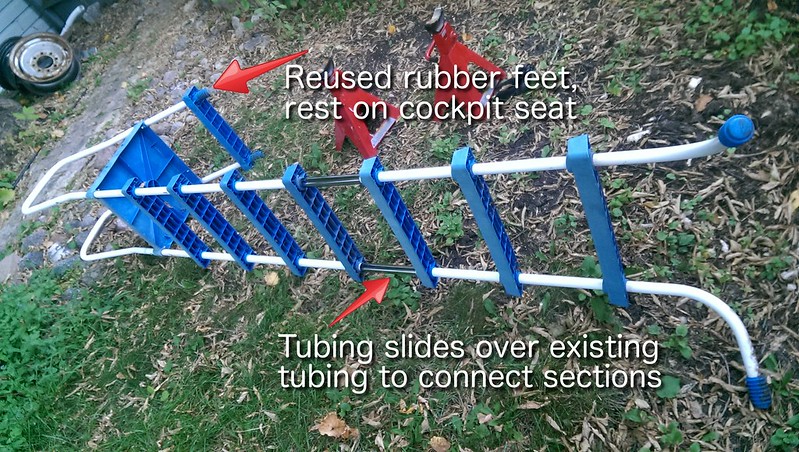
P.S. This leads to my next post, which covers my building a new land boarding ladder for the boat....
 
Last edited:
Nov 19, 2008
2,129
Catalina C-22 MK-II Parrish, FL
I also carry a 6' step ladder while rigging. But I only use it help easily and safely get onto the stern ladder and board the boat there where I can hold onto the stern pulpit also. Try it......

I've given up on launching our boat at a ramp with no finger dock that extends along the boat. Launching is easy, but I want a finger dock where I can walk the boat up on the trailer. Driving the boat up on the trailer and leaning over the front to try and attach the strap to the bow eye just hasn't ended up successful.

Nice rudder! LOVE our Rudder-Craft rudders, especially the kick-up version which also has an optional mast crutch so you never have to remove the rudder, even while trailering.

Gotta love those "new design" C-22 versions! :dance:

Don
 
Mar 20, 2015
3,094
C&C 30 Mk1 Winnipeg
-----
Prepare the Boarding Party Lads !
-----

If you read my previous post you know that we had a small mishap with the fibreglass step ladder we had been using all summer.

We knew that we needed a different ladder for boarding the boat on land, and making/building one was on my task list for this fall. Unfortunately my wife fell from the existing ladder before I made a new one.

The big problem with the existing ladder, was that it was only 6 feet tall. Which meant that you had to hold onto the boat while bending way down to hold the ladder, as you climbed onto it.
Obviously not a good way to do it.
There's a reason they say you shouldn't stand on the upper steps of a step ladder.
(check the photo in my previous post)

EDIT: We plan on using the boat as an RV occasionally, when on the road to other lakes, and the coast. Climbing on and off the boat, multiple times a day, brings other considerations into play.


One possible solution to make the ladder safer is to use a taller ladder. That way you could hold onto the top while climbing on.

The strange coincidence of the event is..
I was planning to build a ladder based on, or similar to, an above ground pool ladder. After the my wife sprained he knee, my sister said "Why don't you use the old pool ladder we have ? We don't need it, you can have it"

What I like about that style of ladder, is that they have handles at the top that stick up above the top platform.


Old Pool Ladder on the Operating Table...

A quick look at the ladder, showed that the top was deep enough to perfectly pass over the side, and rest on the cockpit seat.

Modifying the ladder for my needs was easy.

I simply:
1) took a hacksaw and trimmed the legs off one half of the ladder, saving the rubber feet for later.
2) used the hacksaw to cut half of the ladder away, leaving just a single step at the top.
3) put the rubber feet on the bottom of the cut section.
4) trimmed the top+bottom of the two ladder sections so that if they were attached, the steps would still be evenly spaced
5) use the leftover piece of scrap pipe from my mast crutch project, to make to short tubes to connect the two ladder sections. (The inside diameter of the pipe is the same as the outside diameter of the ladder's tubing.


On testing, the ladder works fairly well, with a few flaws:
1) The height of the boat and upper ladder rung positions combine to interfere with each other. This could cause damage to the rub rail and the ladder.
2) I kept the ladder longer than needed, so that it can handle uneven ground. This causes the ladder to flex more than normal, due to more side loading on the tubing.
I will probably cut the legs off and use more left over tubing to make adjustable legs.
This will not only make the ladder more stable, but also reduce side loading due to improved positioning.
3) The handles at the top may interfere with loading things on the boat. I may remove or shorten one, so that you can still hang on but load stuff easier. That decision will have to wait until it's been used a lot.


I'll be experimenting tomorrow with those modifications, and hope to have the ladder working as I envisioned.

Total cost should be $0

Cheers,
Roy
 
Mar 20, 2015
3,094
C&C 30 Mk1 Winnipeg
I also carry a 6' step ladder while rigging. But I only use it help easily and safely get onto the stern ladder and board the boat there where I can hold onto the stern pulpit also. Try it......

I've given up on launching our boat at a ramp with no finger dock that extends along the boat. Launching is easy, but I want a finger dock where I can walk the boat up on the trailer. Driving the boat up on the trailer and leaning over the front to try and attach the strap to the bow eye just hasn't ended up successful.
Don
Hey Don !

I've used the stern ladder that way, which would work well when launching/rigging.

We plan on using the boat as an RV occasionally. For example, tow it to the coast and sleep in it until we get there to launch it.
For that type of all day use the stern ladder won't work well, especially if the BBQ is mounted, which it would be when using the boat as an RV.

I made a steel ladder to weld on the trailer at the winch post, with the idea that it would add the additional option of boarding over the bow. Edit: With the tailgate down on the truck I should be able to reach the ladder without getting wet.

I have no idea if it will work as planned yet. I was going to weld it on, but I found an abandoned C22, parked in a boat ramp parking area, that I hope to use the galvanized trailer from. Assuming I can find the owner. No point in modifying this trailer if I'm not keeping it.

Roy

EDIT: I wonder about using a temporary rope bridle attached to the bow cleats instead of the bow eye ? Then use the bow eye when close enough.
 
Sep 30, 2013
3,538
1988 Catalina 22 North Florida
Hey Don !

I've used the stern ladder that way, which would work well when launching/rigging.

We plan on using the boat as an RV occasionally. For example, tow it to the coast and sleep in it until we get there to launch it.
For that type of all day use the stern ladder won't work well, especially if the BBQ is mounted, which it would be when using the boat as an RV.

I made a steel ladder to weld on the trailer at the winch post, with the idea that it would ease boarding over the bow. Edit: With the tailgate down on the truck I should be able to reach the ladder without getting wet.

I have no idea if it will work as planned yet. I was going to weld it on, but I found an abandoned C22, parked in a boat ramp parking area, that I hope to use the galvanized trailer from. Assuming I can find the owner. No point in modifying this trailer if I'm not keeping it.

Roy

Our old trailer had a welded-on ladder that worked quite well. Sadly, I can't seem to find a single photo of it. But it was on the starboard side, just aft of the pulpit, with a support member between it and the winch post to help keep it solid. The right handrail extended upward a couple extra feet above the top rung to give you a firm handhold as you stepped off the ladder onto the deck and vice versa.

Nowadays we just climb up via the spare tire 90% of the time. I sometimes use a ladder at home, but never take one to the ramp anymore.

 
Mar 20, 2015
3,094
C&C 30 Mk1 Winnipeg
Gene,

Nice looking boat and trailer !

Yeah, I've considered the side ladder too. My concern was it's further into the water for launching. It would make it easier to aboard without climbing over the pulpit.

The big advantage of the pool ladder for Boat RVing IMO is that it's on an angle like a step ladder, not vertical.

The spare tire mount is something I've never considered as a boarding method, because our spare just sits in the bed of the truck. Good idea. I love things that serve multiple functions.
 
Sep 30, 2013
3,538
1988 Catalina 22 North Florida
Okay, how about a welded ladder, at an angle, that also serves as part of a mast raising system! LOL

I'm actually a little skeptical of it. But I'd love to see one being used.

 
Jul 23, 2013
487
1981 Catalina 22 #10330 Bayview, ID
After my wife took a short fall climbing down from the trailer fender, I bought one of those folding, telescopic, rolling Little Giant ladders at Costco when they were on sale for $129.


That thing has turned out to be more handy than I imagined for launching our boat. Fully extended as a step ladder, it's the right size to step off onto the deck. Packed up, it fits easily in the back of my Tacoma along with the rudder, gas can, toolbox, cooler, and other necessities. It's light enough and rolls so anybody can move it around.

Two thumbs up.
 
Mar 20, 2015
3,094
C&C 30 Mk1 Winnipeg
Okay, how about a welded ladder, at an angle, that also serves as part of a mast raising system! LOL

I'm actually a little skeptical of it. But I'd love to see one being used.
I agree.

That ladder would be better if it started closer to the tongue and was angled towards the boat. Walk along the tongue, and up the ladder. Makes it better for both launching and day to day use. But then the pulpit is still in the way, which is ok for launching IMO, but is an issue for Boat RVing or maintenance.

The ultimate setup IMO would be a sloped ladder attached to the trailer, running from the tongue area. leaning towards the stern but ending just behind the pulpit, along side of the boat. The rungs would be vertical when towing, and the whole thing would pivot down so the rungs were horizontal.
Easy for launching, easy for Boat RVing, easy for working on the boat.
No need to haul a ladder around. It's just part of the trailer.
Would be relatively simple to build actually. I may make one eventually when I have more spare time.

I've been using the trailer winch + anchor roller to raise the mast, simply because I haven't set anything else up yet.
If you have two people, it would make more sense for everyone to be on the deck.
With one person, that mast raising setup would required a remote control powered winch.
Needlessly complicated.
 
Mar 20, 2015
3,094
C&C 30 Mk1 Winnipeg
Back to our irregularly scheduled program....

Back when I picked up the boat in Ontario, I spent about 15 minutes making some supports for the mast so we could tow the boat the 1500 miles home. I've finally got around to making one for the bow, for permanent use.

I wanted to make something that was as simple as possible, yet do the job well.
I ended up taking the temporary support apart and reusing a piece of 2x6 and a piece of 2x4 spruce.
I considered staining and using a cleat finish on it, but decided that using left over exterior house paint would be free, faster, and more durable.

The 2 x 6 has two notches cut into it to fit over the bow pulpit tubing, and 1 large notch cut into it, for the mast to fit into.
I lined the mast notch with some leftover heavy duty rubber pond liner, attached with construction adhesive.

Stormwatch has a CDI furler. The furler drum+foil, are longer than the mast, so I added a 2x4 to support them.
The 2x4 not only supports the furler, it also helps support the 2x6 (which is sitting on edge) from falling forward or backwards.
the furler, and stays, shrouds, halyards etc. are all held in place with 9" ball bungees i had left over from a temporary shelter i used to have.

When trailering, the mast and support are strapped down to the boat with cambuckle cargo straps. I don't use ratchet straps since they don't need to carry a strong load, and ratchets are much slower to adjust. With good quality cambuckles I can remove/install the straps in seconds.


Cheers !

Stay Tuned... Stormwatch was launched for the first time yesterday... Pics to follow.