Building a gimbaled stove holder for my CP-22 (COMPLETED)

Slartibartfass

Capri 22 Mod
Dec 13, 2015
499
Catalina Capri 22 1139 Mamaroneck, NY
After my first overnight with rain the next day that made using the grill impossible I decided I need a gimbaled stove attached to the compression post to be able to make some Joe in the morning....

Did some research on the internet and bought a JetBOIL PCS and an adapter to use Coleman Camping Propane bottles.

Design wise the internet helped as well. Have a rough idea... It should look like this:
2EB1A9EF-EB44-4420-874C-FC4E2E69022A.jpeg

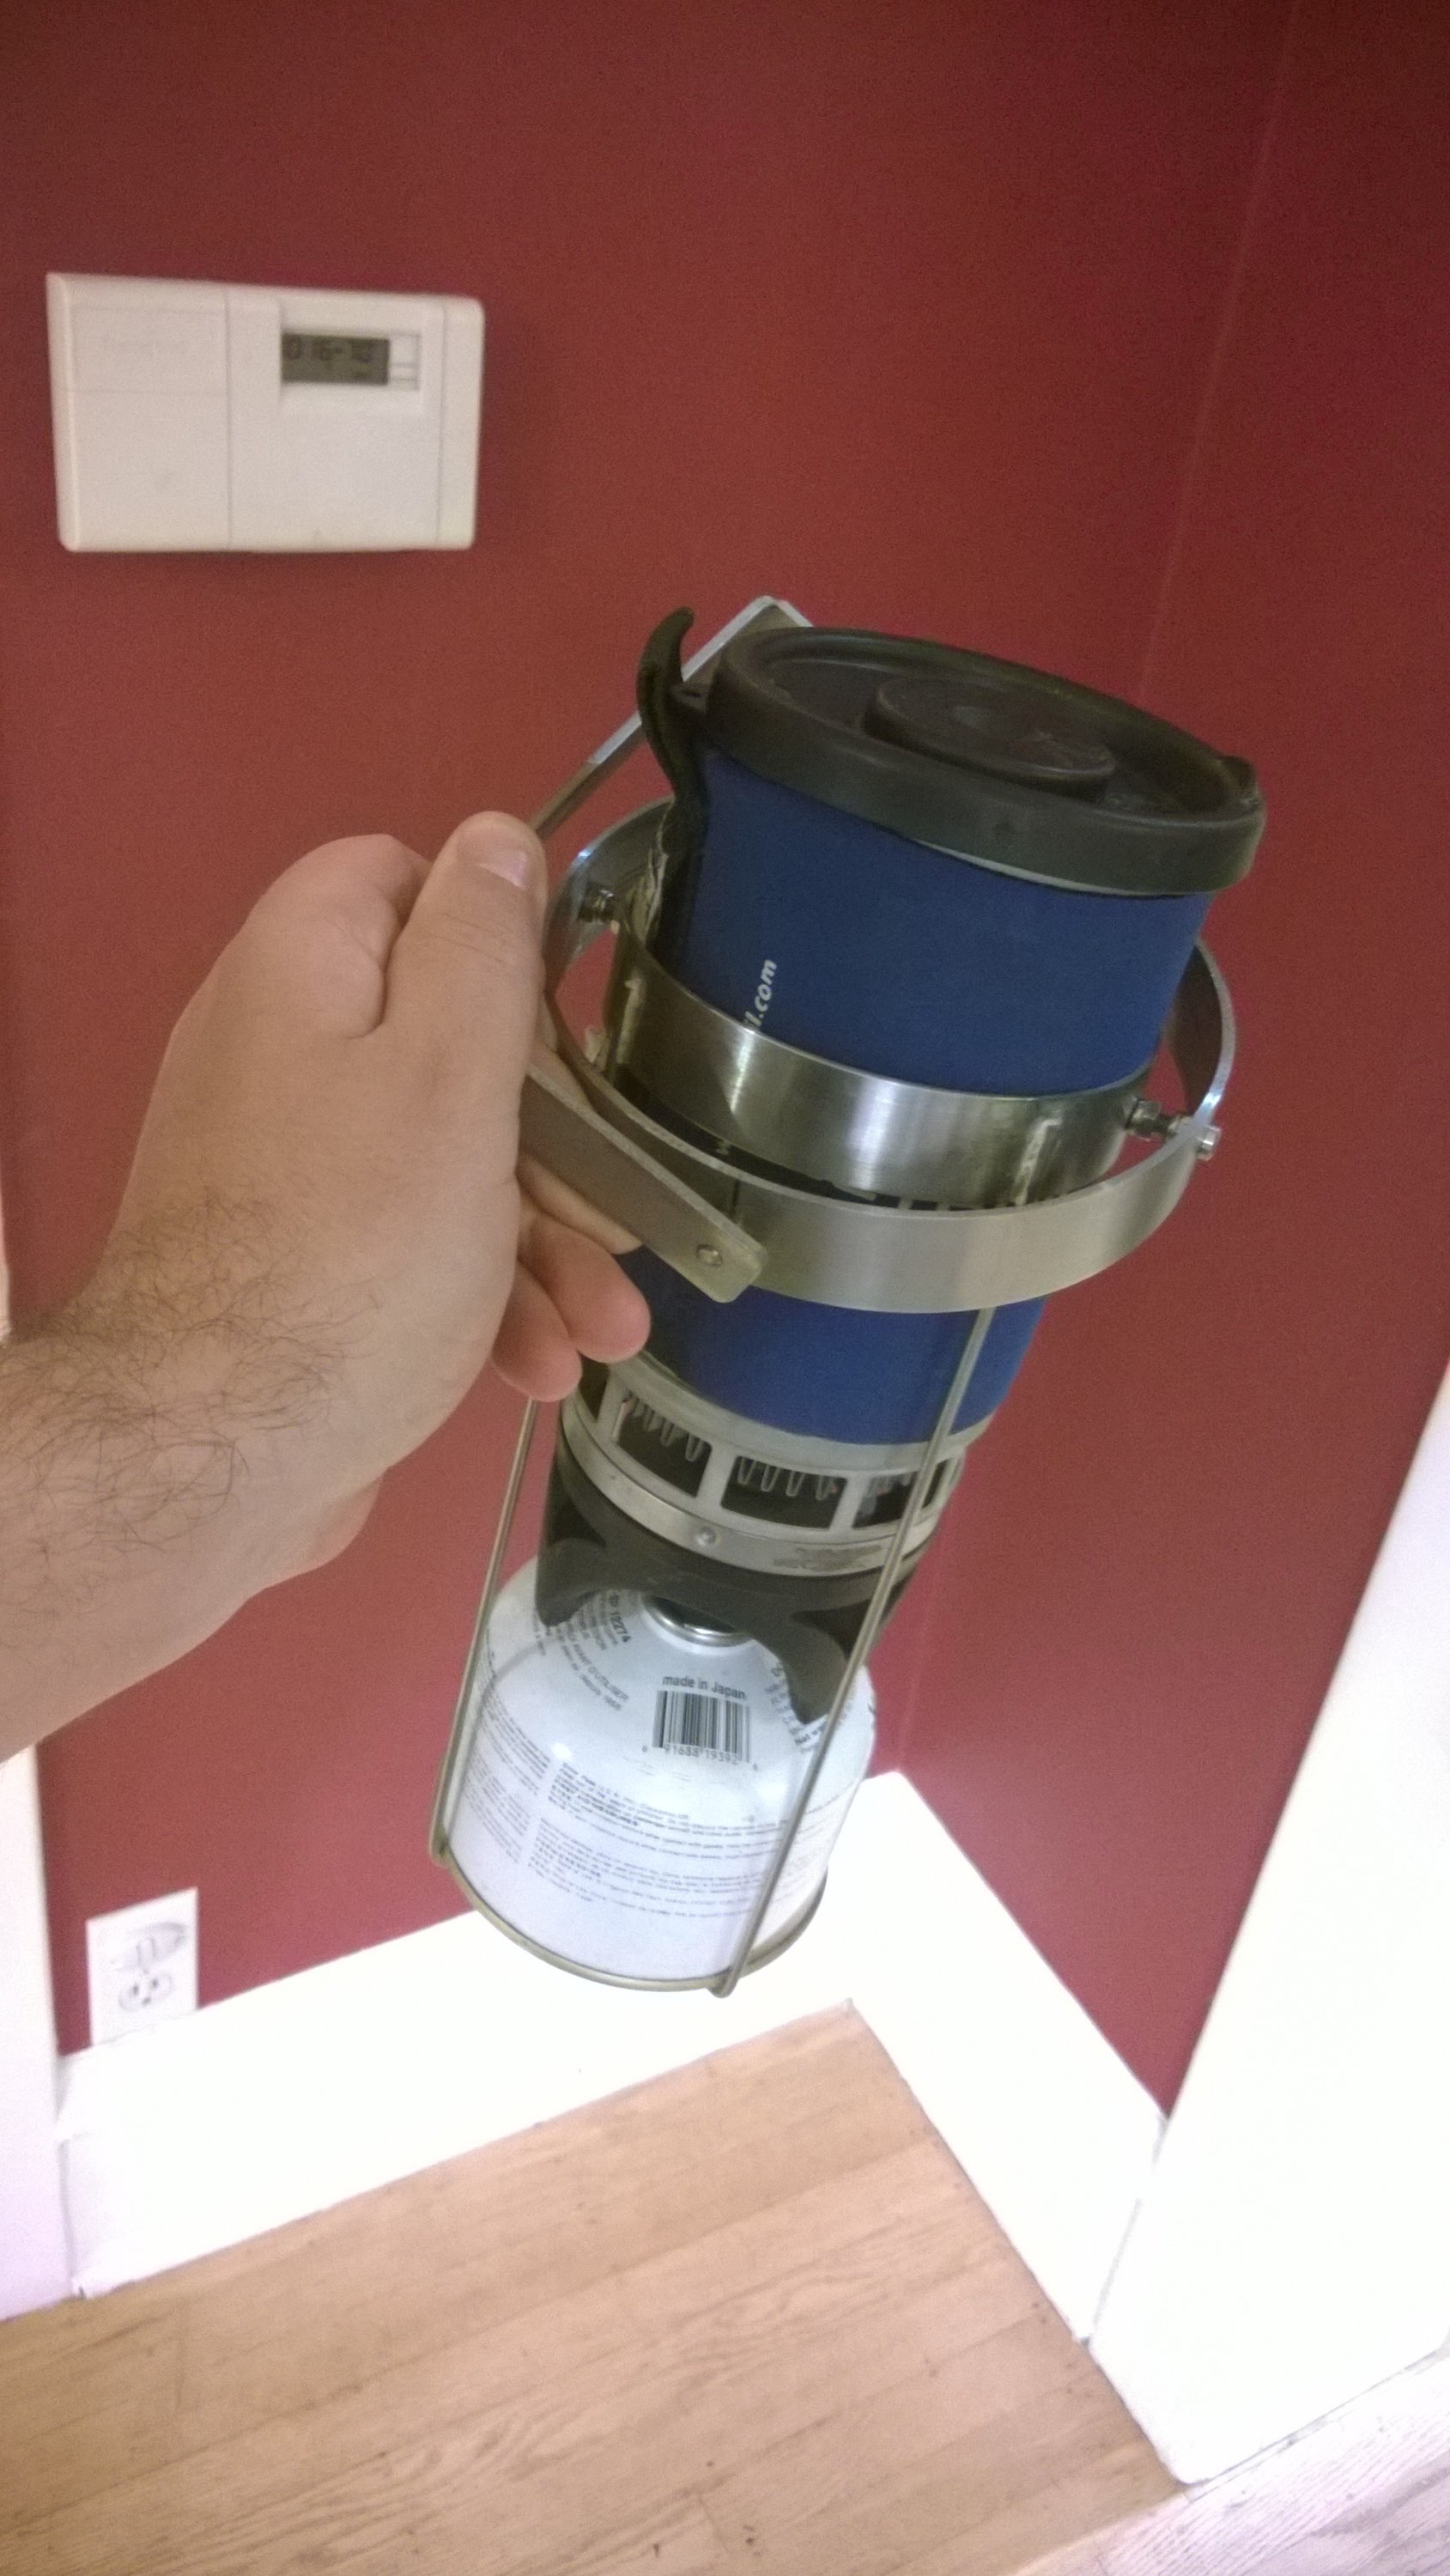
Although this setup might restrict the range of motion a bit. It’s a 4“ in a 5“ SS steel ring.

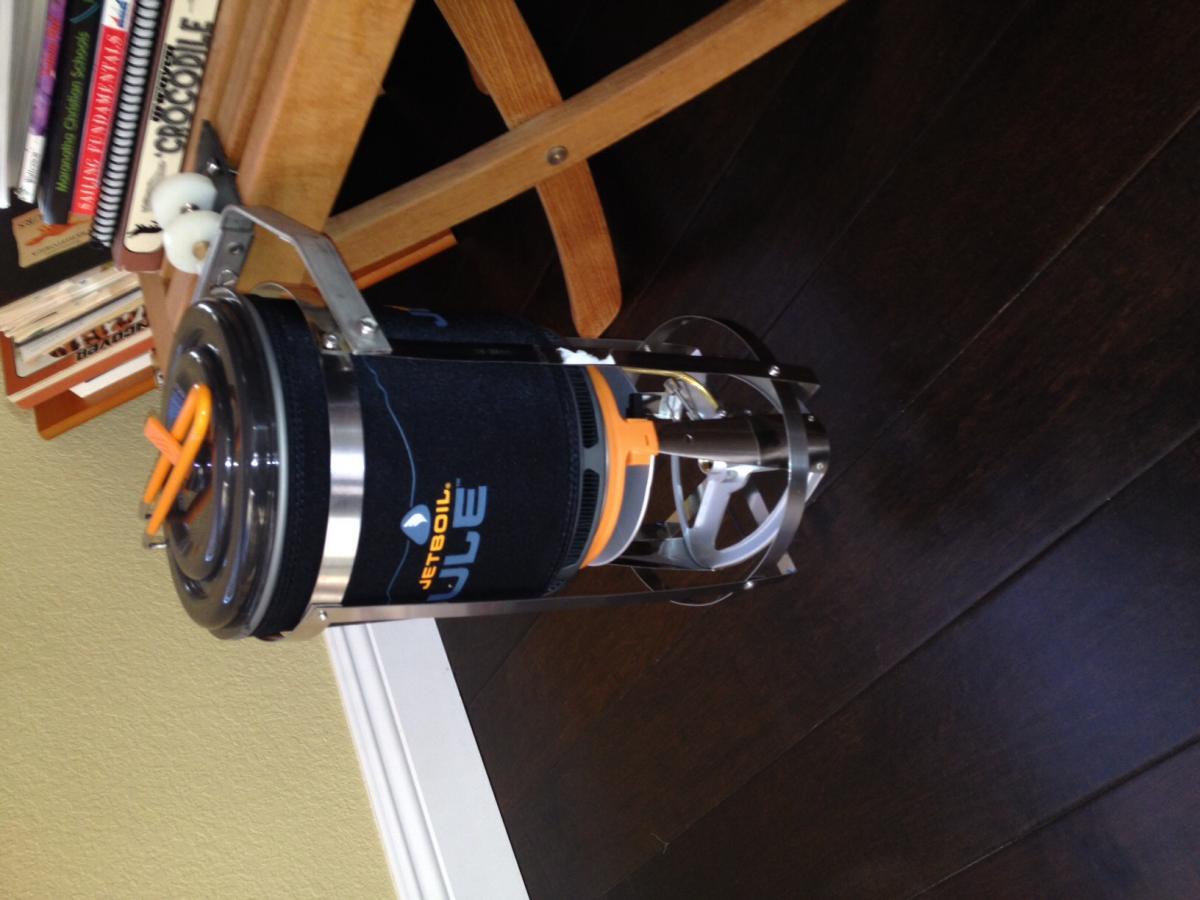
Other builds incorporate the hinge in the attachment point which results in no restriction of sideways motion (the main movement in a sailboat):
222D6B87-13AD-4D68-85DE-F61676B63F5F.jpeg

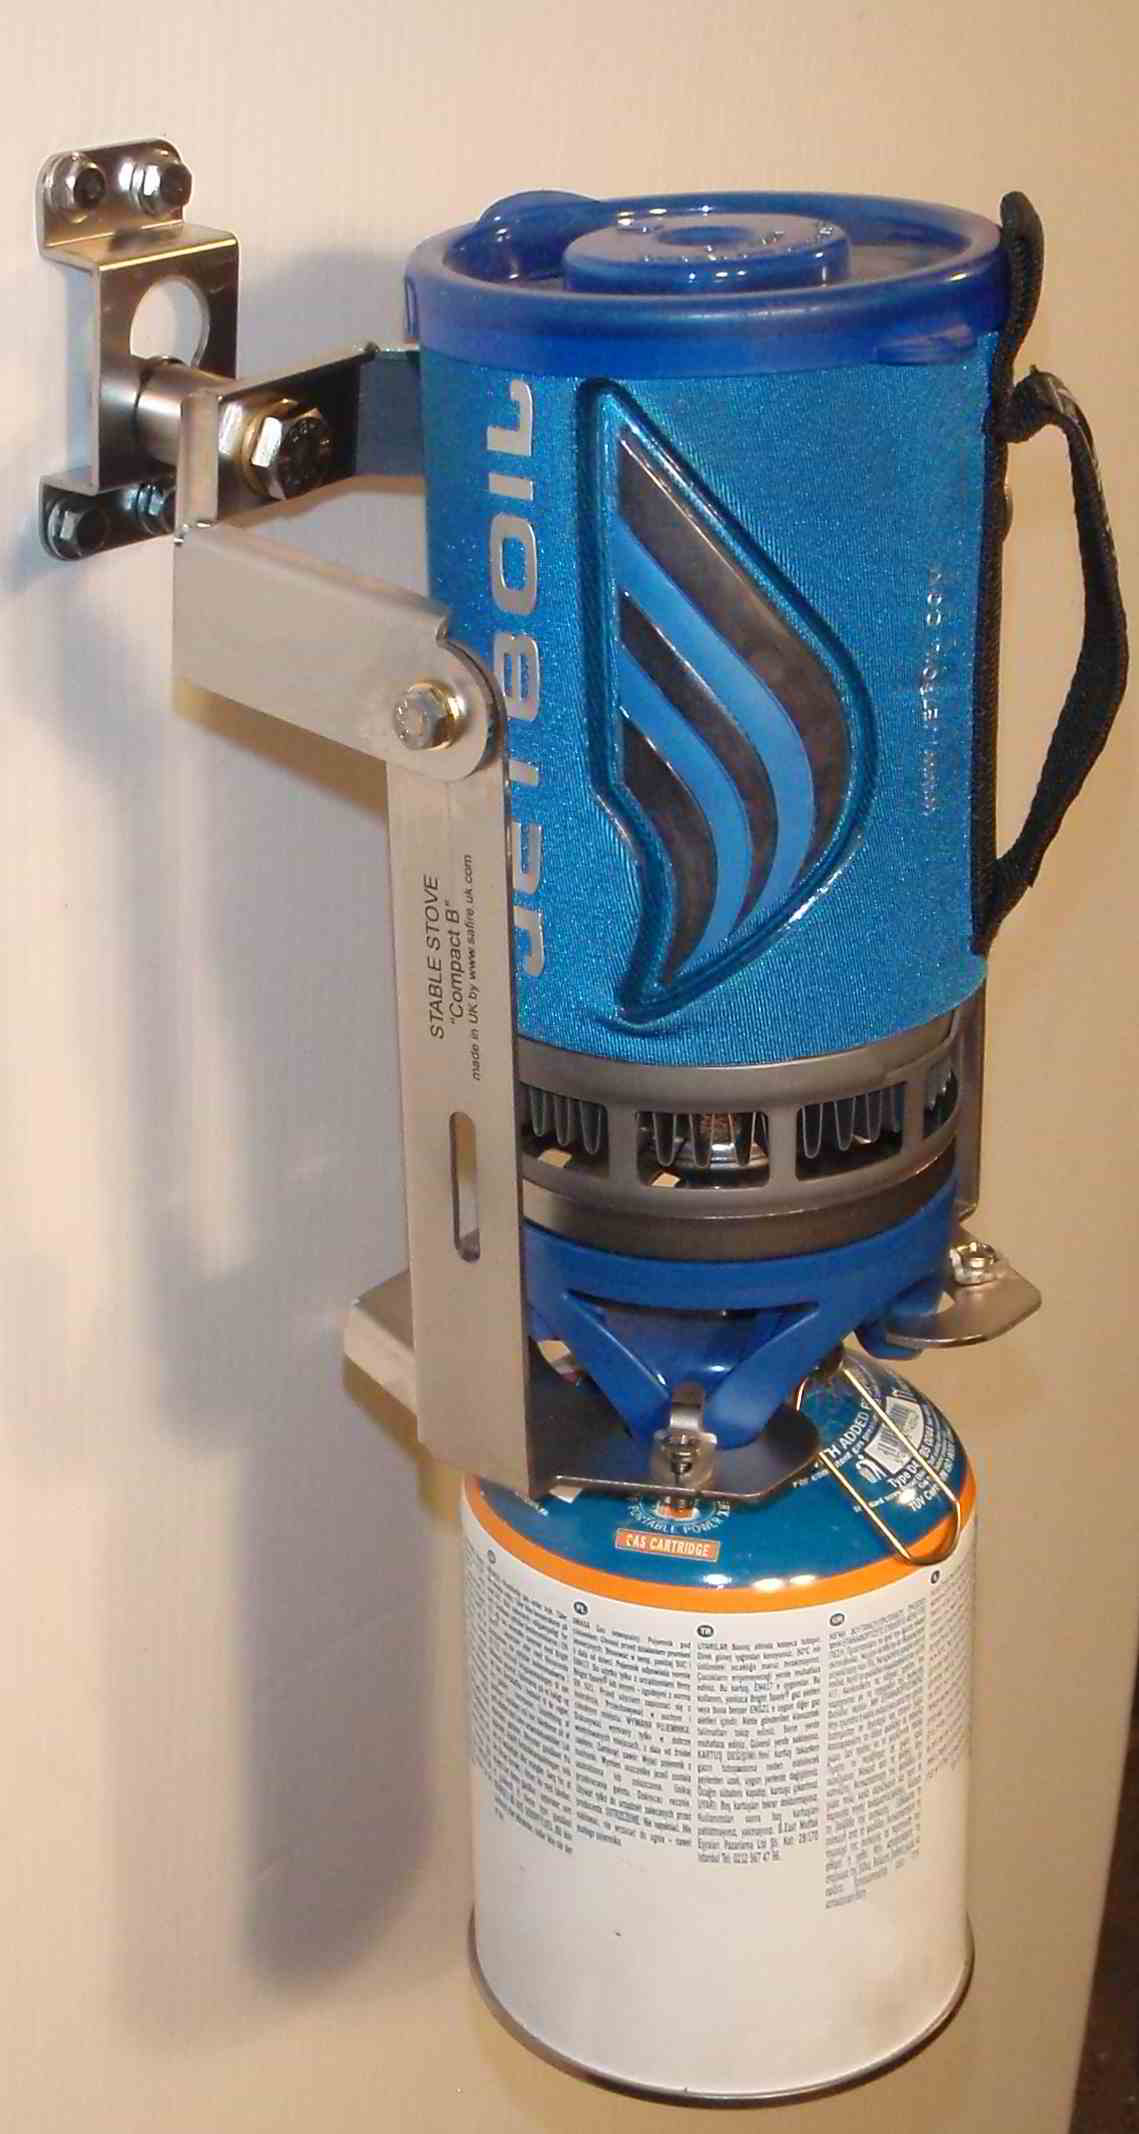
Some other noteworthy designs (I prefer the bottle be held as well not to create a stress/leak point between the gas bottle and the burner):
A93C5552-1EEF-4FAC-BFB7-AE91FB73E80F.jpeg
 
  • Like
Likes: Will Gilmore

Slartibartfass

Capri 22 Mod
Dec 13, 2015
499
Catalina Capri 22 1139 Mamaroneck, NY
So I bought 2x 4“ and 1x 5“ 304 SS ring and some flatbar stock from OnlineMetals.com cut to a rough 1“ width.

I had to square the cut a lot with a grinder and some sanding using the Festool RAS as a temporary rotary sander.

After first 100 grit sanding:
574B7006-9758-4199-9E2B-2112468ED7EC.jpeg

More sanding:
4B5C5FF9-9A6A-439D-9040-6D3CA9953CEA.jpeg

And more sanding to 400 grit finish:
DFC60AD7-0C72-4774-BF47-C6606815A725.jpeg
 
  • Like
Likes: Will Gilmore

Slartibartfass

Capri 22 Mod
Dec 13, 2015
499
Catalina Capri 22 1139 Mamaroneck, NY
More sanding/polishing:
IMG_1188.jpg


Trying to figure out distance between rings:
IMG_1189.jpg


Drilling and taping 1/4-20 holes:
IMG_1190.jpg

IMG_1191.jpg

IMG_1192.jpg


Bend the first flatbar to start the "cage":
IMG_1193.jpg


Unfortunately messed up the second flatbar while bending in shape -> crap pile....

Added the second upper ring...:
IMG_1195.jpg


Test fit with JetBoil. Realized that the 5" outer ring is too narrow. Gives me maybe 20 degrees sideways motion. Not enough. Ordered a 6" ring.
IMG_1196.jpg
 
  • Like
Likes: Will Gilmore
Jul 28, 2016
95
476
Nice workmanship no question. As these gimbaled stoves are available commercially from several sources (I had a Forespar stove on my previous boat), why the decision to reinvent the wheel?
 

Slartibartfass

Capri 22 Mod
Dec 13, 2015
499
Catalina Capri 22 1139 Mamaroneck, NY
Nice workmanship no question. As these gimbaled stoves are available commercially from several sources (I had a Forespar stove on my previous boat), why the decision to reinvent the wheel?
Forespar version is no longer available and some of the other ones are made overseas and quite expensive to import. Also like the challenge to figure this out for myself.....
 
  • Like
Likes: Will Gilmore
Oct 19, 2017
7,732
O'Day 19 Littleton, NH
Now that's a project to get my head going. What an awesome post Slartibartfass. :thumbup:
Forespar version is no longer available and some of the other ones are made overseas and quite expensive to import.
So, it sounds like you have a market. What was the production cost of the prototype? You should consider making it clip on and off so you can also cook in the cockpit to make hot buttered rum.

- Will (Dragonfly)
 

Slartibartfass

Capri 22 Mod
Dec 13, 2015
499
Catalina Capri 22 1139 Mamaroneck, NY
Now that's a project to get my head going. What an awesome post Slartibartfass. :thumbup:

So, it sounds like you have a market. What was the production cost of the prototype? You should consider making it clip on and off so you can also cook in the cockpit to make hot buttered rum.

- Will (Dragonfly)
It will be held to the compression post by an easily removable clamping contraption. Still figuring out details and ordering some stuff that might not work out in the end but I will post a complete material list at the end of the project...
 
  • Like
Likes: Will Gilmore

Slartibartfass

Capri 22 Mod
Dec 13, 2015
499
Catalina Capri 22 1139 Mamaroneck, NY
More progress today after I got the 6” stainless steel ring. Had to cut to size again (7/8 of an inch):
3F3A17A4-335C-4882-8C22-716C0BCABF70.jpeg


Drilled the pivot holes:
A0EC64AE-83EB-4C41-BE8A-417FF1F1CF66.jpeg


Test fit:
D2413A4F-D6B5-4F43-852F-456D182EEEEA.jpeg


With JetBoil:
1170F398-252B-41E9-B13C-B429BDE56A1A.jpeg

85BD4C28-0176-486D-AE12-D2574668D9AB.jpeg


I now get at least 40 degrees sideway motion = heel.
 
  • Like
Likes: Will Gilmore
Oct 19, 2017
7,732
O'Day 19 Littleton, NH
I am really loving this thread. Thanks for sharing. I keep thinking, yuloh, for my next project, but first, 2 more days of grout, then finish deck, then...

- Will (Dragonfly)
 

Slartibartfass

Capri 22 Mod
Dec 13, 2015
499
Catalina Capri 22 1139 Mamaroneck, NY
I am thinking about shortening the flatbar cage slightly so the JetBoil sticks out a bit on the top which will make removal easier now that I can verify/account for potential interference with the 6” ring..
 
  • Like
Likes: Will Gilmore

Slartibartfass

Capri 22 Mod
Dec 13, 2015
499
Catalina Capri 22 1139 Mamaroneck, NY
Laid out the shape of the main bracket that attaches to the compression post via a truss clamp (hopefully). Still pondering the distance from the post to allow for enough motion range. Depends on how long the cage is from the pivot point....

IMG_1219.jpg


I ordered the following clamp in the hope that I can drill two holes to connect the flatbar to it securely and make it relatively easy to remove:

https://smile.amazon.com/gp/product/B01N20NE25/ref=oh_aui_detailpage_o03_s00?ie=UTF8&psc=1
 
  • Like
Likes: Will Gilmore

Slartibartfass

Capri 22 Mod
Dec 13, 2015
499
Catalina Capri 22 1139 Mamaroneck, NY
The clamp fits perfectly around the compression post:

322221FC-636B-49CA-A52C-B49A7439636F.jpeg


Unfortunately I had a total brain fart when I saw the big hole in the base that I wanted to use to drill and tap 2x 1/4-20 holes for bolts. Have no welder to fill the void so I tried to off set drill holes but that did not work with the width of my flatbar stock.

After some thinking I finally had an eureka moment. Just plug the dam hole with a plug. I drilled and taped the hole 1/2-13 and luckily had an appropriate bolt I could cut off a piece.

All this was done in haste and looks terrible but works (have ordered a new clamp to do this correctly now that I know how to proceed).

DDEB50C4-425A-41F6-A074-5B628E58429F.jpeg


With 2 (not so) center line drilled new holes:

B65FB821-40EA-4749-8FB9-941A275B6FB7.jpeg
 
  • Like
Likes: Will Gilmore

Slartibartfass

Capri 22 Mod
Dec 13, 2015
499
Catalina Capri 22 1139 Mamaroneck, NY
Now on to bending 0.1875“ thick 304 Stainless steel. A tad more challenging than the thinner flatbar for the cage (0.125”).

Heating the bend area and using some leverage to get a relatively tight bend:
A9C16B66-28FC-4DCA-BCCA-1FA521EF9E27.jpeg

B5DDE7F6-B25B-42DE-91CE-FB5ABBD23B44.jpeg


Checking bends/dimensions:
74C2FE42-73AB-453E-9C68-735B7CC7DB0F.jpeg


With the clamp (not attached yet)
63A31416-7207-41FA-A218-CE2296431CAC.jpeg


Drilled the missing hinge holes and added spacer tubes and assembly:
7A79C4D1-8394-431B-9C1C-5795D5E0D409.jpeg


Did some tweaking to the bends to get rid of some pressure on the hinges. Also did a quick 120 grit polish on the outside holder.

694ED5F7-1E17-4F43-A18E-E3689739850E.jpeg


F8B25807-F33B-493A-9A15-595F92C6126E.jpeg

832883E5-4A62-4009-BF6E-C59798A2B92F.jpeg

BC0AC2D1-D77A-4FC9-9DF6-F11C6F185C47.jpeg


So far so good. Not perfect but does the job.... Should have used my drill press instead of free hand drilling for the holes.....
 
  • Like
Likes: Will Gilmore

Slartibartfass

Capri 22 Mod
Dec 13, 2015
499
Catalina Capri 22 1139 Mamaroneck, NY
So I shortened the cage by roughly an inch for the cup to stick out a tad so it is easier to grab and to remove. No interference with the side ways motion...

The new truss clamp is on the way so I should be able to wrap this up soon and install in my boat...

348D7B78-748A-4B13-80EC-14CCA3D8D819.jpeg
 
  • Like
Likes: Will Gilmore

Slartibartfass

Capri 22 Mod
Dec 13, 2015
499
Catalina Capri 22 1139 Mamaroneck, NY
Gimbalded Stove holder for JetBoil PCS:

All metal stock ordered from OnlineMetals.com (s&h estimated to double the cost)

2x 4" 4.5" OD x 0.08" Wall x 4.334" ID Schedule 5 304304L WELDED Stainless Pipe - 1" (Inner pivot ring and lower ring for cage)
$3.00 x2 $6.00 plus s&h
https://www.onlinemetals.com/merchant.cfm?pid=920&step=4&showunits=inches&id=56&top_cat=1

2x 0.125" x 0.5" T304 Stainless Rectangle - 48” (Flat bar stock for cage)
$6.12 2x $12.24 plus s&h
https://www.onlinemetals.com/merchant.cfm?pid=4386&step=4&showunits=inches&id=25&top_cat=1

1x 6" 6.63" OD x 0.13" Wall x 6.357" ID Schedule 10 304304L Welded Stainless Pipe - 1" (Outer pivot ring)
$7.02 1x $7.02 plus s&h
https://www.onlinemetals.com/merchant.cfm?pid=938&step=4&showunits=inches&id=57&top_cat=1

1x 0.1875" x 1" T304 Stainless Rectangle - 24" (Outside pivot ring holder)
$9.70 1x $9.70 plus s&h
https://www.onlinemetals.com/merchant.cfm?pid=4399&step=4&showunits=inches&id=25&top_cat=1

COST FOR METAL ~$70 including s&h

8x1/4-20 Button Head Socket Cap Screws Allen Bolts Hex Drive Stainless Steel 18-8 3/8” length (For attaching U-bend flat bar stock to cage)
25 pack on eBay.com $5.12 (free shipping)
https://www.ebay.com/itm/232241609909

2x 1/4-20 Button Head Socket Cap Screws Allen Bolts Hex Drive Stainless Steel 18-8 1/2” length (For connecting outside pivot ring holder to truss clamp)
25 pack on eBay.com $5.72 (free shipping)
https://www.ebay.com/itm/232241609909

1x MILOS CELL102 truss clamp with bolt and wingnut-SWL 419lbs for 32mm (1 1/4"") Tube (to attach the holder to the compression post)
$12.40 plus $4.99 s&h
https://smile.amazon.com/gp/product/B01N20NE25/ref=oh_aui_detailpage_o01_s00?ie=UTF8&psc=1

4x Aketek Inline Skate Wheel 15/64" Shaft Hex Socket Screw (10XSilver) (Hinge pins)
10 pack $7.87 (prime)
https://smile.amazon.com/gp/product/B013YN8LVO/ref=oh_aui_search_detailpage?ie=UTF8&psc=1

TOTAL MATERIAL COST: ~$110.00 (incl s&h)


Tools needed:

Pencil/marker

Heavy Hammer

Blowtorch

Large pipe wrench and securely attached larger scale vise or bending brake/hydraulic press to bend metal

Grinder/metal cutting wheel to cut flat bar stock to length or metal cutting bandsaw

Dremel/metal cutting file/rasp to de-burr edges

1/4-20 tap

#7 HSS drill bit (for drilling proper 1/4-20 holes)

#B (0.238”) HSS drill bit to drill hinge holes

1/2-13 tap and 27/64 HSS drill bit to drill out hole in truss clamp and fill with a 1/2-13 plug (cut of from a bolt)...

Center punch to locate holes

Electric drill (or even better drill press for better accuracy)

Sand paper to polish stainless steel: 40/60 grit / 100 / 150 / 200 / 300 / 400 (for mirror finish up top 2000 grit/polishing paste).

Lots of elbow grease, and

a lot of patience....
 
  • Like
Likes: Will Gilmore