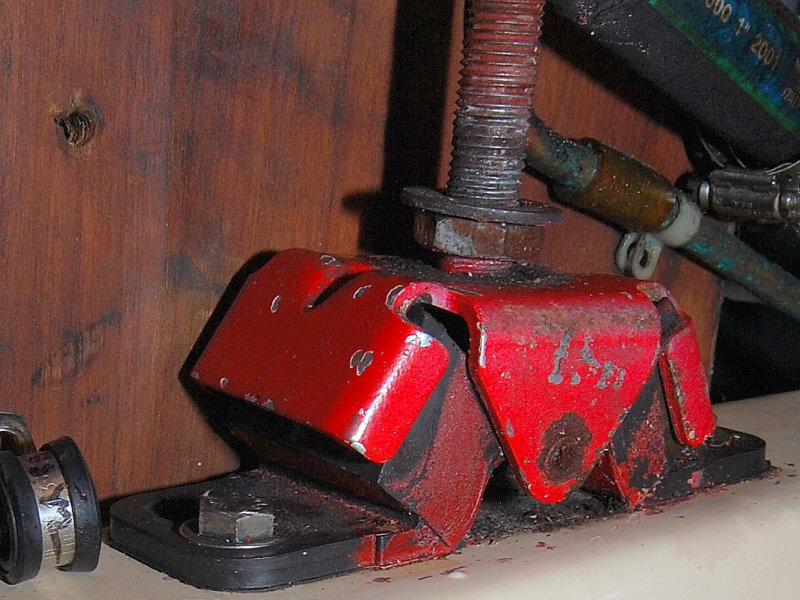
Don't know what you mean by "pre loaded". Mount seems ok, but note paint stir shims to keep mount from vibrating against bulkhead. Starboard motor mount has slightly more room, maybe 1/2" total clearance
I mean that the mount looks cocked off the port side of the boat and seems pre-loaded. Pre-loaded means that if you took the motor off it would not be canted, twisted or cocked and would pop back to it's natural position. After years of being pre-loaded though it will not spring back but it does not mean that it was not pre-loaded.
With the motor properly aligned and installed there should be no pre-loading of any of the mounts other than the angle of the motor mount brackets which are not always level with the motor beds when properly aligned though they generally should be.
Alignments should ALWAYS take into account the proper centering thought he cutlass and shaft log. Many owners and yards simply adjust the motor until it seems aligned to the coupling. This may be only half the job and doing only half can cause the shaft to thump the shaft log or cause shaft whip due to side loading from the cutlass or stuffing box. You need to align the "system" not just the flange to the gear box as many so called "mechanics" do..
Some things the books won't tell you:
1- After making an adjustment re-tighten the motor mounts to the beds and wiggle the engine from the valve cover or other good holding point re-settling it in the mounts.
1A- The reason for doing this is to make sure none of the mounts get "pre-loaded" during the alignment process. The mounts should all be sitting naturally under the motor. Any pre-loading, usually side to side, will cause issues once you lock everything down. For instance if you move the front of the motor to port and the starboard mount only leans over but does not slide to port along the engine bed this is going to be a pre-loaded mount. When the engine is properly aligned the studs will be vertical when looked at down the centerline of the boat.
2- Please don't hit your engine with a hammer...
3- A 2X4 used as a lever can be used to move the engine side to side.
4- Dish soap can be used under motor mounts to make them slide on the beds easier for side to side adjustments. It will dry and become non slippery by the time you are done.
5- If a gap rotates around the coupling and does not always stay at say, the bottom, or top, it is a good sign the shaft is bent.
6- Every time you put the feeler gauges in between lightly push the couplings together.
7- Leave the coupling bolts in but loose.
8- Always do a final adjustment with the rig tuned and the boat having been in the water for a few days, a week is better. You should always do a rough alignment on shore down to .004" or .003" but will usually need to tweak it with the boat in the water. Some boats move more than others. Generally the shorter the shaft the less you will notice it move when in the water. Our CS-36 moves about .001"-.002" from in water to out.
9- When aligning out of the water be sure the shaft is passing though the cutlass in the dead center and parralel. This will insure that the shaft is aligned to the cutlass. The shaft when passing through the cutlass bearing must have a constant contact through the center over it's entire bearing length. After the shaft is centered in the cutlass check to make sure the shaft is passing through the shaft log in the center. I have seen many DIY's "go to town" on a re-alignment and not pay attention to the shaft centering and only to have the shaft slapping the shaft log under power later. If you get to 98% on land, and centered, you'll only need light tweaking once in the water.
On a short enough shaft one secret trick I employ is to do the rough alignment with the cutlass bearing not yet installed. This allows you to see side to side centering very well and allows you to measure it accurately as it passes through the p-strut. Side to side is always the toughest as it means moving the engine side to side without pre-loading the mounts. The up down can also be roughly centered providing you don't have a lot of shaft sag from the coupling to the prop end. This can be pre-measured or determined first. Once you get everything as centered as you can the cutlass can be pressed in and a final precision alignment done.
10- Remember this entire procedure is predicated on the premise that the factory built your boat so the shaft log center lines up with the cutlass bearing center. If you are skeptical of this you'll need to confirm these two line up before doing anything. The shaft log may not line up with the cutlass and in this case you always want to align the shaft to the cutlass so it rotates perfectly centered in the cutlass, preferably with a new cutlass bearing, or only slightly worn. On many boats this means the shaft does not or can not pass through the center of the shaft log without major surgery. This can lead to other issues with stuffing boxes etc..
11- The engine should be aligned to the cutlass bearing firstly then the shaft log secondly but both are important as you don't want an off center stuffing box wearing the shaft either. On our boat the shaft log and cutlass bearing line up almost perfectly but this is not all that common.
12- If you have an exhaust hose or engine driven compressor belt connected to the engine that can "hold it" disconnect it while aligning so you don't have any competition fighting you. Once aligned re-connect these items in the aligned position. For fridge compressors only adjust the belt so it does not slip and no more. Do not overtighten these belts. Doing so will throw your alignment off if the compressor is not mounted to the motor and is mounted to the engine beds or vessel.
13- A lot of shaft vibration on small dia shafts comes from shaft whip and not the actual small .001" alignment issue. There is often a rather long, bearing free, distance between the gear box and the cutlass and if the couplings are out, even a little, it will induce shaft whip or what I refer to as the "jump rope effect". If you really want to get anal about alignment do the following. Once the couplings have been aligned and the bolts are tight locate a dial indicator, set it up, and turn the shaft to by hand to be sure you have a true concentrically rotating shaft. Before running the dial indicator on the shaft surface clean it with Scotch-Brite or wet sand paper so it is smooth. If the couplings are not aligned or the packing gland is applying a side load the shaft won't rotate concentrically.
14- It should be noted that an improperly centered packing box, after alignment, can induce a loading effect to the shaft and can also cause shaft whip. Once aligned simply loosen the hose clamps and adjust the stuffing box to a "relaxed" and centered position around the shaft so it does not impart any side loads. If it is not well centered loosening the stuffing box hose and adjusting it won't do much of anything. It needs to be very close to center in order to get some slight relief from the stuffing box. If you can't get it centered in the shaft log a PSS seal is much more forgiving at relieving side loads..
15- To help minimize shaft whip a balanced prop that has been lap fit to the shaft, a proper alignment and a coupling that has been fit and faced to the shaft are all components of the mix.
16- It is also important that the exposed space between the prop and strut does not exceed one times diameter of the shaft it's self.




 Having been posting on these forums for 10+ years I have a lot of stuff already written that I can clip, cut and paste from. I do often type new but I type pretty fast.