A chart plotter is a MFD - multi function display.Laughing, I am a luddite and don't have an MFD; I do have a chartplotter which serves my purposes well..
Auto Pilot for H34
- Thread starter betzhunter
- Start date
Not necessarily. I had a chartplotter that displayed nothing else but the chart; an old Raymarine RC420, I think.A chart plotter is a MFD - multi function display.
jssailem
SBO Weather and Forecasting Forum Jim & John
- Oct 22, 2014
- 23,808
Claude. You can call a friend like I did.You can seek out a Raymarine dealer and ask them to upgrade your software. WM will sometimes do the upgrade for a boater. or you can send the unit to Raymarine and request them to upgrade the software. This last method is not preferred as it will take them 3 months and they may loose your hardware. When i spoke to them they referred me to a local dealer. But then I bought Les a beer and that solved the problem.

A big help with finding an area of low magnetic deviation when mounting an EV1 is to use the Gemeco iNstall app. It uses the flux gate compass in the iPhone to search for magnetic deviations on your boat from ferrous metal and current carrying conductors. It is free and has other cool stuff. http://www.gemeco.com/apps.php. My EV1 reports only 3 degrees of deviation after linearizing the compass by motoring in a figure 8. Gemeco is the distributor for Airmar depth and speed sensors used by Raymarine. Dan
Hey Dan, thanks for the info on the app. I down loaded it to my android phone and used it against one of my speakers, it pegged out the needle.A big help with finding an area of low magnetic deviation when mounting an EV1 is to use the Gemeco iNstall app. It uses the flux gate compass in the iPhone to search for magnetic deviations on your boat from ferrous metal and current carrying conductors. It is free and has other cool stuff. http://www.gemeco.com/apps.php. My EV1 reports only 3 degrees of deviation after linearizing the compass by motoring in a figure 8. Gemeco is the distributor for Airmar depth and speed sensors used by Raymarine. Dan
Bub
Just an update, I went with EV100 that I bought from a friend in Florida. Brand new in the box. Never installed and comes with 2 years left on the warranty. I couldn't resist for $700. He got it when he purchased a 37' gulfstar boat. Didn't need it.
Attachments
-
 197.9 KB Views: 115
Bub,
That’s quite a deal; one half a boat buck less than I paid for mine from defender. Just purchased it a couple weeks ago. Trying to determine where to mount the components, where to run wires, how to connect together, & how to interface with C80 plotter and ST60 instruments. Ordered STng to ST converter and waiting for that. May also need to order a longer spur cable. Installation & wiring is definitely more complicated than my 4000ST+ and Raymarine doesn’t make it easy with their instructions! Was able to download a schematic from the Ray support forum that was better than the instruction book.
That’s quite a deal; one half a boat buck less than I paid for mine from defender. Just purchased it a couple weeks ago. Trying to determine where to mount the components, where to run wires, how to connect together, & how to interface with C80 plotter and ST60 instruments. Ordered STng to ST converter and waiting for that. May also need to order a longer spur cable. Installation & wiring is definitely more complicated than my 4000ST+ and Raymarine doesn’t make it easy with their instructions! Was able to download a schematic from the Ray support forum that was better than the instruction book.
jssailem
SBO Weather and Forecasting Forum Jim & John
- Oct 22, 2014
- 23,808
I feel your pain @BigEasy. I spent an Saturday just positioning the three parts and seeing if the wire runs would fit, if I plugged the parts in would they come alive. Even with all that I ended up wit the motor affecting the compass. After running the system awhile and hearing from friends, it’s ok you don’t really need a compass. The electronic one works great. Then, I learned I could rotate the wheel unit and it would locate the motor far enough from the compass that it would work again. A fifteen minute job and I was in business.Trying to determine where to mount the components, where to run wires,
Time is your friend.
I was hoping someone here would give us a heads up on their installation, location of components, wiring etc.... I haven't even thought about installing mine yet. I am on vacation next week starting Friday the 2nd and was going to start planning the install.Bub,
That’s quite a deal; one half a boat buck less than I paid for mine from defender. Just purchased it a couple weeks ago. Trying to determine where to mount the components, where to run wires, how to connect together, & how to interface with C80 plotter and ST60 instruments. Ordered STng to ST converter and waiting for that. May also need to order a longer spur cable. Installation & wiring is definitely more complicated than my 4000ST+ and Raymarine doesn’t make it easy with their instructions! Was able to download a schematic from the Ray support forum that was better than the instruction book.
Bub
I installed mine a few months ago. All of it went on the opposite side of the port birth wall above the fuel tank. Been working great. Got the Rudder Ref. installed, too.I was hoping someone here would give us a heads up...
Bub
The hard part was integrating the SeaTalkNG stuff with my existing N2K. Your friend are Garmin Field Connectors...
I’ll try to get some pictures later this weekend. Post by Sunday PM.
That would be great!I installed mine a few months ago. All of it went on the opposite side of the port birth wall above the fuel tank. Been working great. Got the Rudder Ref. installed, too.
The hard part was integrating the SeaTalkNG stuff with my existing N2K. Your friend are Garmin Field Connectors...
I’ll try to get some pictures later this weekend. Post by Sunday PM.
1. I have a 30a Relay triggered from the "instruments" switch on the main control panel. It powers up the Pedestal and NMEA Backbone.
2. I have another 30a Relay triggered from inside the companionway to power up the Refrigeration.
3. I have a fused connection to the Cockpit BT Amplifier.
4. Also just installed the Balmar SG200. You can see the shunt towards the bottom in the middle.
** I have not labeled everything, yet. This will happen in the next month or so - - once I'm sure of all of the placement.
Getting back on the subject of the EV-100 Wheel Pilot: As you can see, all of the hardware is lined up along the Port Berth Wall. The compass has had no problem getting locked in while in this position. Hope all of this helps. Shannon
Wow, thanks Shannon, very nice and neat set up! I will use your picture (s) of your installation of the EV100 hardware and wire routing as a guide to installing mine. I just hope I can get it as neat as you have yours. On the other hand, I hate getting down in that compartment. I can get in it but, getting out of it is another question.View attachment 167665 View attachment 167666 View attachment 167668 Bubby, I was able to get on the boat today and snap a few shots from inside the "pit" and the pedestal. Pretty self explanatory. As you can see from the right side of the pit, I've run some electricity service there to run the following:
1. I have a 30a Relay triggered from the "instruments" switch on the main control panel. It powers up the Pedestal and NMEA Backbone.
2. I have another 30a Relay triggered from inside the companionway to power up the Refrigeration.
3. I have a fused connection to the Cockpit BT Amplifier.
4. Also just installed the Balmar SG200. You can see the shunt towards the bottom in the middle.
** I have not labeled everything, yet. This will happen in the next month or so - - once I'm sure of all of the placement.
Getting back on the subject of the EV-100 Wheel Pilot: As you can see, all of the hardware is lined up along the Port Berth Wall. The compass has had no problem getting locked in while in this position. Hope all of this helps. Shannon
Thanks again for taking time to take the pictures and explaining your setup for me,
Bub
Oh well, I'm 67" and 200# you get the picture.......If I have to put 25+ hours down there, they might have to bury me!Yeah. I’m 65” and 135#. It’s easy in and pretty easy out. Knees Get uncomfortable after 20-min. Have to climb out and stretch up before another 20...
I’ve put 25+ hrs down there, I’ll bet...
Here is a recent picture of the back of the new nav/elec panel with the Ship Modul multiplexer installed. The two units at top are Standard Horizon VHF/AIC/DSC and Standard Horizon CPF300i Chartplotter/Fishfinder. Rewired the AC and DC distribution with terminal blocks and shrinkwrap wiring. Ironically, during the project I discovered the EXCELLENT videos by Jeff Cote of Pacific Yacht Systems in Canada. Was happy to learn that many of the techniques he recommends I had incorporated into my project...
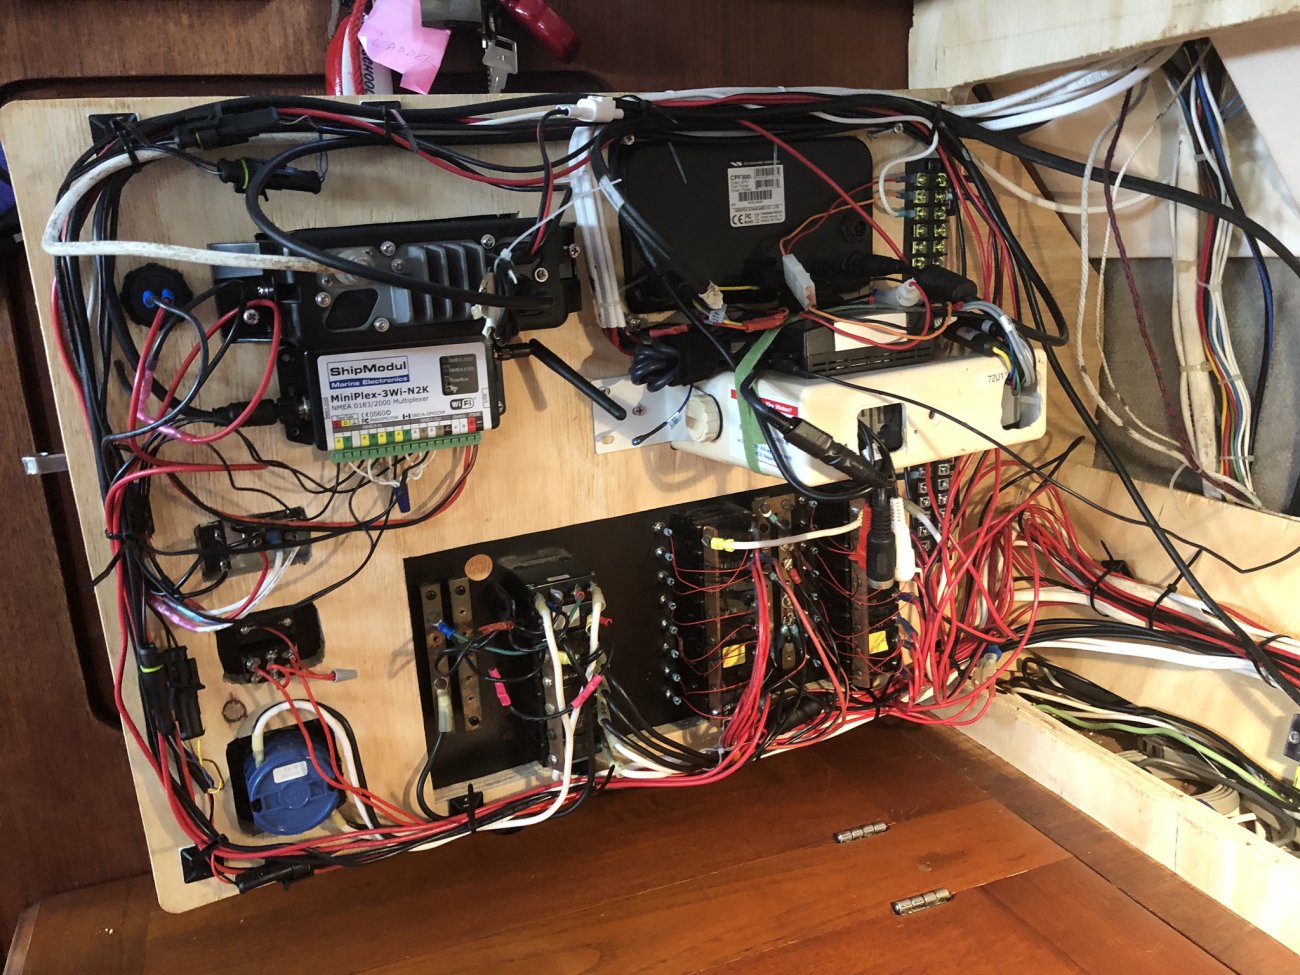
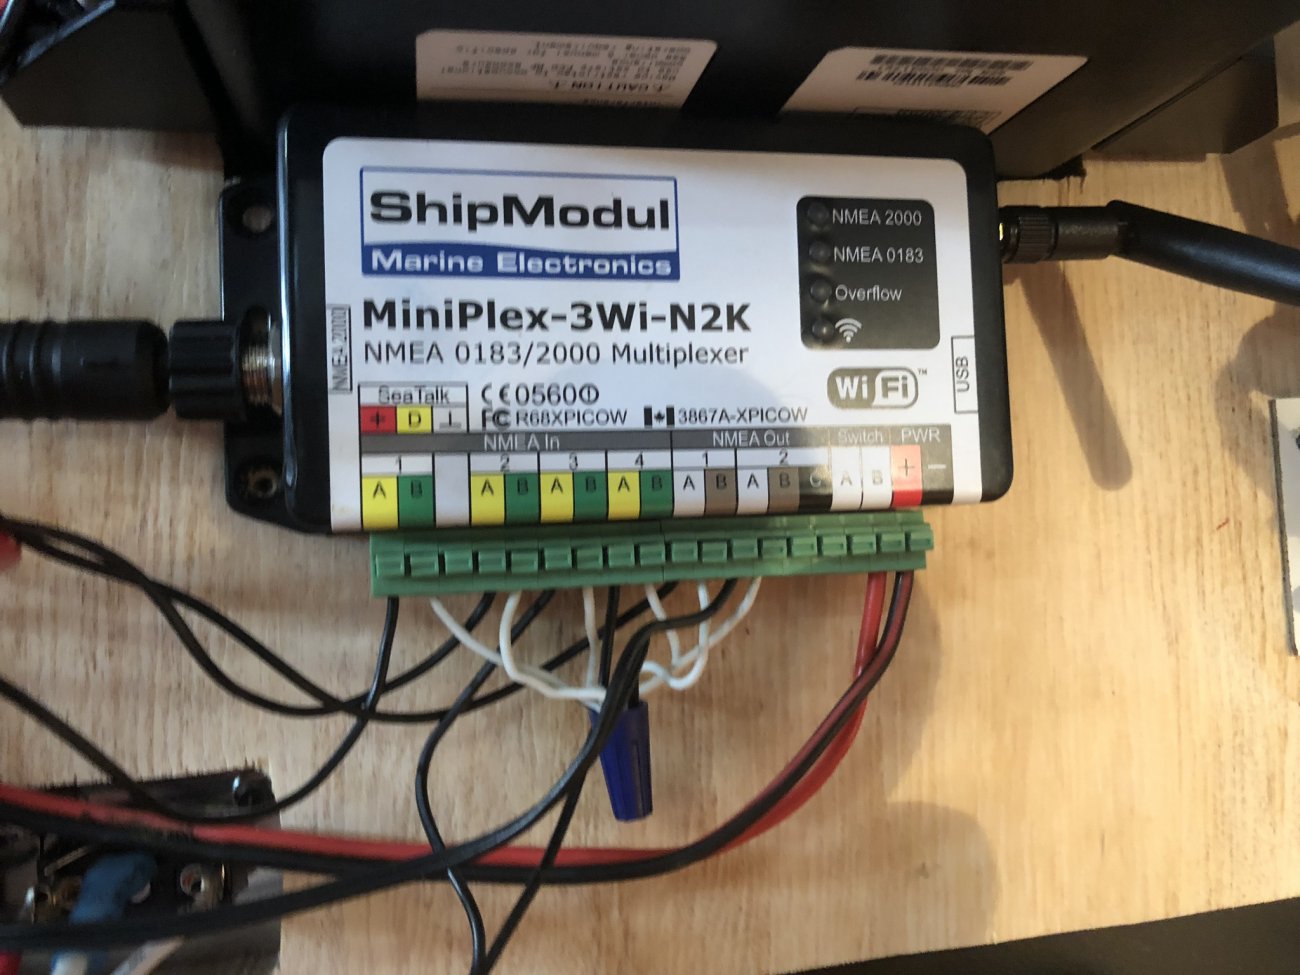
[QUOTE="pa391as, post: 1551577, member: 139437"very nic]Here is a recent picture of the back of the new nav/elec panel with the Ship Modul multiplexer installed. The two units at top are Standard Horizon VHF/AIC/DSC and Standard Horizon CPF300i Chartplotter/Fishfinder. Rewired the AC and DC distribution with terminal blocks and shrinkwrap wiring. Ironically, during the project I discovered the EXCELLENT videos by Jeff Cote of Pacific Yacht Systems in Canada. Was happy to learn that many of the techniques he recommends I had incorporated into my project...
View attachment 167831 View attachment 167832[/QUOTE]
Very nice. I need to rewire mine also.
View attachment 167831 View attachment 167832[/QUOTE]
Very nice. I need to rewire mine also.
this just had to be done. the wiring had grown organically as circuits were added. there were some safety issues, and all wires needed to be reterminated with shrink wrap
fun project but definitely takes awhile, both thinking and doing. i’m happy with the result
fun project but definitely takes awhile, both thinking and doing. i’m happy with the result