That would be a really fun use, though HDPE is a difficult material to print from what I’ve read. Some plastics print easier than others. Apparently HDPE is very susceptible to warping and shrinking as it cools. I’ve dealt with that when printing polycarbonate but it sounds like HDPE is even trickier. If anyone has experience with that I’d be curious to hear.I said it was cool! I wish I knew printing.
I did need a flared end and to cut it on an angle. I warmed the PVC with hot water and gently forced a traffic cone up inside, while bending and wearing gloves. It took about 10 minutes to make. I could also easily have formed it and molded it in glass, then made the cutouts. Your shape was not difficult to shop build ... depending on the shop.
The point is that old school engineering and tinkering guys have a toolbox full of methods that were used before printing. Unfortunately, that approach requires a ridiculously equipped shop (mine includes machining, welding, wood working, and fiberglass) and a varied skill set in addition to regular boat and mechanic skills. On the other hand, we can make things in any material the structural needs require.
Here is a sailor-specific example of something that can be made on either a lathe or 3-D printed. I needed a winch feeding block and I had a large low friction ring with exactly the size and flare I had in mind. I turned the core from two disks of HDPE, but it could be printed in two pieces, and the plastic strength is not that critical because the hub is so large. The friction of HDPE on a low friction ring is so low it's like ball bearings, maybe less at high load. I only needed one, so I grabbed a scrap sheet and turned this out in about 30 minutes. You cut disks with a hole saw, mount them on the lathe with an arbor, and turn using radius and taper set-ups to match the LFR. A single bolt holds it together. The lathe is probably faster for one-off, if you have the jigs and the practice, but the printer wins hands down if you need several. The lathe allows more material choices. For example, if I had not had an LFR to start with, I could have turned something from aluminum. But you can just buy the LFR. Different thought processes.
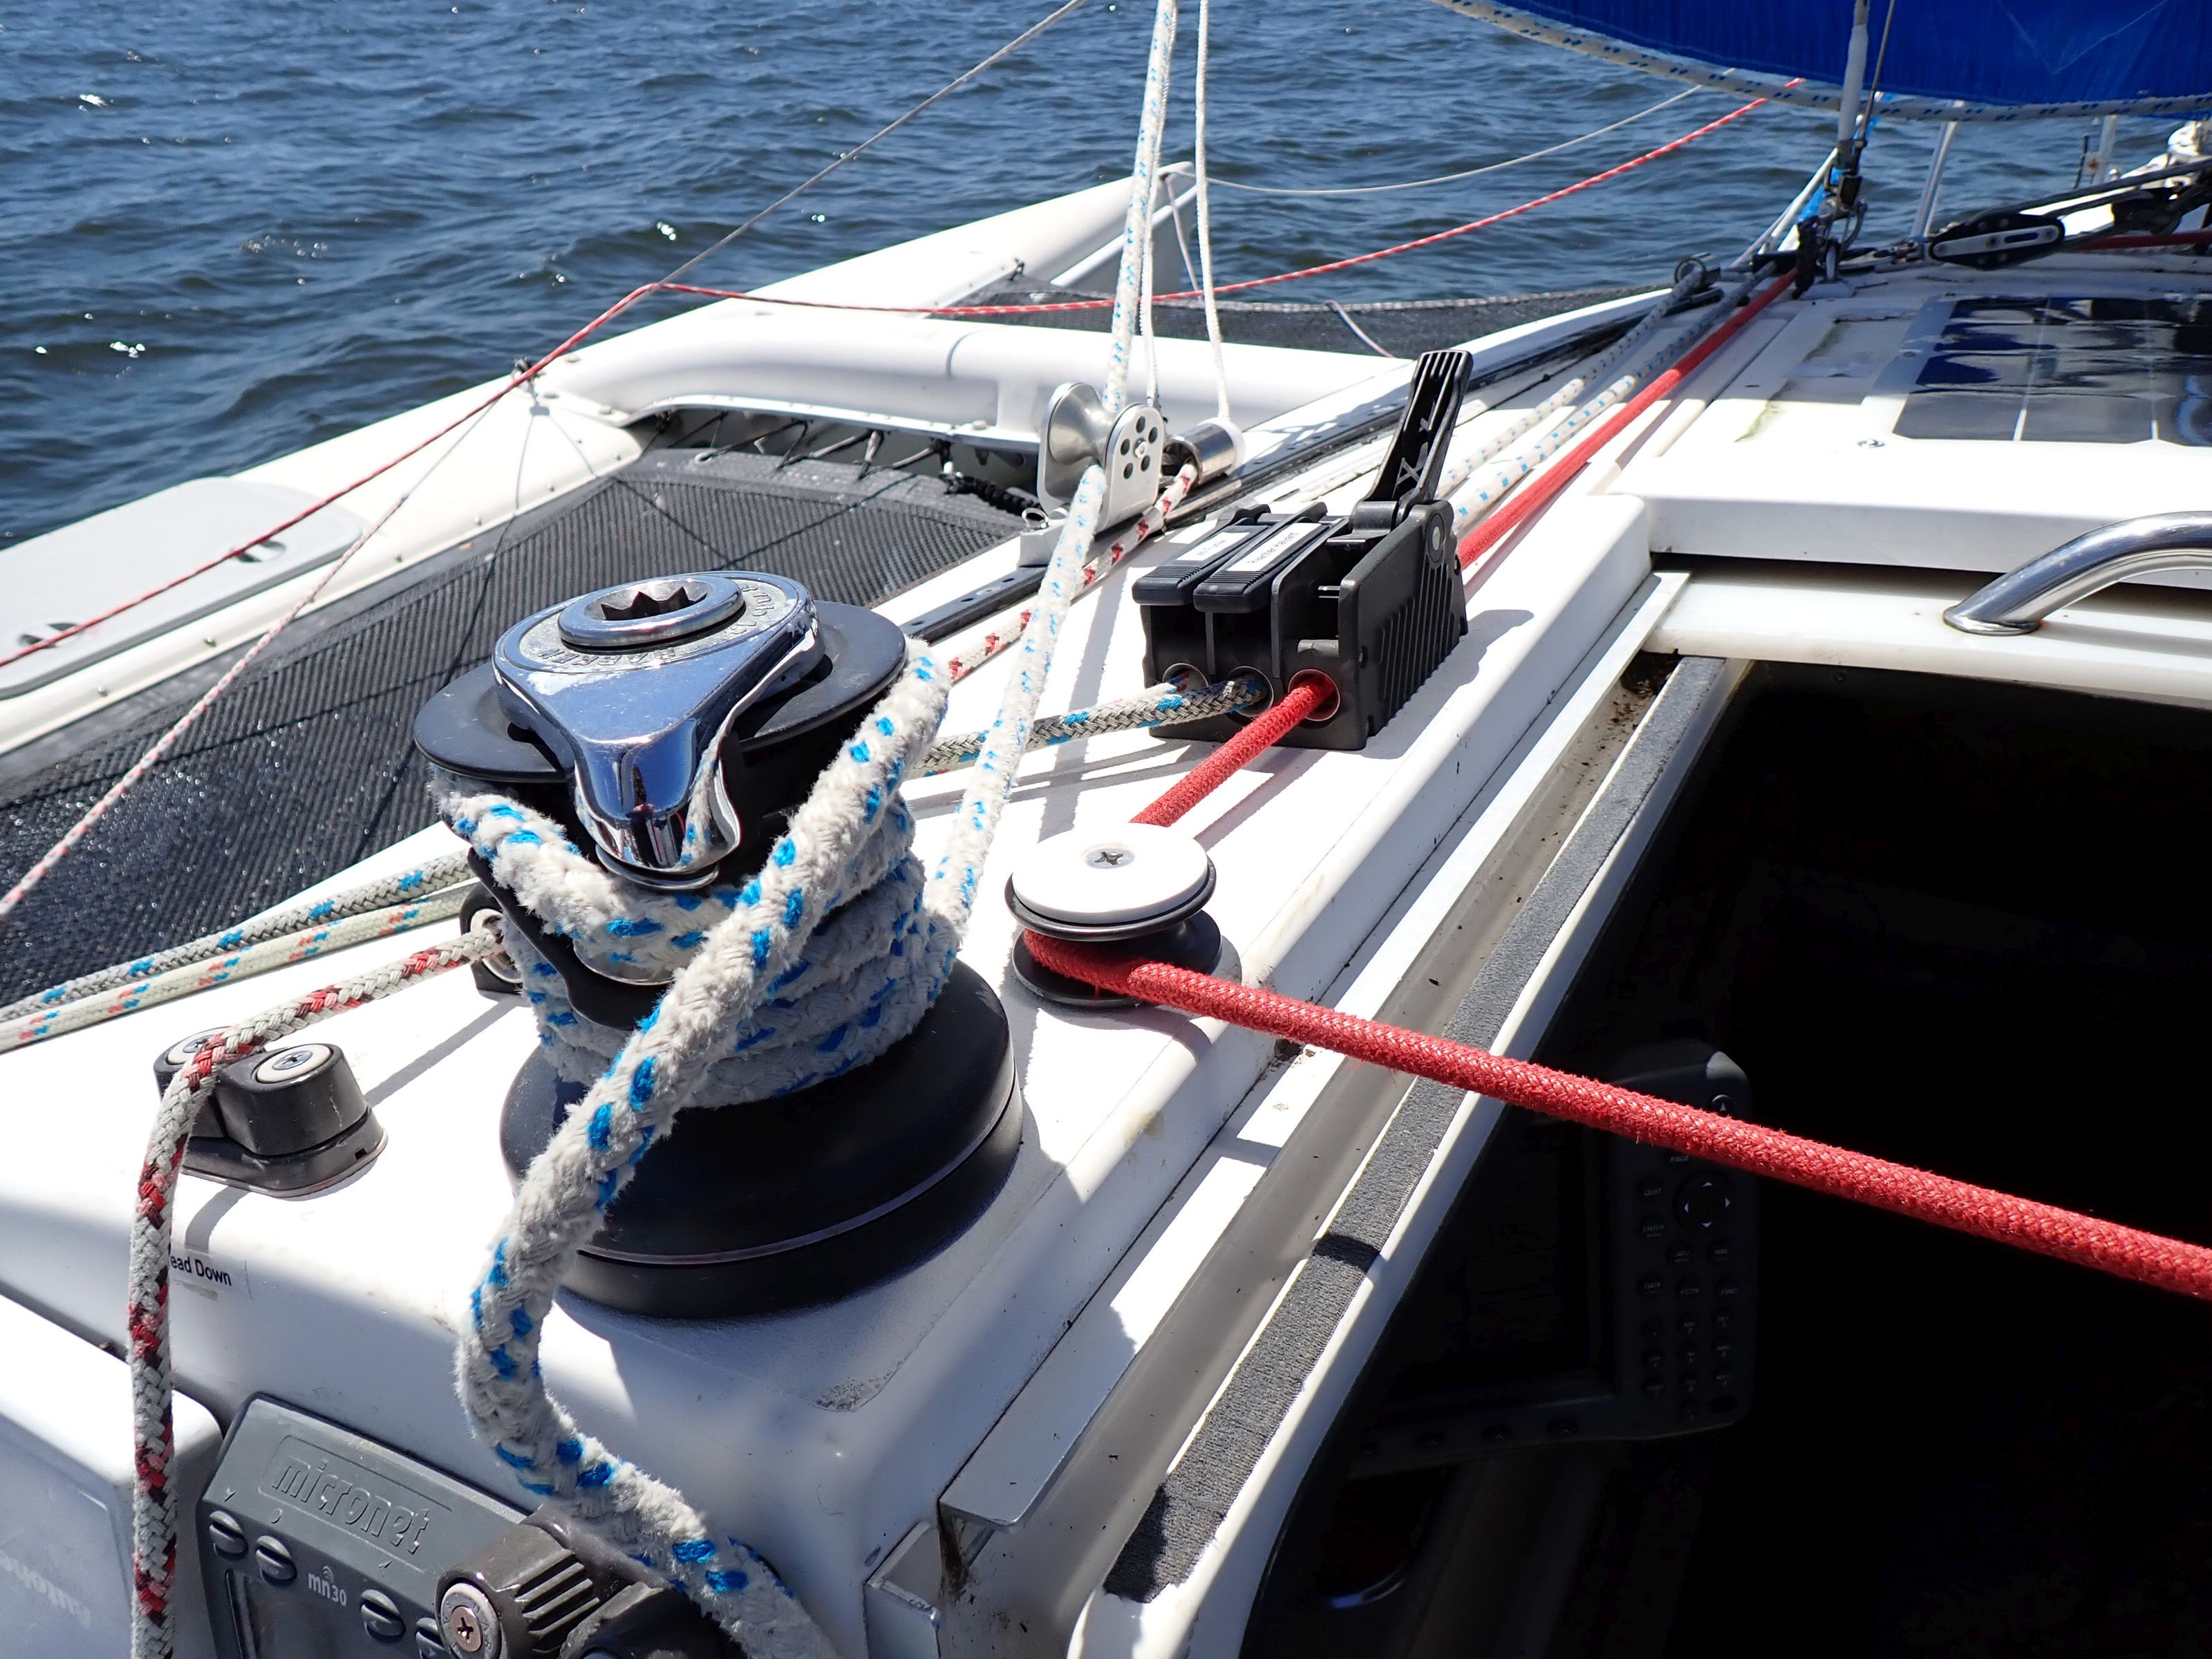
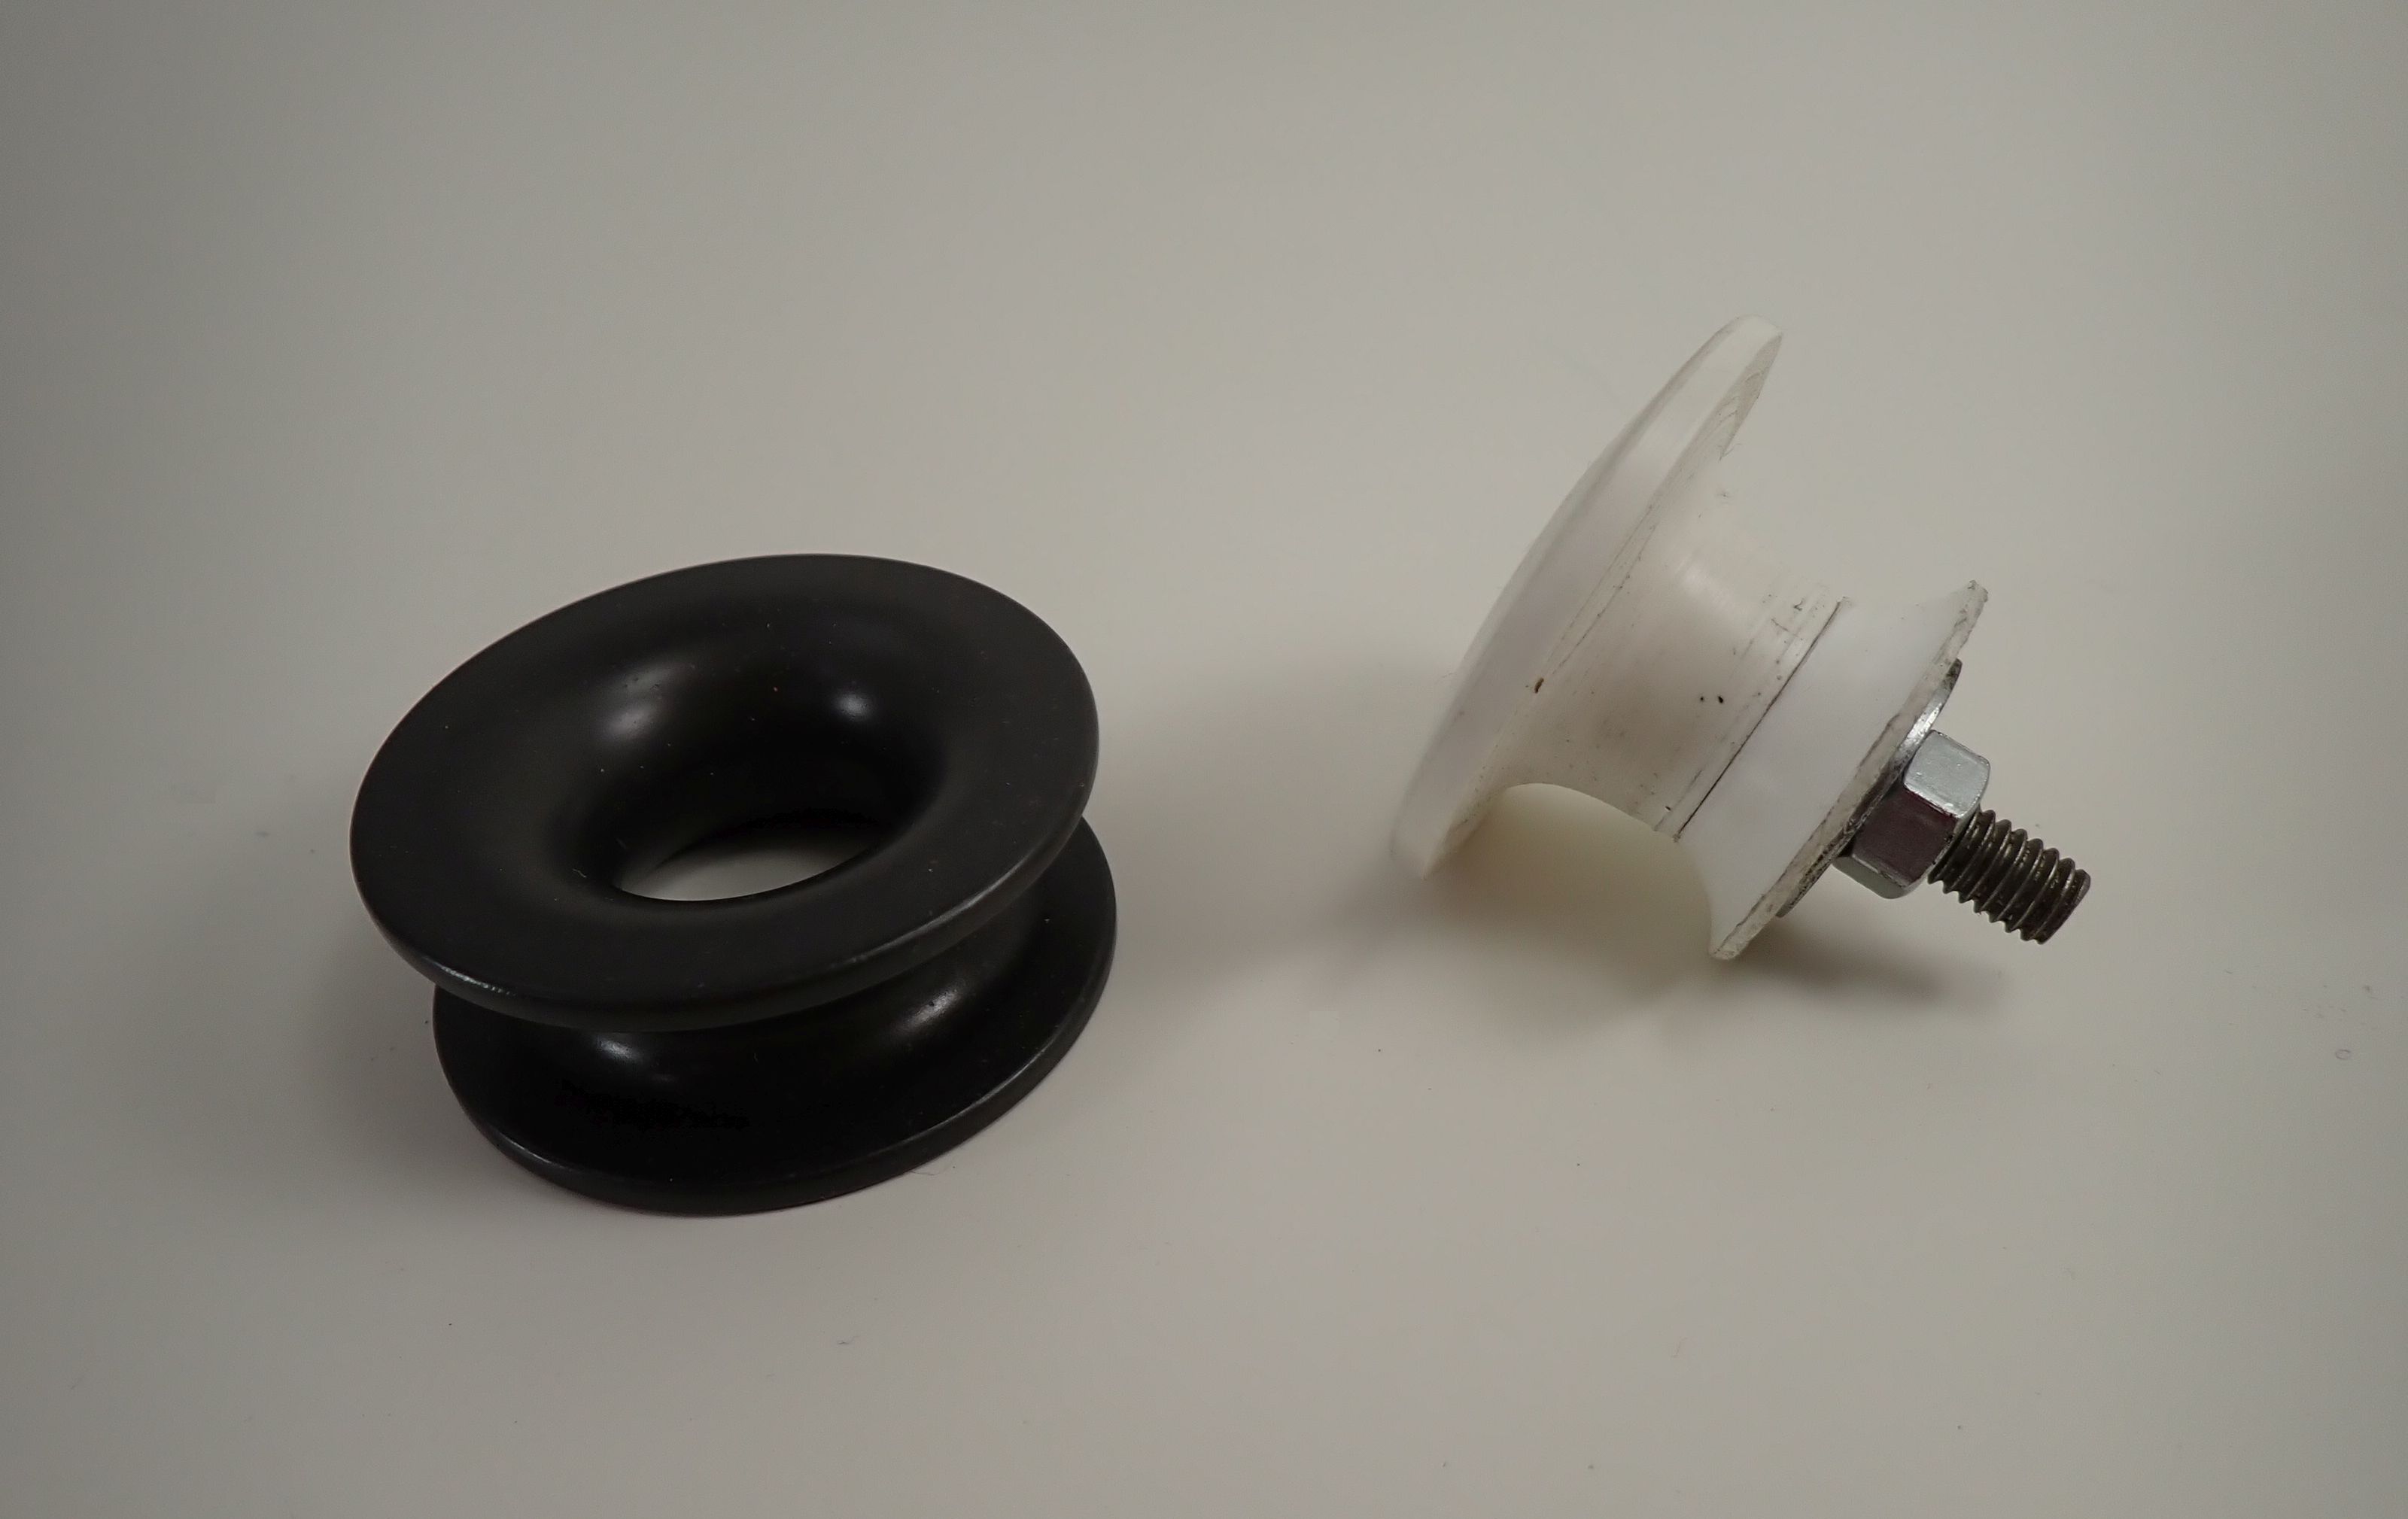
I would love to see someone come up with a 3-D file for winch feeder blocks from LFRs; it really worked great and is very simple. Compact, strong, and silky smooth. The idea would be far more accessible as a 3-D file than as a lathe project.
My cup holders are welded from aluminum rod and are sized for bottles, not cans. Pretty fast, since a jib is used to do the bending. A few dabs of weld. UV does not bother them; I believe one is from my last boat and is >20 years old.
---
Oh. And I need more non-engine boat machining projects! Pulleys are easy and boring. Autopilot parts. Guide bushings for ropes and rudder bushings. Wheel thimbles are neat. Lacing knobs for tramps. But these are more routine than inventive.
My friends say I get a new-to-me boat every time I run out of tweaks.
3d printing for boats.
- Thread starter Hayden Watson
- Start date
Tech wonks were saying years ago that having a 3D printer in the home would pay for itself, and in my case I could say that's true as long as I don't subtract the cost of time and filament making silly things.I was given a problematic printer for free a few months ago. Three hours later it was up and running. So far I've printed stanchion mounted line hooks, TPU coasters and a ring to surface mount an inspection port because I didn't feel like cutting a 6" hole in fiberglass.
Used 3D printers are abundant because so many buyers lack the time, patience and/or mechanical aptitude to maintain them properly, and new ones get better all the time, so price and initial ease of use are really not significant barriers to ownership.
The thing that finally nudged me into the pool was an idea for a jib sheet guide that I had initially cobbled together from a slab of plastic, but wanted a more finished appearance for. It turns out PLA filament doesn't hold up well to abrasion and I ended up going down the desktop CNC rabbit hole to make one from aluminum, but that's another story. Scores of repaired appliances and handy little devices later - and lots of fun printing cool stuff for the grandkids - I am hooked on it and probably spend too much time messing with it. I'm retired now so shut up.
")
A few things I would recommend for anyone considering getting a 3D printer:
1. Make sure your significant other does not begrudge you your "frivolous pursuits".
2. Make sure you have the patience to perform maintenance and repairs tasks and have at least some mechanical aptitude.
You're a sailboat owner, so these first two are probably a given.
3. Learn basic 3D design (TinkerCAD, Onshape, Fusion 360, etc.)
4. Ask yourself just how much time you have for this and choose your machine accordingly. For many people, getting an entry-level machine (i.e. the Ender 3 V3 SE) begins a journey of performance modifications that becomes a hobby unto itself. You may be better served spending a little more for a more capable machine.
Yes, there is a learning curve that can often feel like a rabbit hole, but IMO it is worth the time and effort.
It was her idea after I sent a week playing with my brother-in-law's P1S.1. Make sure your significant other does not begrudge you your "frivolous pursuits".
A own a sailboat, Duh!2. Make sure you have the patience to perform maintenance and repairs tasks and have at least some mechanical aptitude.
yep!You're a sailboat owner, so these first two are probably a given.
I just retired and closed my one-man structural engineering consulting company and have spent the last several decades 3d modeling buildings, so this was a natural outlet for my creative juices.3. Learn basic 3D design (TinkerCAD, Onshape, Fusion 360, etc.)

Did I mention recently retired?4. Ask yourself just how much time you have for this and choose your machine accordingly. For many people, getting an entry-level machine (i.e. the Ender 3 V3 SE) begins a journey of performance modifications that becomes a hobby unto itself. You may be better served spending a little more for a more capable machine.
Looking forward to lots of fun.Yes, there is a learning curve that can often feel like a rabbit hole, but IMO it is worth the time and effort.
I am going to have to keep this one!I'm retired now so shut up.
I don't think the core would need to be HDPE, just some reasonably slippery plastic. Nylon would be very good, but also problematic to print.That would be a really fun use, though HDPE is a difficult material to print from what I’ve read. Some plastics print easier than others. Apparently HDPE is very susceptible to warping and shrinking as it cools. I’ve dealt with that when printing polycarbonate but it sounds like HDPE is even trickier. If anyone has experience with that I’d be curious to hear.
There's a learning curve to machining, welding, machining, and laminating too. And a major investment in tooling. But I've already climbed that mountain. That does not make it better, it's just where I am.
As thinwater alludes to, once you start doing your own manufacturing at a hobby level, you quickly run into the limitations of your hobby-level devices. Something I have not yet done, but may, is to send a design to a company that specializes in producing such things. I see more and more adds for such companies, but have no idea of what they charge.
I have had a set of the stainless steel boat hook clips and they have never worked well. The bend and then do not hold the pole in place.
I printed this set and love how firmly they snap into place. I was able to customize each side so that it perfectly aligned with the screw holes I already had in the boat. I really like how the hook snaps into place so solidly.
I printed this set and love how firmly they snap into place. I was able to customize each side so that it perfectly aligned with the screw holes I already had in the boat. I really like how the hook snaps into place so solidly.
Same story with my boat hook holders, and several other things that I made after the off-the-shelf solutions failed to satisfy.I have had a set of the stainless steel boat hook clips and they have never worked well. The bend and then do not hold the pole in place.
I printed this set and love how firmly they snap into place. I was able to customize each side so that it perfectly aligned with the screw holes I already had in the boat.
I made stand-off brackets for some clutches for our jib. They worked great, and since I made them I could print them exactly the thickness and angle I needed. It took a couple of iterations in PLA to decide what I wanted, but once I did I printed some in PETG and they've been great for a couple of seasons.
I don't know what material you would print with that would be suitable. But, I will say that a good approach is to either use a printed part as a core (like with PETG) sand and layup fiberglass over the top. Or, make a smooth mold with vapor-polished ABS and layup on the inside for a smooth surface. Either approach works nicely for making a fiberglass part to an exact size and shape. Of course, foam works just as well or better for something like this.Now I can just print myself a suitable base.
One cool thing you can do with a printer, though, is to combine these. You make a smooth outer shell and also make a laid-up core that is inset by just the target thickness of the fiberglass. Then, bond the cored piece inside the shell. This approach has a few things you need to watch out for, but can produce some really nice parts.
This fall, I'll be making some raised mounts for cam cleats for the jib sheets, using this hybrid method.
Another case of it depending on where you are coming from.I don't know what material you would print with that would be suitable. But, I will say that a good approach is to either use a printed part as a core (like with PETG) sand and layup fiberglass over the top. Or, make a smooth mold with vapor-polished ABS and layup on the inside for a smooth surface. Either approach works nicely for making a fiberglass part to an exact size and shape. Of course, foam works just as well or better for something like this.
One cool thing you can do with a printer, though, is to combine these. You make a smooth outer shell and also make a laid-up core that is inset by just the target thickness of the fiberglass. Then, bond the cored piece inside the shell. This approach has a few things you need to watch out for, but can produce some really nice parts.
This fall, I'll be making some raised mounts for cam cleats for the jib sheets, using this hybrid method.
Some shapes are complex and 3D printing makes some sense. But for a shop guy raised mounts (a thin block with a few holes, some side taper, and perhaps a bottom profile) are the work of a few minutes in whatever material you want. Trace the shape, cut it out, drill some holes, hit it with the disk sander, and then a finish sander. If you want to save a fraction of an ounce and want a fiberglass finish, then build it out of Cossa and glass it. On the other hand, there is nothing wrong with teak, in which case it would take 10 minutes start to finish. Of course, I would use a band saw, drill press, and a bench disk sander with a tilting table. I've used pre-cast GRP, HDPE, ABS, PVC appearance board, Cossa/glass, teak, and cedar. They all worked out.
Given the compression load, both at the bolt and the edges, I'm not sure foam is often the best choice (though I have done this). Crushing is a problem unless there are solid cores for the bolts and heavier glass on the rim , which is getting, IMO, unnecessarily complicated for most applications.
Thinwater hits on a question that doesn't get much attention on 3D printing forums: "Is 3D printing the best way to approach this problem?". The main reason to not use it is strength. A solid print (no infill) will handle compressive forces just fine, but otherwise 3D printed plastic is far more prone to failure than metal, solid plastic, and even wood in some cases. While the ability to use hand tools is pretty much prerequisite for a sailboat owner, not everyone has the space for a drill press, band saw, table saw, and other larger power tools that make it possible to fabricate parts from stock.
I ran into a good example yesterday on a rolling planting table for my wife when I needed a bushing to make a wheel fit properly on the axle. It would have been simple enough to print them, but as luck would have it I had a spare piece of aluminum tube that was perfect for the job. Ditto for the attachment pieces I needed to hold the top to the frame which I made from ABS plastic rod. So in this case, having a well-equipped shop and stockpile of odd materials made it easier just to make what I needed by "subtractive" methods. I'm lucky to have the space to do this, but of course not everyone does.
Filaments are getting better all the time, but I long for the day when 3D metal printing becomes affordable for home workshop use.
For the winch base, I would not plan on it being a raised base that the winch bolts to. the flat spot on the side of a C30 mast is large enough for the bolt pattern of most winches of the size I anticipate. The problem is the perimeter of the drum extends beyond that flat. The base I have in mind would have minimal thickness under the bolts and then follow the curve of the mast out to the perimeter of the drum. I would print it in ABS with probably 6-walls and high percent of infill to make it more solid.I don't know what material you would print with that would be suitable. But, I will say that a good approach is to either use a printed part as a core (like with PETG) sand and layup fiberglass over the top. Or, make a smooth mold with vapor-polished ABS and layup on the inside for a smooth surface. Either approach works nicely for making a fiberglass part to an exact size and shape. Of course, foam works just as well or better for something like this.
One cool thing you can do with a printer, though, is to combine these. You make a smooth outer shell and also make a laid-up core that is inset by just the target thickness of the fiberglass. Then, bond the cored piece inside the shell. This approach has a few things you need to watch out for, but can produce some really nice parts.
This fall, I'll be making some raised mounts for cam cleats for the jib sheets, using this hybrid method.
All true but then there is the availability of tools. I have the skill and training to do any of these projects in wood, metal or fiberglass. The problem is that my tool selection is limited. If I were to travel 300 miles to my brother-in-law's shop [which I do on occasion] I have access to a complete wood and metal shop including cnc mill and lathe. At home the 3d printer gives me some additional choices. My printer can also print the more exotic filaments like carbon fiber infused nylon and other strong filaments.Thinwater hits on a question that doesn't get much attention on 3D printing forums: "Is 3D printing the best way to approach this problem?". The main reason to not use it is strength. A solid print (no infill) will handle compressive forces just fine, but otherwise 3D printed plastic is far more prone to failure than metal, solid plastic, and even wood in some cases. While the ability to use hand tools is pretty much prerequisite for a sailboat owner, not everyone has the space for a drill press, band saw, table saw, and other larger power tools that make it possible to fabricate parts from stock.
I ran into a good example yesterday on a rolling planting table for my wife when I needed a bushing to make a wheel fit properly on the axle. It would have been simple enough to print them, but as luck would have it I had a spare piece of aluminum tube that was perfect for the job. Ditto for the attachment pieces I needed to hold the top to the frame which I made from ABS plastic rod. So in this case, having a well-equipped shop and stockpile of odd materials made it easier just to make what I needed by "subtractive" methods. I'm lucky to have the space to do this, but of course not everyone does.
Filaments are getting better all the time, but I long for the day when 3D metal printing becomes affordable for home workshop use.
I think that the strength issue is something that gets more attention with experience.
When I was relatively new to 3D printing, we had a plumbing fitting fail and there was no hardware store open within a reasonable drive. I was excited because I could simply design and print a replacement for pennies. That was true. I did design and print this part:

And, it did fit and work ... I think for a day or two. What I did not appreciate, at the time, was that a part is weakest along the layer separation. And, in order to print clean threads, I needed to print in that orientation. And, I could not really print the part any bulkier to compensate for that because if I did, it would no longer fit and/or it would restrict water flow.
Still, it was a good immediate/temporary fix.
Over time, you learn what you can and can't get away with. I just designed and printed a lifeline fender hanger (just came off the printer this morning, in fact). I oriented the print and altered my print settings for optimal strength. And, the item was designed specifically to be printed - with those benefits and drawbacks in mind. I think that you just need to experience some failures to start to approach projects with that in mind.
And, as was raised, 3D printing is pretty cool, but it isn't the best tool for every manufacturing job - just like any other tool. It just happens to be very versatile. Sometimes the best use is to prototype with the printer, then manufacture the permanent part in some other way. Or, print custom jigs and guides that aid in the manufacturing process.
When I was relatively new to 3D printing, we had a plumbing fitting fail and there was no hardware store open within a reasonable drive. I was excited because I could simply design and print a replacement for pennies. That was true. I did design and print this part:
And, it did fit and work ... I think for a day or two. What I did not appreciate, at the time, was that a part is weakest along the layer separation. And, in order to print clean threads, I needed to print in that orientation. And, I could not really print the part any bulkier to compensate for that because if I did, it would no longer fit and/or it would restrict water flow.
Still, it was a good immediate/temporary fix.
Over time, you learn what you can and can't get away with. I just designed and printed a lifeline fender hanger (just came off the printer this morning, in fact). I oriented the print and altered my print settings for optimal strength. And, the item was designed specifically to be printed - with those benefits and drawbacks in mind. I think that you just need to experience some failures to start to approach projects with that in mind.
And, as was raised, 3D printing is pretty cool, but it isn't the best tool for every manufacturing job - just like any other tool. It just happens to be very versatile. Sometimes the best use is to prototype with the printer, then manufacture the permanent part in some other way. Or, print custom jigs and guides that aid in the manufacturing process.
Here's that fender hanger (prototype). I printed in super low-quality with a 0.8 nozzle, just to verify the design. And, the completed part will be annealed and polished. But, it should be amply strong so I'm leaving it in place on a non-critical fender for a bit. Pretty happy with the design. (The line leading off to the right is just the bitter end secured to the lifeline as a backup until I'm confident it won't come off.)

It's a little hard to see, so here's the design. The whip weaves through the holes and locks off on a loop. I'm pretty pleased with it. Very easy to adjust and super easy to hang and remove, but doesn't seem to want to accidentally come off. We'll see how it goes after a week or two of cruising:

It's a little hard to see, so here's the design. The whip weaves through the holes and locks off on a loop. I'm pretty pleased with it. Very easy to adjust and super easy to hang and remove, but doesn't seem to want to accidentally come off. We'll see how it goes after a week or two of cruising:
jssailem
SBO Weather and Forecasting Forum Jim & John
- Oct 22, 2014
- 24,454
They hold your nuts.
Like that they are sanitary white.
But three?
Like that they are sanitary white.
But three?
I have not decided if they should be called Nutsets or Nutters.
Anyone who had gone through the ordeal of rebedding the stanchions on a mk2 Catalina 30 will likely agree with me that it is the most frustrating endeavor to be undertaken on a C30. Tiny little nuts that need to be placed in a small gap beyond the reach of a fingertip.
These are captive nut holders with a short handle. The nut pocket is blind so that once the screw is threaded onto the nut, it will be pushed off so that you can then use a box end wrench to firmly hold the nut to finish tightening the screw. I have modified the print to have a hole in the handle so that you can tie it to your wrist for all of those times it will slip out of your hand before the nut is finally secured.
I'm thinking he was conceived within walking distance of Three Mile IslandThey hold your nuts.
Like that they are sanitary white.
But three?