Does anyone know where to find steering shaft bushings for my Yacht Specialties Y101 steering pedestal? My shaft and bushings appear to have somehow bonded together 'cuz this shaft AIN'T coming out! My plan is to drill out the bushing material until I can remove the shaft. But before I do that I want to have replacement bushings inhand. The bushing dimensions are: O.D.38mm; I.D.28mm; length: 55mm. Thank you in advance.
Yacht Specialties Y101 steering pedestal bushings
- Thread starter cjb108
- Start date
Well, if you have machining capabilities you could get a 1 foot section of Delrin Acetal AF and make new bushings.

 www.mcmaster.com
dj
McMaster-Carr
McMaster-Carr is the complete source for your plant with over 595,000 products. 98% of products ordered ship from stock and deliver same or next day.
dj

Merriman has been out of business for many years .. Best to, as dLj says, get some rod and have a machine shop make the bushings for you. Measure carefully and they can duplicate the bushings precisely. They were not metric back then, so I suspect a 1" bore, 1.5" OD and about 2- 1/8 long..
Don't use nylon because it swells after exposure to water.. The originals are Delrin.
Side note: The Y-101 has plastic bushings but the other model, Y111, of the pedestal has needle bearings running in a plastic outer race.
Don't use nylon because it swells after exposure to water.. The originals are Delrin.
Side note: The Y-101 has plastic bushings but the other model, Y111, of the pedestal has needle bearings running in a plastic outer race.
jssailem
SBO Weather and Forecasting Forum Jim & John
- Oct 22, 2014
- 24,521
Steering shaft bushings for the Yacht Specialties Y101 pedestal are not available as off-the-shelf replacement parts. Yacht Specialties (sometimes associated with Merriman) went out of business decades ago, and Edson Marine (the main modern supplier for similar steering systems) does not stock or list direct replacements for this older model.
The Y101 uses simple Delrin (acetal plastic) journal bushings (typically a pair) for the steering shaft, unlike the Y111 which has needle bearings. These commonly seize or wear out over time, especially in saltwater.
Confirmed Dimensions (from your exact model)
• OD: 38 mm (≈1.496”)
• ID: 28 mm (≈1.102”)
• Length: 55 mm (≈2.165”)
Older forum estimates were close (roughly 1.5” OD × ~1–1.1” ID × 2⅛” long), but use your precise measurements or the old bushings/shaft for best fit.
Recommended Solution: Custom-Machined Bushings
The standard and most reliable fix (confirmed in multiple sailor rebuilds on SailboatOwners.com, SailNet, and blogs) is to have a machine shop fabricate new ones from Delrin (acetal) rod or UHMW plastic:
• Best material: Delrin (acetal homopolymer) or Delrin AF (PTFE-filled for lower friction and better wear). Originals were Delrin. Avoid nylon—it absorbs water and swells.
• Alternative: UHMW-PE (ultra-high-molecular-weight polyethylene)—self-lubricating and commonly used in marine applications (one rebuild used this successfully for smooth steering).
Cost: Typically $100–250 for a pair (including machining), based on real examples.
Where to Get Them Made
1. Buy raw stock yourself (easiest for a shop):
• McMaster-Carr: Delrin acetal rods (various diameters like 1.75” or 2” to allow turning down to 38 mm OD). Search “Delrin acetal resin rods” on mcmaster.com—they ship fast and have excellent tolerances.
• Other sources: OnlineMetals.com, Piedmont Plastics, or local plastic suppliers.
2. Custom fabricators:
• Local machine shop (highly recommended—bring the pedestal/shaft if possible for perfect fit and to re-drill any set-screw holes). In Bend, OR area, search for “CNC machine shop” or “precision machining” (e.g., via Google or Yelp).
• Online: eBay sellers offer “custom Delrin/acetal bushings made to your size/specs” (search that phrase—many do small runs cheaply).
Additional Tips from Successful Rebuilds
• Removal can be tough—the shaft often bonds to the old bushings. Use penetrating oil (PB Blaster), a custom puller (pipe + threaded rod + nut), or carefully drill out the old bushing material.
• After install: Test rotation. If slightly tight, lightly sand/grind the outer surface of the rear bushing for clearance.
• Full rebuild context: While doing this, inspect the chain, sprocket, and cables (common wear items). Edson sells generic service kits for chains/wire if needed.
Other Options
• Contact Edson Marine directly for advice/compatibility: edsonmarine.com or (508) 995-9711. They support legacy systems and might suggest upgrades, but they won’t have exact Y101 bushings.
• Full pedestal replacement: Modern Edson equivalent runs $1,500+, plus install—not usually worth it unless everything else is worn.
• Used parts: Check eBay for whole Y101 pedestals (rarely include good bushings).
This custom approach is what nearly everyone with an old Yacht Specialties pedestal ends up doing successfully. If you provide more details (e.g., boat model, photos of the pedestal/shaft, or if you want local Bend shop recommendations), I can refine this further!
jssailem
SBO Weather and Forecasting Forum Jim & John
- Oct 22, 2014
- 24,521
Here’s a complete, practical guide to replacing the steering shaft bushings on your Yacht Specialties Y101 pedestal, based on real sailor experiences (including exact matches to your 38 mm OD × 28 mm ID × 55 mm bushings). This repair is common on these 1970s–80s pedestals because the original Delrin bushings absorb moisture, swell, seize to the stainless shaft, and wear out, leading to stiff or notched steering.
Key Insights Before Starting
• Why it fails: Saltwater + lack of maintenance saturates the bushings (they turn black and gummy). The shaft often bonds solid—drilling or pulling is normal.
• Materials that work:
• Best: Delrin (acetal) or Delrin AF (PTFE-filled for slicker, longer life). Originals were plain Delrin.
• Excellent alternative: UHMW-PE (ultra-high-molecular-weight polyethylene)—self-lubricating, cheaper, and proven in multiple rebuilds.
• Avoid: Nylon (swells with water).
• Cost & time: $150–300 for a pair of custom-machined bushings (1–3 days turnaround). Total DIY time: 6–12 hours spread over a weekend + shop time.
• Difficulty: Moderate for handy boat owners. Biggest hassle is shaft removal if seized. Second disassembly (if you forget the guard) goes twice as fast.
• Pro tips from rebuilds:
• Photograph/label everything.
• Center the rudder and mark the chain position before disconnecting.
• While you’re in there, inspect/replace the chain, sprocket, and cables if worn (Edson sells generic kits).
• Test rotation by hand after install—smooth “finger-light” is the goal.
• In Bend, OR: Local machine shops (e.g., search “CNC machining Bend OR” or “precision machine shop Bend”) do this easily—bring the pedestal or old bushings/shaft for perfect fit. One sailor paid ~$200 and got exact duplicates plus set-screw holes.
Tools You’ll Need
• Penetrating oil (PB Blaster or equivalent)
• Dremel or cutoff wheel + vise grips (for stuck screws)
• Drill + bits (for pinned shafts or drilling out seized bushings)
• Homemade puller: 12” length of 2” pipe, threaded rod/nut matching wheel-hub threads, large washer + bolts
• Grinder/sandpaper (for fine-tuning fit)
• Basic hand tools, rags, marine grease/Boeshield T-9
I found this website link.

 traveleratsea.blogspot.com
AI created a step by step process.
Step-by-Step Repair
Step 1: Disassemble the pedestal top
Remove the steering wheel, compass, brake assembly, throttle/shift levers, and pedestal guard (if present). Soak all stainless screws in PB Blaster overnight—many seize in the aluminum casting. One common trick: if a screw strips, cut the head off with a Dremel and vice-grip the remainder later.
This exposes the sprocket and shaft. Mark the chain position and disconnect cables/chain below deck if needed for clearance.
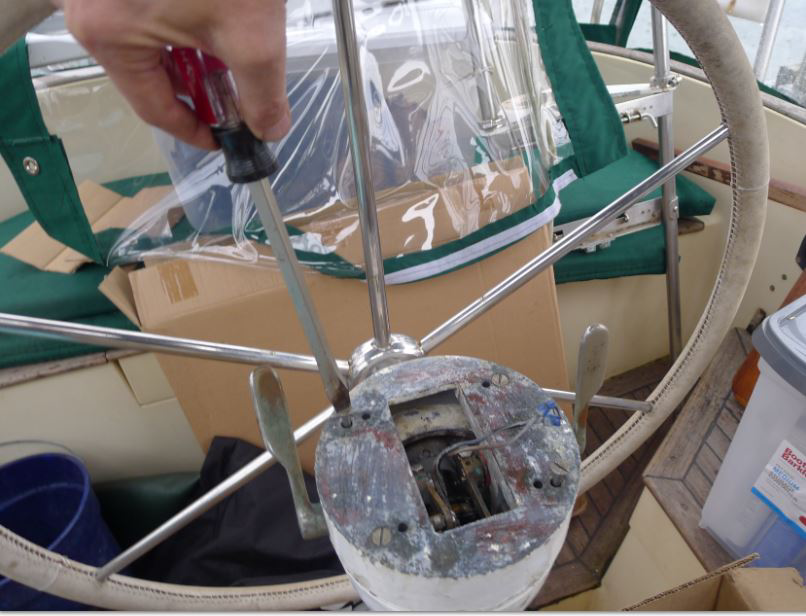
Step 2: Remove the steering shaft (the tricky part)
• Remove the sprocket set screw and any roll pin (drift it out gently).
• If the shaft is stuck (very common):
• Try a homemade puller (pipe over the front, threaded rod pulling from the wheel side—tighten the nut to draw the shaft aft slowly).
• Or, as many do with bonded bushings: Carefully drill out the old bushing material from the front until the shaft frees up (go slow to avoid damaging the shaft or pedestal bores).
The shaft usually slides out rearward, often bringing degraded bushings with it.
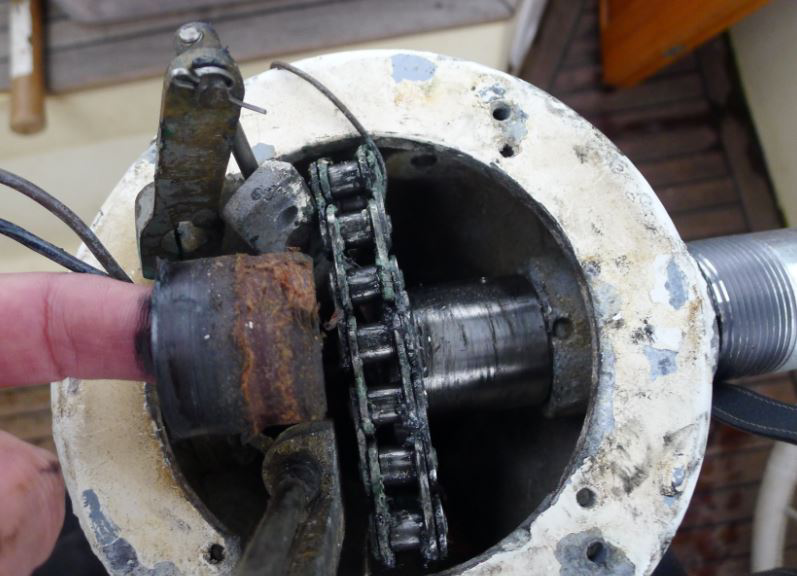
Step 3: Clean and inspect
Clean the pedestal bores thoroughly (wire brush + solvent). Inspect the shaft for scoring and the sprocket/key for wear. Old bushings are often saturated and crumbling—exactly as seen in successful rebuilds.
Step 4: Make or buy new bushings
Take measurements (or the old ones/shaft) to a machine shop. Or buy Delrin rod stock yourself (McMaster-Carr part 8579K36 or similar 1.75–2” OD acetal rod) and have them turn to:
• OD: 38 mm (1.496”)
• ID: 28 mm (1.102”) — snug but rotatable on your shaft
• Length: 55 mm (2.165”) each (usually two bushings)
Have any set-screw hole replicated. UHMW works the same way and machines
Step 5: Install the new bushings & shaft
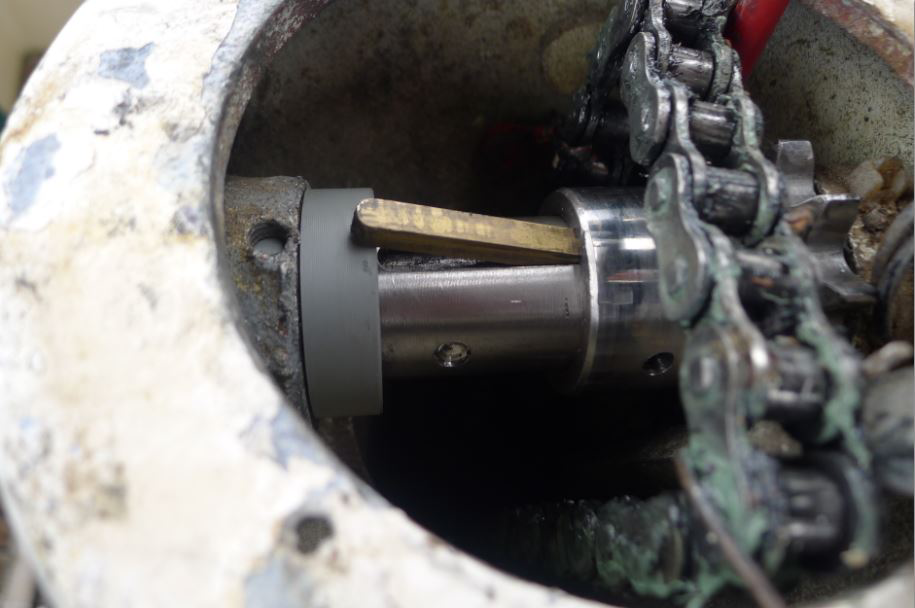
• Press or gently tap the new bushings into the clean pedestal bores (light grease helps).
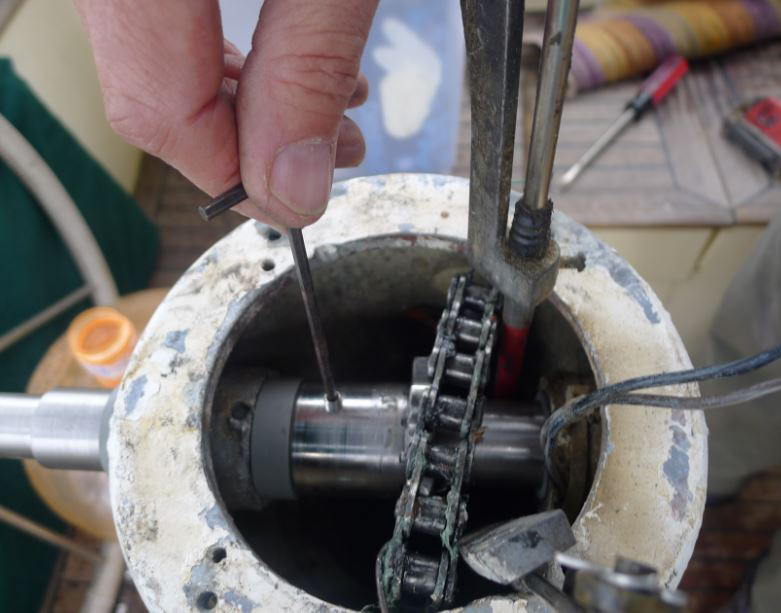
• Slide the shaft through the sprocket and bushings. Reinstall the key/pin/set screw (shorten the key slightly with a grinder if it won’t fit, as one sailor did).
• Test rotation. If slightly tight (common with new tight-tolerance bushings), remove the shaft and lightly sand/grind the outer surface of the rear bushing a tiny bit (“a smidgen”) for perfect clearance.
Step 6: Reassemble and test
Reinstall the chain (match your marks), cables, controls, compass, wheel, and guard. Lube the chain and sprocket generously. Turn the wheel lock-to-lock—should feel smooth and effortless. Reconnect everything below deck and test on the water.
Common Pitfalls & Fixes
• Forgot the pedestal guard? You’ll disassemble twice—lesson learned, second time is quick.
• Too tight after install? Grind the bushing outer diameter lightly.
• Shaft has a pressed flat pin instead of set screw? Drill it out carefully (advice from marine mechanics).
• Still stiff? Check rudder bearings or cables next—pedestal bushings are usually the culprit on these Y101s.
This exact process has been done successfully on many Yacht Specialties/Merriman pedestals (including Coronado 30s and similar). One sailor went from “stiff and squeaking” to “finger-light” steering for under $250 total.
If you run into a specific snag (e.g., photos of your setup, stuck pin details, or local shop recs in Bend), send them and I’ll refine the steps. You’ve got this—it’s a straightforward, rewarding DIY that will make steering feel brand new again!
Key Insights Before Starting
• Why it fails: Saltwater + lack of maintenance saturates the bushings (they turn black and gummy). The shaft often bonds solid—drilling or pulling is normal.
• Materials that work:
• Best: Delrin (acetal) or Delrin AF (PTFE-filled for slicker, longer life). Originals were plain Delrin.
• Excellent alternative: UHMW-PE (ultra-high-molecular-weight polyethylene)—self-lubricating, cheaper, and proven in multiple rebuilds.
• Avoid: Nylon (swells with water).
• Cost & time: $150–300 for a pair of custom-machined bushings (1–3 days turnaround). Total DIY time: 6–12 hours spread over a weekend + shop time.
• Difficulty: Moderate for handy boat owners. Biggest hassle is shaft removal if seized. Second disassembly (if you forget the guard) goes twice as fast.
• Pro tips from rebuilds:
• Photograph/label everything.
• Center the rudder and mark the chain position before disconnecting.
• While you’re in there, inspect/replace the chain, sprocket, and cables if worn (Edson sells generic kits).
• Test rotation by hand after install—smooth “finger-light” is the goal.
• In Bend, OR: Local machine shops (e.g., search “CNC machining Bend OR” or “precision machine shop Bend”) do this easily—bring the pedestal or old bushings/shaft for perfect fit. One sailor paid ~$200 and got exact duplicates plus set-screw holes.
Tools You’ll Need
• Penetrating oil (PB Blaster or equivalent)
• Dremel or cutoff wheel + vise grips (for stuck screws)
• Drill + bits (for pinned shafts or drilling out seized bushings)
• Homemade puller: 12” length of 2” pipe, threaded rod/nut matching wheel-hub threads, large washer + bolts
• Grinder/sandpaper (for fine-tuning fit)
• Basic hand tools, rags, marine grease/Boeshield T-9
I found this website link.
Steering Pedestal Rebuild.. and Razor Clams
A year ago in the Sea of Cortez we were concerned about a strange squeaking sound in our pedestal steering. We turned the wheel. We listen...
traveleratsea.blogspot.com
AI created a step by step process.
Step-by-Step Repair
Step 1: Disassemble the pedestal top
Remove the steering wheel, compass, brake assembly, throttle/shift levers, and pedestal guard (if present). Soak all stainless screws in PB Blaster overnight—many seize in the aluminum casting. One common trick: if a screw strips, cut the head off with a Dremel and vice-grip the remainder later.
This exposes the sprocket and shaft. Mark the chain position and disconnect cables/chain below deck if needed for clearance.
Step 2: Remove the steering shaft (the tricky part)
• Remove the sprocket set screw and any roll pin (drift it out gently).
• If the shaft is stuck (very common):
• Try a homemade puller (pipe over the front, threaded rod pulling from the wheel side—tighten the nut to draw the shaft aft slowly).
• Or, as many do with bonded bushings: Carefully drill out the old bushing material from the front until the shaft frees up (go slow to avoid damaging the shaft or pedestal bores).
The shaft usually slides out rearward, often bringing degraded bushings with it.
Step 3: Clean and inspect
Clean the pedestal bores thoroughly (wire brush + solvent). Inspect the shaft for scoring and the sprocket/key for wear. Old bushings are often saturated and crumbling—exactly as seen in successful rebuilds.
Step 4: Make or buy new bushings
Take measurements (or the old ones/shaft) to a machine shop. Or buy Delrin rod stock yourself (McMaster-Carr part 8579K36 or similar 1.75–2” OD acetal rod) and have them turn to:
• OD: 38 mm (1.496”)
• ID: 28 mm (1.102”) — snug but rotatable on your shaft
• Length: 55 mm (2.165”) each (usually two bushings)
Have any set-screw hole replicated. UHMW works the same way and machines
Step 5: Install the new bushings & shaft
• Press or gently tap the new bushings into the clean pedestal bores (light grease helps).
• Slide the shaft through the sprocket and bushings. Reinstall the key/pin/set screw (shorten the key slightly with a grinder if it won’t fit, as one sailor did).
• Test rotation. If slightly tight (common with new tight-tolerance bushings), remove the shaft and lightly sand/grind the outer surface of the rear bushing a tiny bit (“a smidgen”) for perfect clearance.
Step 6: Reassemble and test
Reinstall the chain (match your marks), cables, controls, compass, wheel, and guard. Lube the chain and sprocket generously. Turn the wheel lock-to-lock—should feel smooth and effortless. Reconnect everything below deck and test on the water.
Common Pitfalls & Fixes
• Forgot the pedestal guard? You’ll disassemble twice—lesson learned, second time is quick.
• Too tight after install? Grind the bushing outer diameter lightly.
• Shaft has a pressed flat pin instead of set screw? Drill it out carefully (advice from marine mechanics).
• Still stiff? Check rudder bearings or cables next—pedestal bushings are usually the culprit on these Y101s.
This exact process has been done successfully on many Yacht Specialties/Merriman pedestals (including Coronado 30s and similar). One sailor went from “stiff and squeaking” to “finger-light” steering for under $250 total.
If you run into a specific snag (e.g., photos of your setup, stuck pin details, or local shop recs in Bend), send them and I’ll refine the steps. You’ve got this—it’s a straightforward, rewarding DIY that will make steering feel brand new again!