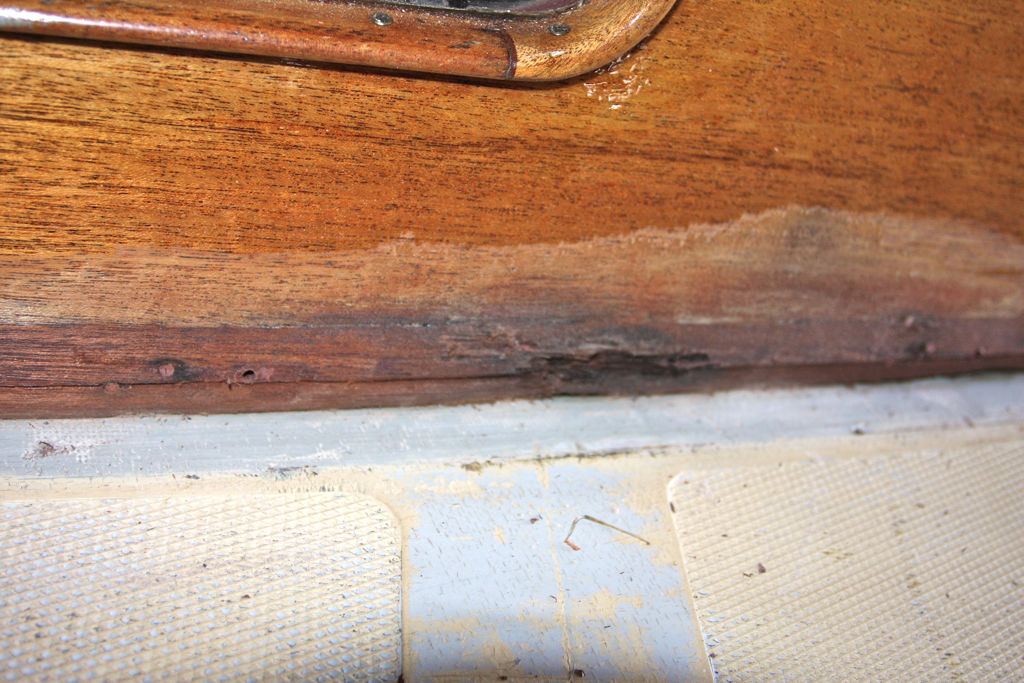
I've pulled off the trim at this joint. Despite rebedding it just a couple seasons ago, water was getting in behind it and lifting the newly applied varnish(frustrating,...) I think I got a bad batch of Boatlife, probably past it's usable date and hence was too stiff to give a uniform "splooge" out all the seams. On top of that, the mahogany is a little chewed up in spots(past screws, a bit of water damage) which doesn't make for a good bedding surface. Also, the gelcoat on the deck along the joint is a little rough.
I thought I'd fix this by getting a smooth bedding surface on both edges by applying thickened expoxy, fairing. Anywhere water can get behind the trim, it can travel fore and aft under the mahogany and come out through loose bedding, screws, even into the cabin if it wicks up past the flange.
\
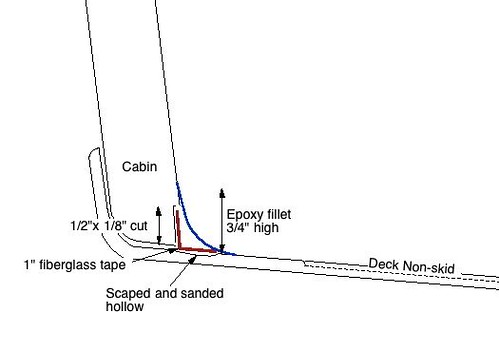
Then I started thinking about what they do with some cabin/deck joints on wooden boats at Rockport Marine(I have friends there who's brains I pick incessantly) They've done some with expoxy filets.
So if I'm going to fill and fair both deck and cabin house damage, why not bond the whole bloody thing together? This joint is never coming apart(unless the cabin is shot), it's screwed and through bolted vertically through the cabinsides, and all screws and bolts I can see have been glassed over as well.
So, I started cutting a chamfer on the edge of the mahogany as I scrapped off some of the gelcoat along the joint area. As a plus, we know well the shaky joint at the cabin front. Due to the angle, there is a long area of cabin that meets the up turned deck flange that will adhere quite nicely. This doesn't address the sagging of the deck forward, but it will help and will not allow that joint to "work", destroying the bedding seal.
I still will need to replace the trim with a conventional bedding compound. I'm not sure I can rely on the epoxy joint to be always watertight(or can I?)That trim/bedding makes sense IF you can get a good application of compound with the right stuff and right conditions(Rockport Marine says this is a crap shoot with bedding wood) which I think I can do successfully now several times burned.
But then,...what about adhering that trim as well to deck and cabin? That might be too far to go but I think I will run it by my friends at RM.
Here's 3 shots showing the worst area aft where some wood needs repair and filling. Next the mid area that is pretty good, showing the scraper I'm cutting the chamfer with. The last is the front side. I have no leaks up here thanks to the slender dutchmen patches I epoxied into saw kerfs cut between the corner posts and cabins.
What do you all think?
Sorry, I can only post one file the site is telling me, I'll try to add the others.
I thought I'd fix this by getting a smooth bedding surface on both edges by applying thickened expoxy, fairing. Anywhere water can get behind the trim, it can travel fore and aft under the mahogany and come out through loose bedding, screws, even into the cabin if it wicks up past the flange.
\
Then I started thinking about what they do with some cabin/deck joints on wooden boats at Rockport Marine(I have friends there who's brains I pick incessantly) They've done some with expoxy filets.
So if I'm going to fill and fair both deck and cabin house damage, why not bond the whole bloody thing together? This joint is never coming apart(unless the cabin is shot), it's screwed and through bolted vertically through the cabinsides, and all screws and bolts I can see have been glassed over as well.
So, I started cutting a chamfer on the edge of the mahogany as I scrapped off some of the gelcoat along the joint area. As a plus, we know well the shaky joint at the cabin front. Due to the angle, there is a long area of cabin that meets the up turned deck flange that will adhere quite nicely. This doesn't address the sagging of the deck forward, but it will help and will not allow that joint to "work", destroying the bedding seal.
I still will need to replace the trim with a conventional bedding compound. I'm not sure I can rely on the epoxy joint to be always watertight(or can I?)That trim/bedding makes sense IF you can get a good application of compound with the right stuff and right conditions(Rockport Marine says this is a crap shoot with bedding wood) which I think I can do successfully now several times burned.
But then,...what about adhering that trim as well to deck and cabin? That might be too far to go but I think I will run it by my friends at RM.
Here's 3 shots showing the worst area aft where some wood needs repair and filling. Next the mid area that is pretty good, showing the scraper I'm cutting the chamfer with. The last is the front side. I have no leaks up here thanks to the slender dutchmen patches I epoxied into saw kerfs cut between the corner posts and cabins.
What do you all think?
Sorry, I can only post one file the site is telling me, I'll try to add the others.
Attachments
-
 92.6 KB Views: 4,427


") ) . There may also be a possibility to fashion a finish filet that could be painted as the deck that would raise 1/2" or a bit more? This could also encase fiberglass tape. No holes, done.
) . There may also be a possibility to fashion a finish filet that could be painted as the deck that would raise 1/2" or a bit more? This could also encase fiberglass tape. No holes, done.