Tale of the tape: Let the rigging begin:

Jul 13, 2015
900
Catalina 22 #2552 2252 Kennewick, WA
Many moons ago I lamented my challenges with the existing standing rigging.

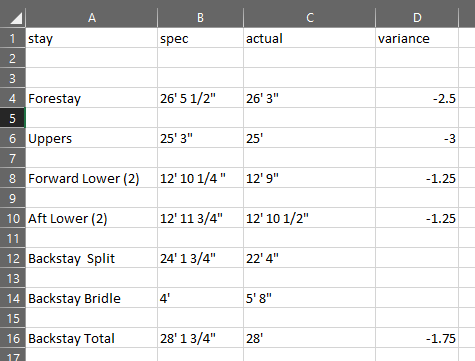
Always seeming to fight with what everyone said was a sure fit and a relatively easy add. Since then I clearly understand my backstay chainplates are non standard-- but if anything that should have lengthened the overall spec. Fairly certain the Mast is still in spec at 25' (but will check to verify). With a standard turnbuckle adjusting at 3" of play-- and every surface back to stock (backstay exception), I have to believe the right call is ignoring what I can touch and using the printed spec. I'm 2.5 to 3" inches under spec on forestay and uppers, 1.25 short on the lowers.

I'll be changing out all contacts points ( CJS quick connects on forestay and forward lowers, new single line adjustable backstay, and all new hayn Hi-mod fittings all the way round at both ends).

curious if anyone tackling rigging found themselves hanging with Goldilocks -- too hot , too cold or just right?

More "fun" to follow.

Capture.PNG
 

Grotto

.
Feb 18, 2018
273
Catalina 22 Wilmington
Defender has the csj quick release on sale just ordered mine for the front lowers! And yes as I was getting the mast in column nothing seemed equal ever. Finally said bag it put the tape away and do it by feel and a level. Worked out when I checked it on the water.
 

Rillo

.
Apr 21, 2019
17
Catalina C22 Bear Lake
I’ve always wondered how people adapt the Johnson quick releases to the C22. Do you need to change the end fitting of the shroud?
 
Jul 13, 2015
900
Catalina 22 #2552 2252 Kennewick, WA
Thanks @Grotto , pretty much aligned with the "eff it" methodology, my fittings are removable, worst case I measure once cut twice.

@Rillo I'l document my results here-- I have the first of 3 on my former too short forestay. It adapts nicely to stem fitting and open eyeloops, the foreward lowers would be identical-- the quick connect would attach directly to the chainplate therefore bypassing the turnbucke. In my case I am changing out fittings but that's on me and I have the right parts to couple up the quick connects.

If you have stock parts it might look like this:


IMG_2459.jpg


IMG_2460.jpg
 
Last edited:

Rillo

.
Apr 21, 2019
17
Catalina C22 Bear Lake
Thanks for the pics. It looks like you give up the fine tuning of a turnbuckle when using the Johnson quick release. Am I missing something?
 
Jul 13, 2015
900
Catalina 22 #2552 2252 Kennewick, WA
Top three holes in the pic is exactly that — a bit of a stay adjustment built in. You can back off or tighten from those set points.
 
Jul 13, 2015
900
Catalina 22 #2552 2252 Kennewick, WA
To @Hunter216’s point - the quick connect is slightly shorter than a expanded turnbuckle— 8 1/2” closed on its max setting vs about 10” for the turnbuckle. Doubling it up would have an impact on the stay length.

A4563954-2A75-46B9-934D-8E665BCD51ED.jpeg


2AB2456E-3DE6-403D-AED1-5E429E5C33A0.jpeg
 
Jul 13, 2015
900
Catalina 22 #2552 2252 Kennewick, WA
Get ready for some seriously seat of the pants engineering: perhaps a testament to everyone with a garage, it can be done with the most basic of tools.

Welcome to the boathouse-- which also doubles as my garage (no judgement-- it's never organized). I had to figure out a way to layout the stainless wire and get a good measurement. This is what I ended up with-- essentially my 200' construction tape strung out across the floor

IMG_2476.jpg


At the head of the tape I stuck it to a wide scrap board with a screw-- and transcribed the actual 0 line next to it.

IMG_2477.jpg


I tried a few methods but settled on taking a scrap trim piece and screwing it to the board just to the back side of the wire-- pinning it nicely to the scrap so I can pull it taught without moving it-- but also not so tight as to deform the wire.

IMG_2493.jpg


For every stay that is on my cutsheet I transcribed the measurements to the floor and crossing the tape-- you can see the 1" or so of tape on the wire with my sharpie mark for "cut here"

IMG_2478.jpg


Kept thinking I wish I had a proper electrician's spool as the stainless wire does not play nicely out of round-- but this worked out pretty well in a pinch; two loose cinch straps that would keep everything together while I payed out wire to my next cut location.

IMG_2491.jpg


I did purchase a loos handheld stainless cutter (rated to 1/8) for this project and it works pretty well with a single chop. But as you can see (sort of) close up I was a bit concerned about the ragged (less than 90 degree ) edges. The tiny fittings are so precise-- the ragged tails might cause me some angst at the next stage.

IMG_2481.jpg


I couldn't toss Dad's bench grinder after his passing-- never give up your tools. It came through like a champ to smooth off the cuts (thanks pops!) Hard to show detail on something so small but you can see the shiny and a crisp outline of the 7x19. Everyone of those tiny 7's has a slot to find in the fitting nut. These pics happen to be the wire rope portion of the adjustable back stay -- 7x7 shown.


IMG_2486.jpg


IMG_2490.jpg


And that's a wrap on cutting wire-- now comes the insanely detailed part I can barely see. 9 stays in about 3 hours of slow steady work on a crappy rainy day. Bring on the fittings:


IMG_2495.jpg
 
Last edited:
Jun 25, 2004
1,108
Corsair F24 Mk1 003 San Francisco Bay, CA
Is that 1/8” diameter 7x19 wire? It looks like it is. The specifications for the Catalina 22 call for 1/8” 1 x 19 wires, not 7 x 19.

I have two worries about this plan: first of all, I think you will have difficulty getting the mast straight, centered and tuned under load because of the adjusters. Secondly, you may have reduced the safety margin of the rig, because the 7 x 19 wire is not as strong as the OEM equipment and it’s a lot stretchier.

the 7 x 19 x 1/8” wire is about twice as stretchy and 2/3 as strong as the 1 x 19 x 1/8” wire. It has a breaking strength of about 1300 pounds. It will stretch about .101% of length per 10 pounds.

The Catalina 22 specs call for 1/8” 1 x 19 wire, which has a breaking strength of about 1800 pounds. It will stretch about 0.050% of length per 10 pounds.

***Here's a link to the specifications from Loos Company

The first consideration is about being able to tune the rig with sufficient precision. With those adjusters and 7 x 19 wire, every quarter inch adjustment in length will correspond to a change of about 80 pounds of tension on your 25’ long cap shroud. That’s a huge differential, when your target is somewhere around 180-220 pounds for the cap shrouds and around 125 - 150 pounds the the lower shrouds. (These numbers are very ball park).

The second consideration is the breaking strength of the wire and the safety margins for the rig. Breaking strength may ot may not be a worry for the shrouds, because 1/8” 1x19 wire may be overkill for the shrouds. It’s cheaper to stock just one size of wire and stages than two. But the strength is probably required for the for the backstay and forestay. They carry a heavier load on that rig.

Judy B

[*** Edited to add a link to the specs about stretch on Loos' website]
 
Last edited:
  • Helpful
Likes: Will Gilmore
Jul 13, 2015
900
Catalina 22 #2552 2252 Kennewick, WA
@DrJudyB -- excellent insights and links, thank you. I have to apologize for my typos-- I keep writing 7x19 for some reason knowing full well its 1x19 316 stainless wire. The early pics are of the 7x7 strand which will be the adjustable (wire sheave) portion of the adjustable backstay.

I will be very interested to see what I think about adjust-ability with the quick connects-- many have done it, some swear by it, primarily I'm looking for some more efficient set up launch and retrieve time-- but I'm willing to test it and revert if necessary or warranted.

IMG_2502.jpg
 

Grotto

.
Feb 18, 2018
273
Catalina 22 Wilmington
I have discovered I will need to shorten my stays and add the turnbuckles back into the mix. they are way too tight with the current stays even at the top of the release. The nice part is once adjusted, I should be able to throw the lever and be at the correct tension, no additional twisting taking out pins, losing pins swearing at pins etc. figure I will reduce by the size of the quick release. then off to west marine to play with their rigging table.
 
  • Like
Likes: DrJudyB
Jul 13, 2015
900
Catalina 22 #2552 2252 Kennewick, WA
Rigging is cut and now it's time to work the microscopic fittings-- you would like to think that you could peel back just enough of the twist to insert the cone and run away-- but no such luck. The gorgeous unraveling flower is a misnomer-- there's not enough room to do any work, and you seriously risk bending the strands which I have learned is the worst possible outcome. Once it's bent it won't come back to a clean and tidy wrap.

IMG_2502.jpg


To that end I found that several inches of unruly unravel is the easiest for me to manipulate-- exposing the core and allowing yourself the room to set aside (without distortion ) the outer bands so you can be a bit heavy handed with the cone.

IMG_2504.jpg


I can now set aside the outerbands with 3 fingers and still grasp fairly firmly the core and the cone. This was the hard part-- what to push that cone on with? Way to small and quite honestly too tight a tolerance to use your fingers. I grabbed everything small in my tool box and actually settled on the rubberized handle of my Klein Screwdriver-- soft enough not to deform the cone, hard enough to tap it on.

IMG_2506.jpg


Below is after the first couple of hard taps. Realized I had to tap to stop, remove by hand and repeat about 3 to 4 cycles-- expanding the cone enough to still be tight but pliable by hand.

IMG_2505.jpg


With the cone now flush to wire, you have to allow a small overhang to support the nut . Only thing I could find that worked was the small set of needle nose pliers that could hold the outer edges of the cone and push down just a bit more.

IMG_2512.jpg


Room to hold the nut the nut now--

IMG_2513.jpg


And one final adjustment using the butt end of the fitting to set the depth:


IMG_2514.jpg


Next challenge with the next set of pics-- lining up coordinated sets of two of the outer strands. I have to get from this mess to perfect alignment. About now I want to punish the manufacturer's YouTube video-- they walk through the process with a massive fist size fitting and it takes a minute or two. Now jack that down to microscopic and try on my bifocals-- finish line tomorrow:

IMG_2515.jpg


IMG_2516.jpg
 
Last edited:

Joe

.
Jun 1, 2004
8,004
Catalina 27 Mission Bay, San Diego
Here's how the pros do it. This is part 2 of an episode on re rigging the author's Westsail 42.
 
  • Helpful
Likes: DrJudyB
Sep 22, 2018
1,869
Hunter 216 Kingston
Rigging is cut and now it's time to work the microscopic fittings-- you would like to think that you could peel back just enough of the twist to insert the cone and run away-- but no such luck. The gorgeous unraveling flower is a misnomer-- there's not enough room to do any work, and you seriously risk bending the strands which I have learned is the worst possible outcome. Once it's bent it won't come back to a clean and tidy wrap.

View attachment 180668

To that end I found that several inches of unruly unravel is the easiest for me to manipulate-- exposing the core and allowing yourself the room to set aside (without distortion ) the outer bands so you can be a bit heavy handed with the cone.

View attachment 180669

I can now set aside the outerbands with 3 fingers and still grasp fairly firmly the core and the cone. This was the hard part-- what to push that cone on with? Way to small and quite honestly too tight a tolerance to use your fingers. I grabbed everything small in my tool box and actually settled on the rubberized handle of my Klein Screwdriver-- soft enough not to deform the cone, hard enough to tap it on.

View attachment 180671

Below is after the first couple of hard taps. Realized I had to tap to stop, remove by hand and repeat about 3 to 4 cycles-- expanding the cone enough to still be tight but pliable by hand.

View attachment 180670

With the cone now flush to wire, you have to allow a small overhang to support the nut . Only thing I could find that worked was the small set of needle nose pliers that could hold the outer edges of the cone and push down just a bit more.

View attachment 180673

Room to hold the nut the nut now--

View attachment 180674


And one final adjustment using the butt end of the fitting to set the depth:


View attachment 180675

Next challenge with the next set of pics-- lining up coordinated sets of two of the outer strands. I have to get from this mess to perfect alignment. About now I want to punish the manufacturer's YouTube video-- they walk through the process with a massive fist size fitting and it takes a minute or two. Now jack that down to microscopic and try on my bifocals-- finish line tomorrow:

View attachment 180676

View attachment 180677
Wow that is intricate! My arthritic fingers ache just looking at the photos (kudos on the photo clarity BTW)

I have an articulated magnifier/light that I use for fine work like that. You could also go full tech and use your IPhone, mirrored through an Apple TV to your 4K TV ;)
 

AaronD

.
Aug 10, 2014
723
Catalina 22 9874 Newberg, OR / Olympia, WA
Wow! I did one of them, and must have blocked the memories. I do know that I wasn't about to try to take pictures at the same time! Nice job on the documentation - that'll be helpful to anyone else thinking of this project.
 
Apr 11, 2017
571
Catalina C22 Solomon's Island, MD
Great write-up pclarksurf. Thanks for taking the time to document and post it-
 
Jul 13, 2015
900
Catalina 22 #2552 2252 Kennewick, WA
So we left off with essentially an unorganized loosely wrapped cone and if the previous pics weren't tedious-- buckle up.

The trick seems to be slight clockwize rotation of the nut itself (and this is a pretty heavy deviation from the manufacturer notes). they say to pull the covering cone body up and rotate and that should start the wire alignment-- I tried it, but not so much. I found the lighter touch with a delicate twist could get you here at lot faster.

It's starting to take shape-- and clear to even the bifocal'd eye that the strands have a natural home and it's up to you to coax them in. Two strands per slot-- and they have a tendency to bunch like the threesome at the top of the pic. You can see an over/underwrap at the bottom of the pic.

IMG_2518.jpg


Tool of choice is again the tiny needle nose-- they can tuck under the wire and pop them out to relocate without much effort. A pocket knife blade worked as well but the needle nose won out. Finally all the strands aligned-- nice tight weave right up to the cone, should be a good fit.

IMG_2519.jpg


IMG_2520.jpg


IMG_2521.jpg


Home free now-- the covering cone went on before the unravel--- it's a simple slide, slight twist to lock the nut in place.


IMG_2523.jpg


IMG_2522.jpg


Voila -- finished product that looks pretty sweet. Remaining steps include primer and threadlocker on the threads. Each get hand tightened and then a 1/2 turn with a wrench. Theoretically that should be quick and easy once I'm ready to apply -- and then the true test.

No expectations that any of this fits perfectly-- but I know that modifying one or many at this point is relatively easy and wire is the cheapest component in the mix. Hopefully the weekend will produce a mast in the air.

IMG_2526.jpg


IMG_2527.jpg


IMG_2528.jpg


Couldn't help the ubiquitous before and after-- my existing standing rigging was serviceable-- no idea if it is original or no. Somewhat have to assume it had been replaced along the way. Typical damage here to the mast end of the Upper Stay.

IMG_2531.jpg
 
Last edited:
Jul 13, 2015
900
Catalina 22 #2552 2252 Kennewick, WA
FAIL-- or partial success depending on your mood: I had a feeling I was going to find out the hard way how close I was to having all the measurements validated in the real world (not on paper) and there was really only one way to find out and that was pick a number and put it in the air.

Hour 1 the first problem shows up-- never thought about the fact the upper stay brackets are not a 1/4" pin like everything else on the boat-- they are 3/8". Don't have a solution for that just yet, I did have 1/4" pins with larger heads that I put in to get us through the validation process.


IMG_2541.jpg


IMG_2538.jpg


Forestay and Backstay all look good at the masthead-- and I'm liking what I see at the spreaders:

IMG_2545.jpg


I then spend the next couple of hours in abject frustration-- Upper stays act like they are overwhelmingly tight, enough that I don't even try. I know I can raise safely without them so I give it a shot-- I can get the forward lowers to grab, no chance for the uppers and the forestay of course is no where close yet. Best I can do is about a 10 degree aft lean when I realize it-- the damn aft lowers are shanking me. I do a quick comparison of the old stay and the new and the light bulb comes on:

I accounted for one end of the turnbuckle stud -- but the joint with the legacy stay is at least an inch longer And they were short from spec.

IMG_2546.jpg


And even more pronounced with the aft lowers that were really off-- the differential is 2 inches. End of the day no mast in the air for very long-- forestay and backstay and forward lowers likely good-- have to pull apart the uppers and aft lowers and recut. One huge bonus, I really got to spend a lot of time with the stick in the air and loading forward/aft and starboard/port-- that aluminum noodle is amazingly flexible. Was fun to see it in unrealistic real time with nothing else to concentrate on.

Luckily wire is .48 cents a lineal foot-- I figured I might be coming back for more.