Stem/Keel Repair

Jul 18, 2020
41
Tylercraft, O'Day T-26, 25 Lake Michigan
How might you go about fixing this? I'm taking this boat into the shop and need to coordinate the stem repair with another shop if they can't fix it there before it's painted. I know it looks pretty bad in the pics, but it real life it's relatively small. Is this something I should be majorly concerned with before having it painted? Thanks!

39656E1E-76FD-4C85-B2CE-EE573D20405B_1_105_c.jpeg


FCA4E48B-4741-4C7E-843C-16568F149A91_1_105_c.jpeg


Worst part:
9C9AD153-2321-4ABF-951B-2435AF613CD0_1_105_c.jpeg
 
Jan 11, 2014
11,323
Sabre 362 113 Fair Haven, NY
That is kind of a major repair. The hull needs to be ground back to solid fiberglass. Ideally this should happen from both the inside and the outside of the boat, so there is a 12:1 taper in the hull. Then the hull has to be rebuilt with new glass and resin, gel coated, barrier coated and then painted.

How did the damage occur? Looks like a hard grounding on some rocks and pounding.
 
Jul 18, 2020
41
Tylercraft, O'Day T-26, 25 Lake Michigan
That is kind of a major repair. The hull needs to be ground back to solid fiberglass. Ideally this should happen from both the inside and the outside of the boat, so there is a 12:1 taper in the hull. Then the hull has to be rebuilt with new glass and resin, gel coated, barrier coated and then painted.

How did the damage occur? Looks like a hard grounding on some rocks and pounding.
I don't know how it occurred, I bought it basically bottom dollar like this. I do have the materials for making this repair myself. Can you speak a little bit more about the 12:1 taper of maybe pass me a link? Thanks!
 
Jul 18, 2020
41
Tylercraft, O'Day T-26, 25 Lake Michigan
Is there a standard approach for redoing the whole boat stem? Though busted and broken at points the rest of the stem is free of exposed cloth, would you rework the whole boat stem or just bad areas?
 

PaulK

.
Dec 1, 2009
1,222
Sabre 402 Southport, CT
Like dlochner suggests, in order to be sufficiently strong the whole repair area needs to be opened up so that the new layers of fiberglass taper into the existing hull at a 12:1 angle. This means that if the existing hull is 1/2" thick at the bow, you'd need to grind the taper back six inches from the bow and then start 'glassing her up. (One inch thick and you'd grind back 12", and so on.) Moisture in the damaged sections is something else you should be concerned about. If the laminates - including any coring - is not totally dry, it can cause further damage to the hull from freezing cycles or from rotting core. (You don't say if this is a cored boat.) The undamaged stem can be left alone; the repair simply needs to be tapered into it at the 12:1 ratio. The problem is that as you grind the damaged area back to sound fiberglass, you may find that the damage extends into areas you thought were OK. The gelcoat may be good, but there may be damage underneath. Sorry about that. Grind all the damage out, let (make) it dry out, and 'glass it back up.
 
Jan 11, 2014
11,323
Sabre 362 113 Fair Haven, NY
The damage looks like the boat broke loose from a mooring or went up on some rocks during a storm. If you are lucky, the boat just rode back and forth on the rocks resulting in mostly abraded fiberglass and gel coat. If you are unlucky the boat pounded on the rocks. The pounding can cause the laminate to delaminate, i.e., the layers of glass cloth in hull begin to separate.

The first step will be determining how extensive the damage might be by sounding the hull. Take a light hammer or the handle of a screw driver and start tapping the hull. If the sound is clear and sharp the hull is in good shape, if the sound is dull and muddy then the hull is severely damaged. Start in an area that is far away from the damage area to train your ear to the sound of a solid hull.

Once you have established the extent of the damage it will be time to become friends with your angle grinder and start grinding to get rid of all the damage and to find solid glass. It will be hot and dusty, wear appropriate PPE, you don't want to breathe the dust and you don't want the dust on your skin because it will itch for days. Once the area is prepped, it will be time to lay up many layers of glass.

One of the best online resources is the West System website. There is a wealth of information there.

Another Resource is Boat Works Today on YouTube. Andy Miller is an expert in fiberglass boat repair. This video is on a repair similar to yours.


Mads on the Sail Life YouTube channel has also done a lot of fiberglass work including filling holes in the hull. Look for the videos on sealing the through hulls that he removed.

This should get you started. Before warned, this job will take longer and be more expensive than you plan. It is axiomatic that all boat projects take longer and cost more than anticipated.
 
Jan 19, 2010
12,362
Hobie 16 & Rhodes 22 Skeeter Charleston
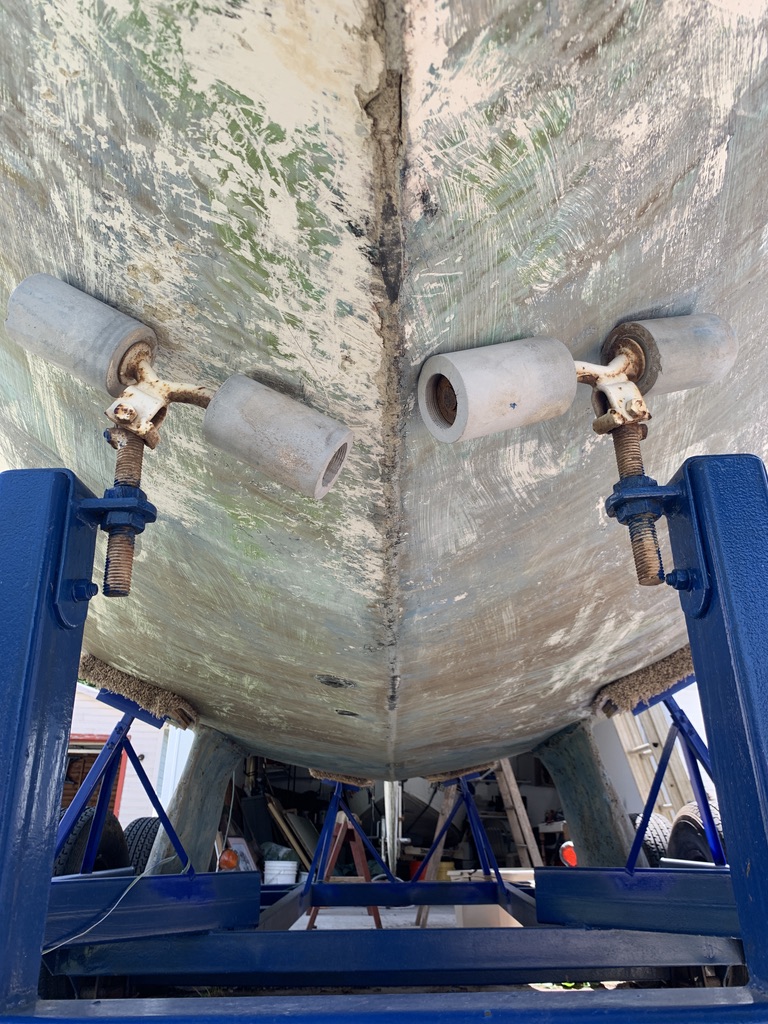
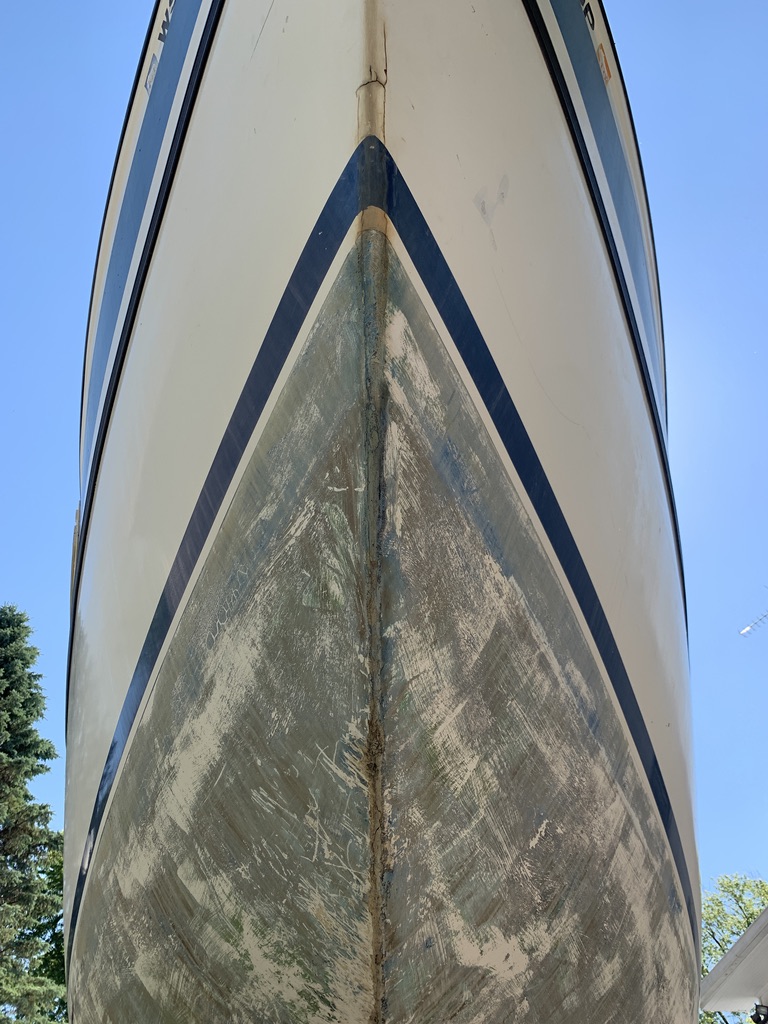
@dlochner 's video is good. A nice trick I have used many times is to take a piece of thick plastic sheeting (visqueen) lay it over the ground out area and trace it with a sharpie onto the sheeting. Imagine the video above... lay the plastic over the area and trace. Use that as a template of your first layer of fiberglass. Cut it out and lay it to the side for later. Then cut about 6 to 10 more with each one getting a bit smaller but with the same shape. Stack up all of the cloth pieces smallest to largest and lay them on another plastic sheet and hold it up to the hole and see how it fits. You want to height of the stack to match the depth of the hole and all of the edges to meet up. You may have to adjust the diameter of a few pieces but once you get it right then....

1) Lay out a fresh piece of plastic and put masking tape around the edges with the sticky side up. (you are going to tape this plastic to the hull later and this will make it easy later).

2) Wet out each piece of cloth (smallest first) with epoxy resin and squeegee out the excess resin on a scrap piece of plastic and then lay it on the piece tapped out in step 1. Repeat for all of your other pieces.

3) Go to your ground out area and tape the plastic and all of the wetted pieces into the ground out area. Let it sit until the epoxy has set.

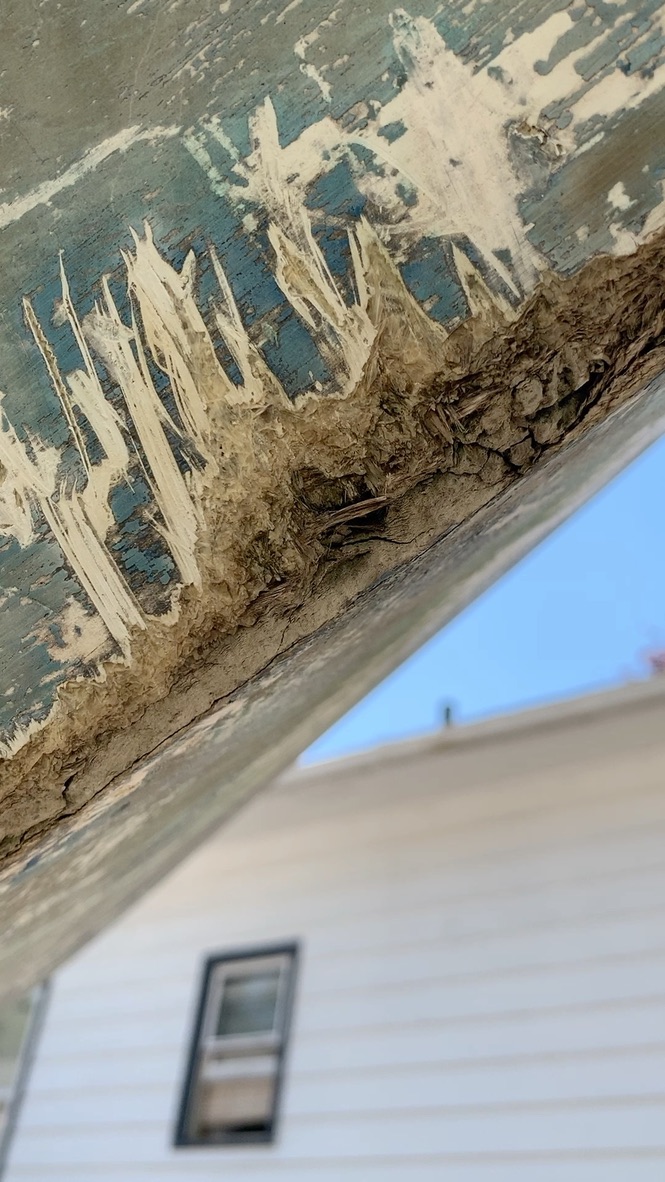
When you remove the plastic, you will have a relatively nice and fair finish. You will have to do a little grinding and sanding but then the next step is three layers of barrier coat epoxy and then bottom paint.

On barrier coat.... I buy mine at James T Davis paint store and it is sold as barrier coat for fiberglass swimming pools. It is about 30% cheaper because it does not say Marine on the label. :biggrin:If you are worried about it working as well, just go with four coats instead of three and you are still coming out ahead.

Edit... you can do this same thing from inside the boat also. But not instead of. I think adding six layers of cloth on the inside stem at the point of damage would give you the pease of mind to know your stem is solid ... even better than new. :beer:

One more edit.... This may sound like a lot of work but it will only take you about 2 hours. Grind and fair one weekend, ...pressure wash off the dust... then let it sit a week or two to dry out. Get all of your materials laid out and the fiberglass piece takes an hour.

I've done this a dozen times and it really is easy.
 
Last edited:
Jan 7, 2011
4,727
Oday 322 East Chicago, IN
I don't know how it occurred, I bought it basically bottom dollar like this. I do have the materials for making this repair myself. Can you speak a little bit more about the 12:1 taper of maybe pass me a link? Thanks!
I was going to reply “if you don’t already own it, the easy way to fix it is RUN AWAY....

But I guess it is too late for that.

As others have said, grind it down, lay new fiberglass, sand, fair, barrier coat, etc.


Greg
 
Jul 18, 2020
41
Tylercraft, O'Day T-26, 25 Lake Michigan
Like dlochner suggests, in order to be sufficiently strong the whole repair area needs to be opened up so that the new layers of fiberglass taper into the existing hull at a 12:1 angle. This means that if the existing hull is 1/2" thick at the bow, you'd need to grind the taper back six inches from the bow and then start 'glassing her up. (One inch thick and you'd grind back 12", and so on.) Moisture in the damaged sections is something else you should be concerned about. If the laminates - including any coring - is not totally dry, it can cause further damage to the hull from freezing cycles or from rotting core. (You don't say if this is a cored boat.) The undamaged stem can be left alone; the repair simply needs to be tapered into it at the 12:1 ratio. The problem is that as you grind the damaged area back to sound fiberglass, you may find that the damage extends into areas you thought were OK. The gelcoat may be good, but there may be damage underneath. Sorry about that. Grind all the damage out, let (make) it dry out, and 'glass it back up.
I don't think the boat is cored. Sailboat data and a few tylercraft brochures mention "all fiberglass construction". I don't see any beam looking structural components when I open the various compartments FYI. Anyways, it's warm here now and it's Friday so I am getting to work on it ASAP
 
Jun 8, 2004
10,024
-na -NA Anywhere USA
Water penetration can lead to many issues not knowing how long it was exposed in the water. We all can make suggestions but without Interior photos of the boat damaged area inside, water intrusion inside the laminates, rappiing or tapping the hull, I would suggest that you get a marine surveyor first to look at it and then go from there. I use to own a major sailboat dealership.
 
Jul 18, 2020
41
Tylercraft, O'Day T-26, 25 Lake Michigan
Water penetration can lead to many issues not knowing how long it was exposed in the water. We all can make suggestions but without Interior photos of the boat damaged area inside, water intrusion inside the laminates, rappiing or tapping the hull, I would suggest that you get a marine surveyor first to look at it and then go from there. I use to own a major sailboat dealership.
I'm working on getting all the flooring up but it's really tight, but so far it doesn't look like there is any visible damage to the seal of the fiberglass from the inside of the boat (so far) really appreciate all the concern over water penetration. I've had my circumnavigator friend look at this boat multiple times and he thinks the hull is strong and ready to go aside from the dinks he says i should hurry up and fix. Truth is, this boat is destined for sailing the shallow interior lakes of Wisconsin. The pictures i posted did a good job of making things look way worse than they are. the scratches and dinks are pretty tiny though in the photos they look HUGE
 
Jan 11, 2014
11,323
Sabre 362 113 Fair Haven, NY
I'm working on getting all the flooring up but it's really tight, but so far it doesn't look like there is any visible damage to the seal of the fiberglass from the inside of the boat (so far) really appreciate all the concern over water penetration. I've had my circumnavigator friend look at this boat multiple times and he thinks the hull is strong and ready to go aside from the dinks he says i should hurry up and fix. Truth is, this boat is destined for sailing the shallow interior lakes of Wisconsin. The pictures i posted did a good job of making things look way worse than they are. the scratches and dinks are pretty tiny though in the photos they look HUGE
If the water is over your head, its deep enough.

The long scrape and abraded glass on the centerline, below the water line is not insignificant damage. That needs much more than some slapdash half-assed repair to be safe.
 
Jul 18, 2020
41
Tylercraft, O'Day T-26, 25 Lake Michigan
If the water is over your head, its deep enough.

The long scrape and abraded glass on the centerline, below the water line is not insignificant damage. That needs much more than some slapdash half-assed repair to be safe.
I agree, and wouldn't feel at all comfortable moving forward without everyones helpful considerations thus far.
 
Jul 18, 2020
41
Tylercraft, O'Day T-26, 25 Lake Michigan
I plan to redo the entire stem FYI, but starting with the worst area at the bow to see if I still want to after that :)
 
  • Like
Likes: rgranger

Tom J

.
Sep 30, 2008
2,301
Catalina 310 Quincy, MA
You might need to grind a bit more on the upper part of the damaged area. Other than that, it looks like you have found solid glass, so the repair should not be too complicated.
 
Jul 18, 2020
41
Tylercraft, O'Day T-26, 25 Lake Michigan
You might need to grind a bit more on the upper part of the damaged area. Other than that, it looks like you have found solid glass, so the repair should not be too complicated.
Yes, I see the flaking near the top still needs some grinding, but with regards to tapering this area for the repair I feel a bit lost. It's going to be a one sided repair. I wonder if I can grind the whole stem down like this and just start laying thinner and thinner glass forming a point
 

Tom J

.
Sep 30, 2008
2,301
Catalina 310 Quincy, MA
Yes, I see the flaking near the top still needs some grinding, but with regards to tapering this area for the repair I feel a bit lost. It's going to be a one sided repair. I wonder if I can grind the whole stem down like this and just start laying thinner and thinner glass forming a point
I don't think using thinner glass will help structurally. The trick is to use smaller pieces of glass to fill in the taper. A piece of glass tape could be used at the edge of the stem. The final look of the stem is going to be determined by fairing. Use a good marine grade fairing, and fill and sand repeatedly to get a smooth finish.