Sealing The Deck Core From Moisture (how to)
- Thread starter Maine Sail
- Start date
Maine Sail doesn't mind. I should be more specific... however I haven't been digging around down there yet. Just from recollection... they are about 3' x 3', about 1/4" thick, white, and made of hard composite or plastic type material?Rich, I won't walk on Mainesail's space but what are you using for backing plates for the stanchions?
Sorry... not much help. I could post photo on old system... however this new set-up is beyond me.
Last fall Maine Sail gave me the same advise as I was cutting a hole thru the cockpit floor for my new Navpod. This was a 7/8 hole and i used a Woodruff Keycutter instead of the bent nail. These are available in all kinds of sizes and aren't much more in price than the dremmell cutters at Lowes. The are made for metal cutting so they will last forever cutting wood or fiberglass. You can get them at McMaster Carr or MSC Industrial Supply. I have a few and they really clean the wood core out flush to the top and bottom of the fiberglass overlays.
http://metalworking.mscdirect.com/CGI/MWSRCH?N=0000030582
Thanks again Maine Sail anyone starting a project should always consult your gallery. That's how I've learned how to buff my boat and re-pack my stuffing box.
I want to know where you got that cool looking air filter on Acoustic?
http://metalworking.mscdirect.com/CGI/MWSRCH?N=0000030582
Thanks again Maine Sail anyone starting a project should always consult your gallery. That's how I've learned how to buff my boat and re-pack my stuffing box.
I want to know where you got that cool looking air filter on Acoustic?
Attachments
-
 10 KB Views: 341
The backing plates should spread the load enough that when you push/pull on a stanchion the deck moves with it or nothing moves. Butyl tape is the most self healing stuff you can get. It never hardens and seems to last forever. Sometimes you can find butyl caulk in tubes. If you think that there is a chance of movement then it is your best choice.
Hey Rich. Those gaskets are likely neoprene and should be removed. The backing plates should be SS to be compatible with the bolts. Use the Butyl to seal them.Maine Sail...
While I have you here. The stanchions on my boat, have a rubber and/or foam gasket under them. After I go thru the deck core epoxy process... I am assuming I wouldn't put the gaskets back (correct?). What sealant would I use under the stanchions? What sealant should I use around my portlights? A couple need to be rebedded... might as well do them all.
Thanks,
Rich
As for the portlights, if they are extruded aluminum, I would use 3M 101. If they are plastic then silicone is probably the best sealent for them. The 3M products are not compatible with most plastics.
Did you mean to say seal the backing plates? Unless I misread the sentence, if I had a leak into the deck at a fitting, I'd want to know about it. I wouldn't seal the backing plate so any leak would weep from the through bolts/plate....The backing plates should be SS to be compatible with the bolts. Use the Butyl to seal them.
Maine Sail:
We have been advocating butyl for sealing deck fittings for years. I am happy to see that you have convinced so many members to use this stuff.
When I use a caulking/sealant material and not butyl we usually try to just seat the hardware without totally tightening the device. Normally we would wait about 24 hours to allow the bedding material to setup. This allow the material to partially cure (forms a gasket). Then I would tighten the device down to the proper tightness. This makes a very good seal.
If you tighten the device without letting it partially cure, you will normally squeeze most of the bedding material out and have very little bedding material to seal the attachment of the device. This is true even if you cut the counter sink.
What most folks do not realize is the butyl stays pliable for many years. The caulking/bedding materials usually become brittle after a few years.
This was a great presentation. Thanks.
When you are tightening a bedded fixture. Someone must prevent the bolt from turning while another tightens the nut inside. I install many drains in bathtubs and sinks and always there is space for the bedding compound. If you get stingy with your countersink size you might just as well not make one. Mainesail detailed the example of allowable joint movement and the effect of very thin bedding lines.
The problem with letting it cure and then further tightening the bolts is that the chances you're going to twist the bolt and break the seal is almost inevitable. There is no reason to not tighten the bolts completely if you've countersunk the fastener holes as described by Maine Sail. The countersink area allows the sealant to form an "o-ring" of sorts and creates the seal. Any bedding material in excess of that really isn't necessary....When I use a caulking/sealant material and not butyl we usually try to just seat the hardware without totally tightening the device. Normally we would wait about 24 hours to allow the bedding material to setup. This allow the material to partially cure (forms a gasket). Then I would tighten the device down to the proper tightness. This makes a very good seal.
If you tighten the device without letting it partially cure, you will normally squeeze most of the bedding material out and have very little bedding material to seal the attachment of the device. This is true even if you cut the counter sink....
")
Sailingdog
I totally disagree and so does Don Casey.
"[FONT=Arial, Helvetica, sans-serif]Snug But Don't Tighten[/FONT]
[FONT=Arial, Helvetica, sans-serif]Assemble the parts and "snug" the fasteners enough to squeeze seal-ant out all the way around. The most common bedding error is fully tightening the fasteners while the sealant is soft. This squeezes out all of the sealant, leaving a dry joint that will soon leak.[/FONT]
[FONT=Arial, Helvetica, sans-serif]Wait[/FONT]
[FONT=Arial, Helvetica, sans-serif]Allow the sealant to partially cure-30 minutes for silicone, 24 hours for polysulfide or polyurethane-then fully tighten the bolts by turning the nuts only to prevent breaking the seal around the shank of the bolt. If the fitting is attached with screws, withdraw them one at a time and ring each with sealant. Reinstall the screws and drive them home evenly. Tightening fasteners after the sealant cures puts it under compression, greatly extending the life of the seal."[/FONT]
This has always been the prescribed method for mounting deck hardware. We have never had a leak using this system.
http://www.boatus.com/boattech/casey/39.htm
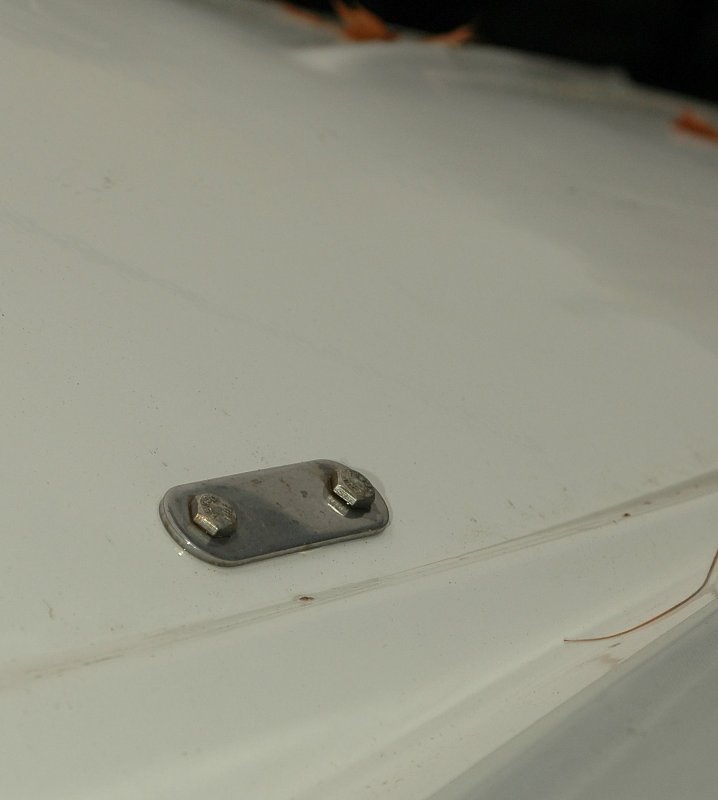
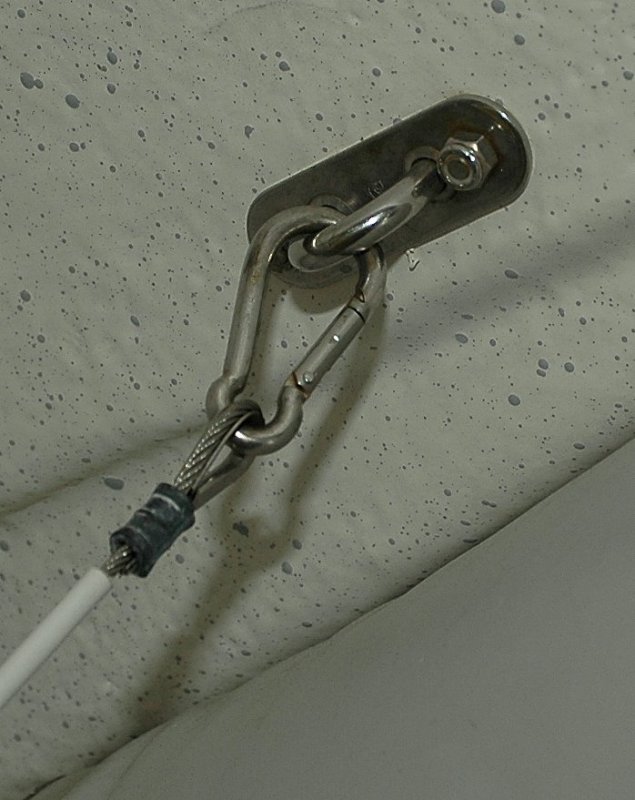
Steve the myth of a gasket with a countersunk or chamfered hole is just that a myth. I present you the photo below. The photo is the lifting pad eye for my RIB. To bed it I used 3M 101 and tightened it immediately with a countersunk hole. I did not wait for it to set up or partially cure.Maine Sail:
When I use a caulking/sealant material and not butyl we usually try to just seat the hardware without totally tightening the device. Normally we would wait about 24 hours to allow the bedding material to setup. This allow the material to partially cure (forms a gasket). Then I would tighten the device down to the proper tightness. This makes a very good seal.
If you tighten the device without letting it partially cure, you will normally squeeze most of the bedding material out and have very little bedding material to seal the attachment of the device. This is true even if you cut the counter sink.
Forming a gasket or partial cure can lead to hardware movement and other associated problems because you can't always get the hardware tight enough against the deck due to compressive resistance if it has cured too much.
This lifting davit is BELOW the waterline and has been bone dry now for seven years even with the loads exerted while lifting it into & storing it on the davits. With a proper countersunk hole you do not need to let it partially cure. This photo is but one example of why you don't need to "form a gasket", it all be it a good one, when you have also countersunk. Keep in mind this pad eye is submerged and deck hardware is not..
Below the waterline and tightened immediately!
I totally disagree and so does Don Casey.
"Snug But Don't Tighten
Assemble the parts and "snug" the fasteners enough to squeeze seal-ant out all the way around. The most common bedding error is fully tightening the fasteners while the sealant is soft. This squeezes out all of the sealant, leaving a dry joint that will soon leak.
Wait
Allow the sealant to partially cure-30 minutes for silicone, 24 hours for polysulfide or polyurethane-then fully tighten the bolts by turning the nuts only to prevent breaking the seal around the shank of the bolt. If the fitting is attached with screws, withdraw them one at a time and ring each with sealant. Reinstall the screws and drive them home evenly. Tightening fasteners after the sealant cures puts it under compression, greatly extending the life of the seal."
This has always been the prescribed method for mounting deck hardware. We have never had a leak using this system.
http://www.boatus.com/boattech/casey/39.htm
And we have had thousands and thousands of boaters listen to this advice and we have thousands of thousands of boats with WET DECKS!!!!
Don Casey is human like everyone else and even Don Casey makes mistakes. This one has cost a LOT of boaters some big bucks! In theory it's good, when you have not countersunk the holes, but in practice, with DIY's, it rarely lasts very long or even works as prescribed for a number of reasons mostly due to installation and cure time isues.
Perhaps you could read the section in my article where I address my issues with the Don Casey method. I can assure you, as an owner of a moisture meter, that the vast majority of deck leaks around hardware I have seen have been with the Don Casey method..
Casey is a good author but he NEVER even mentions or discusses the use or utilization of a chamfer or countersunk hole that I have seen? He's missed the boat, so to speak on, this one and it's really too bad for a lot of boaters.
Therein lay the problem. In many cases, the nuts aren't accessible enough to allow you to "turn the nuts only", as is required by Casey's method. If the screw itself turns even a bit, it will generally break the seal, leaving you a tiny, hard to trace leak. In the best case, Casey's method requires TWO PEOPLE generally—not a luxury I generally have.
I prefer to do it the way Maine Sail describes, and tighten it up all at once... it works, it doesn't leak, you don't have to be "careful" when tightening it up either.
I prefer to do it the way Maine Sail describes, and tighten it up all at once... it works, it doesn't leak, you don't have to be "careful" when tightening it up either.
Sailingdog
I totally disagree and so does Don Casey.
"[FONT=Arial, Helvetica, sans-serif]Snug But Don't Tighten[/FONT]
[FONT=Arial, Helvetica, sans-serif]Assemble the parts and "snug" the fasteners enough to squeeze seal-ant out all the way around. The most common bedding error is fully tightening the fasteners while the sealant is soft. This squeezes out all of the sealant, leaving a dry joint that will soon leak.[/FONT]
[FONT=Arial, Helvetica, sans-serif]Wait[/FONT]
[FONT=Arial, Helvetica, sans-serif]Allow the sealant to partially cure-30 minutes for silicone, 24 hours for polysulfide or polyurethane-then fully tighten the bolts by turning the nuts only to prevent breaking the seal around the shank of the bolt. If the fitting is attached with screws, withdraw them one at a time and ring each with sealant. Reinstall the screws and drive them home evenly. Tightening fasteners after the sealant cures puts it under compression, greatly extending the life of the seal."[/FONT]
This has always been the prescribed method for mounting deck hardware. We have never had a leak using this system.
http://www.boatus.com/boattech/casey/39.htm
I will give a try...
I think I will give it a try... It makes a lot of sense...
It's boat time in Texas.... bugs are not all dead... but they are mightily discouraged.. time for rebedding and painting.. (to start).
My CT33 is on the way and so are the fiberglass rolls... got my grinder, marine planer, and sander in bags - ready to go..
Re: I will give a try...
I don't understand how you can through bolt a fixture if you don't have access to both sides. How do you start the nut and washer onto the bolt. I could make a backing plate that was drilled and tapped and bonded into place. But to assemble a backing plate, washers and nuts seems to me to require access to both sides.
I don't understand how you can through bolt a fixture if you don't have access to both sides. How do you start the nut and washer onto the bolt. I could make a backing plate that was drilled and tapped and bonded into place. But to assemble a backing plate, washers and nuts seems to me to require access to both sides.
Ross:
Many of the deck fixtures that get mounted on some of these new boats have embedded metal plates in the deck. These may be areas where you would mount deck organizers, line clutches etc.
When we have these areas where there are embedded plates we need to drill and tap the hole if this is the case.
When I use caulking I will always continue to use my method of attaching the hardware. If you are using butyl there is no need to use that method. Butyl is a superior bedding material in my opinion.
Main Sail,
In a past life I worked in the boat yards. I wish I had you back then. I also want to point out that boat workers are a hungry, closed lip lot. Many simple tricks, such as running the drill in reverse, the yard workers won't tell the boat owners. They keep things to themselves in the hopes the owners will live in fear of screwing up their boats.
Regarding digging out with a bent nail, that probably came out of some DIY magazine years ago. It got copied by everyone and passed down by, what I feel, are lazy authors who write anything they've heard. A legacy of misinformation by supposedly reputable publications. We did use curved chisels (similar to bowl turning ones) even though rotary tools were available. Besides being closed lipped, the yard workers have an aire of tradition including tools. Balsa is pretty easy to dig out. Give me power tools for ply.
Thanks for all you do and all you share.
Terry C
I have tried woodruff key cutters. I still prefer the little Dremel 1/4" router bit though. In order to use a woodruff key cutter you'll need to drill a bigger hole in the top skin to get it into the core as they generally have a larger diameter head. While they work well sometimes a bigger top skin hole is not such a good idea with deck hardware that does not have much coverage as the epoxy can become visible and exposed to UV. I would not buy one with a larger head diameter than about 5/16" but do get the smallest shaft you can find on a 5/16" head so you get maximum carve out....woodruff key seat cutter....
that is a DARN GOOD IDEA..
I went to MSC and ENCO sites.. there where HUNDREDS available.. I can sort an answer out.. but would you have an "experienced" suggestion??
thanks..
--jerry
Hole location and epoxy
Building a sailing dinghy allowed me to work with WEST epoxy over an extended period and in all types of weather conditions. If you have a freezer available you can mix larger batches and then freeze the stuff. At very cold temperature the reaction slows to almost zero so you can pull it out and use it as needed. Also NEVER MIX TOO MUCH AT ONCE. On a hot day a large batch with exothermically react and be so hot it will burn your hand and solidify almost instantly. And I mean HOT. So only mix what you will use in ten minutes or so otherwise you will waste it. West epoxy and hardner is probably 100 bucks a gallon now.
Just a thought on hole location. Why not take a piece of plastic PVC tubing and slice it lengthwise and wrap it in on itself to give a spring load to the diameter. Put SARAN wrap over it (not sure if the epoxy will stick to pvc?) and stick it in the hole after putting in the epoxy. when it is cured, pull out the plastic plug peel off the saran wrap and you should only have to "chase" the hole to remove a little epoxy residue so you don't risk cutting off center? Just an idea, never tried it.