Sailing and restoring #9874

AaronD

.
Aug 10, 2014
723
Catalina 22 9874 Newberg, OR / Olympia, WA
Customs

I lived in Vancouver for a year, and still have friends there, so I've crossed the border many times; I don't recall ever before saying that the US side was smoother. But it definitely was this time.

We submitted our arrival via the ArriveCan app as we approached Sidney, but that didn't seem to help much. Port Sidney has 2 slots at the customs dock, so the marina directed everyone to wait in the bay and called us in in order. When we arrived, we were 4th in line, and waited almost 2 hours. Someone snapped a picture of the plotter track...

IMG_1420.jpeg


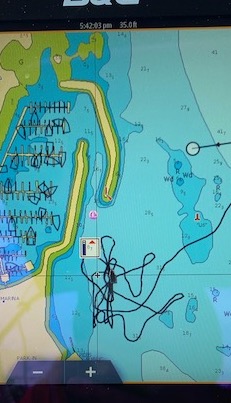
When we arrived at the customs dock, it turned out to be unmanned, with just a phone number (could we have called from the bay while putting in circles?) Another 45 minutes on hold and a bunch of questions laterr, we were cleared in.

By comparison, coming back was almost trivially easy. As we approached Roche Harbor and got US cell service, we submitted our arrival via the ROAM app; the customs official first attempt at calling us via the app didn't go through, and he called via our registered phone number instead. Then he tried the app again to see everyone's faces via video, and approved us in seconds. About 10 minutes total, all while on the water. Nice!
 

AaronD

.
Aug 10, 2014
723
Catalina 22 9874 Newberg, OR / Olympia, WA
Silks

My daughter's birthday present this spring was a set of aerial silks, and I got major Dad points for rigging them on the foredeck. She doesn't love the time spent under sail, but we try to give her some positive memories of boat trips.

The solent stay and halyard worked quite nicely, with a couple soft shackles to space everything centrally. Lots of dyneema put to good use. :cool: (I did forbid any acrobatic drops to avoid shock loading on the rigging).

IMG_0130.jpeg IMG_0154.jpeg
 

AaronD

.
Aug 10, 2014
723
Catalina 22 9874 Newberg, OR / Olympia, WA
A little beauty on the stern rail

My wife grows flowers, and does arrangements for events; she misses her flower gardens while sailing. We were once gifted a few flowers by a dock neighbor, and found ourselves cruising with an empty pop can strapped to the stern rail, serving as a vase.

This one is a bit of an improvement.

IMG_0112.jpeg

1 empty vitamin bottle, washed and scrubbed with acetone to remove the sticky residue
1 long zip-tie with heat-shrink for friction
A few inches of PVC, slotted to snap over the stern rail and drilled for the zip-tie
1 short velcro wrap to back up the PVC (probably not necessary, but easy to do, and I had a big package)

IMG_0187.jpeg

Time: 20 minutes
Cost: $0

Protip: Heat-shrink the zip-tie BEFORE attaching the vitamin bottle. Pointing a heat gun at the vitamin bottle produced something vaguely modern-art-ish, but it wouldn't have made the best flower vase. That mistake delayed this little project by a few weeks, until we finished the next bottle of vitamins :)

And, for future reference, 3/4" Schedule 40 PVC, slotted a bit on the table saw, makes a nice light-duty clamp for our 7/8" stern pulpit tubes. I did the same for a hanger for our kitchen tools. Cut out ~1/4 of the pipe circumference and snap it over the rail. If it's too tight, cut a little more; if it's too loose, try again (PVC is really cheap). I add a little velcro strap to secure it, but the PVC is snug enough I doubt that's necessary.
 

AaronD

.
Aug 10, 2014
723
Catalina 22 9874 Newberg, OR / Olympia, WA
The beauty is above - now for the ugly

This was my first time to blow a trailer tire, and I did it up right. Thankfully, unlike last year’s axle, this was at 11 AM vs. 11 PM.
IMG_0101.jpeg

I hear trailer tires are rated for about 6 years. I tried for 7. (paraphrasing Monty Python: “And the number of the counting shall be 6. You shall not count to 7…”)

The blown tire caught the fender and broke off the rear fender-to-frame weld - but not the front one. The fender wrapped around under the wheel, dragging on the pavement. I was in the center lane, and really glad to be driving a 2500HD that stopped the whole mess pretty smoothly.

The front attachment (~0.1” angle iron) twisted about 180 degrees, and the end interfered with the space that should be occupied by the tire, so I couldn’t just put on the spare and go. After about 5 hours on the freeway, BoatUS got a tow truck there; last year they sent a standard flatbed truck; this time they sent a semi trailer size - anticipated cost $1500 (!?!)

He had an impact wrench and a big pry bar, and was able to remove the remains of the fender and bend the support far enough to give us an inch of clearance for the spare. Since he didn’t have to tow, he reduced the fee by half (thankfully, it should all be covered by BoatUS).

Immediately after he left, a passing driver stopped (the first person to stop in 5+ hours). He took a look, dug in his pickup, and came up with a battery-powered angle grinder! That’s never been on my towing list, but it might be in the future! His quote: "I have horses; I'm familiar with this $^$#" :facepalm:

I cut off the remains of the support, and we no longer had a chunk of steel sitting just off the tire. We (again) went to Tom-n-Jerrys Boat Center; Robert looked it over - he even offered to run over to the launch ramp, pick up the trailer, and work on it while we were out (!!!) But in the end, they aren’t really set up to do fenders, so he said the best option was to strap a carpet scrap to the boat to protect from sand and gravel thrown up by the tire, and deal with the fender at home. Sound advice.

Overall, it cost us a night in a hotel and a trip to Les Schwab for new tires.

I told the kids I think I now have a little Post Trailer Stress Disorder.
 

AaronD

.
Aug 10, 2014
723
Catalina 22 9874 Newberg, OR / Olympia, WA
Topping Lift

Breezy came with a fixed topping lift, of dacron double braid. The line line was old and stiff, and a pain to use. So I decided to replace it wholesale.

Single-braid Dyneema (Amsteel, Endura 12, etc.) is really easy to splice, and this was a good chance to practice. Just be sure to use a bury that's plenty long (72x the line diameter) and use a Brummel splice or lock stitch your deep bury splice it to ensure it won't slip under light load. Note: I first did this with 1/8" Amsteel, and I've since replaced it with 1.75mm Samson Lash-It. Very low windage, and ~500 lb test, which is plenty for our ~15 lb boom. And I wanted to repurpose the 1/8" for something really important - hanging lines for a backpacking hammock, IIRC.

Rigged the same as the CD version and Stingy's with a repurposed micro block, a bit of 3/16" Sta Set, a 20mm cheek block, and an old jam cleat. This system lets us raise the boom at the dock for more headroom in the cockpit.

IMG_1572.jpeg IMG_1571.jpeg

Two notes:
1) On the first go-round, I put a small cam-cleat on the boom (where the cheek block is now). I thought it would be quicker than the CD / Stingy arrangement. But we found that the boom would often rotate just enough to pop the line out. We ended up wrapping the tail around the boom and tying it off, which was secure, but a pain to do. So I replaced it with the cheek block and jam cleat.
2) Splicing Lash-it requires really small wire fids - I use .020 piano wire.

Cost: ~$35
$18 (sale price for a full 180' spool of Lash-it)
~$12 for a micro cheek block
~$5 for 3/16" Sta-set
Time: ~2 hours
 

AaronD

.
Aug 10, 2014
723
Catalina 22 9874 Newberg, OR / Olympia, WA
Echomax 230i Inflatable Radar Reflector

I mentioned this very briefly before, and I know it was referenced on this thread (and perhaps on some other thread I can't find now), but it deserves its own post on a C-22 specific thread, since the inflatable design seems particularly appropriate for small boats.

Evaluating radar reflectors is notoriously difficult, but the best examinations I saw had enough technical detail to convince me of the Echomax style (vs. the rain-catcher style). The inflatable model is designed for a life raft, but it seems perfect for a small boat.

We've carried one for about 8 years now. It normally lives deflated in a locker, and we raise it in fog or if in a channel where additional visibility (to radar-equipped vessels) seems prudent. I'm sure it would probably degrade in UV eventually, but we don't leave it up all season, so it will probably outlive me.

Landfall Navigation and Defender both carry it: E.g.: EchoMax EM230I Inflatable Radar Reflector
 

AaronD

.
Aug 10, 2014
723
Catalina 22 9874 Newberg, OR / Olympia, WA
A simple cooking-fuel safety system

As you probably know, it's a bad idea to store cooking fuel canisters onboard while you sleep. A pressurized canister contains quite a lot of heavier-than-air gas, enough to displace the oxygen in your sleeping compartment, risking asphyxiation and/or explosion danger.

Many older small boats (including original design C-22s) lack a proper vented propane locker. Some owners elect to fabricate one, but I've found that a compression stuff sack hung off the stern pulpit meets my needs. Just 1) Make sure the canisters hang below the gunwale, so leaking gas would go overboard; and 2) Use a hanging bag strong enough to keep your cooking fuel away from Davy Jones. A morning without coffee would be a sad one! :yikes:

I use a couple compression stuff sacks:

IMG_0381.png

Something about like this one from REI They're designed to smash sleeping bags, clothes, etc. to save room in a backpack. I had a couple in my backpacking closet, sitting idle since I bought smaller and lighter gear (and noticed that the sacks themselves add significant weight to a pack). Because they're designed to compress bulky gear, they're somewhat beefier than a normal stuff sack, with reinforced top and bottom and straps and buckles supporting the sides. Ideal for hanging something moderately heavy off the stern pulpit.

A spare backpack would probably work too, but I like that the compression sacks don't have any zippers to break.

Mine are enough to hold 4 propane bottles + a couple Jetboil fuel canisters - adequate for a 2-week cruise for our family of 4.

If the dinghy is convenient, I'll sometimes drop the bag in her, and the carabiner secures it nicely there as well (a leaky canister might fill the dinghy, but her gunwales are much lower than Breezy, so excess fumes would spill out and won't ever end up in the main cabin).

And yes, we also have a fuel vapor alarm. Because paranoia...

Cost: $0 for me, maybe $20-25 to buy new
 

AaronD

.
Aug 10, 2014
723
Catalina 22 9874 Newberg, OR / Olympia, WA
Trailer Tongue Weight

My Weigh-Safe hitch told me I needed some a lot more tongue weight. So, a few modifications:

1) The easy (albeit expensive) one: A spare-tire mount near the trailer tongue.

IMG_0551.jpeg

Looking back, I used a Dutton-Lainson 6126, for which I paid $87.92 (they're even more now). I have no recollection of why I paid so much more than the knock-off brands are going for. D-L makes good stuff, but it's a hefty premium. Since then, I moved the bracket, after only 2 seasons and ~5 salt-water baths, and found the mild steel bolts were already nearly corroded solid, so I replaced all the hardware with 316 SS - another ~$20 or so.

That moves ~40 lbs from near the axle to the tongue, netting 30+ lbs tongue weight.

2) Outboard mount on the tongue

IMG_2460.jpeg IMG_2459.jpeg IMG_2431.jpeg

For several years, I trailered with our outboard on the stern, using Stingy’s method. A little hacking with some 1/4" aluminum sheet and 1" Starboard I had on hand + ~$20 in u-bolts made a tongue mount for the motor. Yes, buying a welder and learning to weld would be more fun, but this was a lot cheaper and a LOT faster.

And it moved 60 lbs from stern to tongue, netting ~120 lbs tongue weight.

3) Another trailer jack.
IMG_0552.jpeg
I'm really happy with the Fulton 1500 lb XLT (#141133) we put on a few years ago. The roller even survived being winched up onto a tow truck. But: 1) That tow-truck adventure strained the jack pretty hard, and I'm sure used up some of its life; 2) With a wheel, the jack travel is limited, and it won't lower all the way down onto the low-drop stinger I launch with. This season, we added a Fulton HD25000101, 2500-lb jack as well. Redundancy, works for the launch stinger, and adds some more tongue weight. $98 + SS hardware

Weight 24 lbs; net ~20 lbs

4) Hitch extension on the tongue
IMG_0550.jpeg
Added a slot to hold the hitch extension and stinger we use for launching. Again, some square U-bolts and scrap.

Net ~25 lbs

--------
Total tongue weight improvement is ~200 lbs. I still carry the gas tank and BBQ in the truck and try to shove most gear into the V-berth, but at least now we're at a much safer weight for towing.

Cost: ~$250
Time: ~3 hours
 
Last edited:
  • Like
Likes: Leeward Rail
Apr 5, 2009
2,787
Catalina '88 C30 tr/bs Oak Harbor, WA
I have moved the outboard to the tongue on two boats. My first boat was a Clipper 26 and when I bought it, the trailer, the tongue weight was less than 1% and any speed greater than 35-mph was pure terror. I was followed home by my brother-in-law in the trip home with my new baby and a few miles into the trip he was flashing his lights frantically. I pulled over and he told me that the outboard was bouncing all over the place and looked as if it would tear the motor mount off. We removed it and put it into the back of the truck for the rest of the trip home and it towed better. Because of that, I made a mount to attach to the winch mount and never had any more problems with towing.
When My BIL got his boat, we did the same thing to his.
 
  • Like
Likes: AaronD
Apr 5, 2009
2,787
Catalina '88 C30 tr/bs Oak Harbor, WA
Trailer Tongue Weight
Total tongue weight improvement is ~200 lbs. I still carry the gas tank and BBQ in the truck and try to shove most gear into the V-berth, but at least now we're at a much safer weight for towing.

Cost: ~$250
Time: ~3 hours
This is a good reminder. Many people do not know that in order to have a stable trailer you need to have 10% - 15% of the total weight of the trailer and load on the hitch ball and anything under 5% is considered unsafe.
Here is a good article on how to measure it.
 

AaronD

.
Aug 10, 2014
723
Catalina 22 9874 Newberg, OR / Olympia, WA
This is a good reminder. Many people do not know that in order to have a stable trailer you need to have 10% - 15% of the total weight of the trailer and load on the hitch ball and anything under 5% is considered unsafe.
Here is a good article on how to measure it.
@Hayden Watson : Thanks for the video - the treadmill demonstration is really effective!

And a quick pitch for Weigh Safe. Their hitch mounts aren't cheap, but not that much more than another good quality adjustable-height stinger; I say the extra cost for the Weigh Safe is worth it.
 

AaronD

.
Aug 10, 2014
723
Catalina 22 9874 Newberg, OR / Olympia, WA
Wifi Router + Extender (Cheap Geekish Solution)

We occasionally end up at a marina with weak Wifi (some marinas don't prioritize coverage at their guest docks). We don't always need Internet access, but on a marina night, sometimes it can be good to catch up - or even to stream a family movie :)

For a couple years, I'd used a USB Wifi adapter on a long USB cable. That works pretty well, but you have to jump through some Internet Sharing hoops to share it beyond the one laptop it's attached to. And when I added a plotter, I wanted to try sharing some of its info with auxiliary devices (e.g. the B&G app on a phone or iPad). So I upgraded to a little boat router with 2 Wifi radios - one to connect to a shore-side network, and one to share that connection with all boat devices. The latter serves as the boat network, whether or not we're connected to shore-side Internet, and the shore-side connection is again on a long USB cable, so it can be raised to the spreaders for longer range. Installed in the starboard pipe berth, up in the coaming, and the long cable lives in a mesh pocket nearby.
IMG_0546.jpeg IMG_0548.jpeg

GL.iNet GL-AR300M16 Travel Router: $28
  • Not a brand I'd heard of before; the case is a little cheap, but the hardware seems solid, and it's well supported by OpenWRT. GL.iNet's default firmware is their own OpenWRT setup, but it uses up a lot of storage for all their extras, so I installed a clean distribution to leave space for the packages I needed.
  • Powered by a Micro-USB input
PlusRoc DC-DC converter (Micro USB): $10
  • A cheap and reasonably efficient 12v -> 5v / Micro-USB power supply.
RT5370 USB Wifi Adapter: $12
  • Just 2.4Ghz 802.11n, not AC or any of the newer and faster options. But it has a chipset that's well supported by OpenWRT. Plus, when would we get 100 Mbit service in a marina anyway? And when would we need it? Streaming a movie works fine with just a few Mbits. If that one isn't available any longer, you're looking for something with the same chipset.
Monoprice 32' USB Cable: $14
  • USB normally limits cable length to 16'. But that's from a device to a hub - I believe this cable adds a tiny hub (powered from the USB bus itself) halfway along, so you can get 32'. They make longer models too (presumably with another little hub chip every 16')
The router's internal Wifi is configured as a boat network - all our devices connect there. The external USB Wifi adapter connects to a marina network. Most of the time, that adapter and cord stay coiled in their little mesh pocket. If we're out far enough from the marina antenna that the Wifi is flaky, we raise the USB adapter up a flag halyard.

I powered up the router via the DC-DC converter on my bench power supply and measured its draw at 141 mA when idle and in normal usage - it occasionally blipped as high as 170-180 mA on a reboot or when initiating a connection, but should always average less than 150 mA (~45 w/h per day, or ~3-4 Ah if running full-time). It's on the same circuit as our AIS transceiver; we normally leave it on 24/7, but if the batteries are getting low, we can turn those off for a bit.
IMG_2597.jpeg

I used the TravelMate package for Wifi bridging. We haven't tried it in many marinas, but it seems to work thus far. I have detailed install instructions, but those are pretty long and not really edited; PM me if interested.

Cost: $64
Time: ~2 hours
(after multiple hours fighting with a different travel router and USB Wifi adapter, neither of which plays nicely with OpenWRT)
 
Oct 31, 2022
58
Catalina Capri 22 Huntington
Just wanted to Thank @AaronD for the information you provided on Post #29 back in 2019. I copied you almost exactly while installing a Porta Potti in my Capri 22. I didn't know MSD Portable toilets existed until I joined this Forum. I think I will be much happier having it pumped out vs hauling and dumping myself.
 
  • Like
Likes: AaronD

AaronD

.
Aug 10, 2014
723
Catalina 22 9874 Newberg, OR / Olympia, WA
Just wanted to Thank @AaronD for the information you provided on Post #29 back in 2019. I copied you almost exactly while installing a Porta Potti in my Capri 22. I didn't know MSD Portable toilets existed until I joined this Forum. I think I will be much happier having it pumped out vs hauling and dumping myself.
Glad it was helpful to someone! You'll love the ease of pumping out!

The MSD portable system seems to me like the best possible option for a trailerable boat - pumping out while cruising is easy and smooth, and if we end up pulling out at a ramp without a pump-out, I can dump it back at home. It's a bit of a pain to get it out to dump, but fine for once or twice a year. A 'real' marine head with holding tank would be a big pain in that situation - do you try to build a home pump-out system? Or trailer to a marina with a pump-out cart and hope they can do it in the parking lot on the trailer? Or... ?

(And yes, I know someone will answer, "Just don't use the toilet after the last pump-out location on your cruise." ... I know better than to try to enforce that on my wife and kids...)
 
  • Like
Likes: Sail22Capri22

AaronD

.
Aug 10, 2014
723
Catalina 22 9874 Newberg, OR / Olympia, WA
Em-Trak B953 AIS Transceiver

We've been caught out in fog a couple times, and decided we'd really like it if the big steel things could see us.

I settled on an Em-Trak B953, class B+ / SOTDMA with integrated splitter, purchased from Milltech Marine. Milltech was very helpful - recommended!

Em-Trak's B900 series includes models with almost any combination of features you might want:
  • Class B or B+ / SOTDMA
  • Without or with an integrated splitter
  • Without or with integrated Wifi and Bluetooth
Pick your features and price point. I picked B+ with splitter, but no Wifi (I added a separate Wifi router, detailed above)

I also considered:
  • Vesper 8000 - it's really highly recommended, but it doesn't support class B+ / SOTDMA, and requires an external splitter, and uses NMEA 0183, so I'd need a gateway to output to a NMEA 2k plotter.
  • Vesper Cortex - a really amazing idea and system; if I was starting from scratch, and didn't already have a good VHF, I'd probably choose this. But as it is, I couldn't justify the price tag.
  • A few from Si-Tex, Digital Yacht and B&G - pricing and feature sets didn't seem to line up quite right for me.
I mounted it in the starboard pipe-berth area, close enough to our existing VHF to use the same coax cable, adding a short jumper from the VHF to the AIS (since the AIS includes an integrated splitter, it is wired between the VHF and the antenna). When I did the VHF a few years ago, I'd bought enough spare LMR-400 cable and crimp connectors to make the jumper.
IMG_0545.jpeg IMG_0547.jpeg IMG_0548.jpeg

I wired the tranceiver on its own breaker, separate from the other navigation equipment; we expect we will normally leave the AIS on when we're aboard (e.g. when anchored), even when we turn off the plotter, VHF, etc.

Em-Trak includes a nice mounting plate - screw the plate to your mount location and then clip the unit onto the plate; it took a couple tries to get that to work - I think because nothing on a boat is quite straight, so the plate bent just a hair when mounted, and then the unit wouldn't clip to it. Added a flat sheet of 1/4" G10 behind it, and everything worked great. The unit supports an external GPS antenna, but our GPS-enabled VHF is mounted under the cored cabin top, and it had never had a problem there. So I guessed - correctly, as it turns out - that the AIS would be able to see just fine through the thin cockpit fiberglass. YMMV, but you can always add an external antenna if necessary.

No complaints thus far about the AIS - we couldn't test it until we were on the water (it's not legal to transmit on marine bands on land). And we didn't have a buddy boat to check our location. But within a few minutes of leaving the dock, we could see ourselves on MarineTraffic's app (they use a network of shore receiver stations and report the info received on the Internet). So we knew we were transmitting nicely. And the NMEA connection to our plotter works great - we can see all the big steel things from around the corner. And if they're looking at their AIS, they can see us.

Cost: $773
Time: ~8 hours

Including a lot of rewiring and cleanup of my old and sloppy electrical wiring, and a couple tries at getting the unit to mount - as noted above, ensure your mounting surface is flat, and you'll save some hours