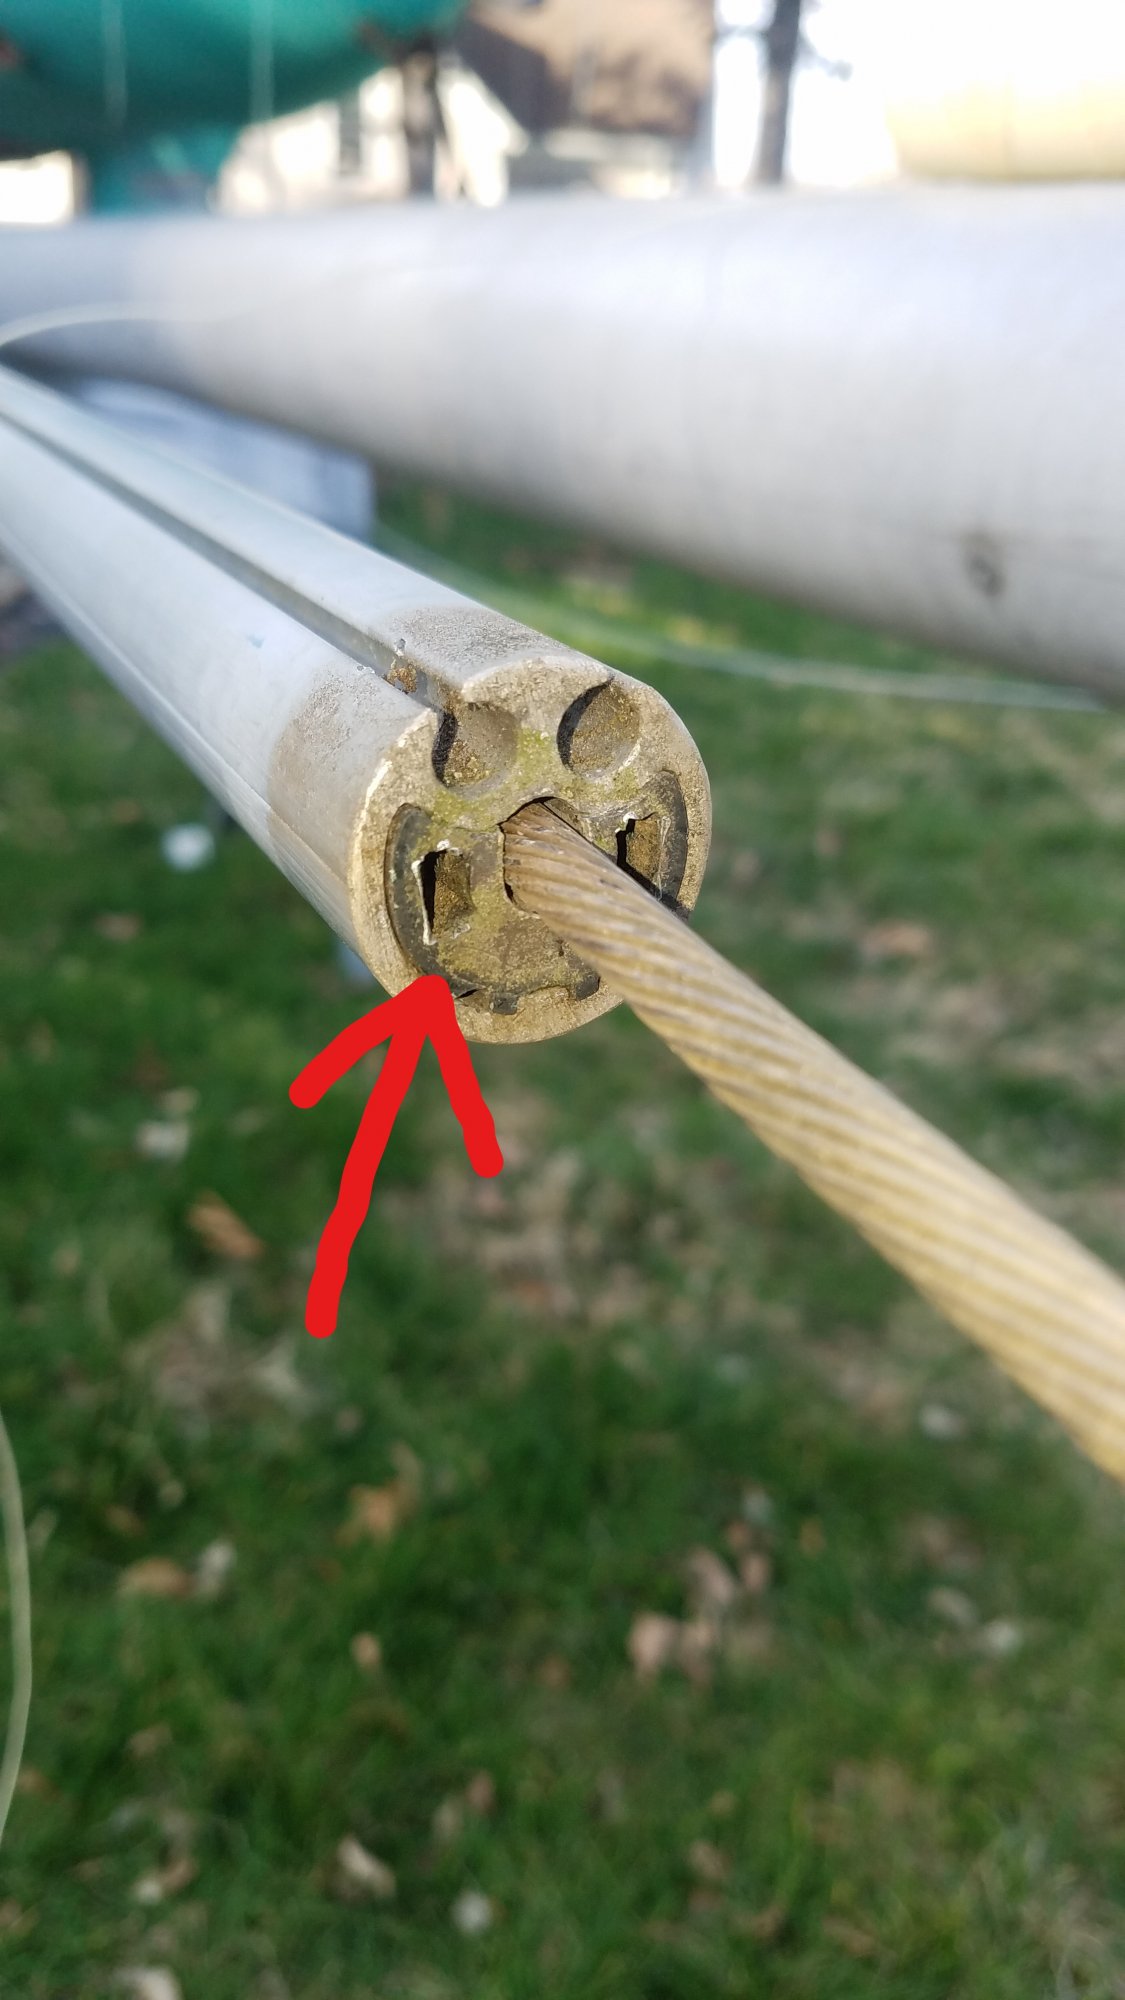
I am in the process of removing all of my standing rigging to have new stays made. I am trying to remove the forestay which goes through the roller furler and there is a plug/guide on each end that prevents me from removing the stay and I can't figure out how to remove the guide. There are no set screws and I'm not sure how to get it out without damaging anything. Any thoughts or tricks from the knowledge base out there? Thanks All
Removing Forestay from roller furler
- Thread starter ontherocks83
- Start date
It is by Schaefer and looks like it could be the original. I'm not sure if the forestay has ever been replaced. I could be wrong but I can tell it is pretty old.
I did spray it with some aero kroil but it could probably use a second application.
I did spray it with some aero kroil but it could probably use a second application.
I thought it looked like a Schaefer system.
The individual sections of the foil are riveted together with pop rivets.
Here's a link to the installation instructions, they might prove helpful
The individual sections of the foil are riveted together with pop rivets.
Here's a link to the installation instructions, they might prove helpful
It looks similar to the one that I installed a few years back. Mine is made by Hood and those are plastic inserts that clip around the head stay and slide into the aluminum extrusions before the sections get riveted together. The instructions were to apply silicone to the plastic piece before inserting. I would think a little help from a heat gun would get that part out. Good luck.
I wonder if you squeezed it with the type of pliers used for a set ring, you could not get the plastic to collapse a bit and take the friction off of the walls. Put the tips of the pliers in the holes of the plastic clip and squeeze a little. Works some WD-40 into the groove. Repeat etc.

they look like they are friction fit but I can't get them to budge. Starting to wonder if I should drill out the rivets and split the furler. Only problem then is not sure what type of rivets to replace them with or where to get them.
This is what you will have to do. The rivets are nothing special, plain old aluminum rivets. You can contact Schaefer to confirm this. I have a new furler sitting in my garage, but I'm not sure I can get to it to double check.they look like they are friction fit but I can't get them to budge. Starting to wonder if I should drill out the rivets and split the furler. Only problem then is not sure what type of rivets to replace them with or where to get them.
There are a large number of rivets holding the foil together. The rigger I use, Dan at RiggingOnly.com suggested using a pneumatic riveter to assemble the foil, it will be faster and easier on the hands. Dan can also provide good advice on reassembling the furler and forestay. He is near you in Fairhaven, MA.

So from what I can figure between looking at the furler and the instructions that dlochner posted, it looks like I either need to drill out all the rivets and disassemble the entire furler at each joint or cut off one of the ends and when I get new cable swage on a new fitting myself.
So here are the problems/options that I could use some guidance on.
Option 1: drill out every rivet, hope that all of the pieces come apart, and then re-rivet the furler back together with the new forestay.
Option 2: Cut off one of the ends. Get a new forestay with only one side pre-made, thread the wire down the furler and swage on a new fitting myself.
I'm leaning towards option 2 but I've never swaged a new fitting nor do I have the tools to do so. If I can get a reliable tool to do so for a "reasonable" price and can have confidence in the swage holding I think that would be the way to go.
What are your all's experience / recommendations? As much as I'd love to buy a new furler and forestay at the same time and kill two birds, I've spent so much money on my mini refit this winter that I can't justify a new furler this year.
As always, thanks in advance!
Option 2. Talk to your rigger. Cut the wire at the shortest fitting as close to the filling as you can. A cutoff wheel on a Dremel works well. Save the piece, pull the wire out.
Take the old forestay and the cut off fitting to the rigger and tell him what you did. He will cut the new wire to the proper length and if it is Dan at Rigging only he will add 6 inches and mark the actual length. He will probably swage on the stud and leave the upper fitting off. Install the torque barrel and drum first, then slide the forestay back up the foil. Once everthing is in place, cut the extra length off of the forestay and install a Sea-Lock fitting. The rigger can provide this.
Reattach the forestay to the mast, step the mast, tune the rig, and have a beer.
Thanks for the reply. I'm glad you gave me their info, I didn't know of them and they're only just over an hour drive away. I think that is who I'm going to use. I'm probably going to drive down and drop off the stuff, could use to get out of the house for a bit. They're doing curb side drop off.
@dlochner has provided you with what sounds like a nice end to end approach especially the last stepI've never swaged a new fitting nor do I have the tools to do so.
and having a rigger involved would seem prudent. If you are interested this is a good thread on self installed rig fittings.
Any experience with Hi-Mod / Hayn Marine?
I've actually contemplated (for 5 seconds) a $5,000.00 compact roller swager (yeah right-- maybe I'll start a second career as a C-22 rigger-- BUT in the process I stumbled across these mechanical (bonus; removable for repair/inspection) fittings in 316. Anyone played with these? I'm going...
forums.sailboatowners.com
Last edited:
Iv never done this job myself, but I’ve watched the riggers do it a bunch of times . I’ve never seen a rigger take apart the extrusion. That sounds like a good way to break something that’s frozen in place.
Instead, you pull the old one out with a plumbers snake attached, then push/pull a new forestay into the extrusion using the snake. Often, but not always, the new forestay has to be bare (with no terminal) on one end for it to fit through the extrusion.
See video below.
Instead, you pull the old one out with a plumbers snake attached, then push/pull a new forestay into the extrusion using the snake. Often, but not always, the new forestay has to be bare (with no terminal) on one end for it to fit through the extrusion.
See video below.
Last edited:
jssailem
SBO Weather and Forecasting Forum Jim & John
- Oct 22, 2014
- 23,840
As usual @DrJudyB is spot on with her advise.
On my rig, I changed the head stay Jan 2016 and reinstalled the ProFurler. I used a "Swaged fitting" at the mast. The Swage was completed at a shop using a cold roll hydraulic press. This is the best practice method. Because the Swage is at the mast, water can not get into the swage it opens to the deck. Water drains out and down the stay if there are any gaps. When it comes out of the press the wire and the fitting look as one solid piece of metal.
At the deck your fitting opens facing up. Water can creep down the stay and into the swage. Here is where I placed the Hi-Mod fittings made by Hayn Marine. Upon review the Hi-Mod design had the best record (my opinion). There is some skill and exactness to any manual swage. The Hi-Mod appeared to be the best design to get a repeatable degree of grip performance. I used 4200 caulk with the fitting to help displace any voids that might allow water to enter the fitting. The fittings and stays look like new after 3 years exposure.
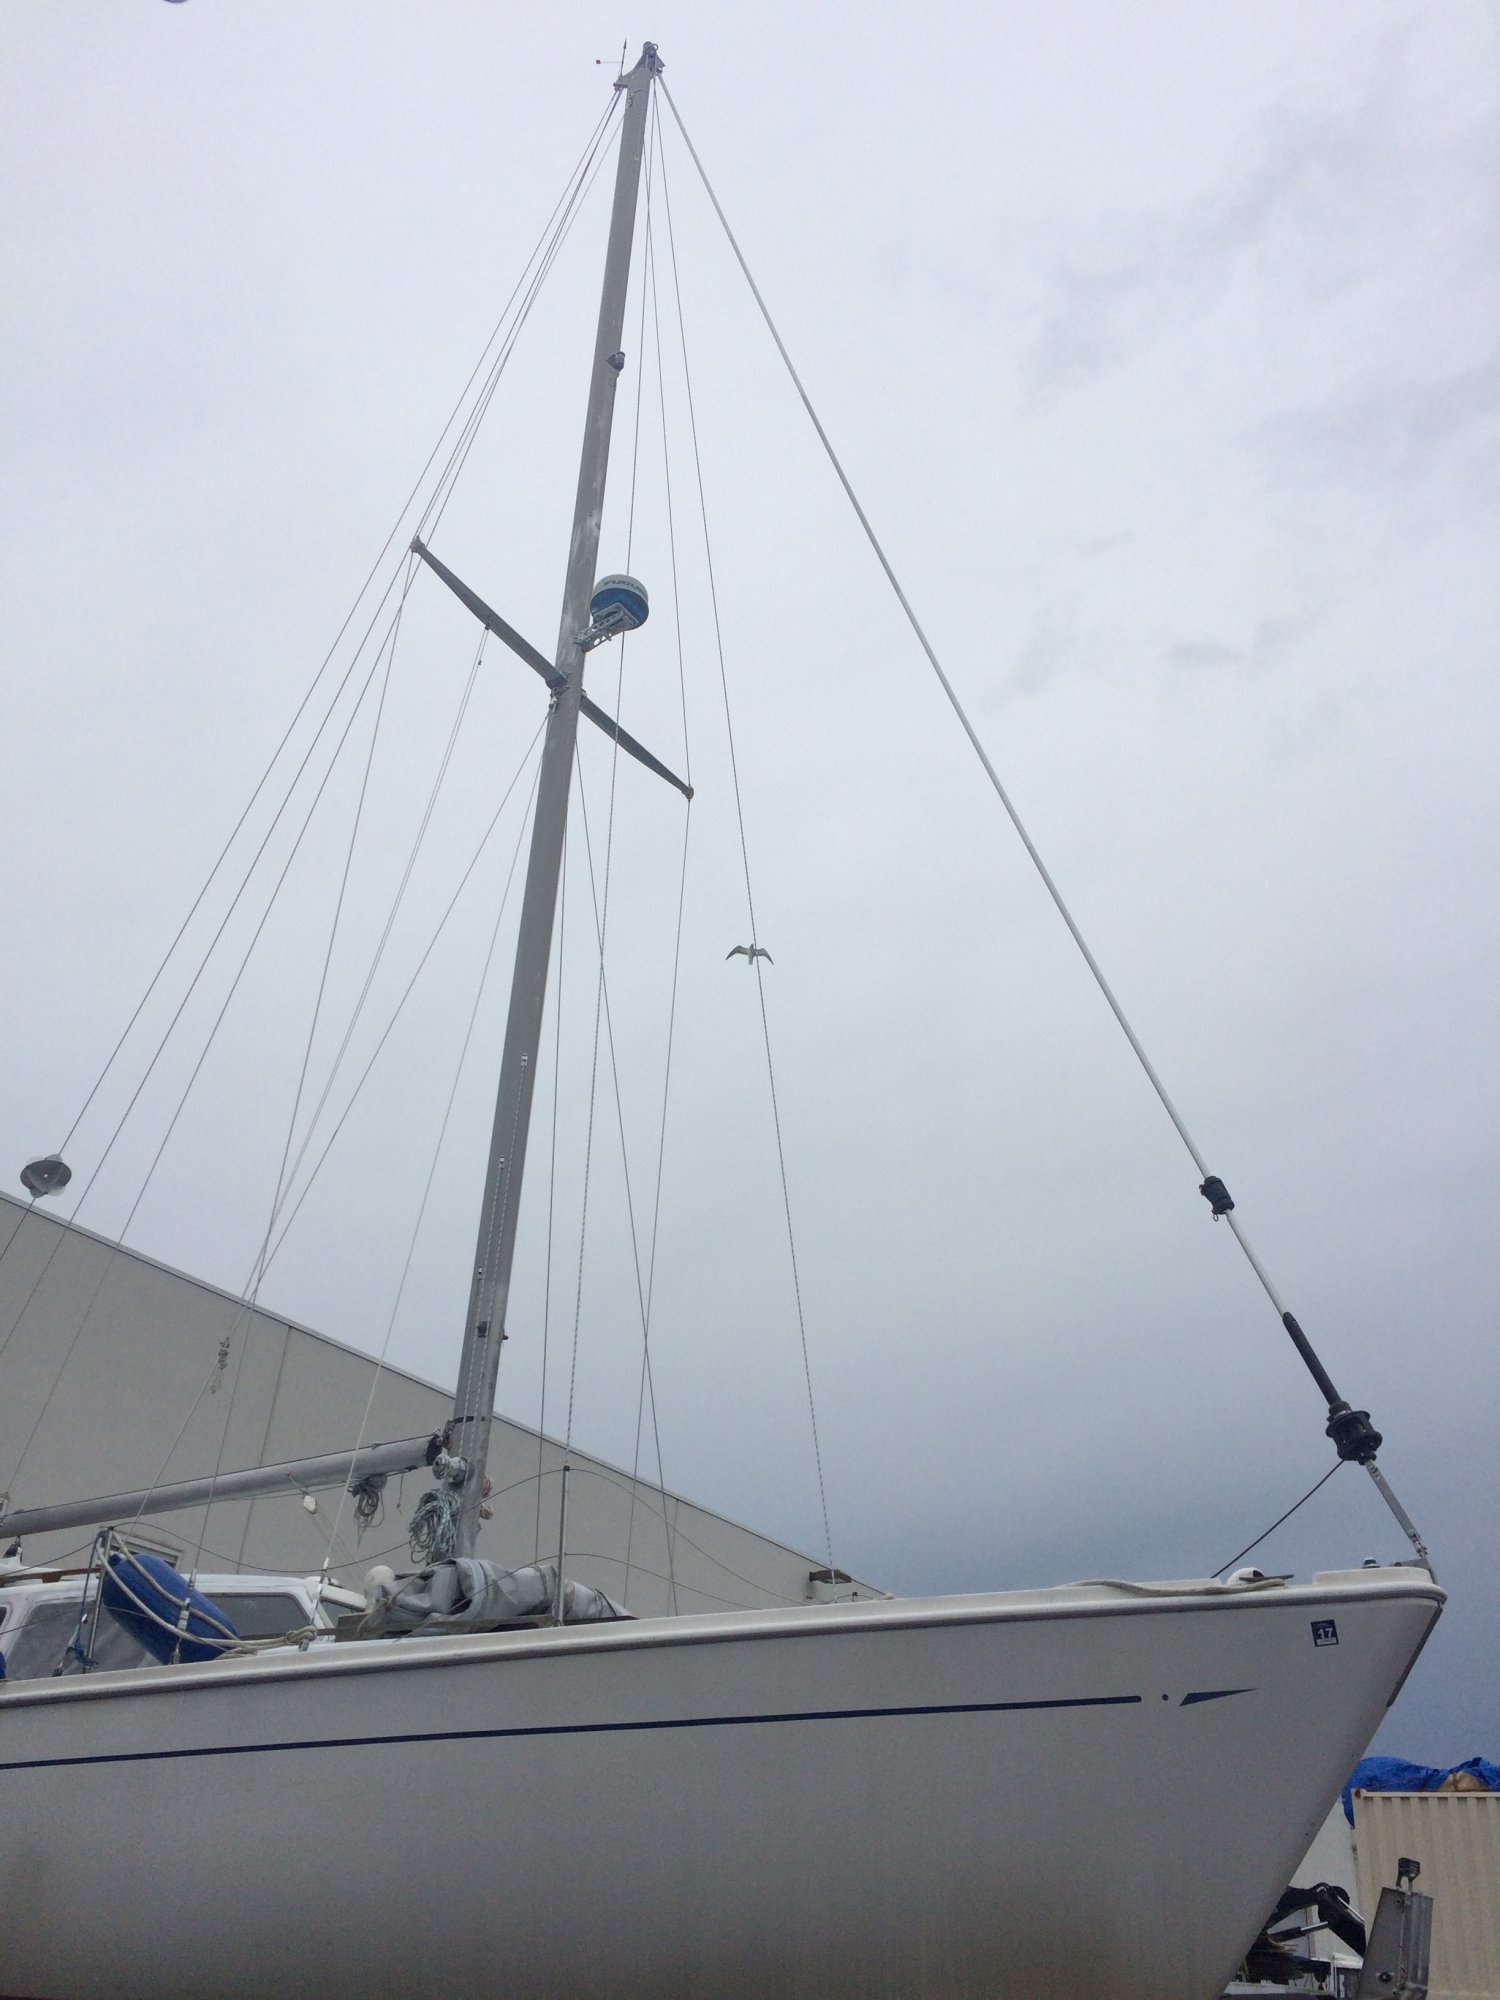
I had the boat in for bottom paint and repair the winter of 2017/18. At that time I decided to replace the ProFurler with a Harken Mark IV Unit 1. We did it with the deck stepped mast in place. We secured the mast tying the halyards to the bow. This permitted releasing the forestay at the deck. We opened the Hi-Mod fitting and tossed the cone (an internal part of the fitting) . Once free the ProFurler extrusion was slid off and the Harken extrusion was slid on. With the boat out of the water there was plenty of room to work the extrusion up the forestay without causing any bends. Once in place the furler was assembled and the extrusion was secured. With the Furler assembled, replaced the cone for the Hi-Mod fitting and applied caulk securing the fitting. We then attached the forestay to the deck.
Here is a picture of the finished new furler installed.
On my rig, I changed the head stay Jan 2016 and reinstalled the ProFurler. I used a "Swaged fitting" at the mast. The Swage was completed at a shop using a cold roll hydraulic press. This is the best practice method. Because the Swage is at the mast, water can not get into the swage it opens to the deck. Water drains out and down the stay if there are any gaps. When it comes out of the press the wire and the fitting look as one solid piece of metal.
At the deck your fitting opens facing up. Water can creep down the stay and into the swage. Here is where I placed the Hi-Mod fittings made by Hayn Marine. Upon review the Hi-Mod design had the best record (my opinion). There is some skill and exactness to any manual swage. The Hi-Mod appeared to be the best design to get a repeatable degree of grip performance. I used 4200 caulk with the fitting to help displace any voids that might allow water to enter the fitting. The fittings and stays look like new after 3 years exposure.
I had the boat in for bottom paint and repair the winter of 2017/18. At that time I decided to replace the ProFurler with a Harken Mark IV Unit 1. We did it with the deck stepped mast in place. We secured the mast tying the halyards to the bow. This permitted releasing the forestay at the deck. We opened the Hi-Mod fitting and tossed the cone (an internal part of the fitting) . Once free the ProFurler extrusion was slid off and the Harken extrusion was slid on. With the boat out of the water there was plenty of room to work the extrusion up the forestay without causing any bends. Once in place the furler was assembled and the extrusion was secured. With the Furler assembled, replaced the cone for the Hi-Mod fitting and applied caulk securing the fitting. We then attached the forestay to the deck.
Here is a picture of the finished new furler installed.
So I am going to be dropping my rigging off with riggingonly.com in Fairhaven Ma. that dlochner recommended . I ended up cutting the lower swage off of the forestay and snaking it through the furler. When I called they said that they will send a mechanical fitting back so that I can install it myself. They were very polite and knowledgeable when I called. The ballpark cost he gave me over the phone was the least expensive I've found so far and the turn around time should be relatively quick. Thanks all for the help and I will try to post a final experience/conclusion to the rigging replacement.
. I ended up cutting the lower swage off of the forestay and snaking it through the furler. When I called they said that they will send a mechanical fitting back so that I can install it myself. They were very polite and knowledgeable when I called. The ballpark cost he gave me over the phone was the least expensive I've found so far and the turn around time should be relatively quick. Thanks all for the help and I will try to post a final experience/conclusion to the rigging replacement.