PYI Dripless Shaft Seal
- Thread starter rfrye1
- Start date
- Status
- Not open for further replies.
Had (have) Three
I like them a lot. SO much easier than having a wet bilge. Drops the humidity inside down too. Used one of the teflon kits once but it wasn't satisfactory for me. I have known two people who had problems. Both were installation-related. One had a damaged seal due to improperly installing it causing leakage. The other one had the seal slide forward causing it to leak. Spooked him pretty good. Likely the cause was not installing both sets of set screws (a common problem with marine mechanics who don't read directions). The latter can be avoided by simply fitting a hose clamp or shaft zinc in front of the seal. Anyhow, I would endorse the use of a PYI shat seal. My current one has 2400 hours on it. I replaced the bellows a few years ago just to be careful.Its time to haul the boat for bottom paint and Im considering adding a PYI Dripless Shaft Seal. Just wondering your thoughts (good & bad) if you have one,
Thanks. Bob
Since it's such a ubiquitous item these days
why not do a search on this board or Google it? You'll find lots of people who really like them. They do have a good history and the newer ones have a certain new connection to avoid them drying out. You can learn all about them with a bit of research on your part.
why not do a search on this board or Google it? You'll find lots of people who really like them. They do have a good history and the newer ones have a certain new connection to avoid them drying out. You can learn all about them with a bit of research on your part.
Good point. I think the great majority of folks who have one of the dripless shaft seals like them very much. But, I've know folks to have serious problems with them and a quick search gave this: http://www.scribd.com/doc/12011159/Shaft-Seals.why not do a search on this board or Google it? You'll find lots of people who really like them.
Having just replaced an oil seal in my saildrive I've been inspired with the following (doubtless silly) thought: why not take a short bit of cutless bearing and machine out the forward end to accept a lip seal and then attach it with hose to the stern tube and then attach the old stuffing box to it with a bit of hose to act as a retainer for the seal and a backup if the seal fails. You could put run dry type stuffing in the box or just leave the nut loose. Simple, cheap, reliable... What am I missing?
")
--Tom
PSS Seals
This is a 2600 hours of use PSS. It has no wear and was sent back to PYI for compression testing and is still well within spec. I still replaced it as it was about five years old at the time with 2600 hours which is 26 years of use+ for the average sailor.. This seal required zero maintenance in those 2600 hours of use.

These are new PSS set screws. They are designed for a ONE TIME tightening into the shaft only. This includes any adjustment! If you need to move the seal, even a 1/8" for adjustment, after tightening them once, when setting it up, these set screws MUST be replaced or the cutting face will not cut into the shaft he second time. I keep about 8-10 of these on board at all times just in case. PSS will sell them to you very reasonably..

This is a 1" Ruland 316 stainless steel clamp collar. I install this right behind my rotor as added insurance. They are available from McMaster Carr and beat the pants off a hose clamp or shaft zinc....

Another view of the clamp collar.

When you only allow competent people to work on your boat, who will follow instructions, these seals are very, very reliable. I have had them on five boats and worked on boats pushing 4000+ hours on the original seals with no problems. The USCG even uses them..
Install them to the instructions and go one step beyond with a Ruland clamp collar and you'll have a long service life free of maintenance..
One more:
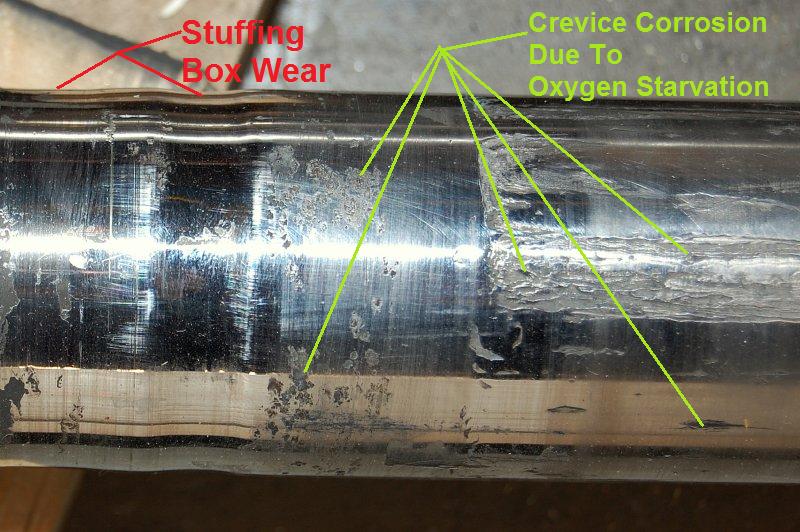
This is what can happen when you try to make a traditional stuffing box "drip free". You can potentially starve the shaft log of oxygen by 100% sealing at the seal. This can lead to crevice corrosion of the shaft and also shaft wear. This shaft was using the mouldable packing clay and is now seriously worn and ruined from fairly extensive crevice corrosion.
Traditional shaft seals need to drip for more than just lubrication it also allows fresh oxygenated water up into the shaft log so the stainless shafts don't suffer from crevice corrosion. PSS Seals have been vented/plumbed since about 2002/2003 which allows oxygen into the shaft log and can greatly reduces the chances of crevice corrosion..
When I pulled the one off our current boat it had 2600 hours on it and showed literally zero signs of wear on either the carbon or stainless when compared to the new one...I would think that any weapage past the seal would end up as dried salt on the inboard side of the seal and the abrasiveness would eat up the lip seal. Just speculation but the lip seal seams pretty vulnerable to that kind of damage.
This is a 2600 hours of use PSS. It has no wear and was sent back to PYI for compression testing and is still well within spec. I still replaced it as it was about five years old at the time with 2600 hours which is 26 years of use+ for the average sailor.. This seal required zero maintenance in those 2600 hours of use.
These are new PSS set screws. They are designed for a ONE TIME tightening into the shaft only. This includes any adjustment! If you need to move the seal, even a 1/8" for adjustment, after tightening them once, when setting it up, these set screws MUST be replaced or the cutting face will not cut into the shaft he second time. I keep about 8-10 of these on board at all times just in case. PSS will sell them to you very reasonably..
This is a 1" Ruland 316 stainless steel clamp collar. I install this right behind my rotor as added insurance. They are available from McMaster Carr and beat the pants off a hose clamp or shaft zinc....
Another view of the clamp collar.
When you only allow competent people to work on your boat, who will follow instructions, these seals are very, very reliable. I have had them on five boats and worked on boats pushing 4000+ hours on the original seals with no problems. The USCG even uses them..
Install them to the instructions and go one step beyond with a Ruland clamp collar and you'll have a long service life free of maintenance..
One more:
This is what can happen when you try to make a traditional stuffing box "drip free". You can potentially starve the shaft log of oxygen by 100% sealing at the seal. This can lead to crevice corrosion of the shaft and also shaft wear. This shaft was using the mouldable packing clay and is now seriously worn and ruined from fairly extensive crevice corrosion.
Traditional shaft seals need to drip for more than just lubrication it also allows fresh oxygenated water up into the shaft log so the stainless shafts don't suffer from crevice corrosion. PSS Seals have been vented/plumbed since about 2002/2003 which allows oxygen into the shaft log and can greatly reduces the chances of crevice corrosion..
Misinterpretation
A previous poster asked about using a lip seal similar to the rear bearing seal on your output shaft of your transmission as a seal for the shaft instead of a PSS or a packing gland. I was suggesting that the very thin rubber lip of the seal would likely get eaten up by crystalized salt that would form on the dry side of the seal from whatever weepage of water occured. A very thin seal of that nature would be extremely susceptible to failure and a FMEA (failure modes and effects analysis) would indicate that a failure would likely cause a sinking. Too great a risk IMHO.
A previous poster asked about using a lip seal similar to the rear bearing seal on your output shaft of your transmission as a seal for the shaft instead of a PSS or a packing gland. I was suggesting that the very thin rubber lip of the seal would likely get eaten up by crystalized salt that would form on the dry side of the seal from whatever weepage of water occured. A very thin seal of that nature would be extremely susceptible to failure and a FMEA (failure modes and effects analysis) would indicate that a failure would likely cause a sinking. Too great a risk IMHO.
PYI, pss shaft seal available in the Chandlery:
http://shop.sailboatowners.com/pss/detail-pss.htm?fno=400
http://shop.sailboatowners.com/pss/detail-pss.htm?fno=400
I don't want to say anything nice about Saildrives! However, they use back to back lips seals on their prop shafts (one to keep the oil in and one to keep the sea out) and they last for years. They do not seem to have a problem with salt build up or oxygen starvation -- you've probably got a lip seal on your raw water pump shaft and it is likely working fine in the salt after many hundreds of hours. A new seal costs about $5 in the sizes you'd need for a typical sailboat shaft. Prying out the spring and replacing it with a top quality "O"-ring adds another buck. Lips seals on pumps and motors and things are usually placed close to the bearings because they can't tolerate much movement in the shaft that's why you'd need a bit of cutless bearing (or some other bushing/bearing) to make the system work. It'd probably be a good idea to "burp" them to insure they are running with some water but doubt there would be any need for venting or water injection at typical sailboat speeds. In practice I don't suppose there would be any real need to put the stuffing box on the end (certainly it would not need to run tight or hot) though you would need a retainer for the seal. The box would add redundancy and act as a spray guard if the seal partly failed. IME, most seal failures are partial and a result of bearing failure. I suspect that even with damaged lips most seals would work as well as a traditional stuffing box...I would think that any weapage past the seal would end up as dried salt on the inboard side of the seal and the abrasiveness would eat up the lip seal. Just speculation but the lip seal seams pretty vulnerable to that kind of damage.
Oh my, how I do run on
Sorry, it's a new idea for me. --Tom.
Re: PSS Seals
Mainsail,
I see several types of clamps on the McMaster website...is this a one piece or 2 piece clamp? The 2 piece SS 316 clamp for a 1 1/4" shaft was around $50 w/ tax and shipping. I'm thinking of just buying the black oxide since I'm a fresh water sailor unless there is some other reason to go with SS.
My budget is a little limited this spring.
Just ordered a PSS seal from sailboatowners. Best price I could find on the web.
Personally I would go with at least the type 303/304 stainless for the $16.00.. That's a nice beefy shaft for a 36 footer..Mainsail,
I see several types of clamps on the McMaster website...is this a one piece or 2 piece clamp? The 2 piece SS 316 clamp for a 1 1/4" shaft was around $50 w/ tax and shipping. I'm thinking of just buying the black oxide since I'm a fresh water sailor unless there is some other reason to go with SS.
My budget is a little limited this spring.
Just ordered a PSS seal from sailboatowners. Best price I could find on the web.
1 1/4 Inch Shaft Collar (LINK)
Thanks Mainsail! I think I missed that one.
BTW, your comment on shaft size had me thinking about the measurements I took. I'm going back to the boat tomorrow and take another look. I think I misread the calipers(been awhile since I've used any and its not digital).
BTW, your comment on shaft size had me thinking about the measurements I took. I'm going back to the boat tomorrow and take another look. I think I misread the calipers
(been awhile since I've used any and its not digital).
Last edited:
Dripless Shaft
Has any one had water coming back up the vent hose,I think once or twice when I had to throw into reverse hard that water has come up into the boat.
I am thinking of rerouting the vent hose into the bilge rather than where it vents now straight up into rear berth cabinet over the engine compartment.
Nick
Do you have any photo's of the shaft collar on with the dripless
Nick
Unfortunately it's a v-drive so my camera won't fit under there.. Just snug it right up to the face of the rotor, the face towards the bow, and tighten her down..
There are a number of ways to handle this. I only needed to drain this about once or twice per summer. Cheap & dirty but worked..Has any one had water coming back up the vent hose,I think once or twice when I had to throw into reverse hard that water has come up into the boat.
I am thinking of rerouting the vent hose into the bilge rather than where it vents now straight up into rear berth cabinet over the engine compartment.
Nick
Here's one:


Another way is to buy a gas or diesel vent and plumb it into your cockpit so if it blasts back the water will vent into the cockpit.
If you vent it into the bilge you may create a potential boat sinking siphon at the worst, or at the very least not allow it to vent by creating a reverse trap..
I've been scooped!
Just noticed that Lastdrop has a lip seal product similar to what I was thinking of. http://www.lasdrop.com/products.php and look at the "Dry-Seal". It's probably cheaper than my DIY idea. But, I'm still fond of the idea of keeping the stuffing box.
-- Tom.
Just noticed that Lastdrop has a lip seal product similar to what I was thinking of. http://www.lasdrop.com/products.php and look at the "Dry-Seal". It's probably cheaper than my DIY idea. But, I'm still fond of the idea of keeping the stuffing box.
-- Tom.
Two PYI dripless shaft seal installation caveats
With apologies for flogging a thread topic that just appears to have died of natural causes I would like to add the following two caveats when installing a PYI dripless shaft seal:
(a) take care that NOTHING can push against the sides of the rubber bellows; and
(b) make sure the forward end of the propellor shaft completely bottoms out inside the engine output coupling.
We have had PYI dripless seals on Rivendel II for a decade and nearly 2,000 engine hours during which they performed as advertised. Nonetheless, we narrowly avoided serious consequences when they failed offshore on two separate occasions as a result of easily made and overlooked installation errors.
The first problem occurred in October 2000 as we approached Vitu Levu (Fiji), after a 600 NM upwind sail from Port Vila (Vanuatu). When we approached the narrow passage between two of the smaller islands guarding the natural channel leading to Lakatoro on the engine, as the wind had died after a period of thunderstorms, I noticed a grinding sound coming from the engine compartment. Fearing a problem with the Hurth transmission I investigated but did not see much except for a tired-looking, slightly sagging PYI bellows which turned out to feel burning hot to the touch!! The heat clearly came from the even hotter ss shaft flange. After helping the flange cool off by burping it repeatedly, I assumed that we had either forgotten to burp the flange after Rivendel's last haul-out or that exhaled air had perhaps accumulated inside the shaft tube during bottom-cleaning, However, within 10 minutes after bringing the engine back up to speed (no more than 1800 rpm or so) flange and bellows became very hot again and I realized that I had little choice than to keep pouring water over the entire assembly by hand while Nelleke slowly drove the remaining 10 NM or so to the entrance of Lakatoro harbor. Once we were safely anchored I took a much closer look and realized that the Australian shipwright who had installed the PYI coupling at the beginning of the season while building a bit of a hollow dome in the teak floorhatch covering the bellows in order to avoid friction (as the bellows diameter is appreciably larger than the diameter of the original stuffing box) had underestimated how high the bellows would rise once the propellor thrust pushes the entire engine forward and up on its rubber supports. As a result the floor board had started to push down on the bellows a bit; ever so slightly pushing the dripless seal out of its perfect alignment while causing minute amounts of salt water to penetrate between the carbon and ss halfs of the seal. Eventually, the dry salt produced enough friction to heat up the ss flange and the rubber bellows, thereby jeopardizing its mechanical integrity. Since I no longer trusted the rubber bellows and did not have the right tools to re-polish the flange surfaces, I simply ordered a new seal while using the occasion to switch to PYI's water-cooled flange version in order to forestall any possible repeat of my several hours-long handcooling ordeal.
fAST forward to July 2008 after nearly 8 years of trouble-free PYI use: Rivendel II is leaving Port Vila Harbor on the engine -- via always rough Devils Point and after having had the propellor shaft pulled to receive a new cutless bearing in the local boatyard -- when the bilge pump alarm goes off and does not stop..... I dash below and pull the engine hatch in the aft cabin to see a wild spray of seawater coming from the PYI seal. The bellows looks too expanded so we stop the engine and I manually compress the flange, which immediately stops the water flow, then wind a short length of 5/16" rope tightly around the shaft, starting at the engine output flange, uintil the ss PYI flange is being pushed aft and I see the bellows compress again. Finally, I remove the two double set screws, slightly dimple the shaft with a drill and tighten them back into place. Before starting the engine again I also tighten both big set bolts on the engine output flange (just to make sure), remove the "Spanish windlass" rope, mark the shaft with red ink, both at the ss PYI flange and the output flange side and measure the distance between both flanges with a pair of calipers.
Everything seems fine, as the wind freshens we soon shut the engine down and continue under sail alone for the overnight passage to Malakula. About one week later, however, as we need quite a bit of engine power to try and motorsail out of the Maskelyne lagoon against a strong wind, the bilge pump goes off once again, as the PYI seal starts spraying salt water. The caliper shows that the distance between the two flanges has shortened by almost 10 mm. However, contrary to my expectation, it is the red line in front of the output flange that has disappeared, NOT the line in front of the PYI flange!! To make a long story short: the warff personnel clearly did not put the propellor shaft all the way back into the engine output coupling, and the set bolts were unable to take up the full force of the propellor thrust without slipping. Skipper Evan Logan of the three-master Alvei, our trusty project support vessel, comes to the rescue and together we take off the engine output flange, shim the forward end of the propellor shaft with a couple of sturdy rings (so the shaft bottoms out in there), regrind the set screws, dimple the shaft and put everything back together without having to lift Rivendell's stern out of the water. After that (including a 10-day passage to Australia in October 2008) there are no more problems.
Apologies for the longish stories. However, the main purpose is to try and make sure the same problems are unlikely to happen to any of you and -- if they did -- could be solved without first having to grope around in the dark.
Would I install the PYI dripless shaft seal again if we were to make Rivendel II ready for a major new passage?? Probably not.
Unfortunately, this is now only a retorical question since we just sold our 18-year old seahorse to an Australian couple in Brisbane.... In my next post I hope to follow up with a bit more news about that.
Fair winds;
Flying Dutchman
Hank,fAST forward to July 2008 after nearly 8 years of trouble-free PYI use: Rivendel II is leaving Port Vila Harbor on the engine -- via always rough Devils Point and after having had the propellor shaft pulled to receive a new cutless bearing in the local boatyard -- when the bilge pump alarm goes off and does not stop..... I dash below and pull the engine hatch in the aft cabin to see a wild spray of seawater coming from the PYI seal. The bellows looks too expanded so we stop the engine and I manually compress the flange, which immediately stops the water flow, then wind a short length of 5/16" rope tightly around the shaft, starting at the engine output flange, uintil the ss PYI flange is being pushed aft and I see the bellows compress again. Finally, I remove the two double set screws, slightly dimple the shaft with a drill and tighten them back into place. Before starting the engine again I also tighten both big set bolts on the engine output flange (just to make sure), remove the "Spanish windlass" rope, mark the shaft with red ink, both at the ss PYI flange and the output flange side and measure the distance between both flanges with a pair of calipers.
Everything seems fine, as the wind freshens we soon shut the engine down and continue under sail alone for the overnight passage to Malakula. About one week later, however, as we need quite a bit of engine power to try and motorsail out of the Maskelyne lagoon against a strong wind, the bilge pump goes off once again, as the PYI seal starts spraying salt water. The caliper shows that the distance between the two flanges has shortened by almost 10 mm. However, contrary to my expectation, it is the red line in front of the output flange that has disappeared, NOT the line in front of the PYI flange!! To make a long story short: the warff personnel clearly did not put the propellor shaft all the way back into the engine output coupling, and the set bolts were unable to take up the full force of the propellor thrust without slipping. Skipper Evan Logan of the three-master Alvei, our trusty project support vessel, comes to the rescue and together we take off the engine output flange, shim the forward end of the propellor shaft with a couple of sturdy rings (so the shaft bottoms out in there), regrind the set screws, dimple the shaft and put everything back together without having to lift Rivendell's stern out of the water. After that (including a 10-day passage to Australia in October 2008) there are no more problems.
Flying Dutchman
What you describe is actually very typical of poor quality boat yard mechanics. When you remove a coupling that has a layer of rust between it and the shaft it should almost never be re-used. It is a very, very rare case that a one piece coupling that has been on for more than a season or so is re-usable. If it had rust, and was tough to get off, that layer of rust WAS your tolerance and the coupling is scrap iron. You'd be surprised at how many boat yard mechanics have no clue how a coupling is actually supposed to fit.
A shaft coupling should always be a light interference/press fit, many prop shops refer to it as an interference fit or light tap fit too. This means it often requires a lead, brass or phenolic hammer to tap it onto the shaft at a minimum. If it does not require some sort of press, tapping or force to get the coupling onto the shaft the fit and tolerance is not correct and will allow slight movements between coupling and shaft which will then work the key and set screws until a failure has ensued.
If you reinstall an old used coupling, and do not fit (to the shaft) and face it (out of round coupling face) you are only asking for trouble. As you found out the set screws will only work on a shaft with proper tolerances and they will not work on a loose or sloppy fit for very long. I am guessing the shaft was re-installed to the proper depth but that it simply slid into the coupling rather than required a light tap fit and this worked the set screws until failure.
I have been presenting the seriousness of this issue for a long on these forums and yours is a very good example of how not to remove and replace a prop shaft. While it can be done the shaft and coupling should always be taken in for a fit and face before re-installation. If this is done the prop shop would have picked up on a potentially loose fit and replaced the coupling.
You should make it a habit replace a solid one piece coupling once it has been removed and do a full fit and face. Couplings are cheap compared to a sunken boat.
Even with the new dimpling I would recommend that you replace that coupling the next time you haul out and have the new one properly fitted and faced to your shaft. Hamilton Marine will do mail order fit and facing through their shafting source at very reasonable rates.
Unfortunately this problem is not the fault of the PSS but it gets a bad name regardless...

- Status
- Not open for further replies.