O'Day 25 Keel trouble

mihaso

.
Apr 24, 2017
25
Oday 25 Montreal
Hi,
I had a little unpleasant surprise this winter, after winter storage.
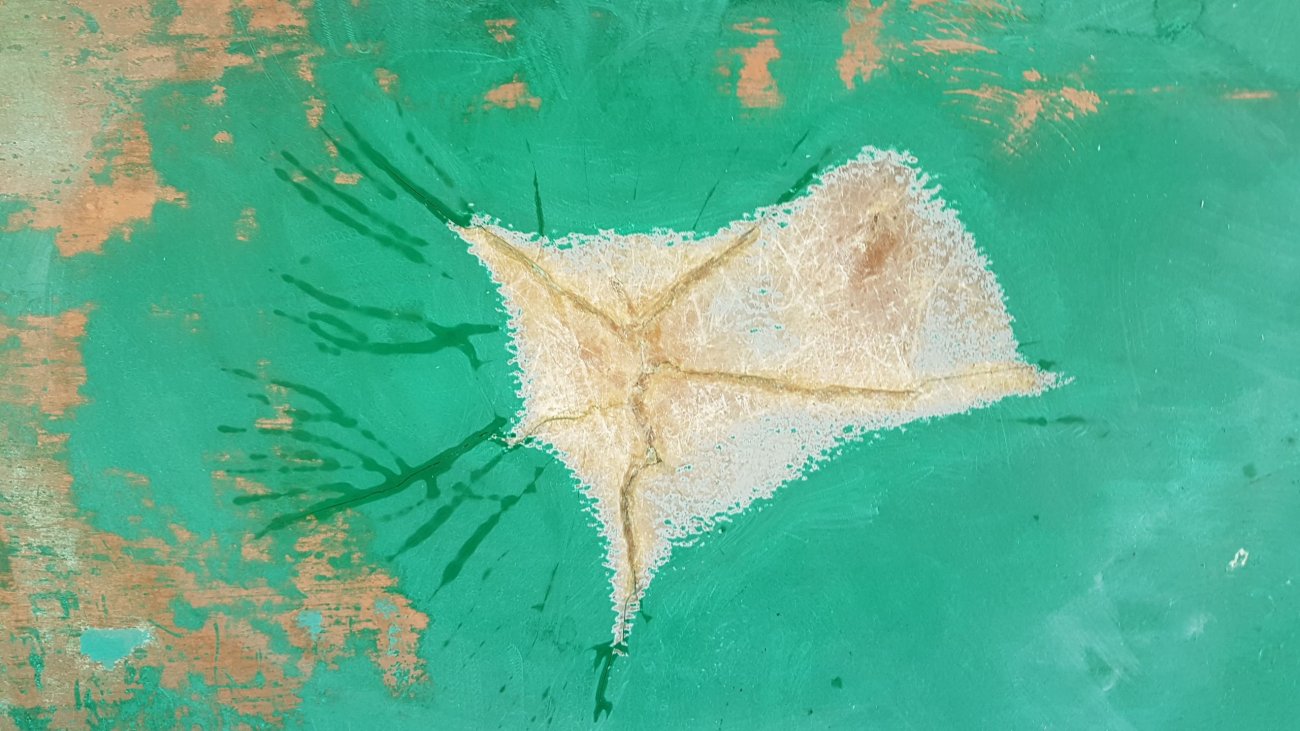
Water must have been stuck in my keel behind the centreboard slot, froze and expanded, causing a crack on both sides.
I took a drill and made a hole through, and I don't understand what's in the middle. After I went through the outer fibreglass layer, the drill just went all the way in.
The only residue coming out was fiberglass - like in colour (white transparent) soaking wet and with sand-like strength. It looks more like a cavity than a place filled with something. .

Does anyone know how the keel is constructed and what I'm expected to find in there? See the picture for clarification.
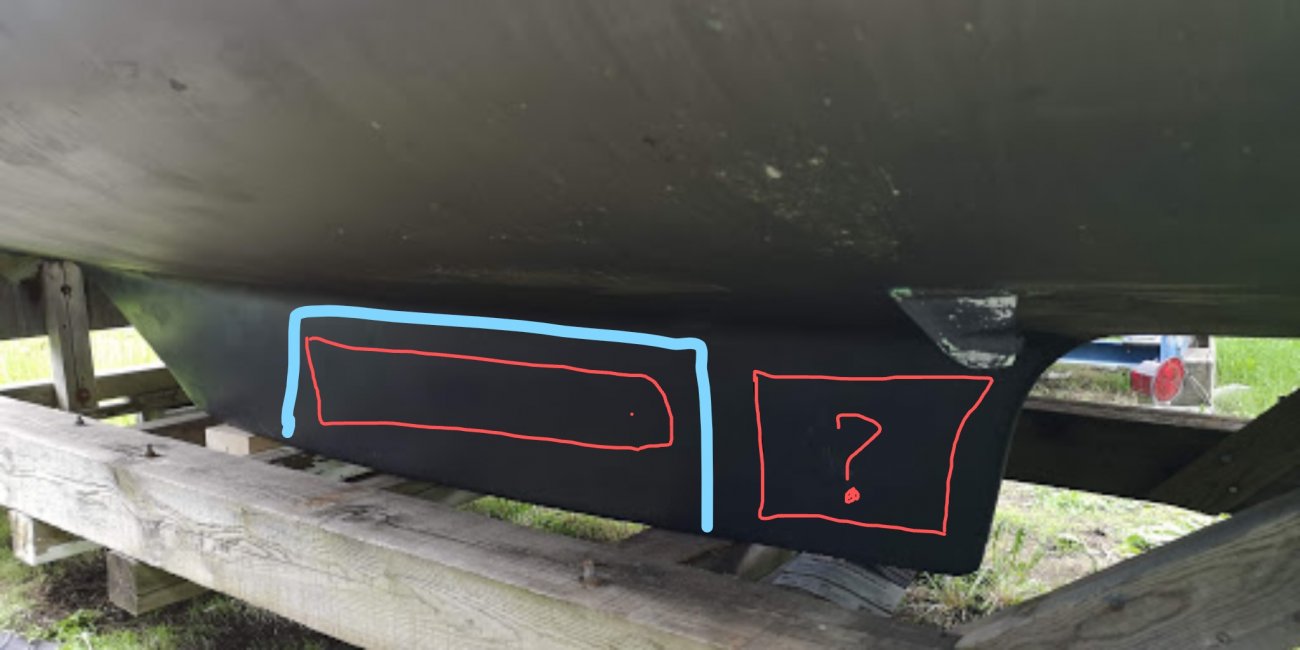
Also, Any idea what's the best way to get in? I'm thinking of cutting a window on the side and filling it with... what?

Thank you
20180609_122542.jpg
Inkedink_LI.jpg
 
Sep 24, 2018
2,549
O'Day 25 Chicago
I'm just about done dealing with this exact issue on my O'Day 25. Here's a summary of what I've learned:
  • Keel Material - The outer shell as you're aware is made of 1/2"+ fiberglass. It's fairly heavy duty stuff. The inside is a bunch of filler and pieces of lead. My filler was has lots of cracks in it. I assume you will find the same
  • Tracing the leak - I believe my leak was from the bilge. I forgot to reconnect the fuel line and it was then that we found gas dripping out of the holes for the centerboard screws (my CB is currently removed). We sealed up the cracks and holes found in the bilge. We also cut off the rusted keel hangers and glassed over them. I was thinking about using isopropyl alcohol to test for additional leaks since it evaporates quickly
I thought about pouring resin in the keel and all sorts of crazy ideas. I then realized that pouring gallons of resin would be very expensive and alter the weight of the keel. After pondering different ideas we ground down the cracks and filled them back. I'll be a few holes in the keel at the end of the season to drain any water that may be in there. Seems to be a somewhat common issue in larger fixed keel boats. I'm no expert on this but I have learned a lot. Feel free to ask any questions you may have.

Here's my thread about this issue.
https://forums.sailboatowners.com/index.php?threads/my-keel-thinks-its-a-popsicle.195816/
 
Last edited:

mihaso

.
Apr 24, 2017
25
Oday 25 Montreal
Thank you Project_Mayhem, that is some good info in your previous thread. I think tracing the leak will be a nightmare. My bilge is nice and dry, the only water ending down there is from the anchor locker. My suspicion is the centreboard cavity, but I fear it might be around the pendant.
I think I'll do the same and just fix up the cracks for this season.
I'm just wondering if cutting a window in the keel side to get a good look from the inside is a good idea.
 
Sep 24, 2018
2,549
O'Day 25 Chicago
When I ground the side of my keel I kept grinding until there were no more cracks in the outer shell. You can see what the inside of my keel looks like in the photos. I was wondering the same but ultimately felt like the deeper I dug, the more work it was in the long run without any meaningful improvements. If I understand correctly (please correct me if needed), the majority of the keel's strength comes from the outer shell. It appears to me that the filler can help with compression loads such as when the boat is on the hard.
My guess is that even with severely broken filler the lead wouldn't move much. I doubt it would be enough to cause much more than a small noise when the boat heels after several years of use. I'm picturing a container that has tightly packed gravel in it as an extreme example.
Nearly every boat will have water in it's bilge at some point. If you're unsure where the leak is I would start by filling the bilge with a quick evaporating liquid that doesn't leave residue. If the liquid is draining then you know you have a leak in the bilge. We found Iso alcohol at the dollar store.
We didn't go crazy when we sealed the bilge. We did a quick cleaning and applied some resin with a paint brush on all of the cracks/holes we saw. Some filler was added when we covered the remains of the keel hooks so it didn't drip off. It took about an hour to seal the obvious spots. I do plan on doing some more sealing on the aft end that's hard to reach but that's a project for another day.

If you cant see into the centerboard trunk try using one of those USB boroscopes/snake cameras. They're about $20 on amazon and ebay. Removing the centerboard isnt hard. An automotive jack would be helpful but far from essential. I'm guessing it weighs 50-60lbs. I called Rudy @ D&R and he said the centerboard screws should be resealed with life caulk or 4200.
As for the repair we started out by giving the area a good cleaning with solvent. From there we used resin and 404 filler to replace the filler that had been ground out during exploratory surgery. Once the filler was roughly even with the inner edge of the shell we ground it smooth to prevent air bubbles when glass was laid. As you can see in the other thread there was some debate if this was actually necessary.
Our first few layers we used 1708 cloth. It's very thick stuff. We had to saturate it before laying it on. We found that if we put resin on afterwards it wouldnt be saturated. We switched to some standard woven cloth once the new glass was almost even with the gelcoat. At this point we were ready to fill and fair. I ordered some filler called P-14 on a recommendation from BoatWorksToday. This stuff is awesome! Time to sand varied from 10-30 minutes in 70F weather. I've always used 404 filler which takes a long time to cure. The P-14 saved a ton of time. It sands easily and is reasonably tough. Applying it it easy. It reminds me of plaster. I was surprised at the results I got considering my minimal experience with plaster. A putty knife or paint scraper works very well for applying. I had unsatisfactory results using popsicle sticks and a mixing stick. We guestimated the resin/hardener ratio. I found that it's better to have a little more hardener than too little. A scale is really the only way to get the ratio right it seems.
Once the P-14 was hardened we sanded it down, filled in a few voids discovered after sanding, filled those in and then did a final sanding. Once it cured we put some barrier paint on it. Next weekend is bottom paint!

I'm no expert but there are some people on here that are. I'm learning as I go so take everything I say with a grain of salt
 
Last edited:
  • Helpful
Likes: Will Gilmore

mihaso

.
Apr 24, 2017
25
Oday 25 Montreal
Thanks for the details. It's weird but your photos are showing something filling the inside of your keel.
In my case the inside looks almost empty. I'll have to explore a little more before I'll close it up. The snake camera is a good idea.
 
Aug 28, 2015
190
Oday 28 St Joseph, MI
I have an O’Day 28 with a fiberglass keel, supposedly filled with lead. when I bought the boat 4 years ago the previous owner said it had been stripped and barrier coated. The surveyor said there were no blisters except one small spot on the rear port side of the keel. After several years the “blister” developed a 1/4” crack and over the winter a liquid leaked out which dried to a white powdery substance. I finally ground it out, see first photo, and let it drain for the winter. I ground out an area about 3”wide x 2” high and maybe 3/4” deep. It never did dry out but the next spring I cleaned it with copious amounts of acetone and used epoxy resin to fill the void with glass. The next winter I notices a crack again leaking. I ground it out again and this spring re-fiberglassed it again. I didn’t find what I expected inside the keel. It appears to be gritty, almost like concrete. I found this boat to have a wet bilge from rainwater coming down the mast slot and the bilge pump was screwed into the fiberglass without the benefit of any sealant. I have since corrected that but I found the laminate in the bilge, over the keel cavity, to be very thin. If I can get around to it I’m going to put several layers of glass in the bilge. I’m posting photos of the cavity I ground out and of the power dry residue from where the leaking liquid dried. E56C56F9-9B1E-449C-939E-C84ABA72B62A.jpegE41B79A5-056F-4A5A-97E5-92E2029DFCE1.jpeg
 
Sep 24, 2018
2,549
O'Day 25 Chicago
I agree that the substance inside the keel looks similar to concrete. I also found that a PO had screwed the bilge pump into the bilge/keel without any sealant
 

mihaso

.
Apr 24, 2017
25
Oday 25 Montreal
I took an inspection cam around the keel, bilge and pendant tube. The tube is pretty much spotless, so is the bilge.
The only potential problem I see is the inside of the centreboard cavity, I suspect there could be some water ingress from there, but there are no cracks there either. This could also be caused by water stuck there from previous poor repair.
I got the same advice from multiple people and I think it's best option at the moment.
I'll patch it up and go sailing. This fall I'll drill some homes to drain whatever water is stuck there over the winter, and next year I'll see if there is more water in. The centreboard cavity does need some TLC, it's getting pretty grimy. If there's still water ingress I'll take the time to do both.
 
Aug 28, 2015
190
Oday 28 St Joseph, MI
Mihaso, That’s what I do, patch it up and go sailing. If your bilge is always dry then that’s a plus. Mine is always wet because the mast is keel stepped and like I said the rain/snow runs down the sail slot to the bilge area. At the end of this sailing season I’m going to drill the bottom side of the keel and also put a hole in the bilge over the keel area. I’ll stick a plastic tube in the hole and seal around it with boat life caulk so no more water goes in. Hopefully this will let whatever is in there drain out faster. Maybe I’ll steal some food coloring from the kitchen and pour it into the tube to see how long it takes to come out of the bottom.
 

mihaso

.
Apr 24, 2017
25
Oday 25 Montreal
Out of curiosity, is your keel missing all of the filler or is it just in one section?
I think I was wrong about the filler. It's there but the drill went through it like butter. Also, it's a darker colour than the fibreglass so I thought it's just a hole but it's not. No idea what it's made of. It's easy to drill through, but when I poked it with a wire it felt more solid.
 
Sep 9, 2019
2
O'Day 23-2 Onalaska
I think oxidized lead is white. And a drill would fly through it.

Wing, have you considered trying to fill the mast slot, which I presume has no function through the deck? Any kind of caulk or packing would do for that.
 
Aug 28, 2015
190
Oday 28 St Joseph, MI
I think oxidized lead is white. And a drill would fly through it.

Wing, have you considered trying to fill the mast slot, which I presume has no function through the deck? Any kind of caulk or packing would do for that.
I have my mast slot sealed with 4200 and the mast is well sealed through the deck. . I’ve all but given up on a solution because every winter I find the crack in the keel reappears, the liquid drains and the white powder appears. I see no cracks in the area when the boat is pulled for the winter and when the hull dries off there is no wetness but it eventually shows up and minute cracks appear so there are probably small cracks letting water in that I just can’t see. I believe the white powder may be oxidized lead and the total volume I estimate to be about 1/4 cup for the winter. It could also be something leeching out of the material I believe to be concrete or cement but in any case it will take many years at that volume to have any negative effect. I’m just leaving it alone to do it’s thing and see what happens. With the liquid obviously in the keel and our Michigan winters I guess a path to the outside is a good thing. One thing I found significant is in temps well below freezing the seepage remains liquid. Probably the correct repair would be to drill a vent in the bilge and put a vacuum on the seepage area and leave it until nothing comes out then epoxy the holes.