Makes sense. What type of consistency would be best for the epoxy? (mayonnaise, ketchup or peanut butter). I’m thinking to put some fiberglass cloth around the hole to help fill in some of the potential space between the curbed hull shape and the flat backing surface.Its a sailboat, its an Internet forum, there will be conflicting advice almost by definition.
The backing plate needs to become one with the hull, essentially you are making the hull thicker at that point. Using epoxy will firmly bond the plate to the hull. It should not move or flex. Thickened epoxy will fill any gaps or unevenness due to the weave of the fiberglass. 4200 and 5200 will not do that as well.
4200 should be used on the threads of the through hull and on the mushroom that comes in contact with the hull. It should also be used on the threads on the inside to secure the nut.
3M uses numbers, obviously, to brand their sealants and adhesives, the higher number products have better adhesion and less flexibility than lower numbered items, while lower numbers have greater flexibility and less adhesion. 5200 is an adhesive with some flexibility, 3000 is a flexible sealant with limited adhesion. 4200 and 4000 are somewhere in the middle.
Newbie installing a new thru hull transducer
- Thread starter mforum
- Start date
Sanding a circle is hard. If I wanted to try sanding rather than drilling, I would use the largest sanding drum that would fit into the hole. You can also use a hole saw and use contact adhesive to glue some 60-grit paper to it.I’m thinking a long the same lines however re-reading the manual it’s actually 51 mm not 52 diameter which means taking off an additional 0.5 mm radius. Current hole is 50 mm as best I can measure without calipers or a micrometer, which makes me wonder if I can’t just take off that 0.5 mm with sanding.
Peanut butter. You do not need any cloth between the two but use one of the dense fillers for thickening. 406 Colloidal or 404 filleting filler.Makes sense. What type of consistency would be best for the epoxy? (mayonnaise, ketchup or peanut butter). I’m thinking to put some fiberglass cloth around the hole to help fill in some of the potential space between the curbed hull shape and the flat backing surface.
Exactly the same way every one of us started out.I’ve not worked with epoxy resin such as the west system and and don’t mind trying it but feel a little challenged with it as I’m not sure on what consistency/filler/timing/setting it in place is needed and if I screw it up (as has been known to happen) creating a bigger problem.
The smart ones (or maybe just chicken
 ones) experimented first before doing the final install. Do your experimenting on a polyethylene lid in the same location as the job to be done. Temperature is the MAJOR influencer on epoxy. You should be looking at about 1/2 to 3/4 hour working time depending on the temp. If it's cold, no prob just takes longer. Just as strong. Don't go crazy and work in the 30* area or you'll be there for a week. Still just as strong. If you've got to do it in cold weather, provide reasonable (50-60) heating within the boat. You can't screw up epoxy as long as it's mixed correctly. Nothing that a Grade 4 reform school education can't overcome
  .
.Make sure you get a reasonably close fit between the backing plate and the hull curvature. Provide gentle pressure from the nut to squeeze out the excess. Tighten after the epoxy has cured.

Definitely don't use cloth. Just keep the curvature of the plate and the hull reasonably close.You do not need any cloth between the two but use one of the dense fillers for thickening. 406 Colloidal or 404 filleting filler.
And here's the biggy DON"T OVERTHINK THIS. The filling and adhesion will leave you chuckling it's so simple. Just remember to experiment first with a blob of epoxy to get the feel of what it's like to work with the stuff and working time.
@mforum You probably did but it's worth asking: Did you try the new depth sounder tube in the existing hole? I ask because I went through this back in 2018 or so. I had pulled the old tube out, measured it, measured the new one and researched the best way to enlarge the hole from 2" to 2 1/8" IIRC. I was ready to go the "drill a hole in plywood, attach it to the hull as a guide" trick.
Then I tried fitting the new tube into the existing hole and it fit! I didn't have to enlarge the hole at all.
Try it, you might get lucky.
For relatively small epoxy jobs where thickened epoxy works well, you might want to give West Systems 6Ten a try. It comes in a two compartment cartridge. You attach the supplied mixing tip and put it in a caulk gun. The mixing tip mixes the two parts together.
Even you need to thicken it a little more with 406 or 404 items Hayden mentioned above, it is cleaner and quicker, probably cheaper, than buying the two part epoxy in cans, using mixing pumps to get the right ration, mixing and adding thickeners.
The tips are disposable but cap the cartridge and it will last a long time.
Ralph, Are you saying to put the thru hull in place and use the nut to squeeze out the excess epoxy? Then tighten the nut after it is cured? If so, won't the squeeze out material epoxy the thru hull in place? Is that the intent? Just curious as I epoxy the backing plates in place but do not epoxy the through hull in place. I use sealant for that.Make sure you get a reasonably close fit between the backing plate and the hull curvature. Provide gentle pressure from the nut to squeeze out the excess. Tighten after the epoxy has cured.
A good explanation. No doubt about it, thickened epoxy is the best material for this use.Good question. The inside surface of the hull is probably not completely flat or smooth. Thickened epoxy will fill the gaps and unevenness better than 5200 and provide a solid base for the backing plate. Even when cured 5200 remains slightly flexible, it is an adhesive sealant, this flexibility may have some negative consequences if a thick layer is necessary and make it difficult to keep the through hull tight against the hull.
For about the same cost as a tube of 5200, a cartridge of TotalBoat Thixio or West SixTen can be purchased, both of which are more versatile than 5200.
Initially, the new thru hull transducer didn’t quite fit with the debri/calking and slight misalignment of the old plywood backing plate. I got a digital read out pair of calipers reading down to 1/10 of a mm and just started sanding the hole with 60 grit, checking the diameter frequently as I went. Only had to take off about 0.5 mm and fits just right without needing to try to drill.
I’m laughing a little at the 1/2 inch G10/F4 sheet that came mail order and going from plywood to that stuff. I’m going to try to find a machine shop for a quote on cutting it before I invest in a bunch of hole saws in trying to cut in myself.
I’m laughing a little at the 1/2 inch G10/F4 sheet that came mail order and going from plywood to that stuff. I’m going to try to find a machine shop for a quote on cutting it before I invest in a bunch of hole saws in trying to cut in myself.
Ralph, Are you saying to put the thru hull in place and use the nut to squeeze out the excess epoxy?
Thanks for pointing that out. My mistake for not thinking that through. No, you certainly don't want to epoxy the thru hull in place. The point I was making was to avoid squeezing too tightly and squeezing all of the epoxy out of the joint. Back to the drawing board.
If it were me starting from scratch, I would first lightly hot glue a couple of guides to the hull interior with the backing plate dead centre over the hole in the hull. Coat both surfaces with epoxy. Firmly press until epoxy is coming out from under the backing plate but not hard enough to drive all of the epoxy out. Remove any excess epoxy in the hole with a rat tail file or better.
I would suggest guides because epoxy keeps slowly moving right up until the last second when it is setting.
Is that similar to your procedure. The time will come and I want to be ready.Just curious as I epoxy the backing plates in place but do not epoxy the through hull in place.
My procedure:Is that similar to your procedure.
I thoroughly clean and sand the area where the backing plate will go.
If replacing an existing thru hull I clean all sealant from the existing hole, inside and out.
I use a hole saw to cut a 1/4" G10 round backing plate. I choose round so there is no hard corners. I round the bottom edge a bit.
I drill the the center of the backing plate to the proper size hole for the thru hull.
I mix thickened epoxy to peanut butter consistency.
I butter the backing plate with the thick epoxy and place over the hole.
I put a cheap thru hull of the same OD size as the one I'm installing, which is well waxed, into the hole from the outside. I go inside and put the nut on the thru hull and tighten the thru hull until the backing plate is well seated against the hull. I do this to ensure the blacking plate is parallel to the outside surface of the hull.
Before the epoxy sets I remove the thru hull and lightly wipe the ID of the hole to remove any excess epoxy.
The "alignment" thru hull can be cleaned with acetone and reused when installing the next thru hull.
I had no problems with the backing plates moving after I removed the alignment thru hull.
I use Sikaflex 291 for bedding and sealing the new thru hull.
Notes on cutting G10 1/4":
I found G10 1/4" easy to cut with good carbide blades. For cutting the large round backing plate I use a 18V Dewalt drill. My smaller 14V? drill did not have enough power. I was able to cut 4 backing plates with one hole saw. I use a 4" circular saw to cut other backing plates/spacers out of G10 and use a belt sander to help shape them.
The first photo shows two thru hulls I replaced in 2018. You can see the green backing plate on the upper thru hull.
Note: I found the Forespar Marelon Thru Hull with Series 93 In-Line Ball Valve shown in this photo will flex slightly when opening and closing the valve.
This spring I'm replacing this set up with the Series 93 OEM Thru Hull which has a 3.1" round flange/base they call a King Nut. I installed one in 2021 and it feels much stronger with no perceptible movement when opening and closing the valve.
The second photo shows the transmission cable bracket I made out of 1/4" black G10 using just the circular saw and belt sander.


You can cut it close enough with a jig saw, scroll saw, etc. and file and sand to final shape. Carbide blades cut better last longer, but cost about the same as 10 ordinary blades, so meh, for one project you can go either way.Initially, the new thru hull transducer didn’t quite fit with the debri/calking and slight misalignment of the old plywood backing plate. I got a digital read out pair of calipers reading down to 1/10 of a mm and just started sanding the hole with 60 grit, checking the diameter frequently as I went. Only had to take off about 0.5 mm and fits just right without needing to try to drill.
I’m laughing a little at the 1/2 inch G10/F4 sheet that came mail order and going from plywood to that stuff. I’m going to try to find a machine shop for a quote on cutting it before I invest in a bunch of hole saws in trying to cut in myself.
Absolute perfection.I put a cheap thru hull of the same OD size as the one I'm installing, which is well waxed, into the hole from the outside. I go inside and put the nut on the thru hull and tighten the thru hull until the backing plate is well seated against the hull.
I was thinking somewhat along this line in my first explanation but it never came out quite right
. Thanks.I found a local engineering shop and the really nice guy there cut the G10 backing plate for me for free.
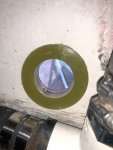
I followed the epoxy instructions and similar procedure with temporary thru hull to hold in place as you described above. Here is a couple pics. Thanks all for all the advice, it’s been educational. I’m not so intimidated by epoxy now.

I followed the epoxy instructions and similar procedure with temporary thru hull to hold in place as you described above. Here is a couple pics. Thanks all for all the advice, it’s been educational. I’m not so intimidated by epoxy now.
Very nice looking indeed.
As a matter of fact, I think it would be even better if you didn't install the transducer and left the hole open for all to admire over the years. They would see how the backing plate exactly matches the hole through the hull and also be able to see the fiberglass laminations of the hull.
You could cover the hole with acrylic on the bottom of the hull to keep the great flood of water out.
Just thinking out loud here .
As a matter of fact, I think it would be even better if you didn't install the transducer and left the hole open for all to admire over the years. They would see how the backing plate exactly matches the hole through the hull and also be able to see the fiberglass laminations of the hull.
You could cover the hole with acrylic on the bottom of the hull to keep the great flood of water out.
Just thinking out loud here
.