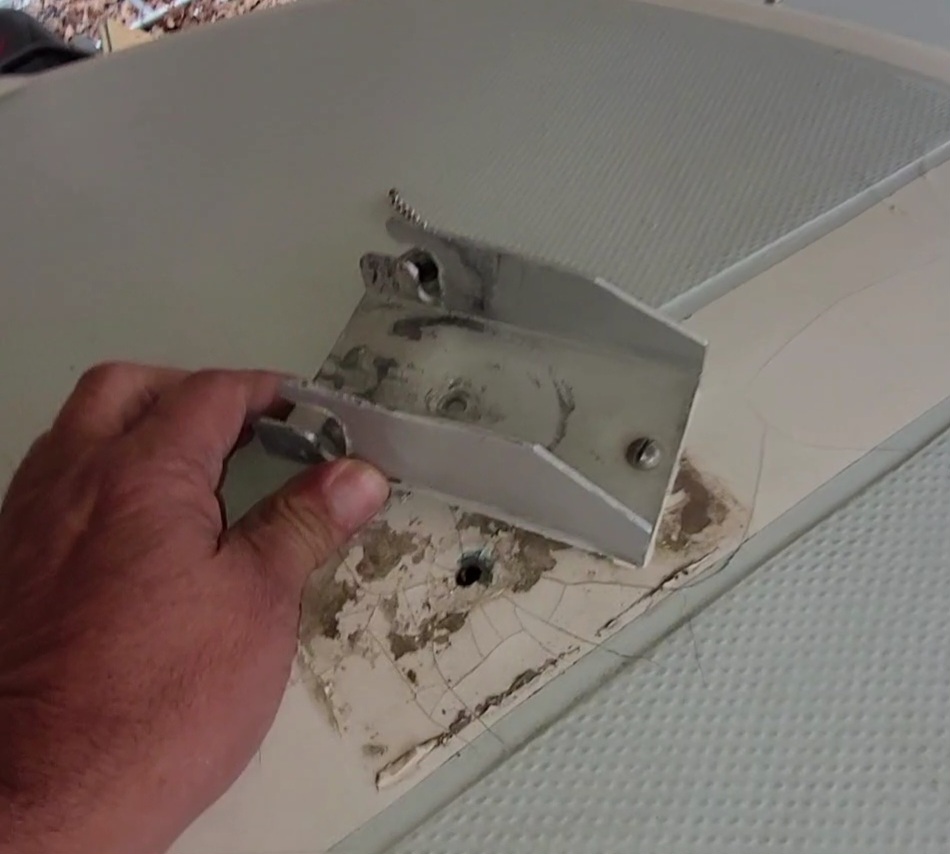
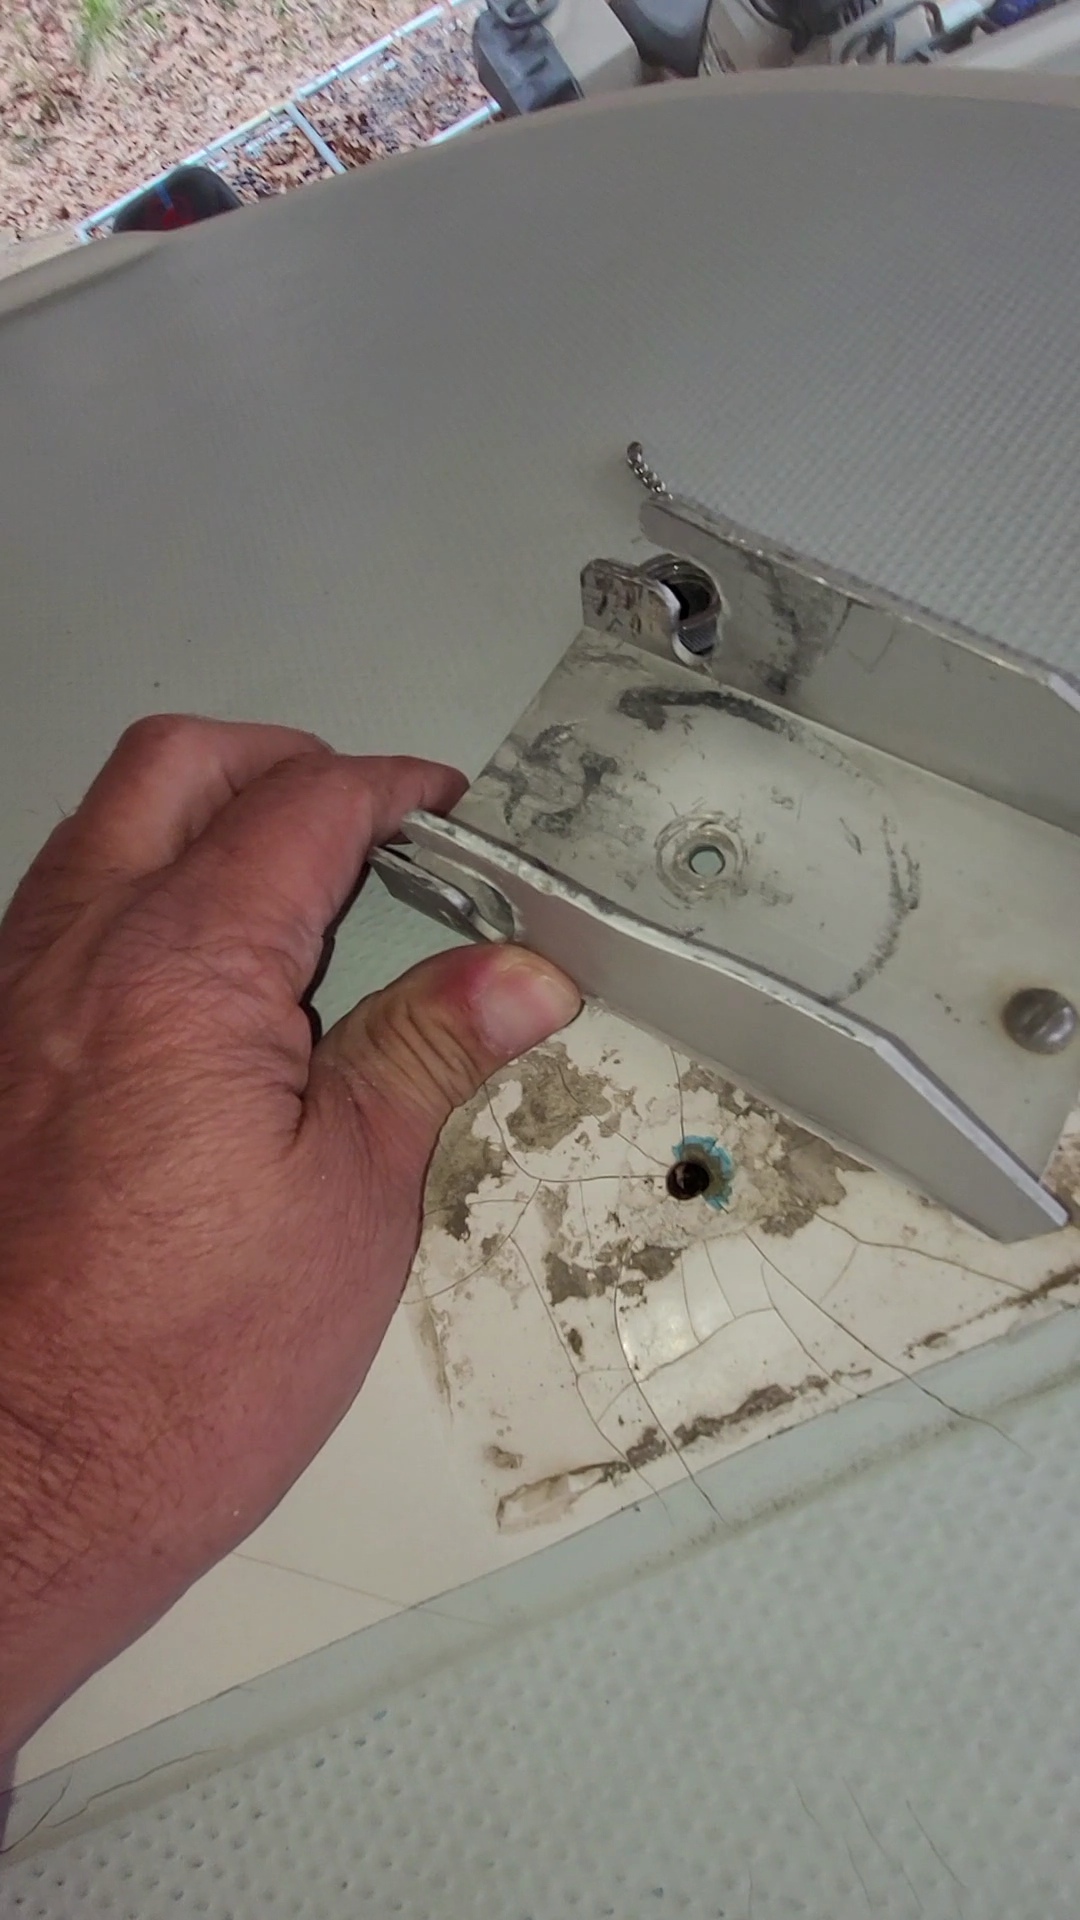
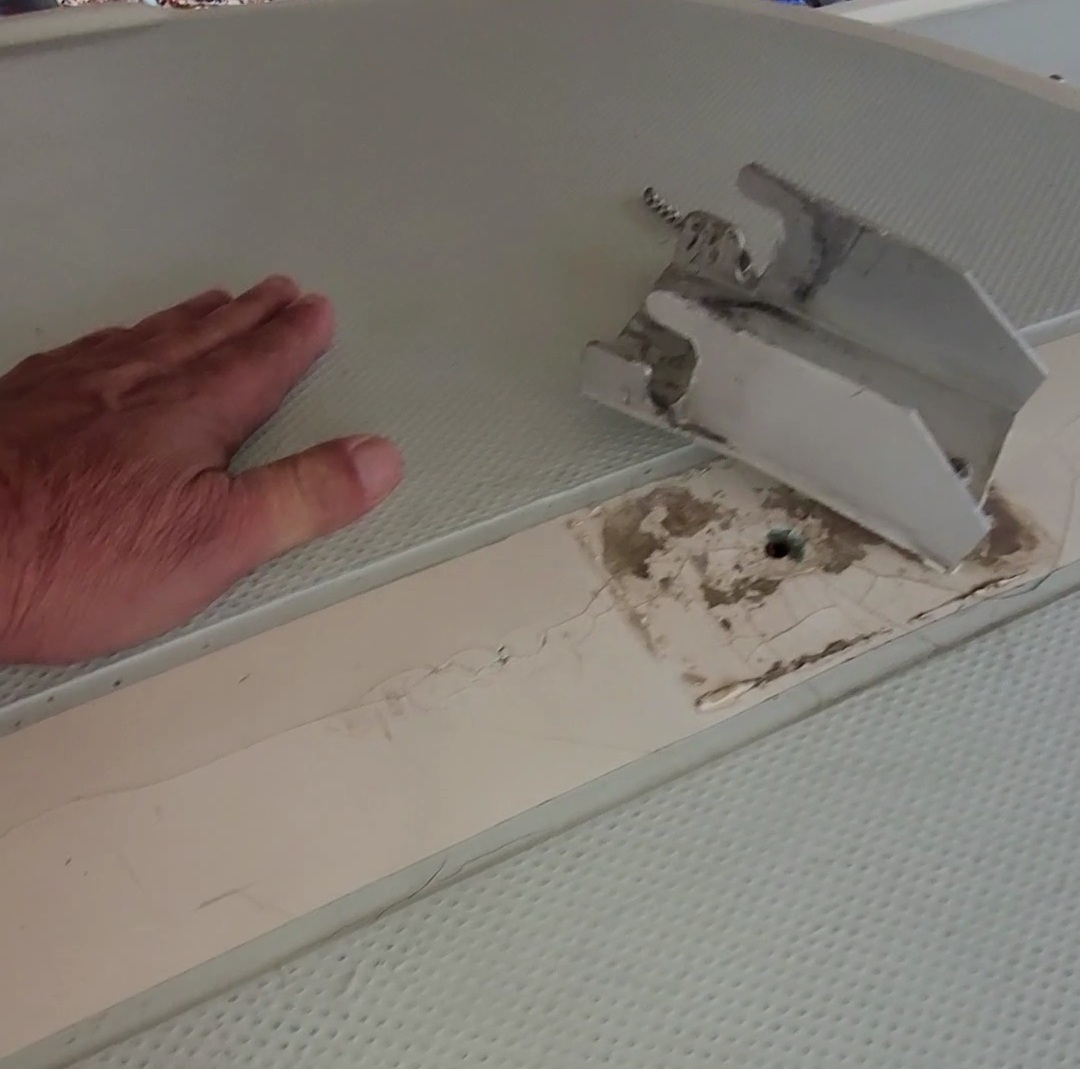
Good day to you all! New owner of a 1970 (hull# 1320) Cat 22! Have been all over the exterior with video and pictures stored. The attached photos are first concern. I will be replacing the step, with a rigging plate included, however it's the unknown with the mast support in the cabin. With the lag bolt not installed, water may have found its way into the interior of the support. Question: Is there a rock solid way to inspect the support for any interior rot? Additionally, if I were to fill the hole in the support for the new bolt, what would the material you suggest? Thank you!
Mast step replacement
- Thread starter Ken n Rox
- Start date

The proper way to rebed the mast step is to open up the hole even bigger and fill with epoxy before drilling a new hole. This way, should you get leakage around the screw it will not effect the wood core. The screw should be coated with bedding compound. Also, by enlarging the hole you can get some idea from the shavings if the wood is wet. From the photo it does not look like the old step used any bedding compound. I am not sure if we can get the butyl caulk tape that used to be available by forum member Maine Sail. The stuff he used to sell was really good for bedding hardware. With the age of the boat you probably should be rebedding all fittings over the next few years.
How to mount deck hardware on a sailboat
At some point in its life, every boat will need a deck fitting replaced or will develop a leak that must be corrected. And while replacing deck hardware is not a complicated operation, doing it incorrectly can cause serious damage down the road.,Tec
 sailingmagazine.net
jssailem
SBO Weather and Forecasting Forum Jim & John
- Oct 22, 2014
- 24,473
Welcome Ken n Rox to the SBO forum. Congrats on your new to you boat. The Catalina 22 is a great boat to learn sailing.
Pictures would help to form an opinion regarding the compression post. Note you mast transfers all of the power of the sail into the hull via the compression post.
The cracks in the gelcoat indicate something has been happening beneath the mast step that caused the deck to flex and crack.
The mast step looks ok though a bit stressed ( the turned out ears from the slot). The slot is to facilitate the raising of the mast. A way to lever the base into place so that you can push the mast up to vertical. Certainly Catalina Direct should be able to provide a replacement if needed, but you may be able to find it at a lower price from a mast company like Dwyer Mast Company. Dwyer Aluminum Mast Company- Manufacturers of Quality Sailboat Masts, Booms, Hardware and Rigging Since 1963.
The folks here at SBO Shop may also have a base. Check in with @Dave Groshong .
Best of luck. When you get a chance let us see an image of your boat in her glory. We love what is often called Boat Porn. It’s winter after all.
I think the stress cracks are no surprise and probably typical of any deck stepped mast of this vintage.Welcome Ken n Rox to the SBO forum. Congrats on your new to you boat. The Catalina 22 is a great boat to learn sailing.
Pictures would help to form an opinion regarding the compression post. Note you mast transfers all of the power of the sail into the hull via the compression post.
The cracks in the gelcoat indicate something has been happening beneath the mast step that caused the deck to flex and crack.
The mast step looks ok though a bit stressed ( the turned out ears from the slot). The slot is to facilitate the raising of the mast. A way to lever the base into place so that you can push the mast up to vertical. Certainly Catalina Direct should be able to provide a replacement if needed, but you may be able to find it at a lower price from a mast company like Dwyer Mast Company. Dwyer Aluminum Mast Company- Manufacturers of Quality Sailboat Masts, Booms, Hardware and Rigging Since 1963.
The folks here at SBO Shop may also have a base. Check in with @Dave Groshong .
Best of luck. When you get a chance let us see an image of your boat in her glory. We love what is often called Boat Porn. It’s winter after all.
jssailem
SBO Weather and Forecasting Forum Jim & John
- Oct 22, 2014
- 24,473
Maybe. My 1984 Montgomery 15 did not show any signs of deck damage when I sold her in 2015. She was 31 years old then. Just guessing the pictures show what happens when a deck gets wet and the water intrusion gets inside the boat.
Sure this is conjecture. It is why one would spend some time inspecting the compression post to rule out damage or a weakness.
Sure this is conjecture. It is why one would spend some time inspecting the compression post to rule out damage or a weakness.

Great information! Will move forward with your suggestions.How to mount deck hardware on a sailboat
At some point in its life, every boat will need a deck fitting replaced or will develop a leak that must be corrected. And while replacing deck hardware is not a complicated operation, doing it incorrectly can cause serious damage down the road.,Tec
I'll be climbing inside for more detailed inspection and pictures today.I think the stress cracks are no surprise and probably typical of any deck stepped mast of this vintage.
Bed-it butyl is available right here on SBO and is an excellent product for bedding projects like this.
To me, the cracking looks like the result of water intrusion (rotted core) and the stresses of multiple freeze/thaw cycles. If so, the core is probably a rotten and soggy mess - providing dubious support for the mast. I recently had a similar situation - albeit larger, requiring a more intensive repair. (I rebuilt a bridge deck which supports my traveler and I am glad that I did! The core was saturated and had gone through countless freeze/thaw cycles, requiring major re-copnstructive surgery). Luckily for the OP, an area this limited *might* not involve as much work.. Here is my $0.02....
Assuming that the interior support (mast compression post/bulkhead) is structurally sound and the repair is limited to the deck alone, start by probing the holes with a bent coat hanger or some other stiff wire and see what comes up.
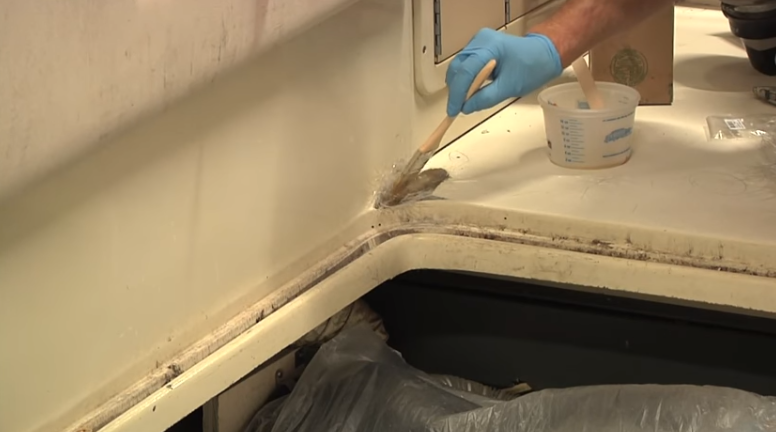
To remove and repair the rotted core: Drill a grid of holes (only through the top layer of the deck). Dig out the rot and dry the resulting cavity as much as possible. Holes 3/8 -1/2 dia. will be a good staring point. Use brad-point drills and start each hole with the drill in reverse to minimize gel coat cracking.
Once the area is dried out, inject thickened epoxy carefully to avoid leaving any voids (syringes are useful for this). For the the surface cracks, you can use a dremel tool to open them a bit, fill and fair them with thickened epoxy: cure and sand. For UV protect you can finish it off with a boat deck paint. Drill and countersink the new bolt holes and re-bed the mast step with Bed-it. A pretty easy repair and it will get you up to speed when it's time to rebed other hardware.
Do your homework, use high quality (marine grade) materials and follow manufacture's instructions. There are also informative and related threads here on SBO as well as many offerings at the University of You Tube.
Good luck and take pics!
To me, the cracking looks like the result of water intrusion (rotted core) and the stresses of multiple freeze/thaw cycles. If so, the core is probably a rotten and soggy mess - providing dubious support for the mast. I recently had a similar situation - albeit larger, requiring a more intensive repair. (I rebuilt a bridge deck which supports my traveler and I am glad that I did! The core was saturated and had gone through countless freeze/thaw cycles, requiring major re-copnstructive surgery). Luckily for the OP, an area this limited *might* not involve as much work.. Here is my $0.02....
Assuming that the interior support (mast compression post/bulkhead) is structurally sound and the repair is limited to the deck alone, start by probing the holes with a bent coat hanger or some other stiff wire and see what comes up.
To remove and repair the rotted core: Drill a grid of holes (only through the top layer of the deck). Dig out the rot and dry the resulting cavity as much as possible. Holes 3/8 -1/2 dia. will be a good staring point. Use brad-point drills and start each hole with the drill in reverse to minimize gel coat cracking.
Once the area is dried out, inject thickened epoxy carefully to avoid leaving any voids (syringes are useful for this). For the the surface cracks, you can use a dremel tool to open them a bit, fill and fair them with thickened epoxy: cure and sand. For UV protect you can finish it off with a boat deck paint. Drill and countersink the new bolt holes and re-bed the mast step with Bed-it. A pretty easy repair and it will get you up to speed when it's time to rebed other hardware.
Do your homework, use high quality (marine grade) materials and follow manufacture's instructions. There are also informative and related threads here on SBO as well as many offerings at the University of You Tube.
Good luck and take pics!
Think after the interior inspection I'll begin with the countersink/drilling from the compression bolt hole and fan out. Ideally where the step attaches to the deck for a complete repair of the cracking. Several different epoxy's out there in the world so I'll look at other forums for the best suggestions here on SBO. Bed-it butyl is in the cart!Bed-it butyl is available right here on SBO and is an excellent product for bedding projects like this.
To me, the cracking looks like the result of water intrusion (rotted core) and the stresses of multiple freeze/thaw cycles. If so, the core is probably a rotten and soggy mess - providing dubious support for the mast. I recently had a similar situation - albeit larger, requiring a more intensive repair. (I rebuilt a bridge deck which supports my traveler and I am glad that I did! The core was saturated and had gone through countless freeze/thaw cycles, requiring major re-copnstructive surgery). Luckily for the OP, an area this limited *might* not involve as much work.. Here is my $0.02....
Assuming that the interior support (mast compression post/bulkhead) is structurally sound and the repair is limited to the deck alone, start by probing the holes with a bent coat hanger or some other stiff wire and see what comes up.
To remove and repair the rotted core: Drill a grid of holes (only through the top layer of the deck). Dig out the rot and dry the resulting cavity as much as possible. Holes 3/8 -1/2 dia. will be a good staring point. Use brad-point drills and start each hole with the drill in reverse to minimize gel coat cracking.
Once the area is dried out, inject thickened epoxy carefully to avoid leaving any voids (syringes are useful for this). For the the surface cracks, you can use a dremel tool to open them a bit, fill and fair them with thickened epoxy: cure and sand. For UV protect you can finish it off with a boat deck paint. Drill and countersink the new bolt holes and re-bed the mast step with Bed-it. A pretty easy repair and it will get you up to speed when it's time to rebed other hardware.
Do your homework, use high quality (marine grade) materials and follow manufacture's instructions. There are also informative and related threads here on SBO as well as many offerings at the University of You Tube.
Good luck and take pics!
jssailem
SBO Weather and Forecasting Forum Jim & John
- Oct 22, 2014
- 24,473
Ken... Check out Andy's site : BoatworksToday.com
His youtube videos on fiberglass works are excellent.
I like Bed-IT Butyl Tape. It is great is you are using it where you have fasteners that hold the hardware to the deck above the waterline. Especially around the bolts you pass through the epoxy plug in the deck.
Our SBO member MaineSail has an excellent site at Marine How To - DIY for Boaters - Marine How To that may be of help with your projects.
Seems I avoided the rot bullet. Trim ring screws around the compression post were still tight. When removing the thru-bolt from the step, was still tight and required to be screwed out the entire way. Drilled a couple 1/2" inspection holes from the top of the deck and poked with an awl. Didn't sink identifying any rot. Guessing the next step will be using a dremel on the surface cracks, inject/apply epoxy and install a step using the steps identified with the use of Bed-it butyl tape. Found a source for water intrusion on the bow deck section. The little repairs begin! Thanks everyone! (Attempting to add pictures but my aged use of these several platforms have me confused)
Attachments
-
 238.9 KB Views: 245
 -
 186.2 KB Views: 250
 -
 69.9 KB Views: 236
 -
 521.4 KB Views: 257
 -
 387.5 KB Views: 255
 -
 287.3 KB Views: 249
 -
 173.7 KB Views: 246
 -
 193.5 KB Views: 244
 -
 176.3 KB Views: 237
jssailem
SBO Weather and Forecasting Forum Jim & John
- Oct 22, 2014
- 24,473
This may help with your project.
 www.boatworkstoday.com
Fiberglass Repair ~ Stress Cracks | Boatworks Today
This video is part 3 of a series on fiberglass that focuses on how to repair a very common type of damage in preparation of applying a new non-skid surface using Awlgrip paint. Stress cracks can be…
www.boatworkstoday.com
It looks like there's sediment where the trim ring was and water staining on the compression post. Rot can be difficult to detect by simply drilling a hole but judging by the spider cracks and staining I'd be willing to bet you've got rotSeems I avoided the rot bullet. Trim ring screws around the compression post were still tight. When removing the thru-bolt from the step, was still tight and required to be screwed out the entire way. Drilled a couple 1/2" inspection holes from the top of the deck and poked with an awl. Didn't sink identifying any rot. Guessing the next step will be using a dremel on the surface cracks, inject/apply epoxy and install a step using the steps identified with the use of Bed-it butyl tape. Found a source for water intrusion on the bow deck section. The little repairs begin! Thanks everyone! (Attempting to add pictures but my aged use of these several platforms have me confused)
Suggesting I remove the compression post and get a bigger view of the area? Both inside and outside?It looks like there's sediment where the trim ring was and water staining on the compression post. Rot can be difficult to detect by simply drilling a hole but judging by the spider cracks and staining I'd be willing to bet you've got rot
A 1/2" hole would probably be enough to get a look. It's fairly easy to fill and can be done under the mast stepSuggesting I remove the compression post and get a bigger view of the area? Both inside and outside?