Legend 40.5 Removing the Traveler

Jan 18, 2021
45
Hunter 40.5 Burnt Store Marina
Hello all! Got a relatively new to me 40.5 and am working through some of the problems of a 25 year old boat and previous owners. Not my first legend.

In what I am convinced can only be explained as a drunken fit over a lost line and badly designed seahood a previous owner mutilated said hood with a oscillating saw. The dodger damage was mine and entirely sober, I promise.
PXL_20210117_180850344.jpg


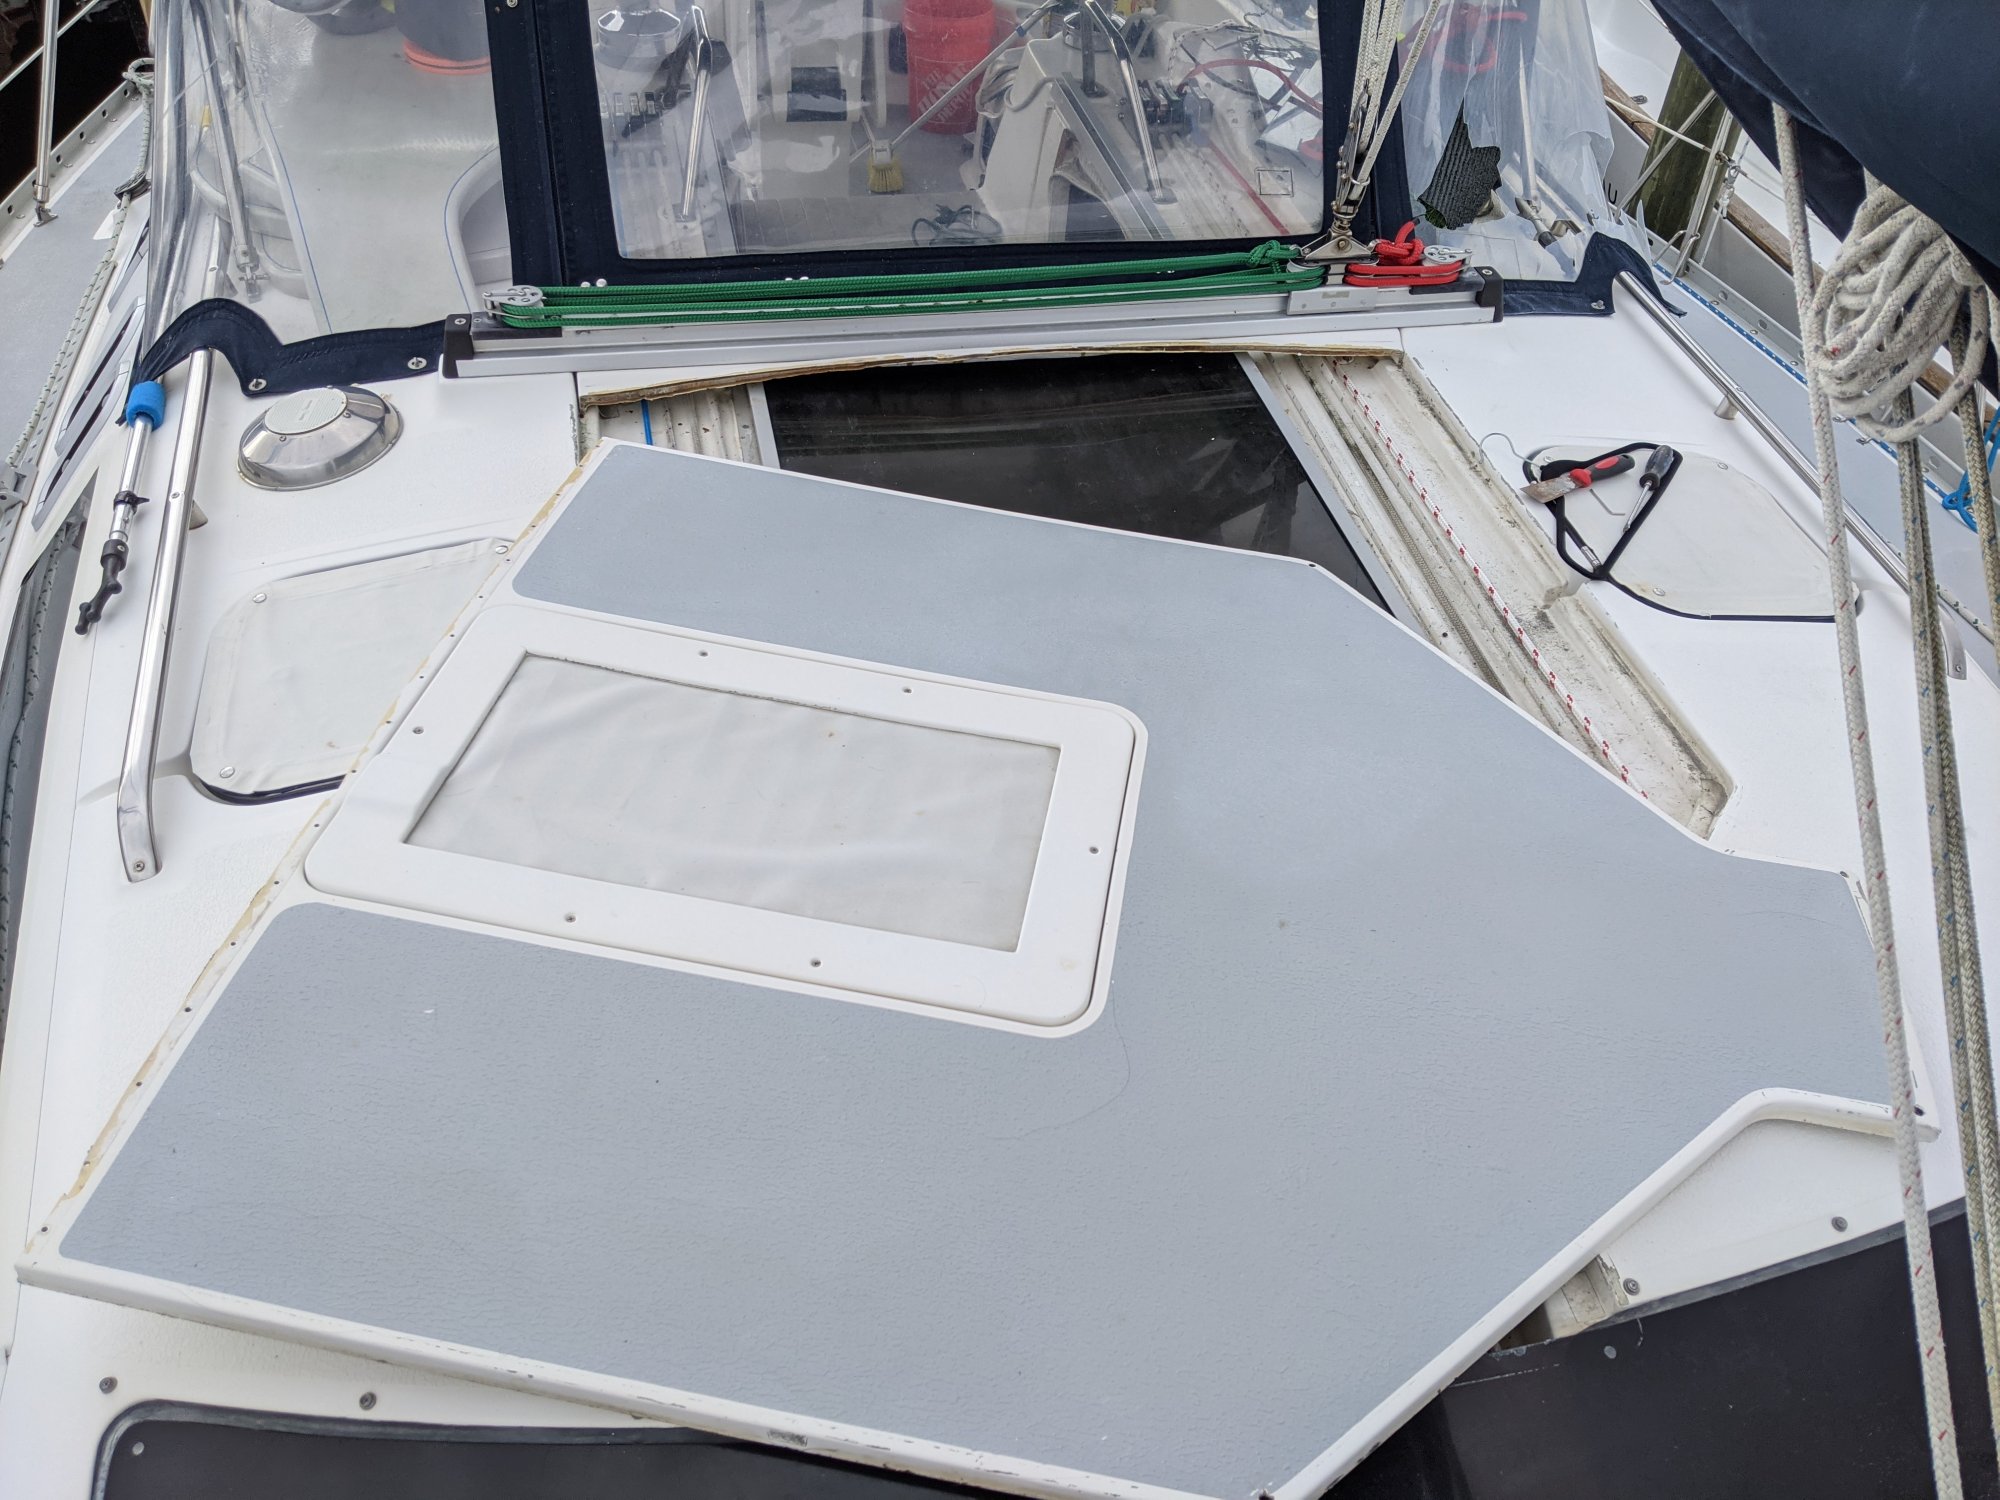
The connection to the Traveler is not my favorite design "feature" of the boat, but it is time to fix it. The core of the large piece of seahood is rotten.

Before I remove the Traveler, I have heard those hunter rumors that the Traveler is secured with self tapping screws etc. Would appreciate some help with understanding the following:
  1. How difficult or easy is removing the Traveler going to be?
  2. Should I be prepared with some epoxy and time to give the screws a new bedding?
  3. Is there a specific torque for the screws when replacing them?
  4. Just a simple large Phillips head to remove the screws?
Separately I am debating if we should re-mate the two pieces together or clean up and secure the seahood as two different pieces.

Your thoughts and experience are appreciated.
 

Rick D

.
Jun 14, 2008
7,132
Hunter Legend 40.5 Shoreline Marina Long Beach CA
Wow, the PO butchered that. I had my hood modified with a cut just in front of the solar panel in order to gain access to the deck organizers. However, they did it professionally and made a lip between the two parts of the hood and cut out and filled the core. As far as the rotten core, Rich Stidger can help out.
As far as the removal of the traveler, as I recall (poorly) from various threads (try search) on this subject, the access plates in the cabin needed removal and the nut(s) removed. Then an impact wrench for the other bolts. However, I'm sure that others who actually did it can weigh in. Have fun
:biggrin:
IMG_20161228_113441_163.jpg
 
Jan 18, 2021
45
Hunter 40.5 Burnt Store Marina
Thanks. I think I found the thread you are referencing here:


From what I am reading it seems like there is no bolt or plate on the other side...
 
Jan 22, 2008
309
Hunter 34 Herrington South, MD
While my 1984 H34 is a different boat, I would think that self tapping screws are NOT the way Hunter would have installed your traveler rail since I doubt that self tapping screws into fiberglass or ?? would hold. I replaced my system with a Harken system by merely unscrewing the 1/4 x 18 (?) screws that held the rail to the deck and then into a plate that is tapped and secured in the deck itself. I then placed the new rail on top of the old rail. Harken sells rails that have the same 4 inch hole spacing as the original. I put the new rail on top of the old one since the original rail sits in a valley and only needed to use longer screws.
traveler.jpg
 
  • Like
Likes: Rick D
Jul 19, 2007
262
-Hunter 1995-40.5 Hunter Saint Andrews, New Brunswick, Canada
Sandy Frank, send me a PM and I can talk you through the whole process from seahood fix to traveller removal and re-install. I've done the whole mess, seahood is a piece of cake, traveller not so much. Karl
 
Jan 18, 2021
45
Hunter 40.5 Burnt Store Marina
In process update.

Holy crap this is a PITA. I got all but three bolts out and one bolt head sheared off with the remaining portion still seized in place.

So I got this far by:
-Freezing the bolts using upside down compressed air PC cleaner.
-Heating the bolts with a blow torch.
-Impact drill to remove.

The remaining three survivers move a little, maybe 10* of a turn and I left some wd-40 to hope that does something. Next attempt will be with a manual impact driver, followed by a ratchet with a Phillips head, followed drilling the damn things out.

Thanks to Karl for his advice.
 
  • Wow
Likes: Rick D
Jul 19, 2007
262
-Hunter 1995-40.5 Hunter Saint Andrews, New Brunswick, Canada
Good to see that you've made some progress. Instead of WD40, try a 50/50 mix of Automatic Transmission Fluid and Acetone. Let it sit, then as I mentioned before turn the bolt out a bit then back in. When you free the remaining bolts or is they break, try and find a reverse thread die, use the die to put some threads on the broken bolt, turn on the right size nut and gently work the remained out with a back and forth turn like before. If you have to try and drill them out, get a mortising drill bit and sleeve, remove the internal spring and using a titanium drill bit drill a small pilot hole, followed up with a slightly bigger bit. The mortising rig will keep the bits centered over the damaged phillips screw head. The use an easy out to turn the bolts out from there.
 
May 9, 2020
135
Hunter Legend 37 Harrison Twp, MI
If you have to drill it, order left handed drill bits from McMaster... way better to have the drill working in your favor. I prefer left-handed cobalt for drilling-out stainless fasteners. Depending on size, they are like $5 each... well worth it!
 
  • Like
Likes: Rick D

Rick D

.
Jun 14, 2008
7,132
Hunter Legend 40.5 Shoreline Marina Long Beach CA
If you have to drill it, order left handed drill bits from McMaster... way better to have the drill working in your favor. I prefer left-handed cobalt for drilling-out stainless fasteners. Depending on size, they are like $5 each... well worth it!
Terrific hint. I had to do that after beating myself up removing a stanchion. Got a small set of left handed drills, and it went fast and smooth.
 
Jan 18, 2021
45
Hunter 40.5 Burnt Store Marina
Small update just for any future google searches.

PXL_20210213_195432809.jpg


Replacing the small bolts that go into the hood with: 1/4-20 x 3" here:
-https://www.albanycountyfasteners.com/14-20-flat-socket-head-screw-316-stainless-steel-p/2010-104.htm

The large bolts that go between the traveler and the deck are very difficult to find: Flat head 5/16-18 x 7"
-I have not found them.
 
Jan 22, 2008
309
Hunter 34 Herrington South, MD
I took a few screws out of my H34 travelor and found the same 1/4 20? screws ... just to see what was holding it in place using my Makita driver. To "keep the boat water tight" I put some sealant adhesive on the screws. MISTAKE. It looks like you have the same on your screws. When I later tried to remove all the screws to install the new travelor rail, even with my electric driver I buggered the heads of several of the screws. I ended up drilling out the heads in order to lift the rail with the screw shafts still in place. Locking plyers were needed to finally remove the old screws.
 
Jul 19, 2007
262
-Hunter 1995-40.5 Hunter Saint Andrews, New Brunswick, Canada
Sandy Frank, try a company called Fasten All they have all those bolts you need.
 
Jan 18, 2021
45
Hunter 40.5 Burnt Store Marina
El Diablo has been removed and a voodoo doll of the PO has been assembled.

Ended up drilling out the stragglers with left handed bits. There is a (presumably) steel threaded receiver in the hood.

Actually does anyone know if it is aluminum?

In any case this is about to become a plug for a mold. Completely rotten.

Sandy Frank, try a company called Fasten All they have all those bolts you need.
OK. I will head to a branch and see if I can get some help there. The website does not show they have the long one.
 

Attachments

Last edited:
Jul 19, 2007
262
-Hunter 1995-40.5 Hunter Saint Andrews, New Brunswick, Canada
Sandy, when I tore into the bottom of the seahood, I found no less than four (4) seperate pieces of aluminum that measured about 1.5" wide and a 1/4" thick. They had been drilled and tapped to accept the traveller bolts from above. One of the bolts actually held nothing as the threads were cut into the aluminum stock right where two pieces butted up against one another. I filled that whole void with glass matt and thickened epoxy and then glassed over it with 1708 cloth. Once the rebuild was finished I drill the old holes through and through and bolted the traveller to it with a 1/4" stainless plate of the same dimensions as the original aluminum. The traveller is going no where fast.
 
Jul 19, 2007
262
-Hunter 1995-40.5 Hunter Saint Andrews, New Brunswick, Canada
Why build a mold, remove the bottom skin and recore it with foam and glass the two pieces back together.
 

Rick D

.
Jun 14, 2008
7,132
Hunter Legend 40.5 Shoreline Marina Long Beach CA
Small update just for any future google searches.

View attachment 190324

Replacing the small bolts that go into the hood with: 1/4-20 x 3" here:
-https://www.albanycountyfasteners.com/14-20-flat-socket-head-screw-316-stainless-steel-p/2010-104.htm

The large bolts that go between the traveler and the deck are very difficult to find: Flat head 5/16-18 x 7"
-I have not found them.
I think I got them through McMaster-Carr. A friend in Italy could not find them locally.
 
Jan 18, 2021
45
Hunter 40.5 Burnt Store Marina
Sandy, when I tore into the bottom of the seahood, I found no less than four (4) seperate pieces of aluminum that measured about 1.5" wide and a 1/4" thick. They had been drilled and tapped to accept the traveller bolts from above. One of the bolts actually held nothing as the threads were cut into the aluminum stock right where two pieces butted up against one another. I filled that whole void with glass matt and thickened epoxy and then glassed over it with 1708 cloth. Once the rebuild was finished I drill the old holes through and through and bolted the traveller to it with a 1/4" stainless plate of the same dimensions as the original aluminum. The traveller is going no where fast.
Thanks! That does convey to one more question I had not thought of earlier. I assume the traveler is Aluminum. Are you now worried about corrosion from the steel bolts and Aluminum traveller?

Why build a mold, remove the bottom skin and recore it with foam and glass the two pieces back together.
Probably will do both actually. The mold is mostly just because I want to make one...

I think I got them through McMaster-Carr. A friend in Italy could not find them locally.
Yeah. I looked but could not find.
 
Jul 19, 2007
262
-Hunter 1995-40.5 Hunter Saint Andrews, New Brunswick, Canada
The traveller is indeed aluminum and I don't worry much about a reaction between the two more than there has been in the past. When I did the re-install of the long bolts into the ends of the traveller and then into the plates embedded in the coach roof I coated all the threads on the bolts top to bottom with and anti-galling compound to limit the galvanic reaction that took place originally. I also now back the bolts out on an annual basis and then reseat them to further guarantee a smooth removal if needed in the future. As to the bolts that go through the traveller and into the seahood with the stainless acorn nuts now on the outside and not embedded, you can again service them when you wish. If you have to you could go to a machine shop and have the long bolts made there. They can take the old bolt, install it on a lathe and get the cup profile of the bottom of the bolt head and then turn you two bolts to the proper length and simple cut a deep slot across the top for a bladed screwdriver or better still a hexhead (Allen key ) or use a Torx head bolt with the new profile.

You and I seem to be like minded, I'm in the process of laying up a mold for the anchor locker hatch on a friends 27 Cherubini Hunter, I fixed the crack in the original and using it as a plug for the new mold. Here are pictures of the rebuild of the seahood. Two 1/4" pieces of Corecel foam laid in opposite directions to avoid any joints falling in the same line, set in place with West System Epoxy, followed by two layers of 1708 cloth then the original glass that I cut and removed from the underside set in place with thickened West System then glassed along the edge seams with two layer of 1708 cut in strips with no overlapping joints. Better than new strength wise. Sanded the non skid and replaced with Kiwi Grip.
 

Attachments

Last edited:
Jan 18, 2021
45
Hunter 40.5 Burnt Store Marina
Back in one pieces and square enough! Supports it's own weight without the bracing.

PXL_20210228_155306687.jpg


Next steps to remove the entirety of the core and fill in the solar holder.