Installing through-hulls in a Yamaha 33.

Nov 21, 2012
598
Yamaha 33 Port Ludlow, WA
Greetings all. I just spent a lovely month in Port Townsend on the hard, replacing 5 of the 8 though-hulls on my Y-33, along with bottom paint and a topside polish, a new bilge pump and new cockpit drain hoses.

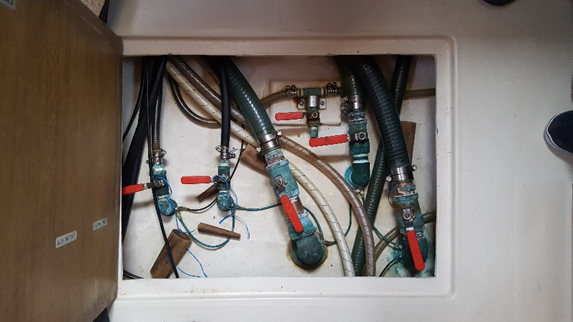
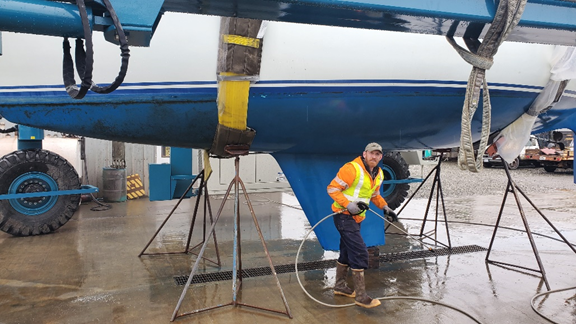
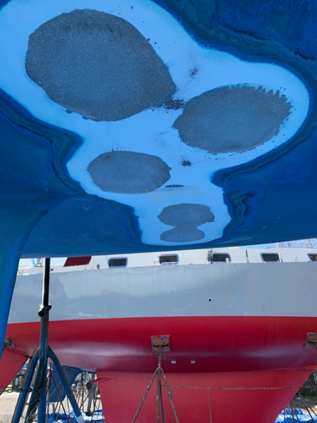
Here’s the before picture. Note the lack of backing plates. The hull is thickened with extra layers of glass at each though-hull. The TH itself is held on with the TH nut, and there’s a plywood disk under the nut. The only purpose that I can think of for the disk is to eventually rot and seep, which will require the unfortunate owner who notices it to gnash his teeth. Note the shallow depth. It’s about 6” max. Not enough height for a proper backing plate. Or is there?
1649299660537.png


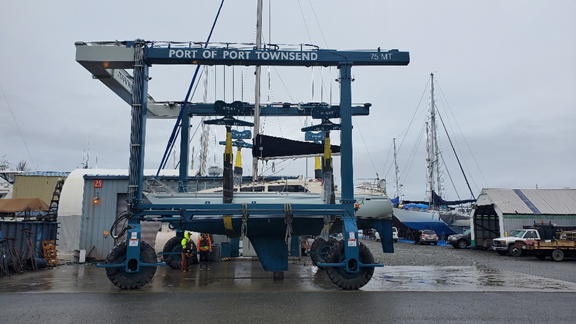
First, Tosca goes for a ride.
1649300437782.png


1649300460155.png


1649300503970.png


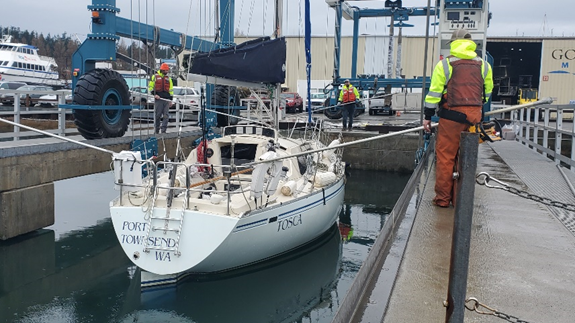
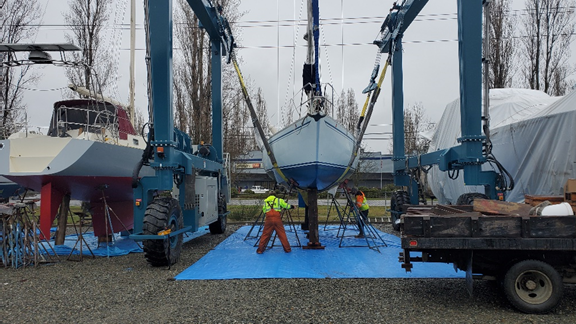
Then she gets a bath.
1649300546724.png


The guys at the yard are straight up nice to deal with.
1649300576100.png


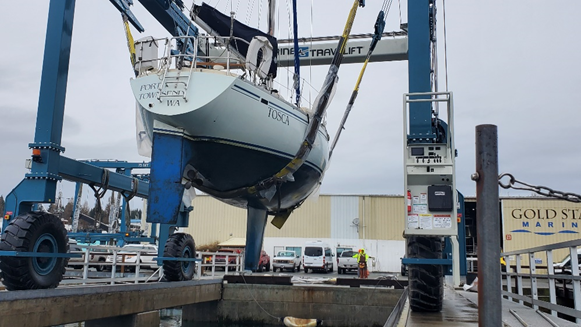
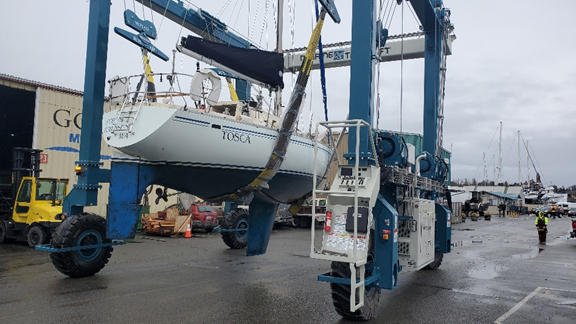
Then into our home for the next month.
1649300597048.png


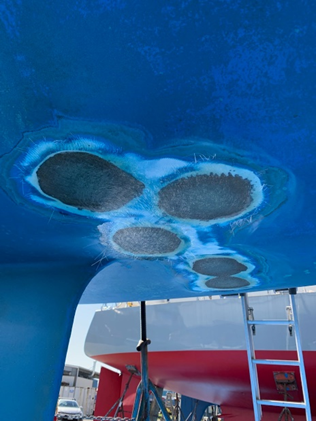
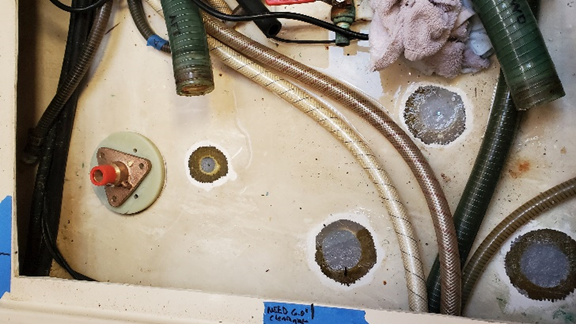
Disassembly was next. No pictures. The air was too thick with, uh, sailor talk. I applied a heat gun and wrestled the through hulls out, one by one. I then took a cone-shaped wire brush on the end of a drill and started removing the old caulk. Now I really wish I had taken photos, because the holes were ginormous. On the 1 ½” through hulls, the hole was almost a half inch wider than the fitting. Even the small ½” TH was rattling around in its hole. Awww shucky darn. Or, as they say on The Good Place, holy forking shirt balls. And, to add spice to the hot mess, the original through hulls were flush mount, and the shape was, shall we say, odd. Made in Japan, 40 years ago, they were NOTHING like anything currently on the market.

Hat in hand, I approached Todd Flye, whose shop was conveniently across the way. Say, uh, Todd? I know you’re busy (Major understatement here. Every tradesman in PT is running full tilt at this time), but do ya think you can delete these holes here? ‘Cause I gotta go back to Boise for a week and work.

I must have looked a sight, covered in old caulk and shredded 5200, because he said yes, he’d do it. Huzzah!

Hole deletion in progress:
1649300724711.png
1649300734584.png


I’m missing the photos where Todd faired the bottom and Brad Clayton of Starboard Services rolled on the epoxy barrier coat. It looked really nice when I got back a week later!

Look, Ma, no holes!
1649300777953.png


But I’m getting ahead of myself. While back in Boise, I made up some backing plates out of ½” G10 fiberglass, following Maine Sail’s instructions (mostly) on marinehowto.com. They’re 5 ½”. Bigger than my largest hole saw, and there’s none available in that size anyway. So I made a jig and tried it on the wood bandsaw. Heck no. So I put it on the metal bandsaw, and that worked better.
 
Last edited:
Nov 21, 2012
598
Yamaha 33 Port Ludlow, WA
Portable bandsaw to the rescue:
1649300994158.png


I cut out 5 disks in 3 different sizes. I drilled and tapped. Pretty soon I had a nice collection of boat jewelry.
1649301037065.png


I headed back to PT and got to work. First step was to redrill the holes. I started with a pilot hole from inside...
1649301073973.png


...Then used the hole saw from the outside. I was working solo, so no pictures of getting showered with gelcoat and fiberglass working underneath the hull. Since I was working solo, I used a portable drill guide to keep the hole perpendicular to the hull. I used to have the cheap Milescraft version of this guide. There's no comparison, this is a high quality tool. Soon, I had a full complement of holes in the bottom. Very unnerving.

I next needed to remove the gelcoat and flatten the inside of the hull to mate with the bottom of each disk. I mentioned earlier that the hull was thickened with extra layers of glass at each through hull. That had to get ground down to make a nice flat surface for the disk. This was, um, challenging. I tried a sander with 80 grit. Ha! The hull laughed. I went to 60 grit. The hull chortled. 40 Grit. Ok, that started to make some headway. If I had a week, it probably would have worked.

I went for my go-to destructor tool- my $9.95 Harbor Freight 4” disk grinder with a 35 grit flap wheel. A brief side note. This tool is amazing. I treat it hooooooribly. This is the tool I used to build and repair several fiberglass and wood boats. It has choked on more fiberglass dust than I care to think about. I treat it like a throwaway. But it just. Keeps. Going.

I gave it a quick test and wahoo, it cut through everything like buttah. It also threw a very thick cloud of gelcoat and fiberglass dust everywhere. Ok, strong measures must be taken. I taped plastic down around the hatch. I taped a hose from the vacuum outside in the cockpit to inside the tent. I put on a full face respirator, bunny suit and head sock, taped my sleeves to my gloves and then I taped myself inside the plastic tent. It occurred to me a few minutes into this operation that I may not have allowed for enough oxygen, but it was too late to back out. Fortunately, nobody died, not even the Harbor Freight grinder.

Here's a photo of the aftermath. You can see all the tools I tried – Multitool, sander, drill with wheel and the venerable HF grinder. Even with mitigation measures, the boat was still a mess.
1649301300935.png


Here, everything is in place. Hull is ground flat. Holes lined up.
1649301333833.png


I then took each flange and bolted it to my temporary workbench. I screwed the elbow down on the flange, so that when I glued in the backing plate, the elbow would be pointing in the right direction. I applied pipe dope and wrenched them on with a 24” pipe wrench. This part gave me nightmares. If they leaked, there wasn’t a lot I could do without disassembling the whole thing and reorienting it. Which meant a trip back out of the water. No pressure!

Here's my temporary workbench. I’m trimming the through hulls to length on the portable bandsaw. It rains in Puget Sound sometimes.
1649301438786.png


i lubricated the through hulls with beeswax. This has plusses and minuses. On the plus side, beeswax is an awesome lubricant. Epoxy will not stick to it. On the minus side, it is darn near impossible to get off.

Working mostly solo, so no time for pictures. I put each through hull up through the bottom and wedged it in place with a strip of bendy plywood, cut to length to keep the flange of the through hull flat against the hull. I mixed up a batch of epoxy and added milled glass fibers to a heavy peanut butter consistency. I was careful not to mix air into the gorp as it will weaken it. i thoroughly cleaned the surfaces of the hull and backing plate and then slathered the disk with the epoxy/glass mixture. I then screwed the backing plate and flange down until it just made contact with the surface of the hull, aligning the elbow with the direction of the hose. I had a generous amount of squeeze out which I cleaned up afterwards.
1649301790967.png


Test fit of the flanges prior to caulking:
1649301465962.png


The next morning I unscrewed the through hulls, and they came out fairly easily. Then I started cleaning them up which proved difficult. Nothing takes beeswax off. Not mineral spirits, not acetone. I finally boiled them in soapy water for 20 minutes which did the trick. I removed the flanges and cleaned up the excess epoxy in the holes. I caulked the holes and flanges with Sikaflex 291. The guys in the yard were insistent that I use 5200 but I said no. They’re probably not wrong. I’ll probably never have to deal with these again, but it just feels wrong leaving that horror for some poor future schlub to deal with.

Here, everything is sealed up.
1649301544458.png


I reduced the valve size on the cockpit drains from 1 ½” to 1 ¼” because with the backing plates in place there simply was not enough clearance to fit the larger valves. Having to glass in and re-drill the holes turned out to be a godsend, because the smaller valves and their flanges just fit. I chose the Groco valves over the Buck Algonquins because of the flexibility in orienting the handle. The BA's were cheaper but I needed the flexibility. I used the Groco full-flow hose adapters which let me use the smaller valve body with a one-size-larger hose. You can see in a prior photo that I had to temporarily splice some additional length to the cockpit drain hose. That was necessary because, did I mention that it rains sometimes in Puget Sound? The water has to go somewhere, and out of the boat is better than into the boat.

The handle on the right-most valve in the picture above is upside down. I’ve probably violated some unwritten rule of boat maintenance, but there was no forking way that valve was going in any other way. I spent a lot of time investigating another location for this cockpit drain, but access to the most promising place in the stern was going to be even harder. So I went with the original location. As it was, I had to drill a ¾” relief hole into the bottom of the hatch board to keep from pressing on the middle valve when standing on the cover. It doesn’t go all the way through. Just enough to keep weight off the valve. I also customized a couple of the handles with a vise and hammer so they'd fit under the cover. "Beat to shape, file to fit, paint to match".

I finished the project with the help of St. Claire, my significant other. We pulled new hose for the cockpit drains. I put in a new 1100GPH bilge pump, which required more holes and more hose. That was the last item left from the survey recommendations when I bought Tosca over 3 years ago. Finally!
 

Attachments

Last edited:

jviss

.
Feb 5, 2004
6,748
Tartan 3800 20 Westport, MA
replacing 5 of the 8 though-hulls on my Y-33
Why so many through hulls on a 33?

Mine's a 38 and there are 6, I think, in addition to drains via sea chests.
  1. galley sink
  2. engine raw water
  3. head sink
  4. head flush water
  5. macerator
  6. head direct overboard
I guess my cockpit and deck drains, and my bilge pumps go overboard via the sea chests.
 

jviss

.
Feb 5, 2004
6,748
Tartan 3800 20 Westport, MA
By the way, thanks for the wonderful write-up and pictures! You did a great job, and your writing style was quite easy and enjoyable to read.
 
  • Like
Likes: mermike
Nov 21, 2012
598
Yamaha 33 Port Ludlow, WA
Why so many through hulls on a 33?

Mine's a 38 and there are 6, I think, in addition to drains via sea chests.
  1. galley sink
  2. engine raw water
  3. head sink
  4. head flush water
  5. macerator
  6. head direct overboard
I guess my cockpit and deck drains, and my bilge pumps go overboard via the sea chests.
I agree, too many. That's just the way they did it, and changing it was a lot harder that keeping it the same. There are 3 more for the head that I opted to save for the next haulout, because I think the hoses might have been installed before the internal pan was placed. I don't see how to get to them without major surgery.
 
Last edited:
  • Like
Likes: jviss
Oct 22, 2014
21,108
CAL 35 Cruiser #21 moored EVERETT WA
Oh Boy... At least now Tosca will not leak from beneath.

Looking real good!:beer:
 
Nov 21, 2012
598
Yamaha 33 Port Ludlow, WA
Oh Boy... At least now Tosca will not leak from beneath.

Looking real good!:beer:
She was starting to get a little damp. Good heavens, boat ownership is just a lot of hard work. On the plus side, I got invited to crew from Puerto Vallarta to the Marquesas. Leaving Boise on the 14th! Super excited about that!
 
Jan 7, 2011
4,788
Oday 322 East Chicago, IN
I feel fortunate that my 32-footer only has 3 thru-hulls!

Bit the worked looked very well done!

I think you said you needed to resize a few, but not all. Did you HAVE to glass and red rill them all? Or was there another reason to do it? Just curious.

Greg
 
Oct 22, 2014
21,108
CAL 35 Cruiser #21 moored EVERETT WA
Oh my. That sounds very exciting. Let me know about your progress. What size boat?
 
Oct 22, 2014
21,108
CAL 35 Cruiser #21 moored EVERETT WA
Oh my.
You are going to get spoiled. Bigger sails, lots of interior room.
Pictures and stories... will be a must do.
 
Nov 21, 2012
598
Yamaha 33 Port Ludlow, WA
I feel fortunate that my 32-footer only has 3 thru-hulls!

Bit the worked looked very well done!

I think you said you needed to resize a few, but not all. Did you HAVE to glass and red rill them all? Or was there another reason to do it? Just curious.

Greg
Greg - I redrilled them all. Mostly because only one of them fit anywhere near closely enough. It was the smallest one and it still wasn't great, so we filled them all in.

There are way too many through hulls - 2 cockpit drains, seawater intake for the galley, raw water intake and galley sink drain. Pls 3 more for the head, but that's a project for a couple of years from now (I hope).